SEO Spider
How to Run the Screaming Frog SEO Spider in the Cloud
Introduction
Note: Google Compute Engine have changed their UI since this post was written. We’re in the process of updating this guide to ensure it’s still the most efficient approach.
While the Screaming Frog SEO Spider is desktop software, it’s able to crawl millions of URLs thanks to its configurable hybrid storage engine.
For most people, the speed and flexibility of Memory Storage and the high scalability of Database Storage is enough to suit all needs and requirements.
However, in both scenarios your machine still needs to be running, and if you are regularly crawling large websites, you may not want to keep your computer turned on for significant amounts of time.
Perhaps you want to fully automate a crawl report in Google Data Studio, but again you don’t want to have to worry about leaving your machine on at the time it’s scheduled to run.
Thankfully, there is a solution: the Cloud.
Why Run the Screaming Frog SEO Spider in the Cloud?
There are a few reasons why running the SEO Spider in the Cloud can be a game changer.
One of the main advantages is that with a Spider licence you’ll be able to run as many instances of the SEO Spider as required in the Cloud. (Note: Any user of any instance requires their own individual licence.)
This means that you could be running some quick spot checks with the SEO Spider on your laptop while a larger crawl (or several!) runs concurrently on the Cloud, all for £199 per year. This frees up your local resources for other tasks, but also has the added benefit of not having to leave your machines running to complete a crawl.
As well as this, running it in the turning the SEO Spider into a cloud crawler allows you to access ongoing or finished crawls from anywhere, so you can easily get the information you need.
Costs & Capabilities
This is heavily caveated based on the desired virtual machine instance, your requirements and the site you’re crawling.
Google’s Compute Engine allows you to deploy some seriously powerful machines, and if you know the limits of the website’s you’re working on, you can crawl a substantial number of URLs very efficiently.
To give you an example of potential costs and capabilities:
- For the purpose of this guide, a VM instance with 8vCPUs, 32GB Memory and 200GB SSD was used
- We crawled 3.1 million URLs using database storage mode, which took around 2 days. This was at a reduced, safer speed as it wasn’t a time-sensitive task. If you’re aware of your website’s capabilities, this speed can be increased.
- The cost was less than £20 in Google Cloud Platform charges (who give you $300 credit for free).
It’s important to note that you’ll be charged on usage, and we’ll discuss ways you can try to lower the costs and/or set budget alerts.
If you need to crawl larger sites at faster speeds, you can easily scale up the VM instance and its SSD size.
You’re able to do this on as many VM instances as you wish with your licensed version of Screaming Frog. (Note: Any user of any instance requires their own individual licence.)
What You Need
There are several different ways to run the SEO Spider in the Cloud or on a server, including using headless mode. Some methods are more resource efficient than others, but this guide focusses on getting you up and running within minutes.
Google Cloud Compute charges based on your usage, meaning you can spin up a VM (virtual machine), crawl what you want, export everything you need and then terminate it to avoid additional costs.
Alternatively, you can keep the VM running for as long as you want, for example if you want to set up scheduled crawls and exports, but obviously this will incur additional costs.
To get started, you’ll need:
- 15-20 minutes of time
- While it may look lengthy and confusing, this process can be reduced to 10 minutes or so once you’re familiar with the steps.
- Screaming Frog SEO Spider licence
- Licences are per user, so you’ll need one for every user that will be accessing it.
- Google Cloud Project
- With a valid billing method associated to the project.
- Google Chrome
- If you want to use a custom configuration file, you’ll also need to export it. To do so, open the SEO Spider on your local machine, set-up the desired config, then go to ‘File > Configuration > Save As’.
1. Getting Started
First things first, you’ll need to create a Google Cloud project. Feel free to call it what you want:

Once you’ve created and selected the project, don’t be put off by the overwhelming and confusing setup. We’ll mostly be working entirely within Compute Engine on the left-hand side:

Click ‘Compute Engine’ and you’ll be prompted to setup a billing account if you haven’t already. As mentioned, you’ll get $300 credit if you’re new to this (sometimes $400 if you’re lucky).
On the subject of billing, you will be charged for usage that exceeds the initial free credit. If you’re worried you’ll accidentally leave something running and rack up costs, we recommend setting budgets on your account to prevent this. This means you’ll receive email alerts if you are nearing your budget, and can take action accordingly.
Be sure to read the ‘Terminating a VM Instance’ section for instructions on how to avoid unnecessary costs when you’re finished with this tutorial.
2. Create a VM Instance
Once you’ve set billing up, you’ll be taken back to the Compute Engine API page where you’ll need to click ‘ENABLE’:

Once you’ve pressed ‘ENABLE’, it can sometimes take some time to load.
Now we’re ready to deploy a virtual machine. Click on Compute Engine on the left-hand side:

Click ‘CREATE INSTANCE’:


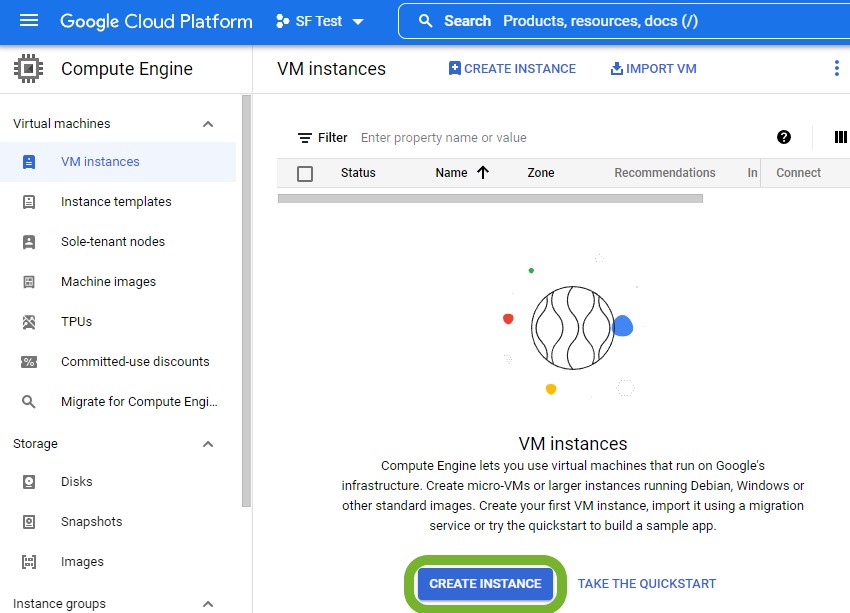
We’re now able to build our VM instance with a specification of our choosing. Different websites will have different needs and requirements, but for the purpose of this guide we’ve put together a VM that allowed us to crawl over 3 million URLs – all for less than £20.
Region
Unless crawling from a particular location is essential, it’s generally best to choose a region that has cheaper monthly estimates and/or Low CO2 emissions. At the time of writing, Iowa was marked as Low CO2 and was producing the lowest monthly estimate.


Machine Configuration
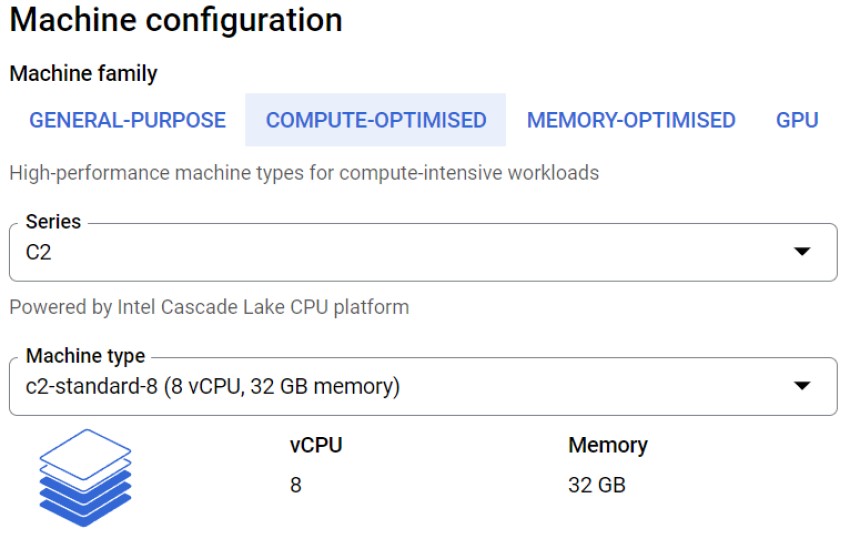
For this use case, we’ve used the Compute-Optimised machine family, which are higher performance than general-purpose and good for compute-intensive workloads.
We’ll be using the C2 series, and the c2-standard-8 Machine type. This VM boasts 8vCPU and 32GB of memory, which is plenty to play around with.

Boot Disk
Next, we’ll need to choose a boot disk. The default settings are no good for us, as we want to be running on Ubuntu as well as on an SSD. Click the ‘CHANGE’ button:


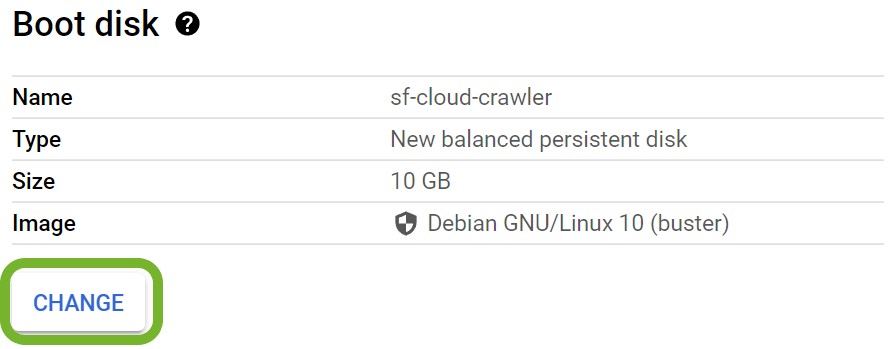
Change the operating system to Ubuntu, the version to Ubuntu 20.04 LTS, the boot disk type to SSD persistent disk, and the size to 200GB:

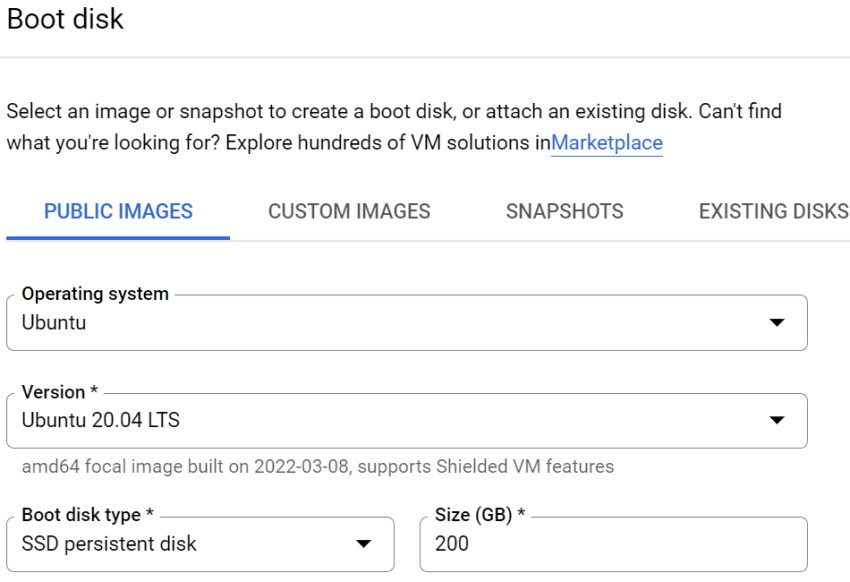
The Screaming Frog SEO Spider generally runs much better on an SSD when using Database Storage mode (for crawling large sites). While there are many caveats, as a rough example, a machine with a 500GB SSD and 16GB of RAM, should allow you to crawl up to 10 million URLs approximately.
If you want to upload from your VM instances to Google’s storage buckets (more on this later), you’ll also need to tweak some permissions.
Under ‘Access Scopes’ click ‘Set access for each API’:

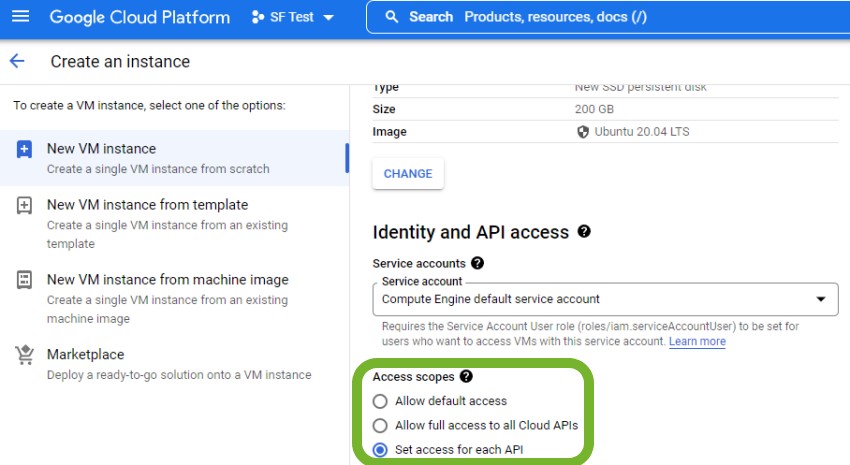
And then scroll down and set ‘Storage’ to ‘Read/Write’:


While doing this, you’ll likely notice the estimated monthly cost. For our setup, this was around $277.89 at the time of writing. It’s worth noting that this is presuming that this VM will run continuously, which it wont be for this task. If you want more accurate estimates, you can use the Google Cloud Pricing Calculator.
That’s all for now, go ahead and click ‘CREATE’ and your VM instance will be ready to use in mere seconds.
3. Install Chrome Remote Desktop
Next up, we need to install Chrome Remote Desktop so that it’s easy to access. Go ahead and click the SSH button next to your shiny new VM instance on the VM instances page:

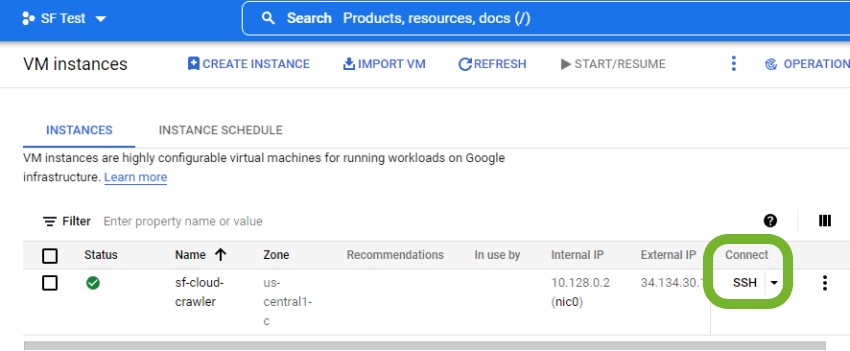
Don’t be put off by how confusing this new window looks, everything will be explained, or you can just go ahead and copy and paste the commands.
Tip: click on the code snippets to copy them to your clipboard.
First up, type in the following command and hit enter:
sudo apt update

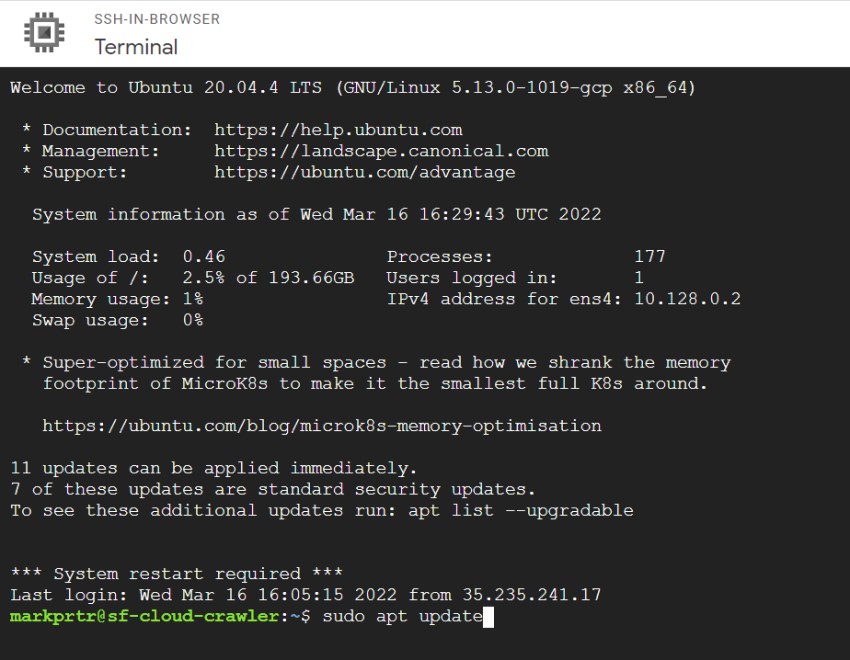
This command is used to download and update the package information from all configured sources. When you run this command, you’re essentially checking if there’s any new software updates and making note of them.
Next, we need to run:
sudo apt install --assume-yes wget tasksel
This command installs wget, a software package for retrieving files using HTTP, HTTPS, FTP and FTPS. Tasksel is a tool that allows you to install multiple packages as ‘tasks’ on your server, as opposed to installing everything one at a time. “–assume-yes” simply answers “yes” to all prompts during installation.
Next, download Chrome Remote Desktop with the following command:
wget https://dl.google.com/linux/direct/chrome-remote-desktop_current_amd64.deb
And then install it:
sudo apt-get install --assume-yes ./chrome-remote-desktop_current_amd64.deb
NOTE: The most recent Chrome Remote Desktop package has been causing issues and errors. If you’re experiencing these, you can install an older version as per this Stack Overflow thread until the issues are fixed. Thanks to Mark Ginsberg for pointing this out.
Ubuntu is much easier to use with a desktop environment, and if you’re familiar with Windows and Mac, you’ll be fine with Ubuntu.
Run the following command to install the Ubuntu desktop environment:
sudo tasksel install ubuntu-desktop
You’ll see a slightly different screen with an installation progress bar, and you can move on once it’s finished.
Next, we need to tell Chrome Remote Desktop to use Gnome, which is the default desktop environment for Ubuntu:
sudo bash -c ‘echo “exec /etc/X11/Xsession /usr/bin/gnome-session” > /etc/chrome-remote-desktop-session’
You’re going to see a ‘Permission denied’ message. Don’t worry, we spent hours scratching our heads trying to solve this, so you don’t have to. Essentially, you can just ignore this message.
The VM instance now needs to be rebooted with the following command:
sudo reboot
You’ll lose connection instantly, but close the SSH window and after a short while you’ll be able to click the SSH button again to reconnect.
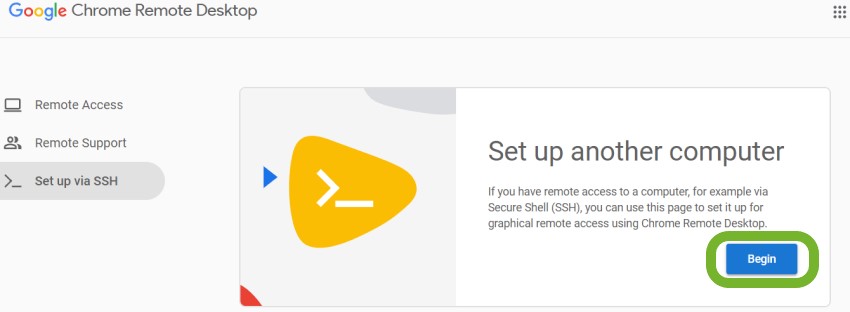
Minimise the SSH window for now and head over to Chrome Remote Desktop on your local machine so that we can set it up on the VM instance.
Click ‘Begin’:

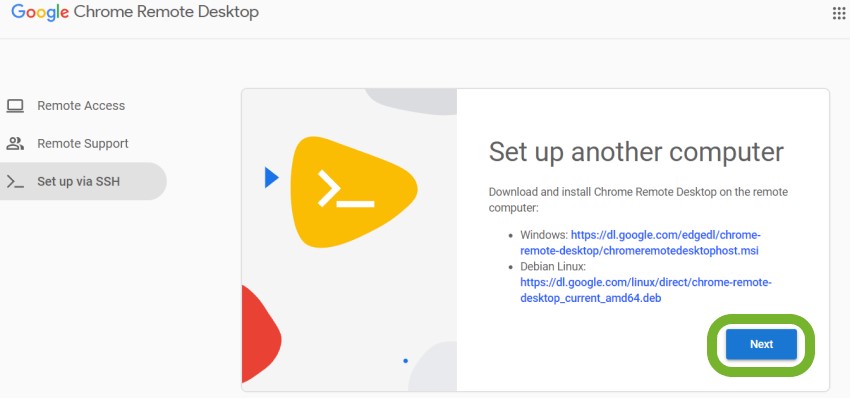
Then ‘Next’ (we’ve already installed it):

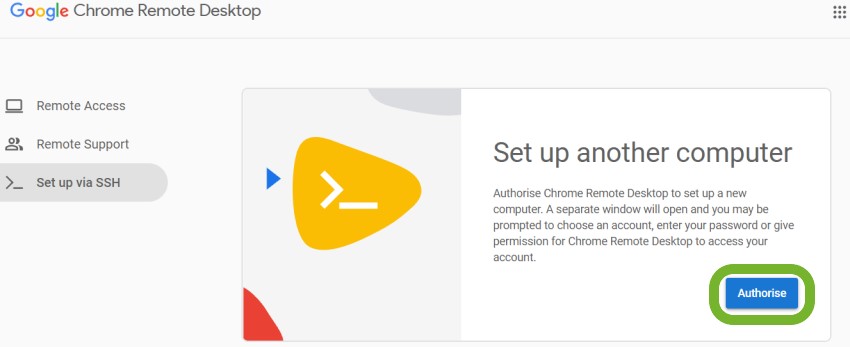
And then ‘Authorise’:

You’ll now be presented with the command to start and authorise Chrome Remote Desktop on your VM instance. Copy the code for Debian Linux:

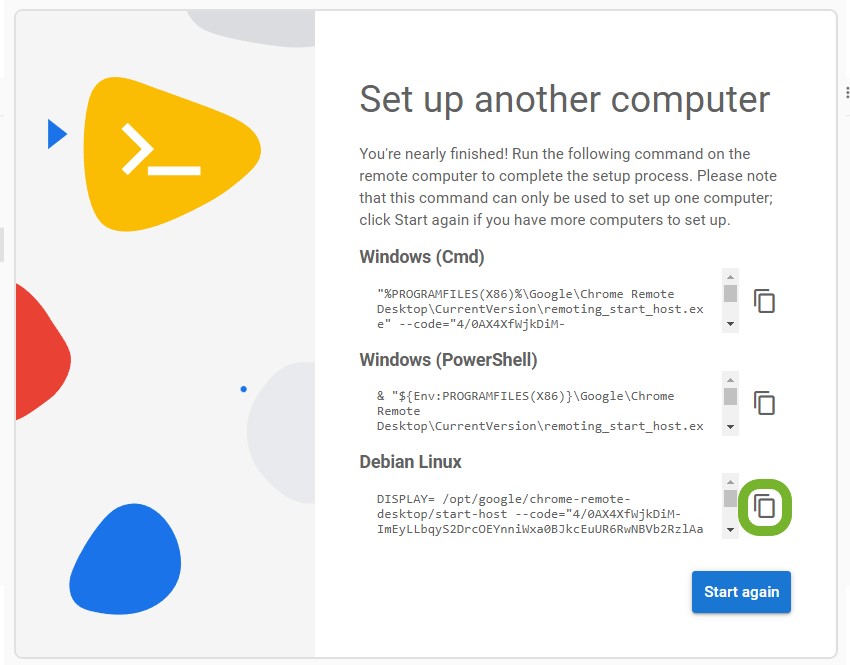
Then paste it into your SSH window with Ctrl+V and hit Enter.
You’ll be prompted to create a 6-digit PIN number, which you’ll need to access the VM instance from Chrome Remote Desktop. Note: no characters will appear while you’re typing your pin in, your keyboard is not broken.
Once you’ve created the PIN, you may see some error messages, but these can be ignored.
To verify that Chrome Remote Desktop is running, you can use the following command:
sudo systemctl status --no-pager chrome-remote-desktop@$USER
If you see green text saying ‘active (running)’ next to ‘Active:’, then everything has gone smoothly:


Head over to Chrome Remote Desktop again, and you should now see your VM instance (you may need to refresh the page if you had it open):


Go ahead and click on it. Then enter your 6-digit PIN. You should see a screen similar to the following:

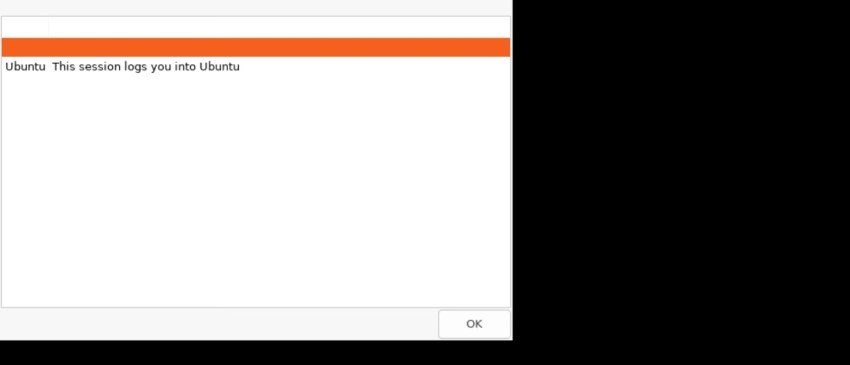
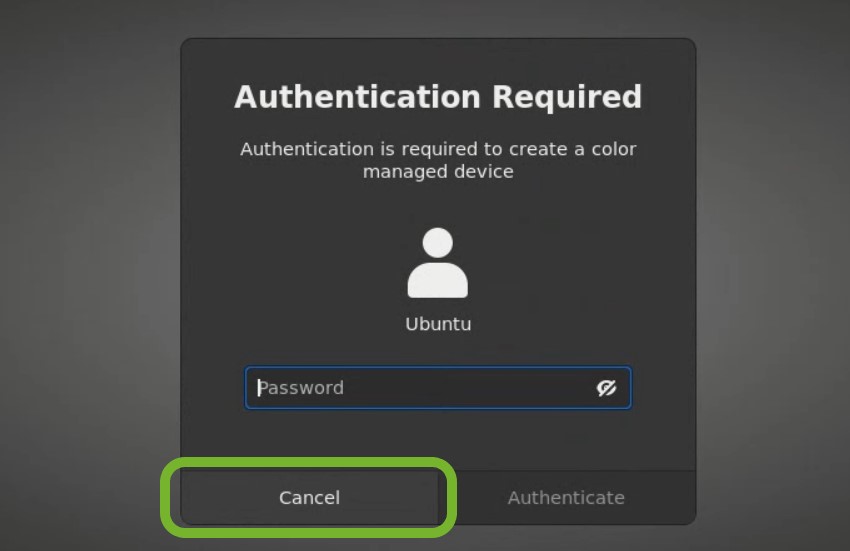
Click ‘OK’, and you’ll be asked for a password, but you can just click ‘Cancel’:

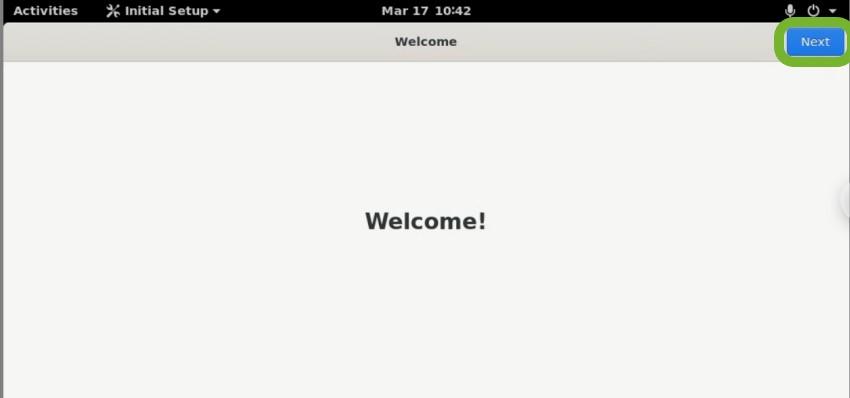
Click ‘Next’:

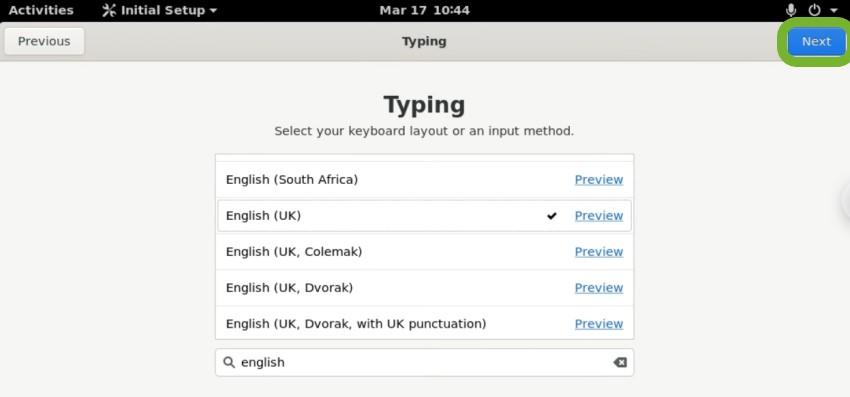
Change your keyboard layout if you wish, and click ‘Next’:

Again, click ‘Next’:

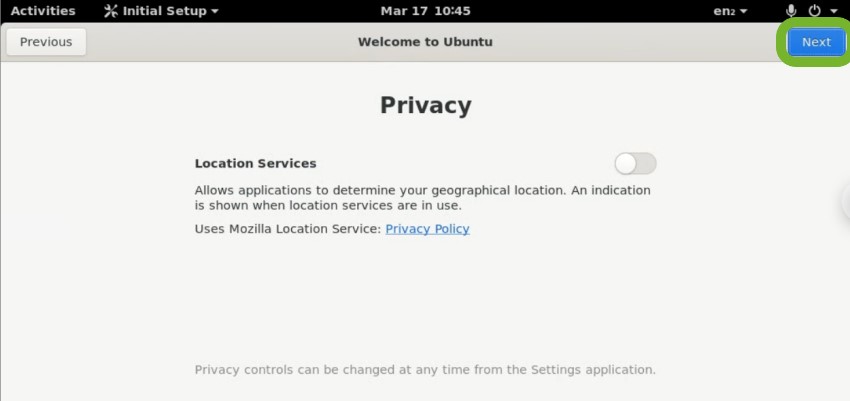
Finally, click ‘Start Using Ubuntu’:

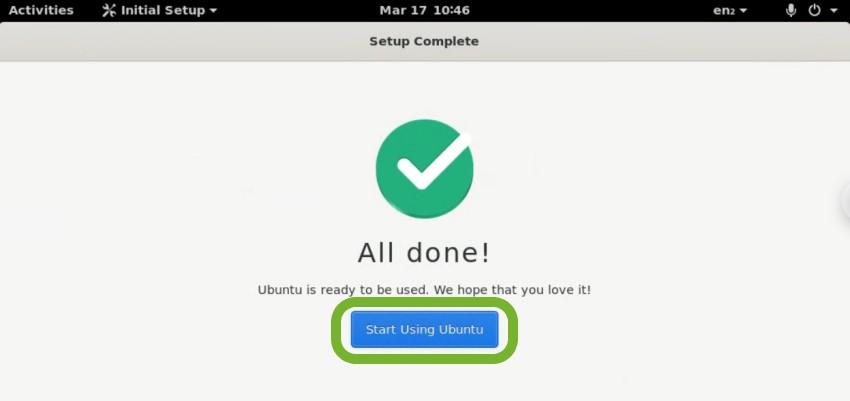
You’ll now be staring at the Ubuntu desktop, and we can get started with crawling!
Note: If at any point you’re logged out of Ubuntu after a period of inactivity, but you haven’t set a password, head over to our troubleshooting section.
4. Install the Screaming Frog SEO Spider
The easiest way to download the Screaming Frog SEO Spider on to your new VM instance is to go back to your SSH window, and use the following command:
wget -c https://download.screamingfrog.co.uk/products/seo-spider/screamingfrogseospider_16.7_all.deb
Note: at the time of writing this was the correct version number, but all old version numbers should redirect to the latest version regardless.
To install it, use:
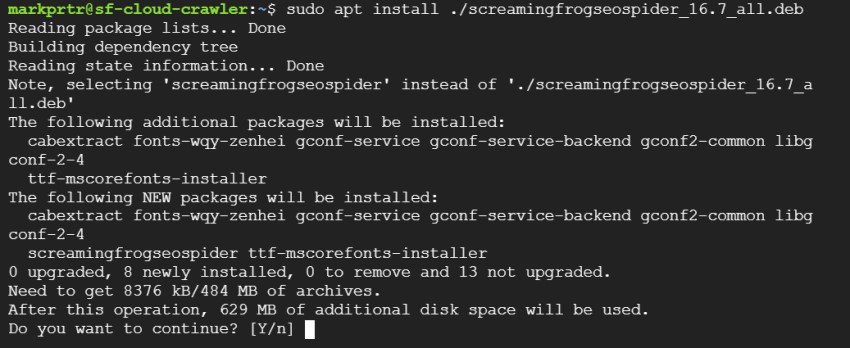
sudo apt install ./screamingfrogseospider_16.7_all.deb
(Again: change this version number as required)
It will prompt you to answer, yes or no. Input ‘y’ and hit Enter:

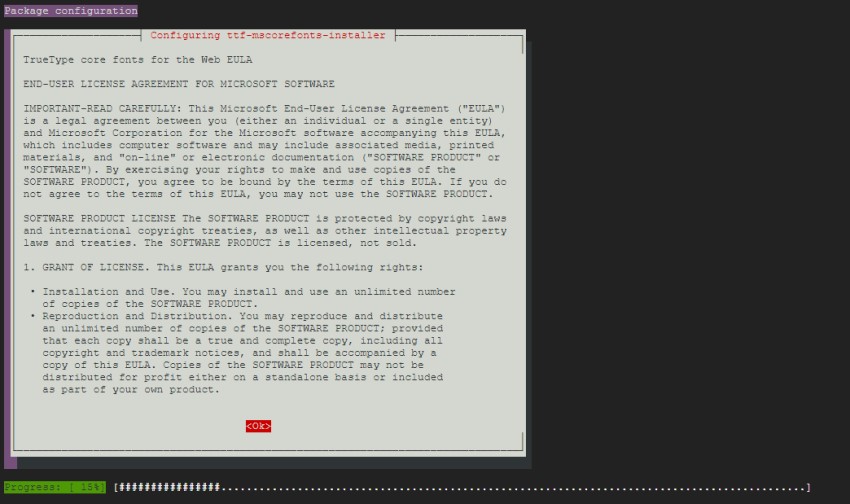
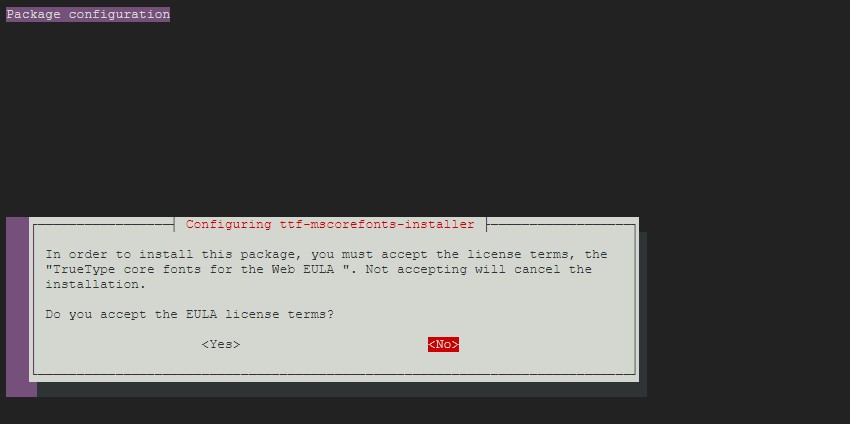
You’ll now be presented with an EULA from Microsoft. ttf-mscorefonts-installer is a Debian package that includes a set of fonts. To accept it, hit Tab once so that the ‘OK’ is highlighted red, and then hit Enter:

Similarly, for the next screen hit Tab once to select ‘Yes’, and hit Enter:

When the install is finished you’ll see something similar to the below:


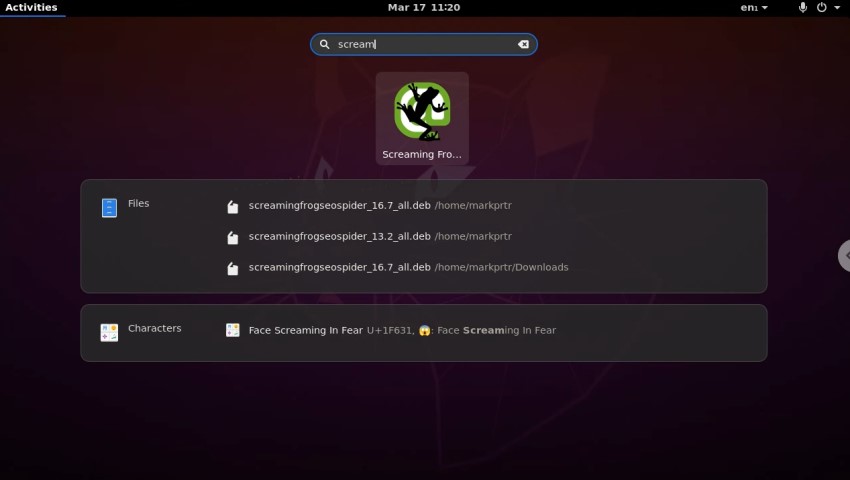
Congratulations, you now have the Screaming Frog SEO Spider installed on the Cloud, easily accessible via Chrome Remote Desktop. To open it, click ‘Activities’, start searching for it and click the icon:

5. Enter Your Screaming Frog SEO Spider Licence Details
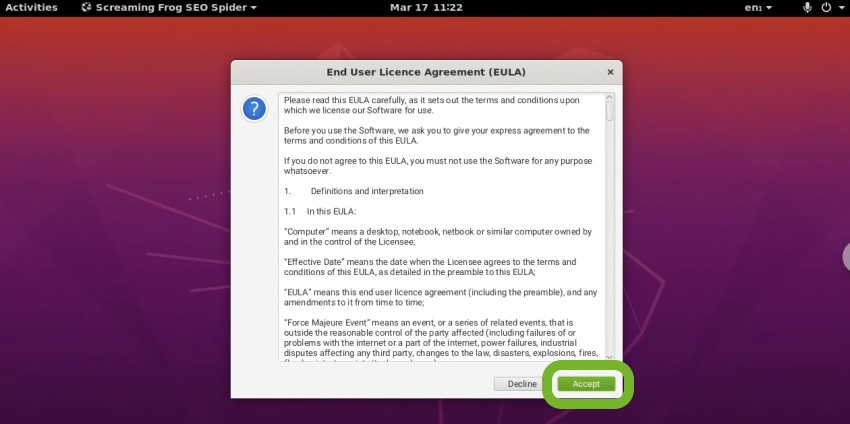
Before you start crawling, you’ll need to configure the SEO Spider to your liking. Firstly, accept the EULA that pops up the first time you run it:

Things should start looking familiar from here.
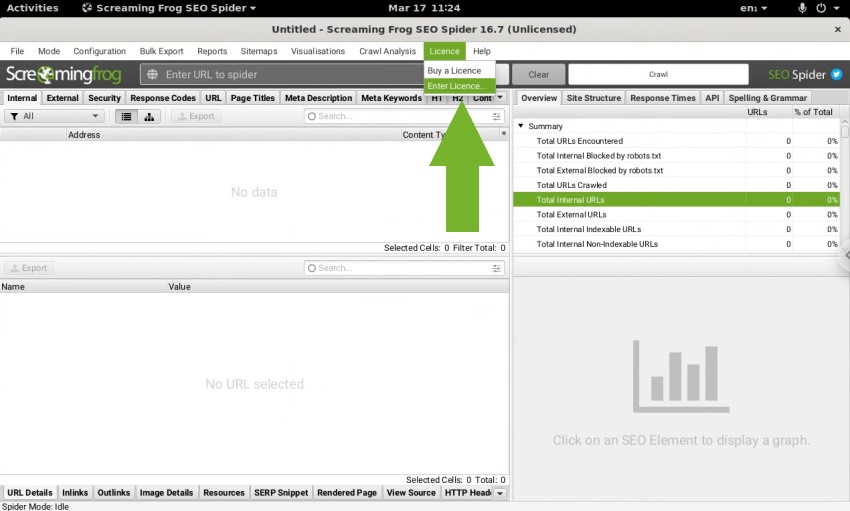
Next up, we’ll enter our license details by clicking on ‘Licence’ and then ‘Enter Licence…’ (or ‘Buy a Licence’ if you’re not yet an owner):

By default, Chrome Remote Desktop will not share your clipboard with your local machine. To do this, click the arrow on the right-hand side of your window:

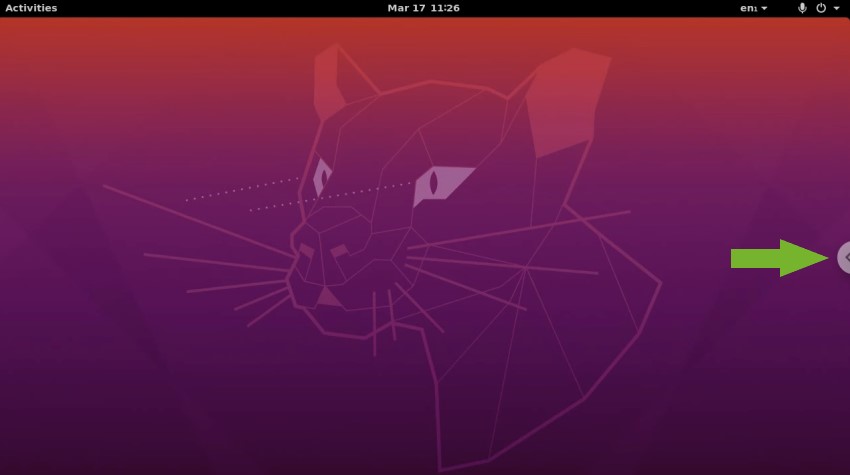
Click ‘Begin’ under ‘Enable Clipboard Synchronisation’, and then click ‘Allow’ when prompted by Chrome. You should see a message saying ‘You’re ready!’.

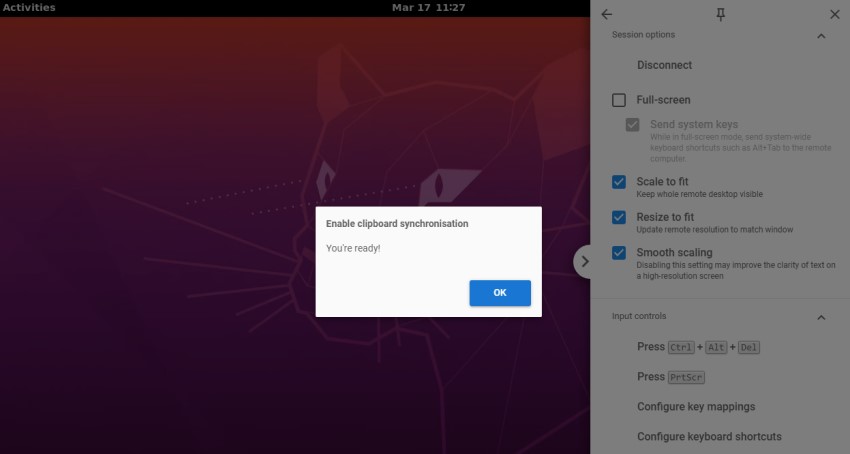
You’ll also notice lots of other Chrome Remote Desktop settings here, which can help you resize the screen etc. if it’s not displaying correctly.
Now we can easily paste our licence details into the SEO Spider:

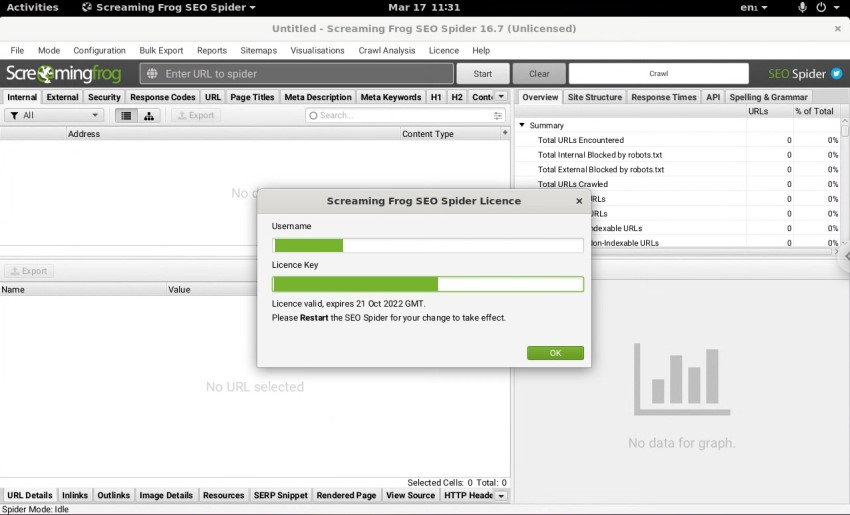
If all is well, you’ll see a ‘Licence valid’ message, and be prompted to restart the SEO Spider. Do so, and you’re ready to go!
6. Configure Storage Mode & Memory Allocation
By default the SEO Spider uses RAM, rather than your hard disk, to store and process data. This provides amazing benefits such as speed and flexibility, but it has disadvantages, most notably, crawling at scale.
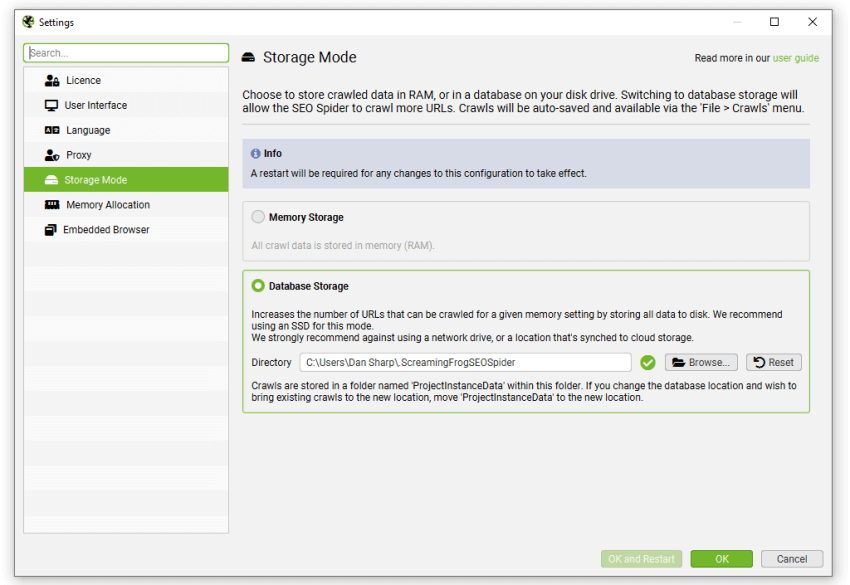
The SEO Spider can be configured to save crawl data to disk, by selecting ‘Database Storage’ mode (under ‘File > Settings > Storage Mode’), which enables it to crawl at truly unprecedented scale, while retaining the same, familiar real-time reporting and usability.
If you’re crawling large sites, we highly recommend you switch to Database Storage Mode and increase your memory allocation. This will allow you to crawl sites with millions of URLs, within the confines of your chosen VM instance specifications.
To switch to database storage mode, open the SEO Spider on your VM instance and navigate to ‘File > Settings > Storage Mode’:

As well as this, we also recommend increasing memory allocation. You can adjust memory allocation within the SEO Spider by clicking ‘File > Settings > Memory Allocation’:

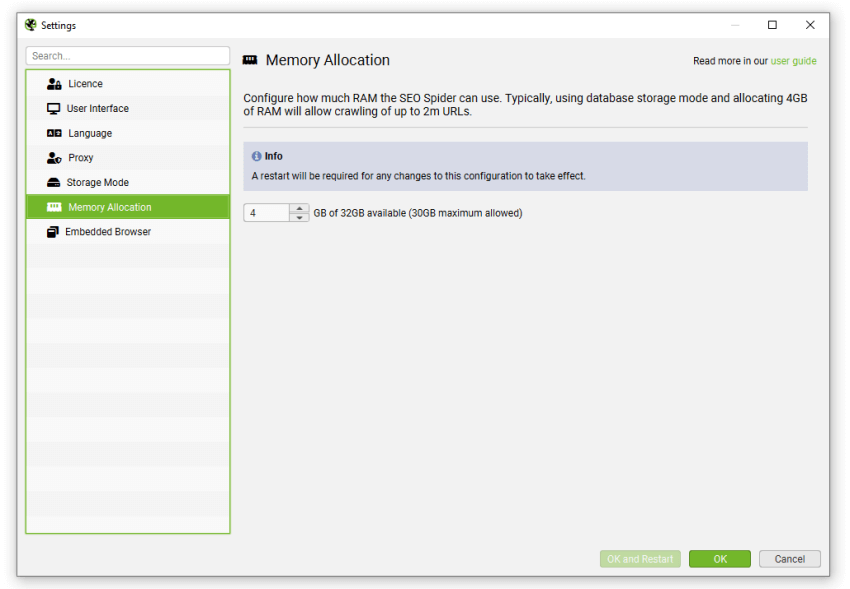
The VM instance that has been used throughout this guide has 32GB of RAM. This means that you could potentially allocate 30GB of RAM, as we always recommend 2GB less than your total RAM available to avoid crashes. While every website is different, allocating 6GB of RAM should be enough to crawl 3 million URLs.
If required, you can use a VM instance with both higher memory and a larger SSD capacity.
7. Import Custom SEO Spider Configuration
The SEO Spider install on your VM instance will have the default settings, but if you want to load in your own configuration, you can simply export it to save yourself the hassle of reconfiguring.
To do so, open up the SEO Spider on your local machine that is using your desired configuration. Then go to File > Configuration > Save As…:

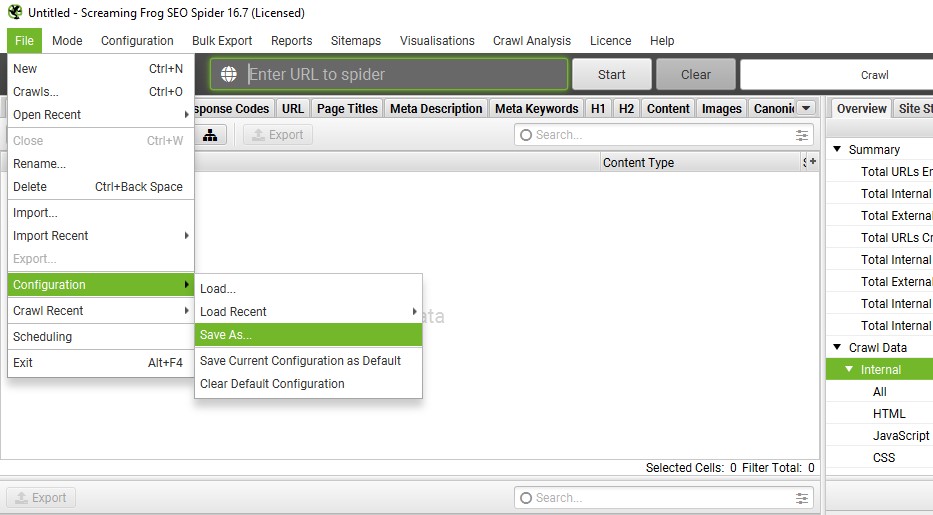
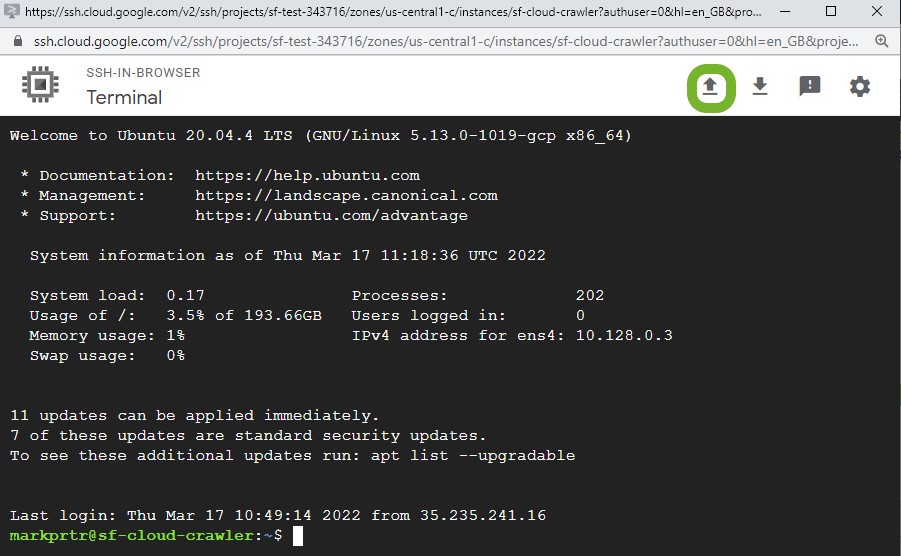
Next, we need to upload the .seospiderconfig file to our VM instance. Head over to your SSH window, and click the up arrow at the top right:

Click ‘Choose Files’ and select the .seospiderconfig file you exported, then click ‘Upload Files’:

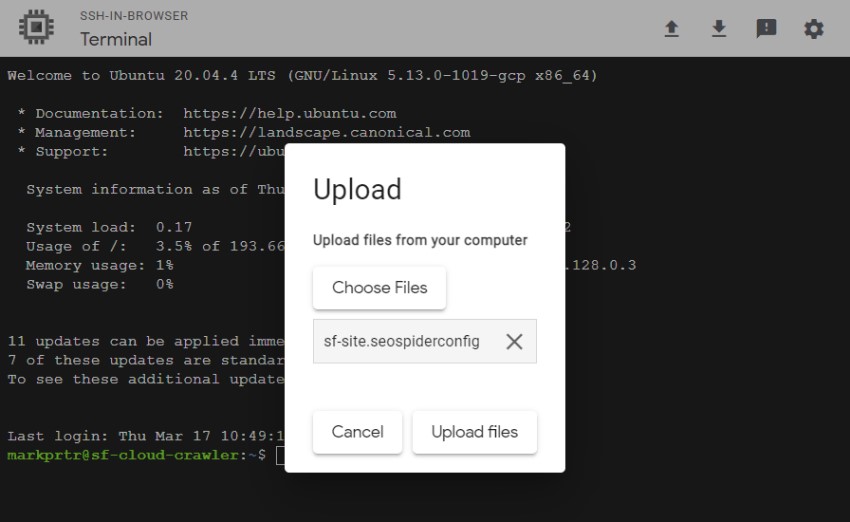
Once you see the green tick next to the upload window at the bottom right, go back to your Chrome Remote Desktop window, open the SEO Spider, and click File > Configuration > Load.
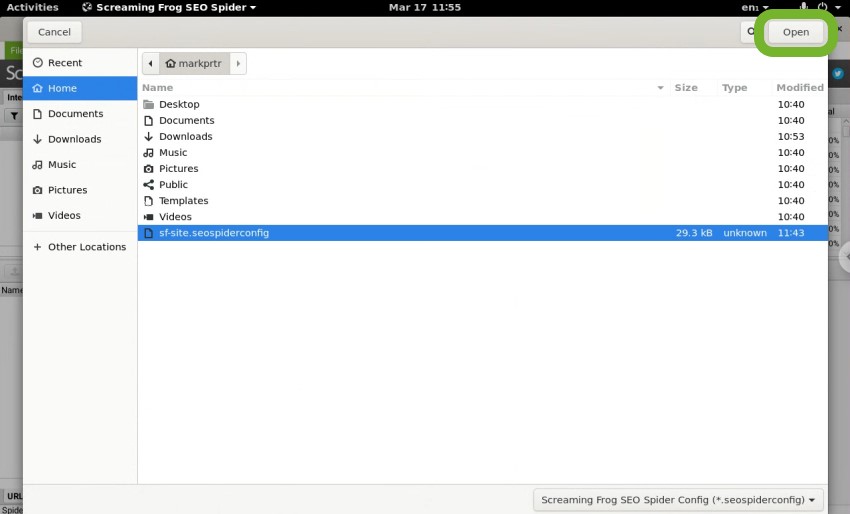
Select the file and click ‘Open’:

If all is well, you’ll see a success message within the SEO Spider:

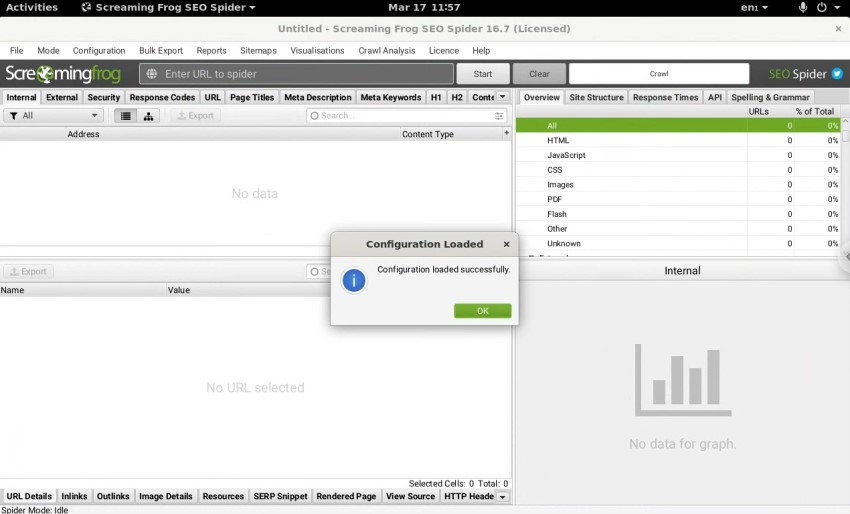
Your custom Screaming Frog SEO Spider configuration is now good to go!
There are also other ways to transfer files to and from your VM.
8. Exporting Smaller Files From the VM Instance
Exporting from the SEO Spider running on your VM instance is straightforward, but there are different ways of doing it.
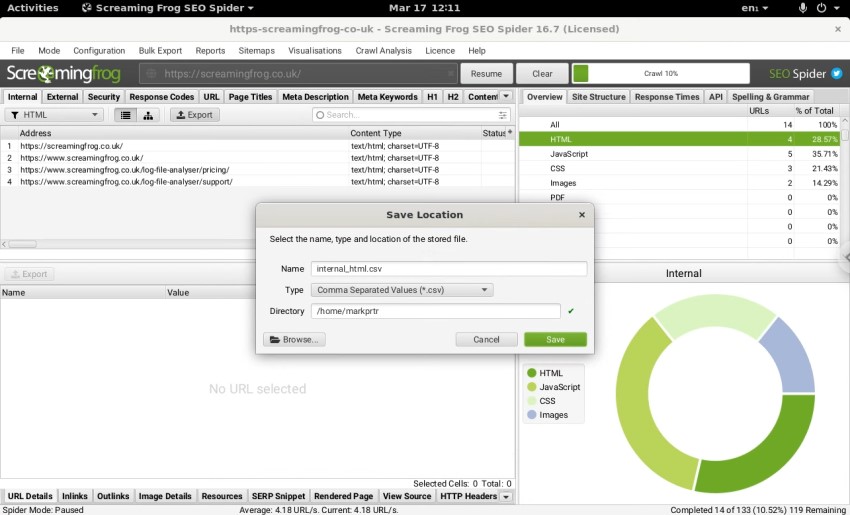
If you are exporting smaller files (less than 1GB), we’d recommend you save any reports and exports to the default location, making a note of the Name and Directory:

Back in your SSH window, click the down arrow at the top right:


Enter the file path. For the above example, it would be internal_html.csv:

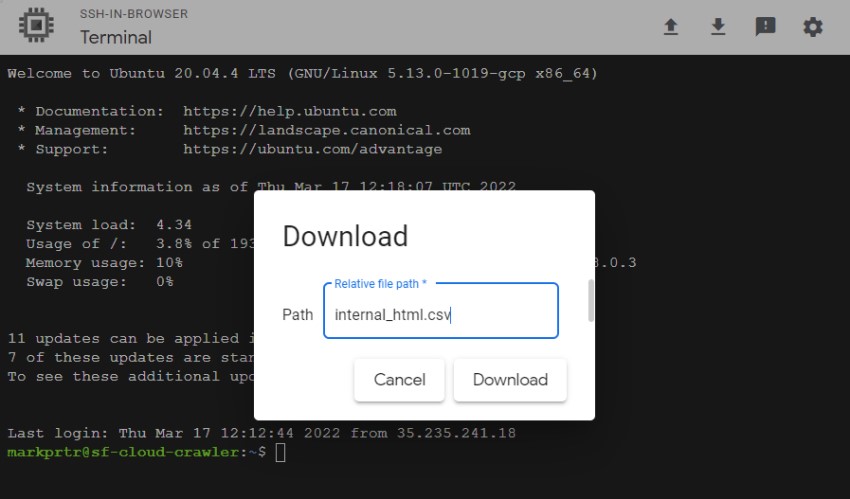
If you saved this anywhere other than the default location, for example in a folder, you’ll need to change the file path accordingly. Click ‘Download’, and the file will download locally:

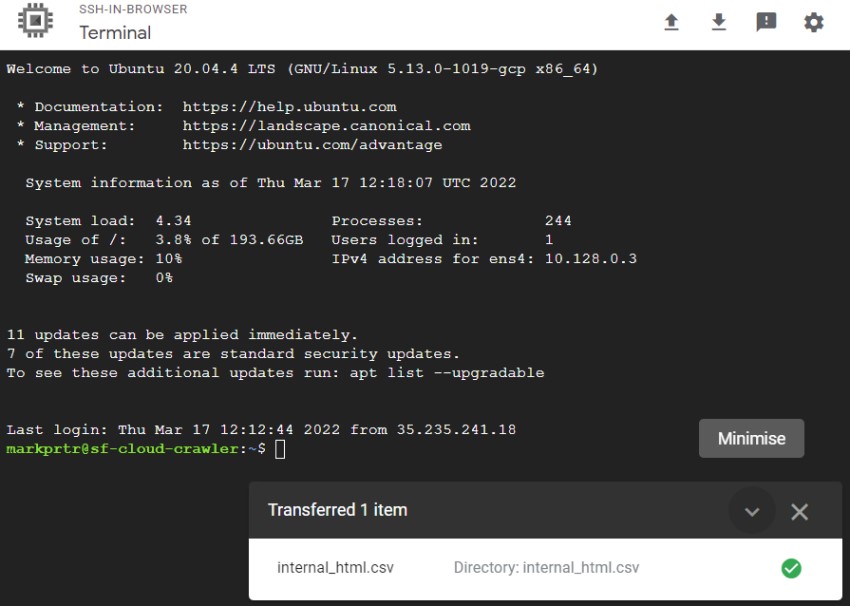
This method is quick and easy, but only allows you to download one file at a time, and larger files can transfer slowly. For example, it took around 1.5 – 2 hours to download an export that was 1.2GB in size, though this varies depending on the location of your VM instance and your network speed.
9. Exporting Multiple or Larger Files Using Storage Buckets
If you need to export multiple files or larger files, we recommend utilising Google’s storage buckets. The 1.2GB file above only took 10 seconds to upload to a bucket from the VM instance, and then it was downloaded in less than 1 minute using the same connection as before.
To use this method, firstly, navigate to Google Cloud Storage to create a new bucket:

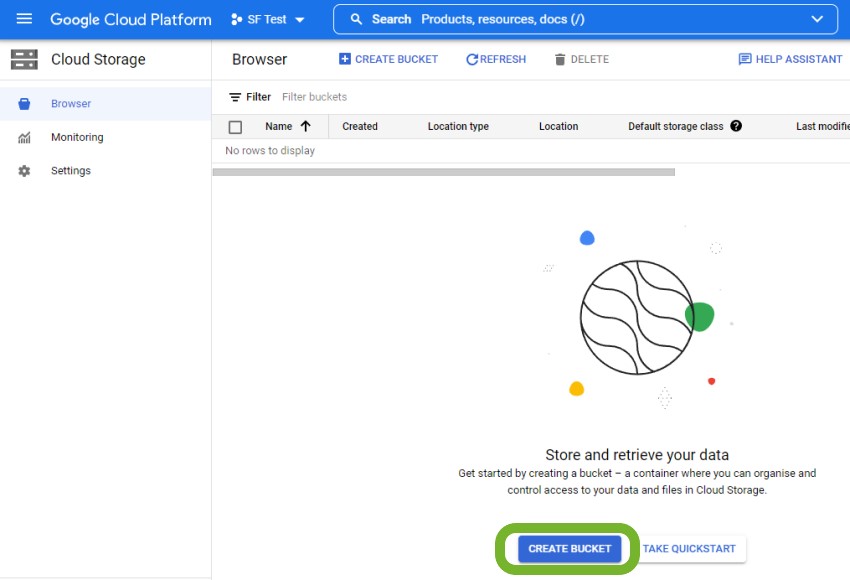
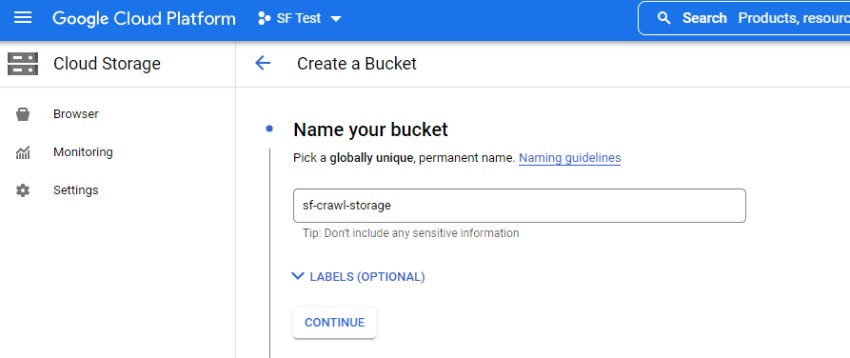
Bucket names must be unique, so avoid anything too generic:

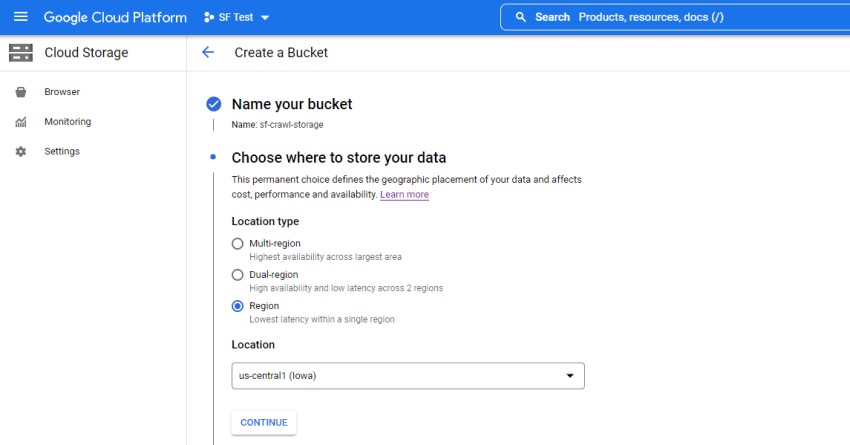
You’re now able to specify the location of your data, which varies on a case-by-case basis. If you intend to keep the bucket for a long time and regularly export to it, for example, if you’re automating XML sitemaps, then you should consider the most logical location for that.
For one-off, large crawls, it’s likely you’ll want to delete the bucket once you’ve downloaded everything off it, so location isn’t as important. For the purpose of this guide, we’ve chosen Iowa as our Region:

You’re also able to choose your storage class. For the this use case it’s fine to leave it on ‘Standard’:

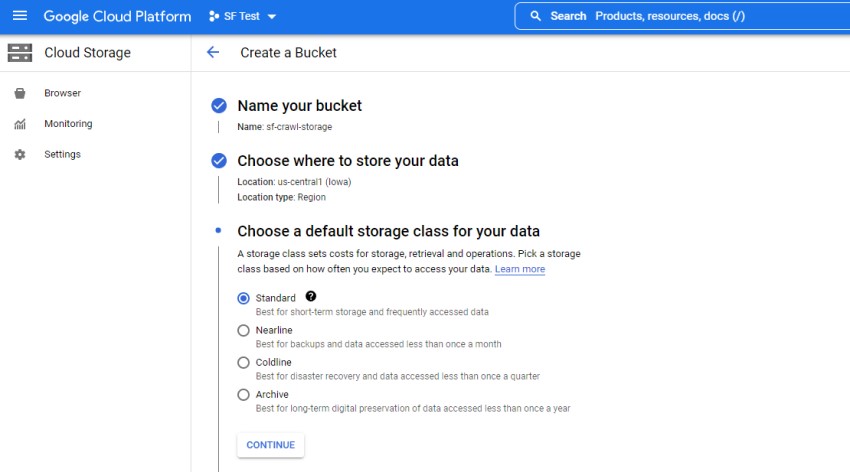
Click ‘Create’, and you’ll now have a Google Cloud storage bucket for uploading to.
To transfer from your VM instance to the bucket, you can use the following command in your SSH window:
gsutil cp -r gs://BUCKET-NAME/
For example, we exported the Internal tab to the default location on our VM instance, and our storage bucket is called sf-crawl-storage, hence the command will be:
gsutil cp -r internal_all.csv gs://sf-crawl-storage/
If all is well, you’ll see the following output:


And if you now navigate to your storage bucket, you’ll see the file is there for you to download whenever you want:

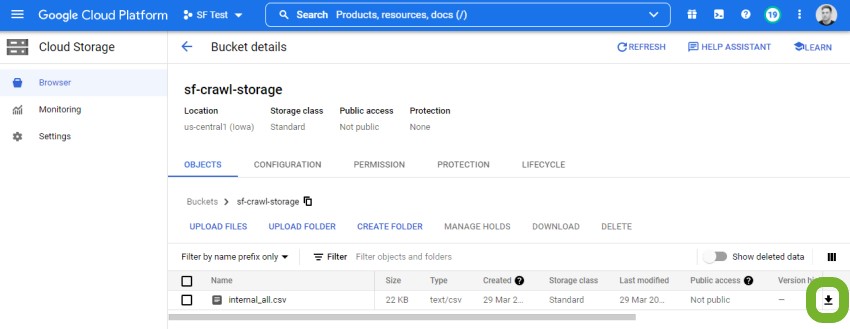
Storage buckets are great for transferring large files or multiple files off your VM instances, but they also open up lots of opportunities for automation.
10. Creating VM Instances From Snapshots
Once you’ve run through the above process a couple of times, it’s possible to get things up and running in under 10 minutes. However, it’s also possible to create a snapshot of your VM instance, which you can then use to create future VM instances.
This means the VM will already be setup for crawling, and your SEO Spider will be configured along with your licence details. The only part that you can’t include in this is the Chrome Remote Desktop setup, as the required code will be different every time.
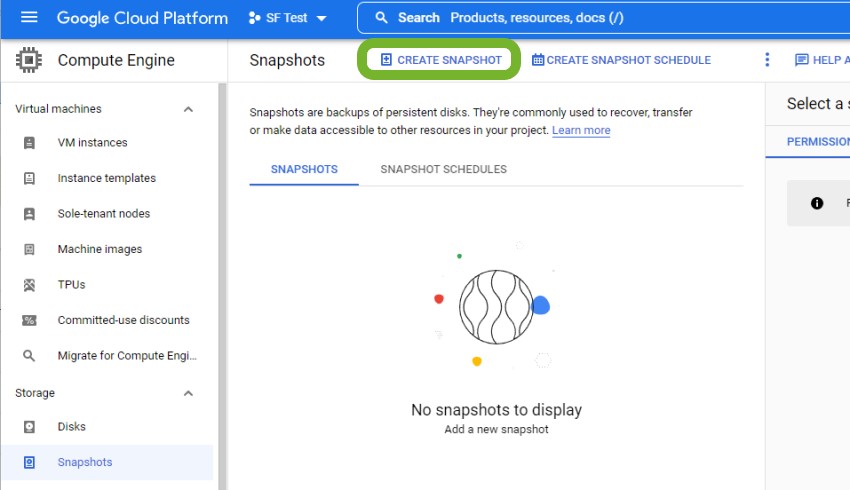
If you want to create a snapshot, once you’re up and running and have everything configured to your liking, head over to Snapshots and click ‘CREATE SNAPSHOT’:

Enter a name, description (optional) and choose your desired source disk – this will be the VM instance which you’ve fully configured.
In this example, the snapshot is simply saved in the same region as the VM instance (Iowa):

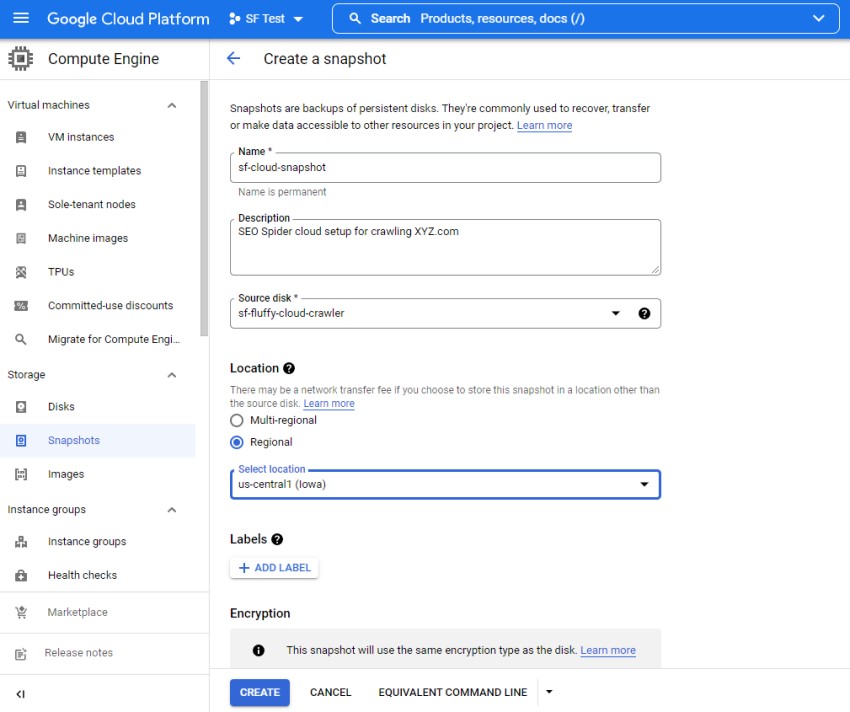
Click ‘CREATE’ towards the bottom to save the snapshot.
When the time comes to spin up a VM instance based on your configured machine, once again click on Compute Engine on the left-hand side:


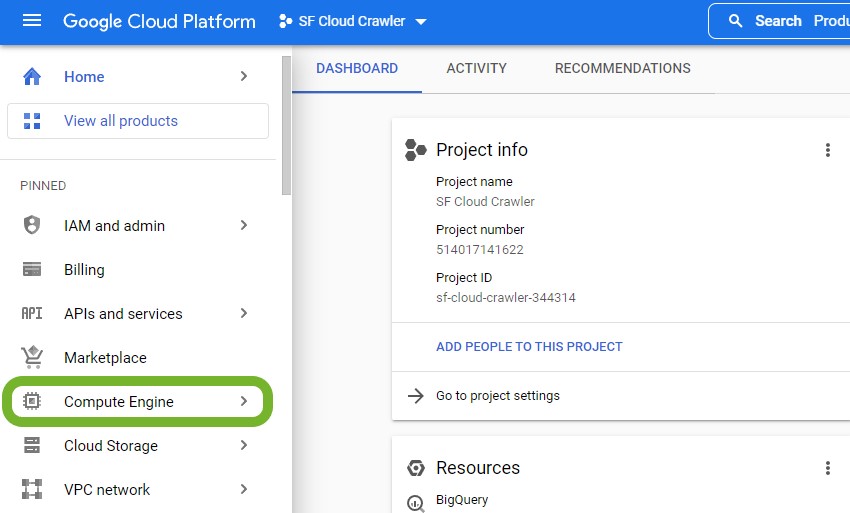
Click ‘CREATE INSTANCE’:


Configure the VM instance as per the beginning of this guide (or as desired), and scroll down to ‘Boot disk’ and click ‘CHANGE’:


Then select ‘SNAPSHOTS’, select the correct one, configure your boot disk type to SSD, and set a desired size:

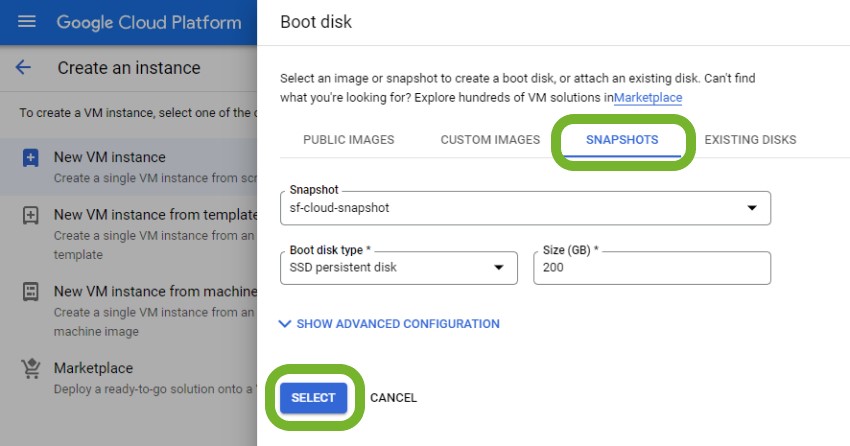
You can change the VM instance specs and boot disk size each time, so you’re able to easily scale it up or down depending on the task at hand.
Don’t forget to adjust the access scopes if you intend to use storage buckets.
When you’re happy with everything, click ‘CREATE’.
As mentioned previously, this VM instance will be configured just the same as the source of your snapshot, retaining your SEO Spider configuration and licence details ready for crawling. However, the Chrome Remote Desktop won’t work because the code within the setup command varies each time.
Head over to Chrome Remote Desktop on your local machine, as outlined previously, and copy and paste the access code into your newly created VM instance’s SSH window.
Again, you’ll need to setup a six-digit pin, and once you’ve done that you should now see your new VM Instance under your Chrome Remote Desktop Devices:


This process of creating a snapshot saves time when spinning up VM instances, with the added benefit of being able to tweak the VM specification depending on the task at hand.
Snapshots will incur costs to keep, but at the time of writing the cost to keep a 200GB snapshot of a configured VM instance was around $5 per month.
11. Terminating a VM Instance & Storage Buckets
Once you’ve carried out your desired tasks, you can easily terminate the VM instance to avoid unnecessary costs. To do so, go to the VM instances page, click the three dots on the right-hand side, and click ‘Delete’:

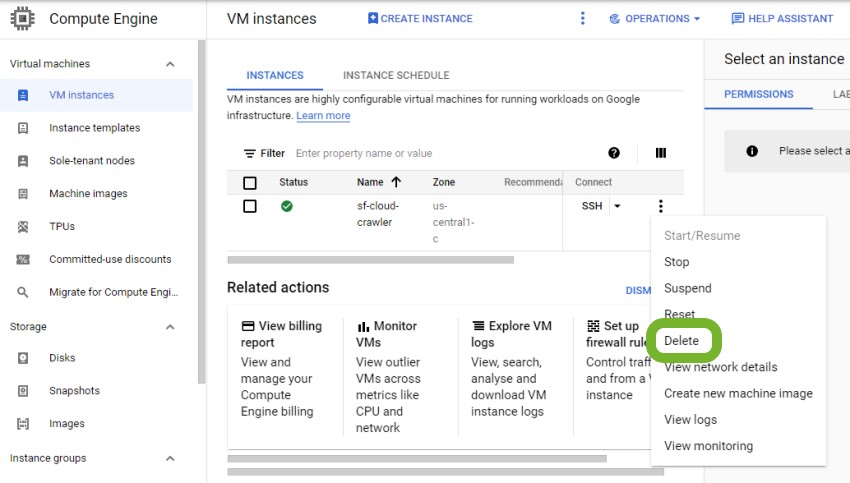
You’ll lose everything from this VM instance, so double check you’ve saved and exported everything you need.
If you created any storage buckets or snapshots that you no longer need, they can also be deleted in a similar way. However, they can be useful to keep for storing exports and crawls, which your future VM instances can easily access. At the time of writing, you can expect to pay around $0.020 per GB per month, so it’s pretty affordable.
Lastly, you can also delete your Chrome Remote Desktop device by clicking the bin icon next to it:


Alternatively, you can stop the instance (under the three dots menu), allowing you to start it again when required. However, any resources attached to the VM, such as the persistent disk, will continue to incur costs.
Wrapping Up & Potential Use Cases
Congratulations! You now know how to run the Screaming Frog SEO Spider on a VM instance, that you or other people can easily access from anywhere using Chrome Remote Desktop.
With your paid Screaming Frog SEO Spider, costing £199 per year, you can create as many VM instances as you want, crawling different websites and carrying out different tasks. This is an incredibly cost-efficient way of crawling in the Cloud, and thanks to the scalability of Google’s VM instances, you can tackle websites spanning tens of millions of URLs.
Further to this, saving and exporting to the Cloud/Google’s Storage Buckets opens up a plethora of additional opportunities. From here, you could generate fully automated XML sitemaps, export to Google Data Studio and more.
Troubleshooting
Logged Out of Ubuntu
At some point, you may notice that Ubuntu has logged you out automatically and you are being asked for a password which you’ve never set:

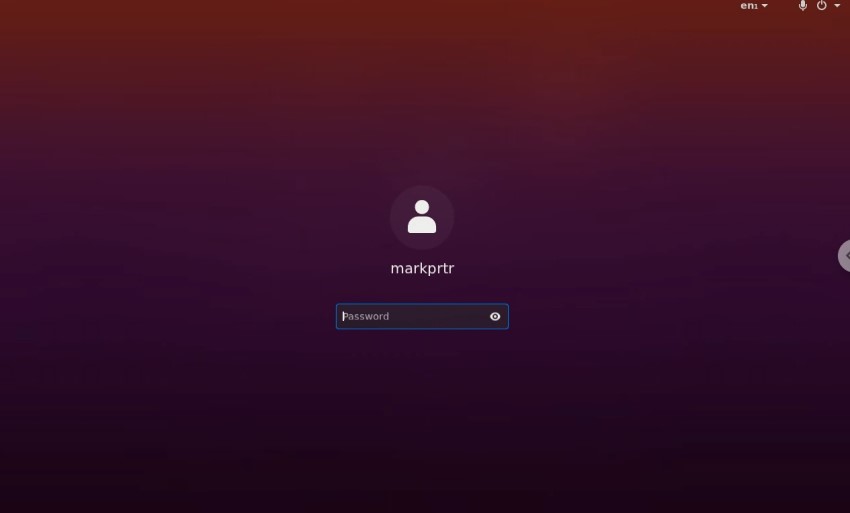
Thankfully, the solution is simple. Open your SSH window and type the following command:
sudo passwd USERNAME
Change USERNAME to the username that is being displayed on your screen; in the above example it would be ‘markprtr’.
You’ll now be prompted to set a new password, and once that’s done you’ll be able to login.
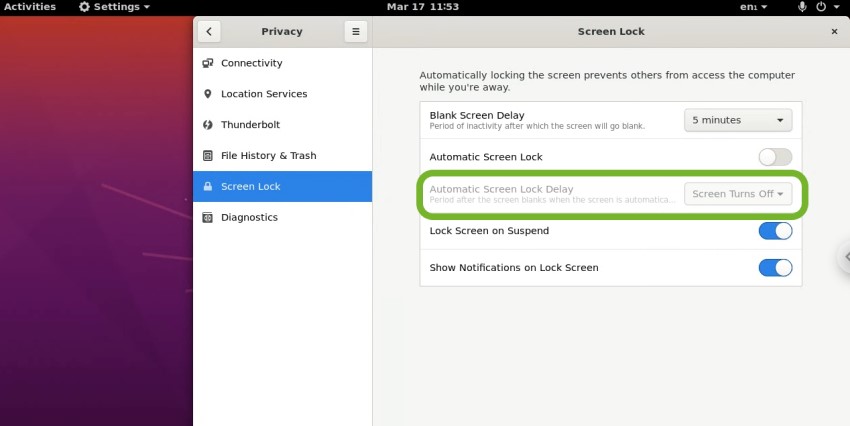
You can prevent this from happening by going clicking ‘Activities’ in the top left, and searching for ‘screen lock’. Toggle ‘Automatic Screen Lock’ off:

