SEO Spider
How To Find Broken Links Using The SEO Spider
How To Find Broken Links
You can use the Screaming Frog SEO Spider for free (and paid) to check for broken links (the http response ‘404 not found error’) on your website.
Below is a very quick and easy tutorial on how to use the tool as a broken link checker. First of all, you’ll need to download the SEO Spider which is free for crawling up to 500 URLs. You can download via the green button in the right hand side bar.
You can crawl more than 500 URLs with the paid version. The next steps to find broken links within your website can be viewed in our video, and tutorial below.

1) Crawl The Website
Open up the SEO Spider, type or copy in the website you wish to crawl in the ‘Enter URL to spider’ box and hit ‘Start’.

2) Click the ‘Response Codes’ Tab & ‘Client Error (4XX)’ Filter to View Broken Links
You can wait until the crawl finishes and reaches 100%, or you can just view 404 broken links while crawling by navigating to the ‘Response Codes’ tab and using the filter for ‘Client Error 4XX’.
There are two ways to do this, you can simply click on the ‘tab’ at the top and use the drop down filter –

Alternatively you can use the right-hand window crawl overview pane and just click directly on ‘Client Error (4xx)’ tree view under the ‘Response Codes’ folder. They both show the same results, regardless of which way you navigate.

This crawl overview pane updates while crawling, so you can see there number of client error 4XX links you have at a glance. In the instance above, there are 11 client errors which is 0.12% of the links discovered in the crawl.
As a lazy alternative, the ‘Issues‘ tab will also alert you to any issues, warnings or opportunities found in a crawl. If any broken links are discovered, they will be reported here.

In this case, the broken links discovered are to external pages. So they are classified as a low priority warning. Internal broken links are classified as a high priority issue in comparison, but there are none found here.
3) View the Source Of the Broken Links by Clicking the ‘Inlinks’ Tab
Obviously you’ll want to know the source of the broken links discovered (which URLs on the website link to these broken links), so they can be fixed. To do this, click on a URL in the top window pane and then click on the ‘Inlinks’ tab at the bottom to populate the lower window pane.
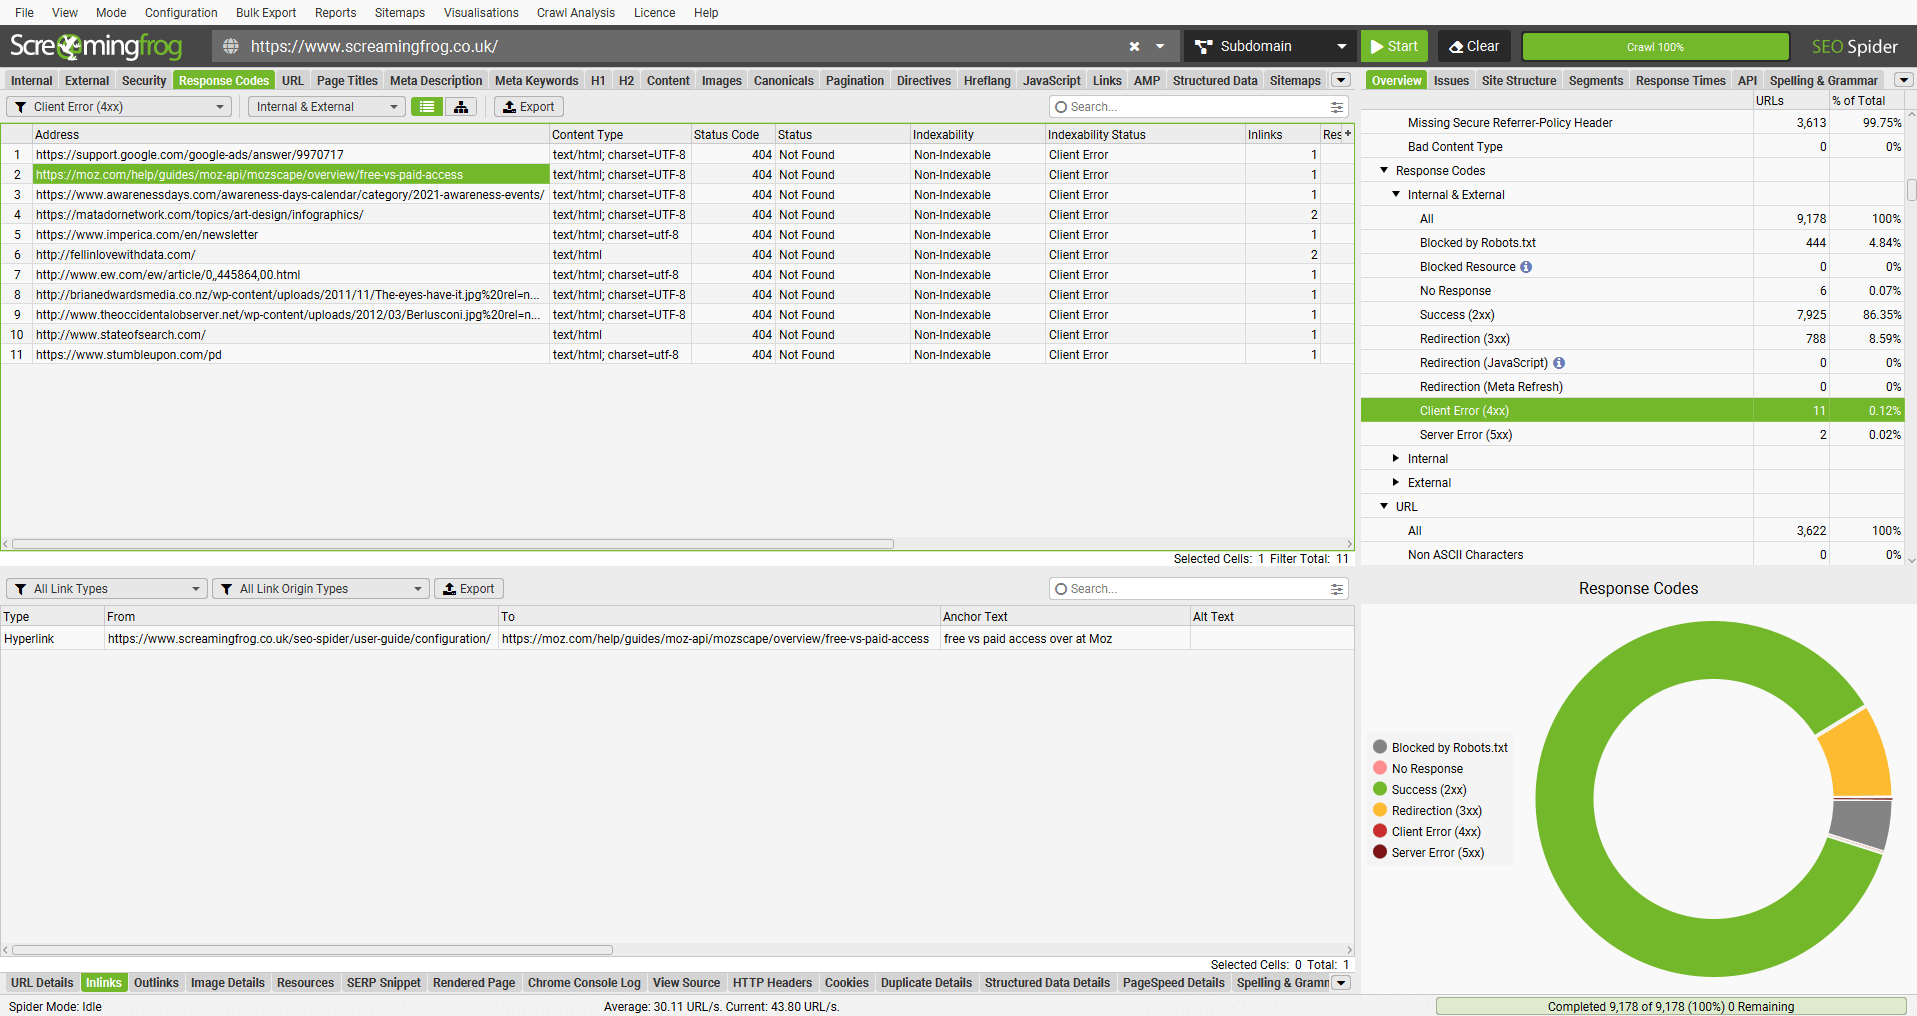
You can click on the above to view a larger image. As you can see in this example, there is a broken link to the Moz website (https://moz.com/help/guides/moz-api/mozscape/overview/free-vs-paid-access), which is linked to from this page – https://www.screamingfrog.co.uk/seo-spider/user-guide/configuration/.
Here’s a closer view of the lower window pane which details the ‘inlinks’ data –

‘From’ is the source where the 404 broken link can be found, while ‘To’ is the broken link. You can also see the anchor text, alt text (if it’s an image which is hyperlinked) and whether the link is followed (true) or nofollow (false).
It looks like the only broken links on our website are external links (sites we link out to), but obviously the SEO Spider will discover any internal broken links if you have any.
4) Use the ‘Bulk Export > Response Codes > Client Error (4XX) Inlinks’ Export
If you’d rather view the data in a spreadsheet you can export both the ‘source’ URLs and ‘broken links’ by using the ‘Bulk Export’, ‘Response Codes’ and ‘Client Error (4XX) Inlinks’ option in the top level menu.

This should cover the majority of cases for finding broken links on a website.
However, the ‘source’ URL is the very last page to link to the 404 error page. So there might be times that the ‘source’ is a redirect (and possibly in a chain of redirects). You can see if the ‘source’ is a redirect as the ‘Type’ column will say ‘HTTP Redirect’ for example.
To quickly find the original source page of these errors, we recommend using the ‘All Redirects‘ export under ‘Reports > Redirects > All Redirects’. Open up the report and filter the ‘final status code’ column to ‘404’. The ‘Source’ is the original source page, the ‘address’ is the last source, and the ‘final address’ is the 404 URL.
There’s a number of ways you can export data from the SEO Spider, so please read our user guide on exporting.
Crawling a List of URLs For Broken Links
If you have a list of URLs you’d like to check for broken links instead of crawling a website, then you can upload them in list mode.
To switch to ‘list’ mode, click ‘mode > list’ in the top level navigation and you’ll then be able to choose to paste in the URLs or upload via a file.

The crawl depth is automatically set to ‘0’ in list mode, so it only crawls the URLs uploaded.
This can be adjusted via ‘Config > Spider > Limits’ and the ‘Limit Crawl Depth’ setting. For example, to crawl the outlinks of the pages uploaded, this could be set to ‘1’ instead.
Please see our guide on how to use list mode.
Find Broken ‘Jump Links’
Jump links are a useful way to link users to a specific part of a webpage using named anchors on a link, also referred to as ‘bookmarks’, ‘named anchors’ and ‘skip links’.
These broken bookmarks can’t be found in the same way as above, as they don’t respond with a 404 status code, and they often go unnoticed.
You’ll need to enable ‘Crawl Fragment Identifiers’ located in ‘Config > Spider > Advanced’, crawl the website and then view them under the ‘URL’ tab and ‘Broken Bookmark’ filter.

Read our tutorial on finding broken jump links for a full walk-through.
Hopefully the above guide helps illustrate how to use the SEO Spider tool to check for broken links efficiently.
Please also read our Screaming Frog SEO spider FAQs and full user guide for more information.


