SEO Spider
How To Perform A Cookie Audit
Cookie Audit Introduction
It’s essential today to understand the presence and purpose of cookies on a website. The data privacy landscape is continuing to evolve and there are various laws and regulations in place throughout the world, where cookie compliance is almost always included in some way.
If you’re tasked with performing a review of existing cookies on a website for compliance (ePrivacy, GDPR), privacy or cookie policy the Screaming Frog SEO Spider tool can help automate the heavy lifting in identifying all cookies that are being automatically set without explicit user consent at scale.
This tutorial guides you through how to configure the Screaming Frog SEO Spider to crawl a website, load each page in its headless Chrome browser, and identify any cookies that are found and report them back to you.
The SEO Spider is free in lite form, but the features discussed below do require a licence. When you have the SEO Spider installed, licensed and open, please follow these steps.
1) Select ‘Cookies’ For Extraction
Open up the SEO Spider, go to ‘Config > Spider > Extraction’ and select ‘Cookies’ under ‘URL Details’.

This means the SEO Spider will now store all cookies discovered.
Please note, when you choose to store cookies, the auto exclusion performed by the SEO Spider for Google Analytics tracking tags is disabled to provide an accurate view of all cookies issued.
This means it will affect your analytics reporting, unless you choose to exclude any tracking scripts from firing by using the exclude configuration (‘Config > Exclude’).
2) Enable JavaScript Rendering
Click ‘Config > Spider > Rendering’ and select ‘JavaScript’. This means the SEO Spider will open each web page in a headless Chrome browser behind the scenes.

This is an important step, as it allows cookies that are loaded using JavaScript or pixel image tags to be discovered.
The window size is automatically set to Googlebot Smartphone, but this can be adjusted to desktop if there are any differences in the way the site issues cookies.
3) Set The User-Agent To Chrome
To replicate a regular user, switch the user-agent to a browser, such as Chrome via ‘Config > User-agent’.

Some websites conditionally set cookies based upon user-agent and crawling as the ‘Screaming Frog SEO Spider’ may not always give a true picture otherwise.
4) Ignore robots.txt
Click ‘Configuration > robots.txt > Settings’ and select ‘Ignore robots.txt’ or ‘Ignore robots.txt but report status’.

Cookies can be loaded from URLs which are available to users but not bots, such as pages or resources blocked via robots.txt. Therefore it’s important we allow all resources to be loaded. Any user set Include or Exclude functions can also affect this.
5) Crawl the Website
Open up the SEO Spider, type or copy in the website you wish to crawl in the ‘Enter URL to spider’ box and hit ‘Start’.

Wait until the crawl finishes and reaches 100%, but you can also view some details in real-time.
6) View Number of Cookies For Each URL
In the ‘Internal’ tab, there’s a ‘cookies’ column which displays the number of cookies discovered for each URL.

You will need to scroll over to the right to see it. This will help you identify where cookies are being discovered in the crawl.
7) View The Cookies Tab
Click on a URL in the top window, then the lower ‘Cookies’ tab to populate the lower window pane with more details on cookies discovered for each URL.
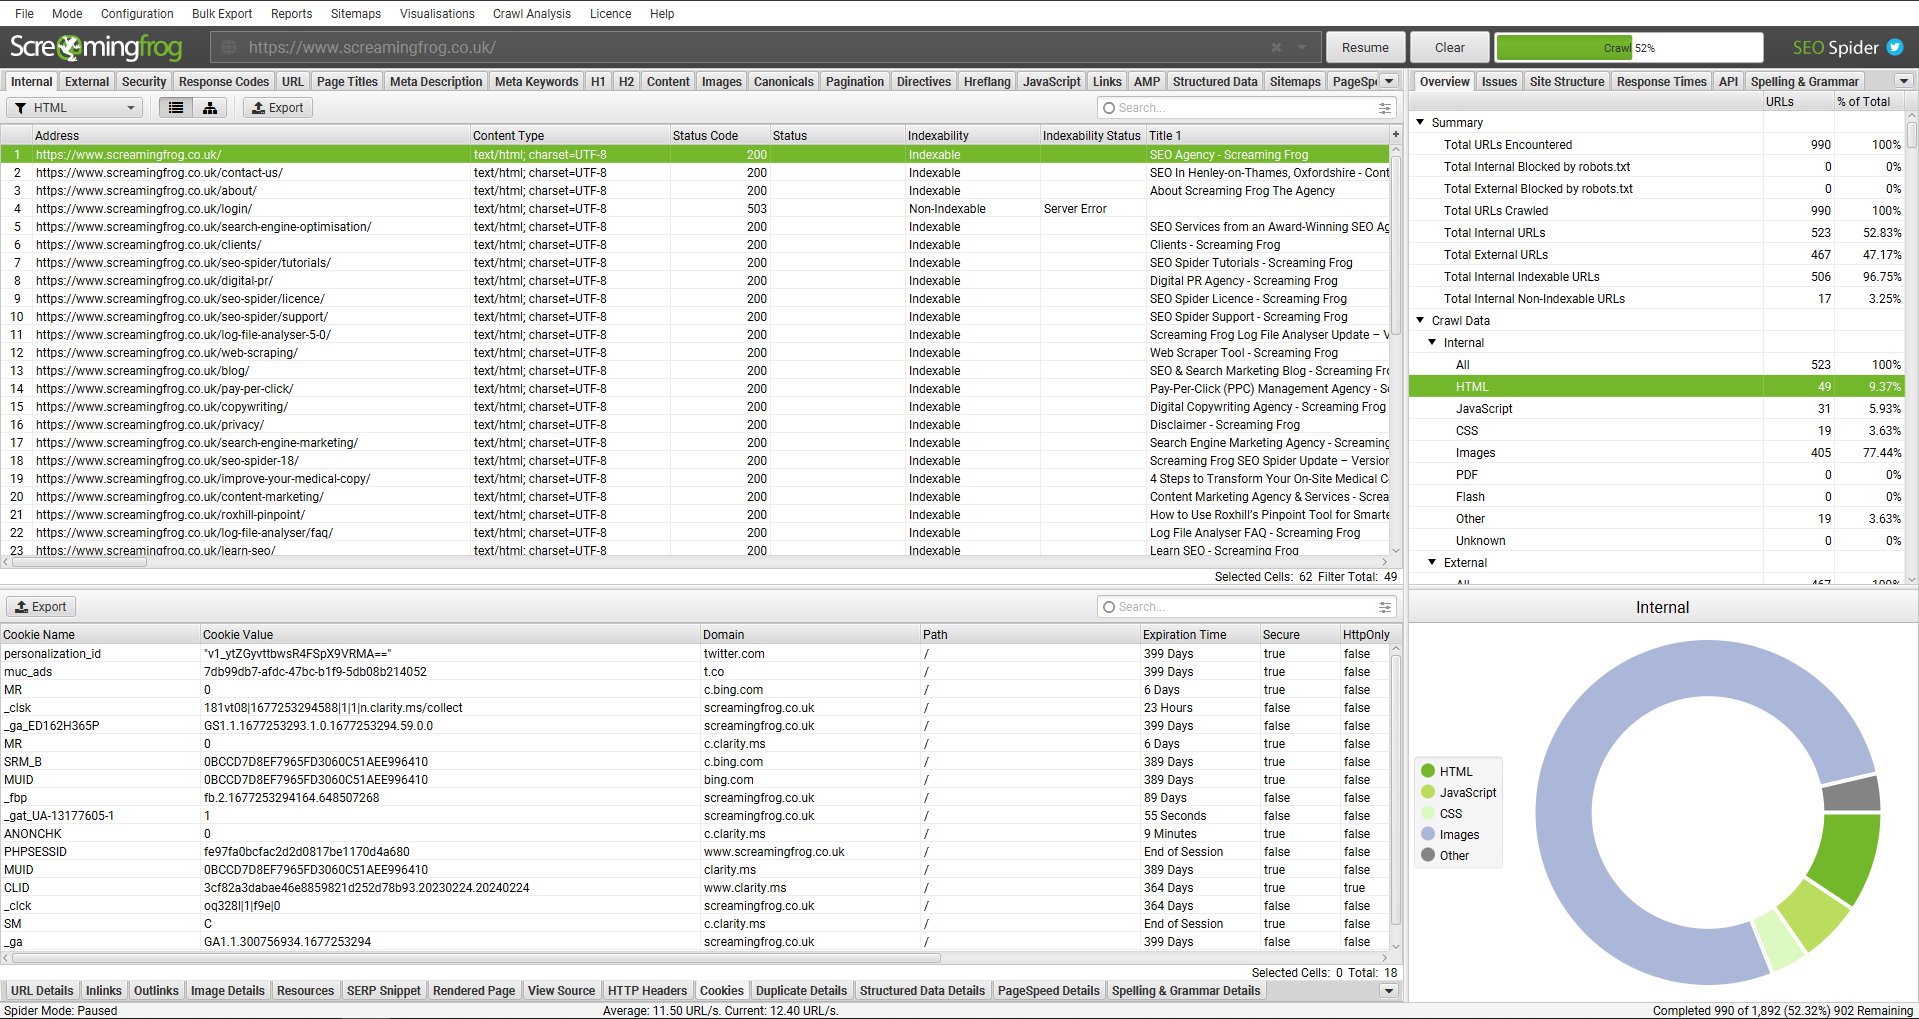
You can click on the above image to view a larger version. You’re able to see granular cookie data for every URL. You can also highlight multiple URLs at a time and view them together (the ‘address’ column on the right shows which URL each is on).

The columns listed in the Cookies tab include:
- Cookie Name – The name of the cookie.
- Cookie Value – The cookie value.
- Domain – The domain that issued the cookie. These can be either first or third party.
- Expiration Time – The cookie expiry time.
- Secure – Details of the cookie secure attribute. True means the ‘secure’ attribute is present.
- HttpOnly – Details of the cookie HttpOnly attribute. True means the ‘HttpOnly’ attribute is present.
- Address – The URL the cookie was set on.
8) View Aggregated Cookie Summary Report
Export an aggregated summary of cookies discovered by clicking ‘Reports > Cookies > Cookie Summary’.

This shows an aggregated view of unique cookies discovered during a crawl, considering their name, domain, expiry, secure and HttpOnly values. The number of URLs each unique cookie was issued on will also be displayed. The cookie value itself is discounted in this aggregation (as they are unique!).

9) Bulk Export All Cookie Details
Click ‘Bulk Export > Web > All Cookies’ to export every URL, cookie and all cookie attributes discovered.

This export allows you to query data how you see fit.
10) Identifying Cookies Subject to Third-party Phaseout
Chrome plan to restrict third-party cookies in 2024, subject to addressing any remaining competition concerns of the UK’s Competition and Markets Authority (CMA). Other browsers will likely follow, that haven’t already.
The goal of the privacy sandbox is to reduce cross-site tracking for privacy. Chrome will disable third-party cookies for 1% of users in January for testing, with a view to increasing this up to 100% of users from Q3 2024. To prepare for this change third-party cookies on your site that will be blocked in Chrome should be identified and tested for breakage.
To identify pages with thirds party cookies that will be subject to the phaseout, enable JavaScript rendering mode via ‘Config > Spider > Rendering’, and ‘JavaScript Error Reporting’.

Pages that may have problematic third-party cookies can be seen under the ‘JavaScript’ tab, and ‘Pages With Chrome Issues’ filter. The lower ‘Chrome Console Log’ tab will identify any issues with the description –
‘Cookie Issue. [WARN_THIRD_PARTY_PHASEOUT]’.

These can be exported in bulk via ‘Bulk Export > JavaScript > Pages With JavaScript Issues’.
11) Little Tip! Audit Cookies After Cookie Consent Acceptance
You can use ‘Forms Based’ authentication to accept a cookie pop-up and crawl the website to audit cookies as if you have consented.
To do this, go to ‘Config > Authentication > Forms Based’, then click on ‘Add’, insert the website URL and click ‘OK’.
When the website loads in the in-built Chrome browser, accept the cookie pop-up as normal.

Click ‘OK’, and ‘OK’ again. Then follow points 1-8 in the tutorial above.
You can then analyse cookies set as if you’ve consented, to see the differences across the website.
Summary
This tutorial will hopefully help you perform a comprehensive cookie audit to identify cookies that are automatically loaded by browsing a website – for cookie policies and compliance, such as ePrivacy and GDPR.
If you experience any issues crawling a website after following the guidance above, check out the following FAQs –
- Why won’t the SEO Spider crawl my website?
- Why is the SEO Spider not finding a particular page or set of pages?
- HTTP Status Codes – Why Won’t My Website Crawl?
Alternatively, please contact us via support and we can help.


