Crawling
si digital
Posted 27 November, 2015 by si digital in
Crawling
The Screaming Frog SEO Spider is free to download and use for crawling up to 500 URLs at a time. For £199 a year you can buy a licence, which removes the 500 URL crawl limit.
A licence also provides access to the configuration, saving & opening crawls, and advanced features such as – JavaScript rendering, custom search, custom extraction, Google Analytics integration, Google Search Console integration, PageSpeed Insights integration, scheduling and much more!
Please see the comparison of free vs paid features on our pricing page.
If you’re a new user of the software, we recommend reading our getting started guide to the SEO Spider.
Crawling A Website (Subdomain)
In regular crawl mode, the SEO Spider will crawl the subdomain you enter and treat all other subdomains it encounters as external links by default (these appear under the ‘external’ tab).
For example, by entering https://www.screamingfrog.co.uk in the ‘Enter URL to spider’ box at the top and clicking ‘Start’, the Screaming Frog www. subdomain will be crawled.

The top filter can be adjusted from ‘Subdomain’ to crawl ‘All Subdomains’.

This means it would conceivably crawl other subdomains, such as us.screamingfrog.co.uk, or support.screamingfrog.co.uk if they existed and were internally linked. If you start a crawl from the root (e.g. https://screamingfrog.co.uk), the SEO Spider will by default crawl all subdomains as well.
One of the most common uses of the SEO Spider is to find errors on a website, such as broken links, redirects and server errors. Please read our guide on how to find broken links, which explains how to view the source of errors such as 404s, and export the source data in bulk to a spreadsheet.
For better control of your crawl, use the URL structure of your website by crawling a subfolder, the SEO Spiders configuration options such as crawling only HTML (images, CSS, JS etc), the exclude function, the custom robots.txt, the include function or alternatively change the mode of the SEO Spider and upload a list of URLs to crawl.
Crawling A Subfolder
To crawl a subfolder, enter the subfolder you wish to crawl and select ‘Subfolder’ from the top switcher.

By entering this directly into the SEO Spider, it will crawl all URLs contained within the /blog/ subfolder only.
If there isn’t a trailing slash on the end of the subfolder, for example ‘/blog’ instead of ‘/blog/’, the SEO Spider won’t recognise it as a subfolder and crawl within it. If the trailing slash version of a subfolder redirects to a non-trailing slash version, then the same applies.
To crawl this subfolder, you’ll need to use the include feature and input the regex of that subfolder (.*blog.* in this example).
If you have a more complicated set-up like subdomains and subfolders you can specify both. For example – http://de.example.com/uk/ to Spider the .de subdomain and UK subfolder etc.
Check out our video guide on crawling subdomains and subfolders.
Crawling A List Of URLs
As well as crawling a website by entering a URL and clicking ‘Start’, you can switch to list mode and either paste or upload a list of specific URLs to crawl.

This can be particularly useful for site migrations when auditing URLs and redirects for example. We recommend reading our guide on ‘How To Audit Redirects In A Site Migration‘ for the best approach.
If you wish to export data in list mode in the same order it was uploaded, then use the ‘Export’ button which appears next to the ‘upload’ and ‘start’ buttons at the top of the user interface.

The data in the export will be in the same order and include all of the exact URLs in the original upload, including duplicates or any fix-ups performed.
Check out our ‘How To Use List Mode‘ guide and video on more advanced crawling in list mode.
Crawling Larger Websites
The number of URLs the SEO Spider can crawl is down to the storage mode being used, as well as the memory available and memory allocation in the SEO Spider.
If you wish to perform a particularly large crawl, we recommend using database storage mode and increasing the memory allocation in the SEO Spider.
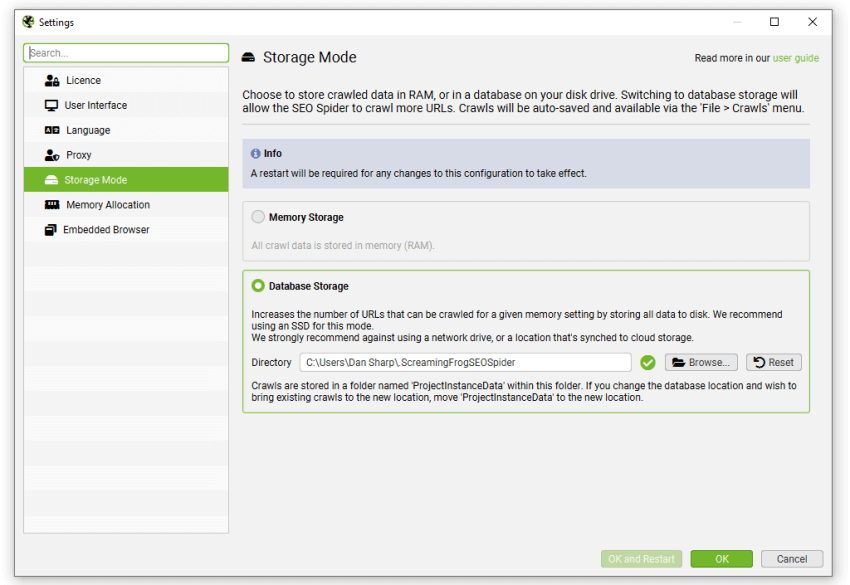
Using database storage will mean crawl data is saved to disk, rather than kept just in RAM. This allows the SEO Spider to crawl more URLs, crawls are automatically stored and can be opened quicker under the ‘File > Crawls’ menu.
This can be configured under ‘File > Settings > Storage Mode’ and choosing ‘Database Storage’.

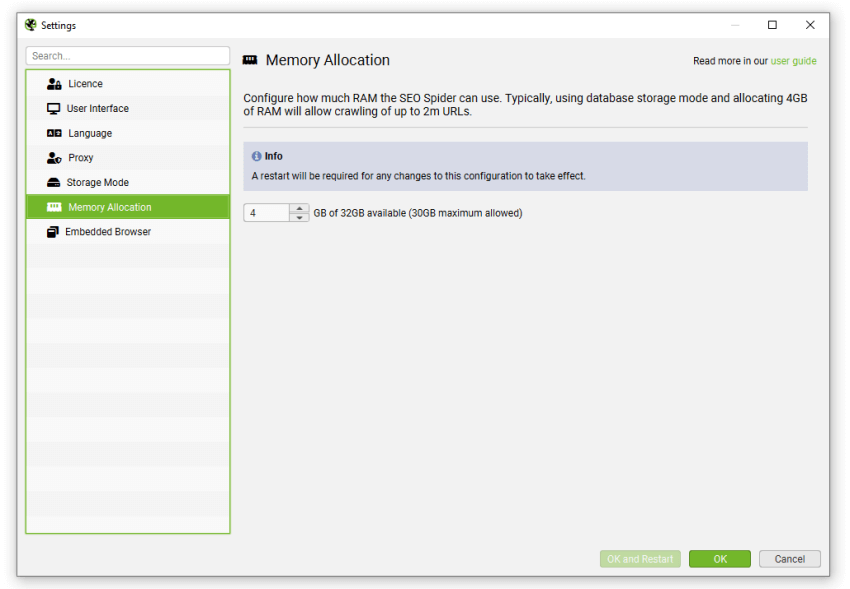
While the SEO Spider will save all data to disk, you can still increase RAM memory allocation to enable the SEO Spider to crawl more URLs. We recommend setting this to 4gb for any crawls up to 2 million URLs. This can be configured under ‘File > Settings > Memory Allocation’.

If you receive a ‘you are running out of memory for this crawl’ warning, then you can save the crawl and switch to database storage mode or increase the RAM allocation in memory storage mode, then open and resume the crawl.
For very large crawls read our guide on how to crawl large websites, which provides details on the best set-up and configuration to make it as managable and efficient as possible.
Available options include –
- Crawling by subdomain, or subfolder as discussed above.
- Narrowing the crawl by using the include function, or excluding areas you don’t need to crawl, by using the exclude or custom robots.txt features.
- Considering limiting the crawl by total URLs crawled, depth and number of query string parameters.
- Consider only crawling internal HTML, by unticking images, CSS, JavaScript, SWF and external links in the SEO Spider’s configuration.
These should all help save memory and focus the crawl on the important areas you require.


