How To Automate Screaming Frog With Google Data Studio
Evgeniy Orlov
Posted 26 January, 2021 by Evgeniy Orlov in Screaming Frog SEO Spider
How To Automate Screaming Frog With Google Data Studio
Update: With the release of version 16 of the SEO Spider, you can now schedule a bespoke export designed for Data Studio integration directly within the tool. View our updated guide on How To Automate Crawl Reports In Data Studio.
Looking to integrate your crawl results with Google Data Studio? Here’s a quick guide on how to build fully automated time-series reports with Data Studio, based on scheduled Screaming Frog crawls.
This lets you gather data natively from a crawl, by an API connector, or even scraped by custom extraction – all of which can be reported and compared over time within Data Studio automatically.
1. Crawl Preparation
In order to use crawl data within a time-series in Data Studio, we need a Google Sheet export with a date/time dimension added when the crawl was run. To have it fully automated we also need this data to be appended (not overwritten) to a master Google Sheet.
Screaming Frog are planning to add this in the future, but until that time, follow this guide.
1.1 Crawl Setup
The primary data source is an export of a scheduled SF crawl. In my example, I took some URLs from our firm’s blog, created a file list.txt and saved URLs into it. (You can gather these from an existing Spider mode crawl).
Then I opened the SEO Spider and built a new configuration file with all crawling options deactivated except for the following:
- Time to First Byte (Configuration > API Access > PageSpeed Insights) – this is my example’s metric, but this works with any data collected.
- Extraction of HTTP headers (Configuration > Spider > Extraction) – this is required to gather a timestamp that Data Studio can use

Do not forget to save the configuration as a new configuration file (File > Configuration > Save As).
This will leave us with the following files:
- A list of URLs.
- An SEO Spider Configuration file.
1.2 Scheduling Setup
Once we have the following we need to set up the scheduled crawl (File > Scheduling > Add).
1.2.1 “General” Tab
Fill the folder name. This is important for having a unique crawl export location later.
You can set a date and time for the crawl to run, alongside how often this repeats. For example, you may want it to run every week.
1.2.2 “Start Options” Tab
Enter your site URL or Choose the crawl mode “List”, then select the file with URLs to crawl and the configuration file.
Do not forget the configuration file! Otherwise, the crawl uses a default configuration meaning we won’t have the necessary data.
Tick any additional APIs you need (PageSpeed Insights is required in our example):

1.2.3 Tab “Export”
Within the export tab, we can select what data is automatically exported when the scheduled crawl completes.
- Check the option “Headless”.
- Check an option to overwrite output files.
- Select gsheet as the output file format.
- Connect to your Google account.
Next, we need to select what data we’re like to report on, alongside the date from the HTTP response.
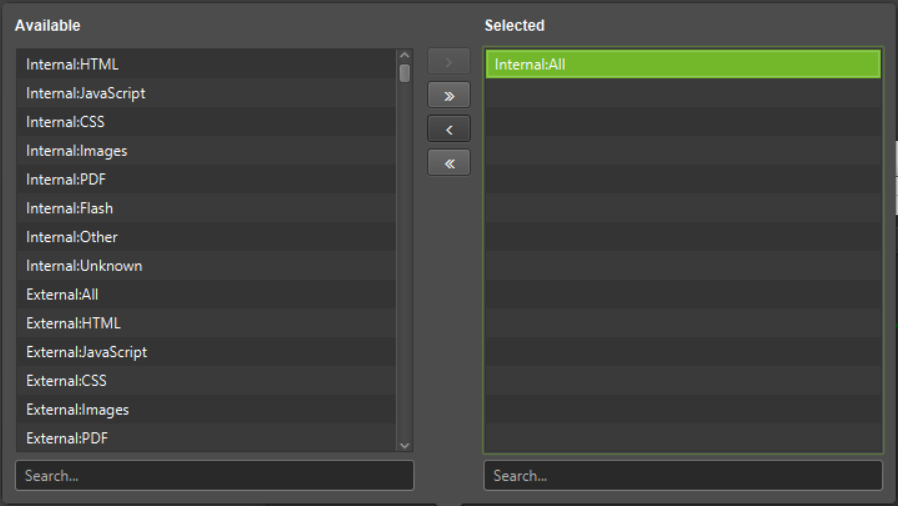
The simplest way to get the data is to remember: the SF tab internal_all contains all data SF crawled. So we click on Export Tabs, select in the left pane internal_all and move it with the arrow to the right pane:
Alternatively, you can export individual reports and the ALL HTTP Headers data, then merge them separately after they’ve been exported – but the latter is much simpler.

Under Export Tabs > drag Internal:All into the right-hand side:
Once the above is done click OK.
2.0 Dancing Around Google Sheets
Where can you find your exported files?
- After the first scheduled crawl, the SEO Spider creates a folder named “Screaming Frog SEO Spider” in your Google Drive.
- There it creates a subfolder with the project name applied in step 1.2.1.
- After the first crawl one file named internal_all appears in this subfolder.
- It contains all data we setup in the step 1.1
If you did everything as described, your internal_all file contains 67 columns, most of them are empty, and information you need to plot data are placed in:
- Column A: URL
- Column BD: Response Header: Date,
- Column BN: Time To First Byte.
The last column BO contains URLs too, so we will use it.
Note if you’re exporting other data, then the column locations will be different and you’ll need to adjust as necessary.
2.1 How To Overcome File Overwriting
Now we have a master sheet with all our crawl data, we need to ensure it’s archived every time a crawl is run. Remember, we set the option “overwrite files in output”. This means, after each scheduled crawl we lose previous data as new data overwrites the old, and our master sheet will be updated – not ideal for this scenario.
Thankfully Ana Kravitz, created a Google Sheets add-on exactly for such cases. The add-on moves data from a selected range of one tab into another range of a further tab. It writes data into rows and into the next empty cell.
This means that every time our scheduled crawl runs, the master sheet will import the data from all exports, and then this addon will append this data into an archive tab containing all the historic crawl information.
After the installation open the export files and setup the archiving. On the screenshot below you see my add-on settings from the “internal_all” file:
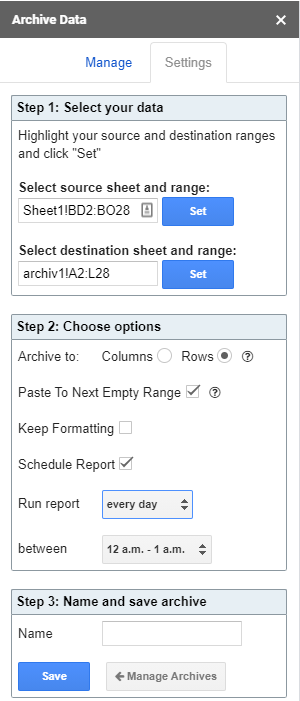
- As a source, we select our Internal:all tab with a range of Sheet!BD2:BO28
- As a destination, we select the tab “Archive”, with a range of archive1!A2:L28
- As options, we select “archive to rows” and “paste to next empty range”.
This makes sure that all data is stored in archived tabs after each scheduled crawl. My best practice is to schedule the archiving one hour after the crawl.
Important: If you archive data with the heading row, it will be repeated with every archiving. That’s why you archive only data, without the heading rows. So, don’t forget to fill column headings into the row 1 of the archive tab.
2.2 Merging Data – optional
This step is optional and only needed if reporting on data not contained within the Internal:All tab.
If for some reason you’d like to report on data that is not included in the Internal:All tab, you’ll need to make a master sheet combining that export with the date from the HTTP Headers export and then archive that master sheet.
This can be done using a formula =IMPORTRANGE() to grab all you’re URLs from another sheet.
=IMPORTRANGE(“Gsheet-id”, “Archive!A2:A”) Where Gsheet-id is replaced with the URL of the exported Gsheet. and A2:A is the column containing all your URLs
Next use =VLookup to match and import any given data point (such as the HTTP header date) against the URLs:
=IFERROR(VLOOKUP(A2,IMPORTRANGE(“ID-of-export-HTTP-headers”,”Sheet1!A2:N1000″),14,FALSE),””) where 14 is the column in the table containing date HTTP header information.
=IFERROR(VLOOKUP(A2,IMPORTRANGE(“ID-of-export-metrics”,”Sheet1!A2:N1000″),4,FALSE),””) where 4 is the column in the table containing our data.
Note, for other metrics you will need to change the Vlookup formula to match the column the data sits in – this is the number before the FALSE statement
Lastly, as you won’t know how many URLs the Spider will discover in each new crawl (from site changes etc..) you need to manually copy any Vlookup formulas downwards until you are sure there are enough rows for all crawled URLs. e.g. if you copy it down to the 10,000 rows that will cover most sites under 10,000 URLs. The =IFERROR will workout the blank cells so they aren’t filled with #N/A
Note: in column A you don’t need to pull the formula manually downwards – IMPORTRANGE will do it for you.
3.0 Data Studio
Now you have an archived spreadsheet automatically updating to add new timestamped data each time a crawl completes. You can use this archived sheet as a data source to your Data Studio reports.
For example, as a simple tracker of TtFB over time: https://datastudio.google.com/reporting/797e830f-6993-4c42-9783-a16dbf171fbe
Summary
Hopefully, this has helped you build a fully automated time-series report with Data Studio based on scheduled Screaming Frog crawls. If you have any questions, you can find me at work at mediaworx berlin AG, or on Twitter @undead_seo.


Thanks guys, this is a really useful trick and will save me a lot of copy and pasting time! :)
That just made my day. You guys are doing a fantastic job at making a tool that can’t be replaced. Well done.
Great job! This is going to be so helpful to me.
So many thanks
Data Studio connection with scheduled crawls is a smart idea. Thank you for this improvement.
Great stuff Guys! Forecasting in SEO is a really hard thing so it will help me a lot :)
Thank you for this — very helpful! We’re big fans of Screaming Frog at Hennessey Digital.
So helpful! Screaming Frog tutorials are ALWAYS really detailed in the instructions making then really easy to follow and set up. Thanks so much!
Hi! Question. In the “internal_all” Google Sheets doc, before we set up the Archive Data add-on, do we need to add a worksheet tab named “Archive” or will the Archive add-on create one?
These steps:
“As a source, we select our Internal:all tab with a range of Sheet!BD2:BO28”
“As a destination, we select the tab “Archive”, with a range of archive1!A2:L28”
Hey Ellen,
Yes, you’ll need to manually add an Archive tab (you can call it anything). Then ensure that tab is referenced in the destination field for the Archive data add-on, with the appropriate ranges.
Thanks,
Rich
Amazing!! This is going to change my reporting at all. And now I can track my website in a different way with the help of Data Studio. Thanks
Fantastic guide! Thank you!
I really need this information about google data studio and finally I got it. Thank you so much sir.
Hello! Let me add a trick: if you use another browser for work and you want to link Screaming Frog with Google Drive on that work browser (which is not your main browser of your computer), the program willautomatically opens your main browser… So, there is the option to do it manually through a link, so that you can link your work browser.
This is awesome! Never really done many scheduled crawls with SF before… so apologies for the supid question? I’ve ticked headless mode…does this mean I only need my computer on for the crawl to work?
Hi Dave,
Hahah! Good to hear, and not at all.
Yeah, exactly that. You just need your machine on, you don’t need to have the SEO Spider open. It will launch and crawl itself, as per your scheduled config.
Cheers.
Dan
Hello,
I have a question, as the process needs to be done while the machine is ON, what happens when the machine if OFF on the scheduled time ? SF will run once the computer is ON to collect data from the missed timed process ?
Hi Herman,
It won’t run if the machine is off and won’t auto run the missed crawl when you turn it back on.
I’d suggest considering auto starting / switching off your machine (built in on Windows etc) for when you want the crawl to run.
Cheers.
Dan
Thank you, Evgeniy for sharing this article on google data studio in screaming frog and its well-presented article with the help of screenshots and images which help your reader to understand easily. Great Work, Keep posting, and good luck with your next upcoming post.
Google data studio is a free tool that turns your data into informative, easy to read, easy to share, and fully customizable dashboards and reports. It’s an remarkable piece of writing in favour of all the internet users; they will get advantage from this I am certain.
Thanks a lot, very useful article! In the nearest future, we will subscribe and test the service properly! Recommending!
Thank you very much! I didn’t really know about this functionality. I will be putting it into practice to optimise my clients’ reports from now on!
As a big fan of screaming frog i found this article extremely useful for my day to day work as a SEO and web designer. Thank you guys for this amazing tool and keep on publish great content :)
Stav.
Good job guys! This article can save us a lot of time.
We’ve been using screaming frog along with another tool for a very long time now. However I suspect there’s a lot more we can do with it, so this will really help
It would be extremely helpful if there was a video walk-through embedded in this article.
I want to automate screaming frog data with the Data Studio report but can you make the video it’ll easy for me, For example, the google sheet formula & other steps. Also, I want to see the data studio report format but I can’t access the report, Screenshot URL: https://prnt.sc/13cjalv, Should I click on the request access button or no.
Let me know your suggestions.
WOW nice one, thanks alot
Dear Evgeniy, i got 8 sheets out of the crawl , 5 x custom extraction 2x http header 1x internal all. Is that normal or did i do something wrong ?
Thank you :-)
This is just what I was looking for, a perfect option to save time on repetitive tasks. Thanks a lot!!
Awesome! Screaming Frog and Google Data studio are very useful SEO tools. This is going to be so helpful to me, thank you so much!
Hello and thank you all for the beautiful tutorial, very simple and clear
t I noticed that the template in the studio is not reachable How can I do to see it and to copy it
Thanks
This post about google data studio helped me a lot. I really need this information about google data studio and finally got it. Thank you very much sir.
Hi Evginy,
This is great! Got to try it and see how it work on my end.
Thank you!
This post about google data studio helped me a lot. I really need this information about google data studio and finally got it. Thank you very much sir.
So for me, I connected my Google Drive account in export settings for the automated crawl. The crawl does run automatically, and saves it locally, but it doesn’t look like it saves it in my Google Drive account or create a folder in Google Drive for the crawl… any tips on what I might be doing wrong?
Hi Andrew,
We have a much better way of doing this now (mentioned at the top), and a tutorial here –
https://www.screamingfrog.co.uk/how-to-automate-crawl-reports-in-data-studio/
If you have any issues, you can drop them through to us ([email protected]).
Cheers.
Dan
Dan