SEO Spider
How To Crawl Large Websites
How To Crawl Large Websites Using The SEO Spider
Crawling websites and collecting data is a memory intensive process, and the more you crawl, the more memory is required to store and process the data. The Screaming Frog SEO Spider uses a configurable hybrid engine, that requires some adjustments to allow for large scale crawling.
By default the SEO Spider uses RAM, rather than your hard disk to store and process data. This provides amazing benefits such as speed and flexibility, but it does also have disadvantages, most notably, crawling at scale.
The SEO Spider can also be configured to save crawl data to disk, by selecting ‘Database Storage’ mode (under ‘File > Settings > Storage Mode’), which enables it to crawl at truly unprecedented scale, while retaining the same, familiar real-time reporting and usability.

TL;DR Version
If you’d rather not read the full guide below, below are the two main requirements to crawl very large websites.
1) Use a machine with an internal SSD, and switch to database storage mode (‘File > Settings > Storage Mode’).
2) Allocate RAM (‘File > Settings > Memory Allocation’). For crawls up to approx. 2 million URLs, allocate 4gb of RAM only. 8gb allocated will allow approx. 5 million URLs to be crawled.
Avoid over-allocating RAM, there is no need, it will simply slow down your machine performance.
The guide below provides a more comprehensive overview of the differences between memory and database storage, the ideal set-up for crawling large websites and how to crawl intelligently to avoid wasting both time and resource unnecessarily.
What Are The Differences Between Memory & Database Storage?
Fundamentally both storage modes can still provide virtually the same crawling experience, allowing for real-time reporting, filtering and adjusting of the crawl. However, there are some key differences, and the ideal storage, will depend on the crawl scenario, and machine specifications.
Memory Storage
Memory storage mode allows for super fast and flexible crawling for virtually all set-ups. However, as machines have less RAM than hard disk space, it means the SEO Spider is generally better suited for crawling websites under 500k URLs in memory storage mode.
Users are able to crawl more than this with the right set-up, and depending on how memory intensive the website is that’s being crawled. As a very rough guide, a 64-bit machine with 8gb of RAM will generally allow you to crawl a couple of hundred thousand URLs.
As well as being a better option for smaller websites, memory storage mode is also recommended for machines without an SSD, or where there isn’t much disk space.
Database Storage
We recommend this as the default storage for users with an SSD, and for crawling at scale. Database storage mode allows for more URLs to be crawled for a given memory setting, with close to RAM storage crawling speed for set-ups with a solid state drive (SSD).
The default crawl limit is 5 million URLs, but it isn’t a hard limit – the SEO Spider is capable of crawling more (with the right set-up). As an example, a machine with a 500gb SSD and 16gb of RAM, should allow you to crawl up to 10 million URLs approximately.
In database storage mode, crawls are also automatically stored, so there is no need to ‘save’ them manually. The other main benefit is that re-opening the stored crawl is much quicker in database storage mode than loading in a .seospider file in memory storage mode.
The database crawl can be accessed and opened via the ‘File > Crawls’ top-level menu.

The ‘Crawls’ menu displays an overview of stored crawls, allows you to open them, rename, organise into project folders, duplicate, export, or delete in bulk.

An additional benefit is that as the crawl is automatically stored, if you do have a problem, such as a Windows update, power-cut, or crash, the crawl should still be retrievable from the ‘crawls’ menu to be resumed.
While not recommended, if you have a fast hard disk drive (HDD), rather than a sold state disk (SSD), then this mode can still allow you to crawl more URLs. However, writing and reading speed of a hard drive does become the bottleneck in crawling – so both crawl speed, and the interface itself will be significantly slower.
If you’re working on the machine while crawling, it can also impact machine performance, so the crawl speed might require to be reduced to cope with the load. SSDs are so fast, they generally don’t have this problem and this is why ‘database storage’ can be used as the default for both small and large crawls.
Do You Really Need To Crawl The Whole Site?
This is the question we always recommend asking. Do you need to crawl every URL, to get the data you need?
Advanced SEOs know that often it’s just not required. Generally websites are templated, and a sample crawl of page types from across various sections, will be enough to make informed decisions across the wider site.
So, why crawl 5m URLs, when 50k is enough? With a few simply adjustments, you can avoid wasting resource and time on these (more on adjusting the crawl shortly).
It’s worth remembering that crawling large sites takes up resource, but also a lot of time (and cost for some solutions). A 1 million page website at an average crawl rate of 5 URLs per second will take over two days to crawl. You could crawl faster, but most websites and servers don’t want to be crawled faster than that kind of speed.
When considering scale, it’s not just unique pages or data collected that needs to be considered, but actually the internal linking of the website. The SEO Spider records every single inlink or outlink (and resource), which means a 100k page website which has 100 site wide links on every page, actually means recording more like 10 million links.
However, with the above said, there are times where a complete crawl is essential. You may need to crawl a large website in it’s entirety, or perhaps the website is on an enterprise level with 50m pages, and you need to crawl more to even get an accurate sample. In these scenarios, we recommend the following approach to crawling larger websites.
1) Switch To Database Storage
We recommend using an SSD and switching to database storage mode. If you don’t have an SSD, we highly recommend investing. It’s the single biggest upgrade you can make to a machine, for a comparatively low investment, and allow you to crawl at huge scale, without compromising performance.
Users can select to save to disk by choosing ‘database storage mode’, within the interface (via ‘File > Settings > Storage Mode’).

If you don’t have an SSD (buy one now!), then you can ignore this step, and simply follow the rest of the recommendations in this guide. It’s worth noting, you can use an external SSD with USB 3.0 if your system supports UASP mode.
2) Increase Memory Allocation
The SEO Spider as standard allocates just 1gb of RAM for 32-bit machines and 2gb of RAM for 64-bit. In memory storage mode, this should allow you to crawl between 10-150k URLs of a website. In database storage mode, this should allow you to crawl between 1-2 million URLs approximately.
The amount of RAM allocated will impact how many URLs you can crawl in both memory and database storage modes, but far more significantly in memory storage mode.
For RAM storage mode, we usually recommend a minimum of 8gb of RAM to crawl larger websites, with a couple of hundred of thousand of pages. But the more RAM you have, the better!
For database storage, 4gb of RAM will allow you to crawl 2-3 million URLs, 8gb of RAM will allow crawling up to 5 million URLs and 16gb for 10 million. These are all approximations, as it depends on the site.
We generally recommend allocating 4gb initially as the SEO Spider will use up to the amount you allocate in memory, before saving to disk. So, if you wish to save to disk earlier and keep RAM available for other applications and the system, don’t over-allocate.
You can adjust memory allocation within the SEO Spider by clicking ‘File > Settings > Memory Allocation’.

We always recommend allocating at least 2gb less than your total RAM available. If you allocate your total RAM, you may well experience a crash, as your OS and other applications will require RAM to operate as well.
The SEO Spider will only use the memory when required and this just means you have the maximum available to you if and when you need it.
If you haven’t adjusted memory and reach the limit of memory allocation, you will receive the following warning.

This is warning you that the SEO Spider has reached the current memory allocation and it needs to be increased to crawl more URLs, or it will become unstable.
To increase memory, first of all you should save the crawl via the ‘File > Save’ menu. You can then adjust memory allocation, and then open the saved crawl, and resume the crawl again.
The more memory you are able to allocate, the more you’ll be able to crawl. So if you don’t have a machine with much RAM available, we recommend using a more powerful machine, or upgrading the amount of RAM.
3) Adjust What To Crawl In The Configuration
The more data that’s collected and the more that’s crawled, the more memory intensive it will be. So you can consider options for reducing memory consumption for a ‘lighter’ crawl.
Deselecting the following resource links options under ‘Configuration > Spider > Crawl’ will help save memory –
Please note, if you’re crawling in JavaScript rendering mode, you’ll likely need most of these options enabled, otherwise it will impact the render. Please see our ‘How To Crawl JavaScript Websites‘ guide.
Deselecting any of the following page links under ‘Configuration > Spider > Crawl’ will also help save memory –
- Crawl & Store External Links.
- Crawl & Store Canonicals.
- Crawl & Store Pagination.
- Crawl & Store Hreflang.
- Crawl & Store AMP.
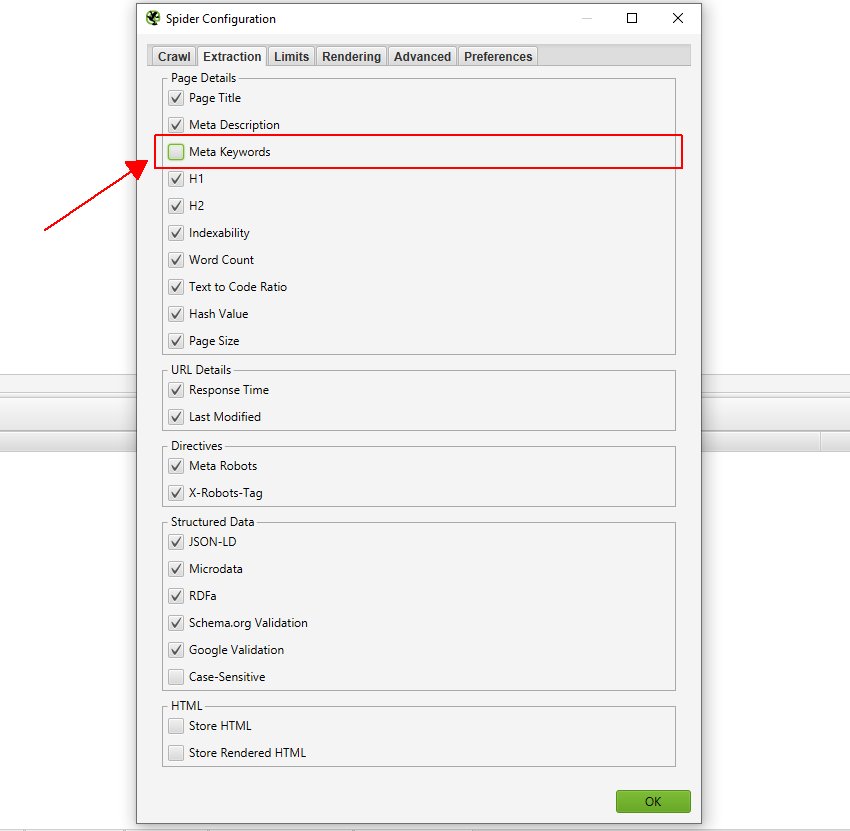
You can deselect non-essential attributes from being stored under ‘Configuration > Spider > Extraction’ to help save memory, such as meta keywords. Or just items you’re not auditing, such as structured data.
We also recommend disabling the custom link positions feature via ‘Config > Custom > Link Positions’. This uses up more memory, by storing the XPath of every link found in a crawl to classify its position (navigation, sidebar, footer etc).

There are also other options that will use memory if utilised, so consider against using the following features –
- Custom Search.
- Custom Extraction.
- Google Analytics Integration.
- Google Search Console Integration.
- PageSpeed Insights Integration.
- Spelling & Grammar.
- Near Duplicates.
- Link Metrics Integration (Majestic, Ahrefs and Moz).
This means less data, less crawling and lower memory consumption.
4) Exclude Unnecessary URLs
Use the exclude feature to avoid crawling unnecessary URLs. These might include entire sections, faceted navigation filters, particular URL parameters, or infinite URLs with repeating directories etc.
The exclude feature allows you to exclude URLs from a crawl completely, by supplying a list of a list regular expressions (regex). A URL that matches an exclude is not crawled at all (it’s not just ‘hidden’ in the interface). It’s also worth bearing in mind, that it will mean other URLs that do not match the exclude, but can only be reached from an excluded page will also not be crawled. So use the exclude with care.
We recommend performing a crawl and ordering the URLs in the ‘Internal’ tab alphabetically, and analysing them for patterns and areas for potential exclusion in real time. Generally by scrolling through the list in real time, and analysing the URLs, you can put together a list of URLs for exclusion.
For example, ecommerce sites often have faceted navigations which allow users to filter and sort, which can result in lots of URLs. Sometimes they are crawlable in a different order, resulting in many or an endless number of URLs.
Let’s take a real life scenario, like John Lewis. If you crawl the site with standard settings, due to their numerous facets, you can easily crawl filtered pages, such as below.

Selecting these facets generates URLs such as –
https://www.johnlewis.com/browse/men/mens-trousers/adidas/allsaints/gant-rugger/hymn/kin-by-john-lewis/selected-femme/homme/size=36r/_/N-ebiZ1z13yvxZ1z0g0g6Z1z04nruZ1z0s0laZ1z13u9cZ1z01kl3Z1z0swk1
This URL has multiple brands, a trouser size and delivery option selected. There are also facets for colour, trouser fit and more! The different number of combinations that could be selected are virtually endless, and these should be considered for exclusion.
By ordering URLs in the ‘Internal’ tab alphabetically, it’s easy to spot URL patterns like these for potential exclusion. We can also see that URLs from the facets on John Lewis are set to ‘noindex’ anyway. Hence, we can simply exclude them from being crawled.

Once you have a sample of URLs, and have identified the issue, it’s generally not unnecessary to then crawl every facet and combination. They may also already be canonicalised, disallowed or noindex, so you know they have already been ‘fixed’, and they can simply be excluded.
5) Crawl In Sections (Subdomain or Subfolders)
If the website is very large, you can consider crawling it in sections. By default, the SEO Spider will crawl just the subdomain entered, and all other subdomains encountered will be treated as external (and appear under the ‘external’ tab). You can choose to crawl all subdomains, but obviously this will take up more memory.
The SEO Spider can also be configured to crawl a subfolder by simply entering the subfolder URI with file path and ensure ‘check links outside of start folder’ and ‘crawl outside of start folder’ are deselected under ‘Configuration > Spider’. For example, to crawl our blog, you’d then simply enter https://www.screamingfrog.co.uk/blog/ and hit start.

Please note, that if there isn’t a trailing slash on the end of the subfolder, for example ‘/blog’ instead of ‘/blog/’, the SEO Spider won’t currently recognise it as a sub folder and crawl within it. If the trailing slash version of a sub folder redirects to a non trailing slash version, then the same applies.
To crawl this sub folder, you’ll need to use the include feature and input the regex of that sub folder (.*blog.* in this example).
6) Narrow The Crawl, By Using The Include
You can use the include feature to control which URL path the SEO Spider will crawl via regex. It narrows the default search by only crawling the URLs that match the regex, which is particularly useful for larger sites, or sites with less intuitive URL structures.
Matching is performed on the URL encoded version of the URL. The page that you start the crawl from must have an outbound link which matches the regex for this feature to work. Obviously if there is not a URL which matches the regex from the start page, the SEO Spider will not crawl anything!
As an example, if you wanted to crawl pages from https://www.screamingfrog.co.uk which have ‘search’ in the URL string you would simply include the regex:.*search.* in the ‘include’ feature.

This would find the /search-engine-marketing/ and /search-engine-optimisation/ pages as they both have ‘search’ in them.

7) Limit the Crawl For Better Sampling
There’s various limits available, which help control the crawl of the SEO Spider and allow you to get a sample of pages from across the site, without crawling everything. These include –
- Limit Crawl Total – Limit the total number of pages crawled overall. Browse the site, to get a rough estimate of how many might be required to crawl a broad selection of templates and page types.
- Limit Crawl Depth – Limit the depth of the crawl to key pages, allowing enough depth to get a sample of all templates.
- Limit Max URI Length To Crawl – Avoid crawling incorrect relative linking or very deep URLs, by limiting by length of the URL string.
- Limit Max Folder Depth – Limit the crawl by folder depth, which can be more useful for sites with intuitive structures.
- Limit Number of Query Strings – Limit crawling lots of facets and parameters by number of query strings. By setting the query string limit to ‘1’, you allow the SEO Spider to crawl a URL with a single parameter (?=colour for example), but not anymore. This can be helpful when various parameters can be appended to URLs in different combinations!
- Limit by URL Path – As well as limits to the overall crawl the other settings in this section are applicable for, it is possible to limit the total number of URLs that match a specific regular expression. For example, using ‘/products/’ in the ‘Configuration > Spider > Limits > Limit by URL Path’, limits the total number of URLs containing ‘/products/’ the Spider will crawl. By default this is set to 1,000 but can be adjusted. It is possible to set multiple rules in this section with different limits.

8) Use An External SSD With USB 3.0(+)
If you don’t have an internal SSD and you’d like to crawl large websites using database storage mode, then an external SSD can help.
It’s important to ensure your machine has USB 3.0 port and your system supports UASP mode. Most new systems do automatically, if you already have USB 3.0 hardware. When you connect the external SSD, ensure you connect to the USB 3.0 port, otherwise reading and writing will be very slow.
USB 3.0 ports generally have a blue inside (as recommended in their specification), but not always; and you will typically need to connect a blue ended USB cable to the blue USB 3.0 port. After that, you need to switch to database storage mode, and then select the database location on the external SSD (the ‘D’ drive in the example below).

Simple!
9) Run The SEO Spider In The Cloud With an SSD & Lots of RAM
If you need to crawl more, but don’t have a powerful machine with an SSD, then consider running the SEO Spider in the cloud. Just ensure it has an SSD and plenty of RAM.
Check out our tutorial How to Run the Screaming Frog SEO Spider in the Cloud for step-by-step instructions.

There’s also some excellent guides written by users –
- How To Run Screaming Frog On Google Cloud – By Fili Weise
- How to Crawl Enterprise Sites in the Cloud with Screaming Frog – By Jordan Lowry
- How To Run Screaming Frog On AWS – By Mike King
- Postavte si SEO stroj v Amazon Cloudu (AWS) – A Czech language guide, by Zdeněk Dvořák
10) Save Regularly In Memory Storage
If you’re pushing the SEO Spider to your memory limits in memory storage mode, we recommend saving crawl projects regularly. If there is a problem, this means you won’t lose all the crawl.
You can save the crawl, by clicking ‘Stop’, then ‘File > Save’. Once the crawl has finished saving, simply hit ‘resume’ to continue the crawl again afterwards!
If you’re using database storage mode, as recommended, then you don’t need to worry. Crawls are automatically stored and if you experience a problem, then the crawl should still be available to be resumed under ‘File > Crawls’.
11) Managing Large Exports
The SEO Spider is capable of crawling millions of URIs, and while this is great for those working on large scale websites, it can cause issues when you want to export and dive into the data.
Microsoft Excel has a limit of 1,048,576 rows by 16,384 columns, and if a file (a .csv for example) exceeds this, it will only open up to that number of rows.
Google Sheets has a cell limit of 10,000,000, and while that sounds like a lot, SEO Spider reports often have lots of columns. For example, our default Internal tab export consists of 65 columns, meaning the 10,000,000 cell limit would be hit after 153,845 rows of data.
As such, it’s sometimes necessary to carry out additional steps to make the data more manageable.
Splitting CSVs
The first method is the simplest and involves splitting a large CSV into more manageable chunks. For example, if your .csv file is 12,000,000 rows, you could simply split this into two files of 6,000,00 rows.
There are many free methods, and a quick Google will return several sites that allow you to upload a .csv and split it in various ways. However, if you’re going to need to regularly split .csv’s, it may make sense to put together something that runs locally on your machine.
The below python script is very basic and uses the pandas library:
import pandas as pd

import math

import warnings


# Specifically ignore the DtypeWarning

warnings.filterwarnings('ignore', category=pd.errors.DtypeWarning)


def count_rows(file_path):

    """ Count the number of rows in the CSV file. """

    with open(file_path, 'r', encoding='utf-8') as file:

        row_count = sum(1 for row in file) - 1  # Subtract 1 for the header

    return row_count


def split_csv(file_path, output_base_path, chunk_size):

    """ Split the CSV file into multiple parts. """

    reader = pd.read_csv(file_path, chunksize=chunk_size, iterator=True)

    for i, chunk in enumerate(reader):

        output_path = f'{output_base_path}_part{i+1}.csv'

        header = True if i == 0 else False

        chunk.to_csv(output_path, index=False, header=header)

    print(f"CSV file has been split into {i+1} parts.")


if __name__ == "__main__":

    file_path = 'C:\\path\\to\\your\\file.csv'  # Replace with your file path

    output_base_path = 'C:\\path\\to\\output\\split'  # Replace with your output base path


    total_rows = count_rows(file_path)

    print(f"Total rows in file (excluding header): {total_rows}")


    # Calculate the number of splits based on Excel's row limit

    excel_row_limit = 1000000

    num_splits = math.ceil(total_rows / excel_row_limit)

    suggested_chunk_size = math.ceil(total_rows / num_splits)

    print(f"Suggested number of rows per split file: {suggested_chunk_size}")


    # Get user input

    user_input = input("Enter number of rows per split file or press Enter to accept the suggestion: ")

    chunk_size = int(user_input) if user_input.isdigit() else suggested_chunk_size


    # Perform the split

    split_csv(file_path, output_base_path, chunk_size)
This script does a few things:
- Firstly, it counts the number of rows within the .csv file, so you can easily see what you’re working with.
- It then suggests the number of split files to create, based on Excel’s upper limit of 1,048,576 rows.
- You can either go with the suggested split, or input a custom amount of desired rows.
- The script will then create the split files, maintaining the first row headers (useful for working with SEO Spider exports!)
Note: this script was put together by ChatGPT, so may be a bit rough around the edges.
If you do not want to break up the spread sheets, you’ll need to explore other options. These include:
- Power Query & Power Pivot
- Google BigQuery
- Gigasheet
- SQL Databases such as MySQL and PostgreSQL
Happy Crawling!
Websites are really unique, but the basic principles outlined above, should allow you to crawl large websites more efficiently.
If you have any queries regarding our guide to crawling large websites, then please do just get in touch with our support team.


