SEO Spider
How To Use The SEO Spider In A Site Migration
How To Use The SEO Spider In A Site Migration
This tutorial explains how to utilise the Screaming Frog SEO Spider for website migrations, to identify any potential issues, work more efficiently, and improve their success rate.
First, let’s quickly summarise what we mean by a site migration.
What Is A Site Migration?
The term site migration is generally used when a website is due to change significantly such as design, platform, structure, content, domain, URLs, or a combination – which can all have varying effects on search engine visibility.
There are various types of migrations, some of which involve more change, potentially opportunity, but also often carry greater risk. It’s important to have a shared scope and strategy as well as a process and checklist in place to mitigate any issues in ranking.
The objective of this tutorial isn’t to tell you how to perform a site migration, but how you can incorporate crawling and auditing using the Screaming Frog SEO Spider to help perform heavy lifting in the typical migration process.
Pre Migration Preparation
There are various stages of scoping, planning and reviewing wireframes before getting close to migration. However, prior to any migration, there are a couple of important steps where a crawler can help that shouldn’t be missed.
1) Crawl Existing Site
First, ensure you have a complete crawl of the existing live website stored. This is essential to –
- Utilise as a benchmark and compare it against the staging site for changes.
- Check your old URLs have been redirected to the new URLs on launch.
- Have a backup of data in case you need to refer to it to help diagnose any issues during the migration.
Before you start the crawl, remember to adjust the configuration to collect any additional data you may need to refer to in the future. This may include hreflang, structured data, AMP and more.

Don’t miss any URLs out at this stage, ensure your crawl is as comprehensive as possible. So consider –
- If there are client-side JavaScript dependencies requiring JavaScript rendering.
- Any other domains, subdomains, or mobile and desktop site variants.
- Integrating XML Sitemaps, and connecting to Google Analytics and Search Console to ensure any orphan pages that might be important (or problematic) are not missed by enabling ‘Crawl New URLs Discovered in GA/GSC’ in their configurations.
- Gather user and conversion data from Google Analytics, search query performance data from Google Search Console and link data (from Ahrefs, Majestic, or Moz) to help keep an eye on important pages based upon revenue, conversions, traffic, impressions, clicks and external links.
- If the site is updated frequently, then you may need to run this crawl again at the very last moment before launch to ensure nothing is missed.
In database storage mode crawls will be saved automatically and are available via ‘File > Crawls’. They can be backed up as well by exporting via ‘File > Export’. For memory storage mode, remember to save the crawl via ‘File > Save’.
Please see more in our user guide on saving, opening, exporting & importing crawls.
2) Export URLs To Redirect
If website URLs are changing, then you’ll need to gather a comprehensive list of URLs to 301 permanently redirect the old URLs to the new URL equivalents as part of your redirect strategy.
This can be relatively simple if it’s a domain migration and the URL path is remaining the same, to quickly becoming more complex if the entire website URL structure is changing, as well as the site structure, design and content.
You can get a full list of existing URLs by exporting URLs from the crawl performed of the live site. Simply click ‘Export’ on the Internal tab after completing a crawl.

This can then be used as a base for setting up redirects alongside other sources, such as GA, GSC, the CMS database, log files, Sistrix, SEMRush and top pages from the likes of Ahrefs, Moz, Majestic, and subsequently mapping them to their new URL destinations.
All URLs should be redirected where appropriate. If this is not possible you can establish a priority set of top-performing pages based upon conversion, user and link data gathered in step 1 to redirect and monitor as a priority.
Pre Migration Testing
When the new site is ready in staging for testing, you can start to identify any changes and issues before launch. Once again, there are a few ways a crawler can assist.
3) Crawl Staging Site
You can crawl the staging website and review data to help identify differences, problems and opportunities.
Staging websites should be restricted from being crawled by search engines and crawlers. There are various methods to prevent crawling, such as robots.txt, authentication, IP address and more, and each requires a different approach to bypass, which is covered in more detail in our ‘How To Crawl A Staging Website‘ tutorial.

Sites in development can also respond to HTTP requests differently to those in a live environment, and can often have robots directives that require additional configuration in the SEO Spider. Read ‘How To Configure Settings To Crawl Staging Sites‘ when faced with noindex, nofollow and more.
Once you have crawled the website, the right hand ‘Overview’ tab and data can be analysed.

If the staging site is completely different – with entirely different architecture, content and the URL structure, then reviewing this crawl might be the best way to analyse it before migration.
However, if the staging site has similar content and URL structure, then it’s far more efficient to compare it directly against the existing website for changes.
4) Compare Live Vs Staging With URL Mapping
You can directly compare a staging website against the live website and see the differences reported using ‘URL Mapping’ in crawl comparison. This feature enables two different URL structures to be compared, such as different hostnames, directories, or more specific and subtle changes to URLs using regex.
To compare staging against the live website, you need to be in database storage mode, then click ‘Mode > Compare’ and select the existing site crawl, and the new staging site crawl.

Then click on the compare configuration (‘Config > Compare’) and ‘URL Mapping’. Input a regex to map the previous crawl URLs to the current crawl.
In the example below, the existing website is being mapped to the staging website hostname only, as they share the same URL paths.

The existing live site URLs are then mapped against the new staging website, so the equivalent URLs are compared against each other for overview tab data, issues, and opportunities, the site structure tab, and change detection.

You can click on the numbers in the columns to view which URLs have changed, and use the filter on the master window view to toggle between current and previous crawls, as well as added, new, removed or missing.
There are four columns (and filters on the master window view) that help segment URLs that have changed in tabs and filters.
- Added – URLs in existing website crawl that moved to filter of the staging website crawl.
- New – New URLs not in the existing website crawl, that are in the staging website crawl and filter.
- Removed – URLs in filter for existing website crawl, but not in filter for staging website crawl.
- Missing – URLs not found in the staging website crawl, that were in existing website crawl and filter.
In summary, ‘added’ and ‘removed’ are URLs that exist in both the existing AND staging website crawls. ‘New’ and ‘missing’ are URLs that only exist in one of the crawls.
This helps determine whether new issues or fixes are for existing URLs or new URLs.
Check out our ‘How To Compare Crawls‘ tutorial for a walk-through of using crawl comparison.
5) Identify Differences With Change Detection
When performing a site migration, it can be useful to keep as much as possible the same and reduce the number of changes that might impact a site’s visibility. For example, keeping the same page titles and meta descriptions.
You can use ‘Change Detection’ in ‘Compare’ mode to be alerted to elements that have changed between crawls.
To run change detection, click on the compare configuration via ‘Config > Compare’ (or the ‘cog’ icon at the top) and select the elements and metrics you want to identify changes in.

Next up, you just need to click ‘Compare’ at the top. The crawl comparison analysis will then run and the ‘Change Detection’ tab will appear as the last tab in the right-hand overview tab, and master view.

The numbers in the current, previous and change columns will always match up. This is because they are all communicating the number of URLs that have changed between the current and previous crawls. In the example above, 2 URLs have page title changes, 250 have changed in word count etc.
You’re able to click on an element and view the changes in the master window. For example, for page titles, you can view current and previous page titles side-by-side to analyse how they have changed.

If site structure and internal linking are changing considerably in your site migration, then it’s really important to understand which pages have lost (or gained links), and changed crawl depth.

All of these items can be vital to how a page performs organically and this feature can help monitor and alert you to any changes while in testing, so they can be resolved before they become an issue.
6) Redirect Mapping
While not built for this purpose, the near-duplicates feature in the SEO Spider can be used to help set up redirect mapping from old URLs to new URLs if the content is similar between them.
Switch to list mode (‘Mode > List’). ‘Enable Near Duplicates’ & disable ‘Only Check Indexable Pages For Duplicates’ under ‘Config > Content > Duplicates’.

Next, refine the content area used for similarity analysis for old and new URLs (‘Config > Content > Area’).
For example, you could ‘include’ category and product descriptions classes of the old and new sites if they have changed. If the templates are the same, then you’re not likely to need to adjust the content area, which tries to pick out the main content area of a page.

You can either upload both new and old URLs in list mode and crawl them, or remove the crawl depth under ‘Config > Spider > Limits’ and input both the existing site and staging website homepages.
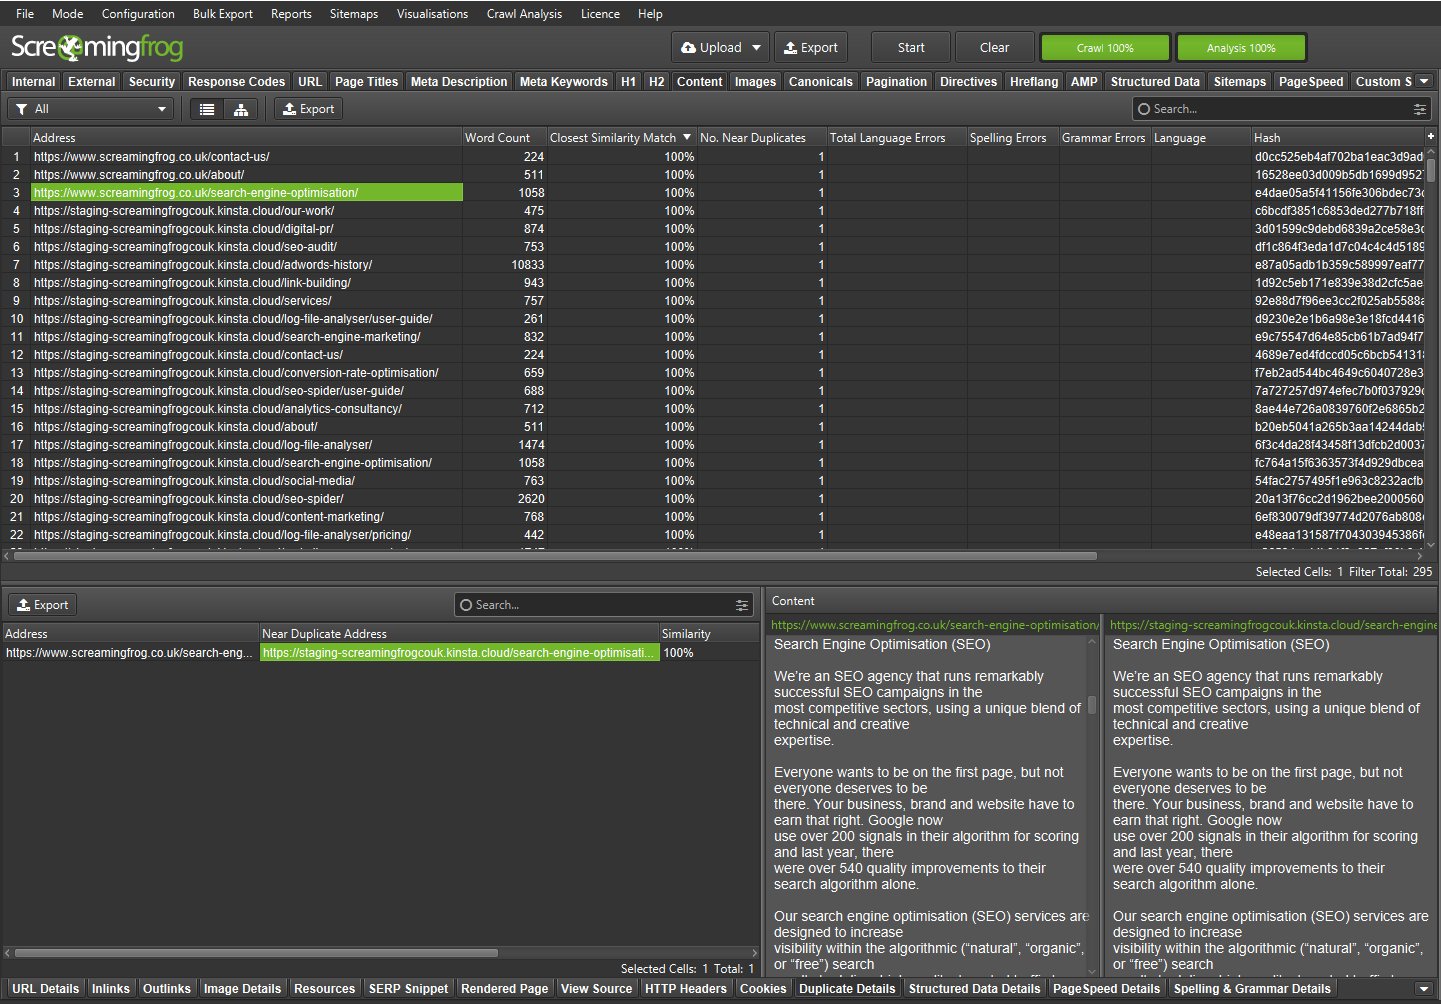
Wait for the crawl to complete, and hit ‘Crawl Analysis > Start’ in the top-level menu. Navigate to the ‘Content’ tab, which will show details of near duplicates and their similarity match.
If the content is a perfect match, each URL will have 1 near duplicate, with close to 100% similarity. If the content has changed significantly, similarity scores and numbers of near duplicates will differ.

You can see the ‘Address’ and ‘Near Duplicate Address’ in the lower window ‘Duplicate Details’ tab.
You can bulk export via ‘Bulk Export > Content > Near Duplicates’.

The export won’t always be perfect and will require you to analyse carefully, but it can give you an easy 1:1 URL redirect mapping base to work from.

The export will include the existing and staging site URLs in the ‘Address’ column, so you can sort them in a spreadsheet and use one version.
See our tutorial on ‘How To Check For Duplicate Content‘ for more on this feature.
Post Migration
It can often be quite stressful when a new website is launched, but there are a few ways a crawler can help you perform some heavy lifting.
7) Crawl New Website On Launch
Perform a crawl of the website, and ensure it’s crawlable and indexable. Check the site and key pages are not blocked by robots.txt (Response Codes > Blocked by Robots.txt).

Ensure they haven’t carried over any noindex, nofollow, or none directives in meta tags or in the HTTP Header (Directives > Noindex).

Every URL that you want to rank in the search engines should say ‘Indexable’ within the ‘Indexability Status’ column.

Review essential elements such as titles, canonicals, directives and hreflang for further issues.
Once the crawl has been completed, you can use crawl comparison against the old site crawl, and check changes are as expected from staging site testing.
8) Audit Redirects
If URLs have changed, it’s crucial that they are 301 permanently redirected to their new locations. This is vital to ensure indexing and link signals are passed to the new pages and avoiding loss of organic visibility.
This means it’s important that redirects are set up correctly to the right destinations, without errors, hops, loops, temporary redirects or to non-indexable pages. Auditing redirects means any problems can be identified and corrected as quickly as possible. This is challenging at scale, which is where the SEO Spider can help.
Switch to list mode (‘Mode > List’) and enable ‘Always Follow Redirects‘ in ‘Config > Spider > Advanced’.

Then click ‘upload’ and paste in your old URLs from step 1 to crawl them.
Depending on the scale and timings, you can upload the top priority set of URLs first to ensure they are set up correctly, however you should verify all URLs redirect which have any value (revenue, traffic, links etc) when possible.
Now export the ‘All Redirects’ report.

This report maps out the redirects in a spread sheet (click on the tiny image below to view a larger version).
This report shows you the old URLs (Address) and the final URL they redirected to (Final Address), and key details –
- Chain Type – Whether it’s an HTTP Redirect, JavaScript Redirect or Meta Refresh for example.
- Number of Redirects – The number of hops in the chain.
- Redirect Loop – True of False to whether the redirect goes back to a previous URL and loops.
- Temp Redirect in Chain – True or false to whether there is a temporary redirect in the chain.
- Indexability – Whether the final address URL is Indexable or Non-Indexable at a glance.
- Indexability Status – The reason why a URL is Non-Indexable. For example, if it’s ‘noindex’.
- Final Content – The content type of the final address.
- Final Status Code – The HTTP status code of the final address (this will be a no response, 1XX, 2XX, 4XX, or 5XX).
- Final Status – The HTTP status of the final address.
While this report does a lot of the hard work, the ‘Final Address’ of each redirect should be manually verified to ensure it’s the correct target URL. If it goes to an unrelated resolving page, then Google will likely ignore it, which will impact ranking.
This process can help you identify issues quickly, which can be shared with developers to resolve before they start becoming a big problem. Please read our tutorial on ‘How To Audit Redirects In A Site Migration‘.
9) Check Analytics Tracking
Upon launch, checking that analytics tracking is set up correctly should be on every checklist.
You can use custom search (‘Config > Custom > Search’), with a ‘does not contain’ filter to search for the full tracking tag within the HTML Head of every page on the website.

The Custom Search tab and respective ‘Does Not Contain’ filter will then flag any pages on the website with a missing analytics tag.

In this case, every page ‘contains’ the GTM tag! Check out our tutorial on How To Use Custom Search.
10) Ongoing Monitoring
Perform regular crawls and compare them to keep an eye on progress and keep on top of issues.
Data from the crawl overview can be used for benchmarking of site health, and after the initial launch, more granular analysis can be performed on key areas, such as site speed, using the PageSpeed Insights API, which performs a lighthouse audit on every page.
Additionally, keep an eye on log files (remember those?) for errors from search bots and crawling activity using a Log File Analyser (or spreadsheets!).

Crawl requests can also be monitored using the ‘Crawl Stats’ report in Google Search Console.
Summary
This tutorial should help you better understand how to use the SEO Spider and work more efficiently when performing a site migration.
For more advice on migration strategy and process, then learn more from the following guides –
- The Website Migration Guide: SEO Strategy, Process, & Checklist – From Modestos Siotos
- A SEO’s Guide to Website Migrations – From Faye Watt
- The Ultimate Guide to Successful Website Migrations – From Content King
Please read our Screaming Frog SEO Spider FAQs and full user guide for more information on the tool.
If you have any queries or feedback on how to improve the SEO Spider then get in touch with our team via support.


