Finding and Testing Internal Link Changes with Screaming Frog
Ryan Jones
Posted 16 May, 2025 by Ryan Jones in SEO
Finding and Testing Internal Link Changes with Screaming Frog
Internal linking is a crucial but often overlooked aspect of SEO that can significantly impact your website’s search performance.
This guide explains how to use the Screaming Frog SEO Spider’s features to identify internal linking opportunities, implement strategic changes, and measure their impact.
Whether you’re looking to boost underlinked pages, enhance your site’s crawlability, or leverage AI for more effective linking strategies, this step-by-step approach will help you create a more robust internal link structure that benefits both users and search engines.
This article is a guest contribution from Ryan Jones, Marketing Manager at SEOTesting.
Quick Start Guide
Within this article, I’ll cover:
- How to export All Inlinks to identify underlinked pages.
- How to use the SEO Spider’s GSC & GA4 integrations to prioritise opportunities.
- How to analyse crawls with the Link Score and Crawl Depth metrics.
- How to implement your internal link improvements.
- How to use the SEO Spider’s Crawl Comparison to measure changes.
- How to leverage the SEO Spider’s OpenAI integration for internal link suggestions.
So, let’s get into it.
Finding Internal Link Opportunities
First, I want to discuss how you can quickly audit your site’s internal links using some of the features the Screaming Frog SEO Spider offers.
Screaming Frog have some great guides on the various ways this can be achieved, which are great starting points:
- How To Use Custom Search to Find Internal Linking Opportunities
- How To Use N-Grams to Find Internal Linking Opportunities
Using the All Inlinks Export
You can use the All Inlinks export within Screaming Frog to find pages on your site that are underlinked.
Here’s how to use it:
- Run a complete site crawl in Screaming Frog
- Navigate to “Bulk Export” > “Links” > “All Inlinks”
- Open the exported CSV file

This report reveals exactly how many internal links each page receives. Look for this key information:
- Source URL
- Destination URL
- Anchor Text
- Follow
- Link Position
Pages with high business value but few internal links are your primary opportunities. These might include product pages, conversion pages, or important guides that deserve more visibility.
For example, if your “Pricing” page only has 3 internal links while your “About Us” page has 25, that’s a red flag. Visitors need clear pathways to conversion pages, which internal links provide.
Leverage Performance Data to Prioritise
Rather than making changes blindly, use actual performance data to guide your efforts. This is where the GSC & GA4 integrations within the Screaming Frog SEO Spider really shine.
In order to set up the GSC and GA4 integrations:
- Head to “Configuration” > “API Access”
- Click on the “Google Search Console” link
- Sign in with your Google account.
- Repeat the step for GA4.
Here is what the connection will look like for the GSC integration:

Here is what the connection will look like for the GA4 integration:

After your crawl is complete, this integration helps you answer some very important questions:
- Which pages get impressions but few clicks?
- Which pages convert well but receive little internal linking support?
- Which pages rank on page two (positions 11-20) that could reach page one with more internal link equity?
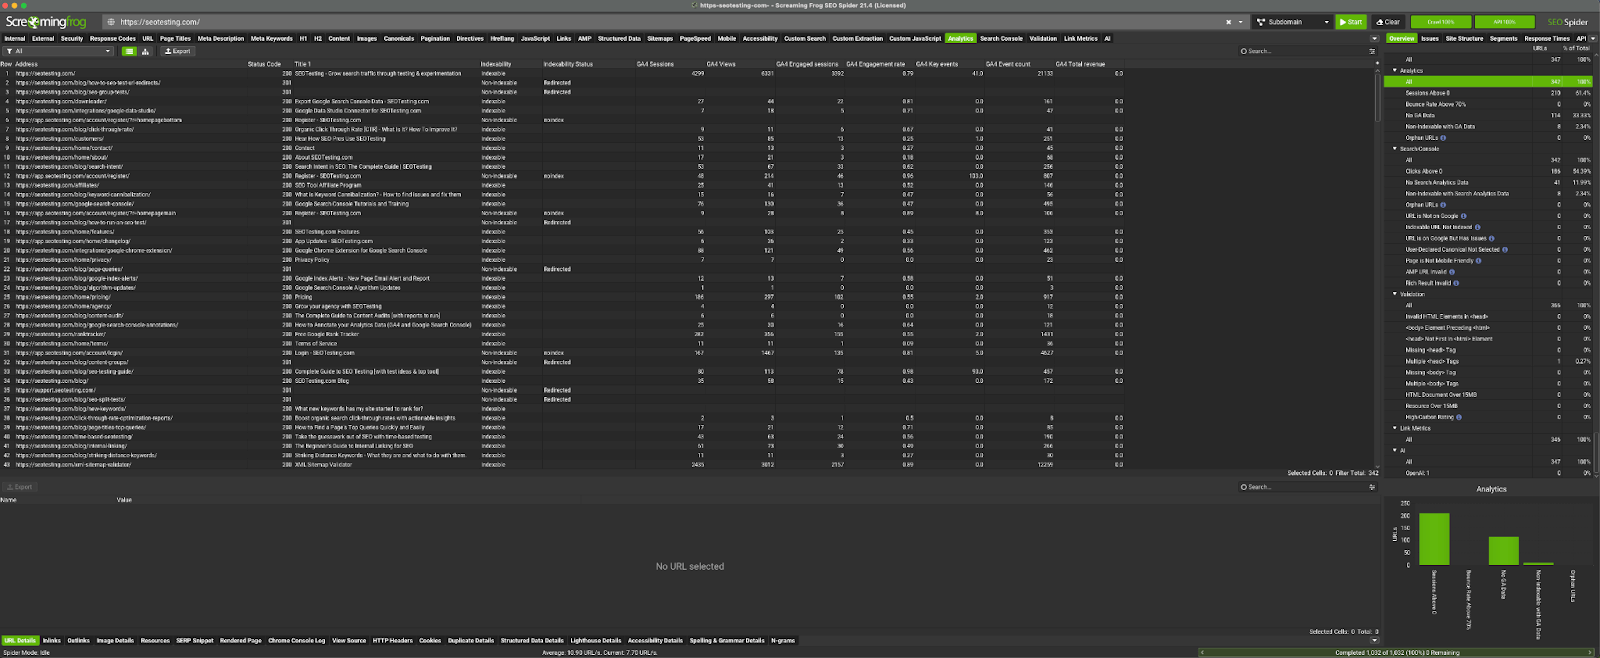
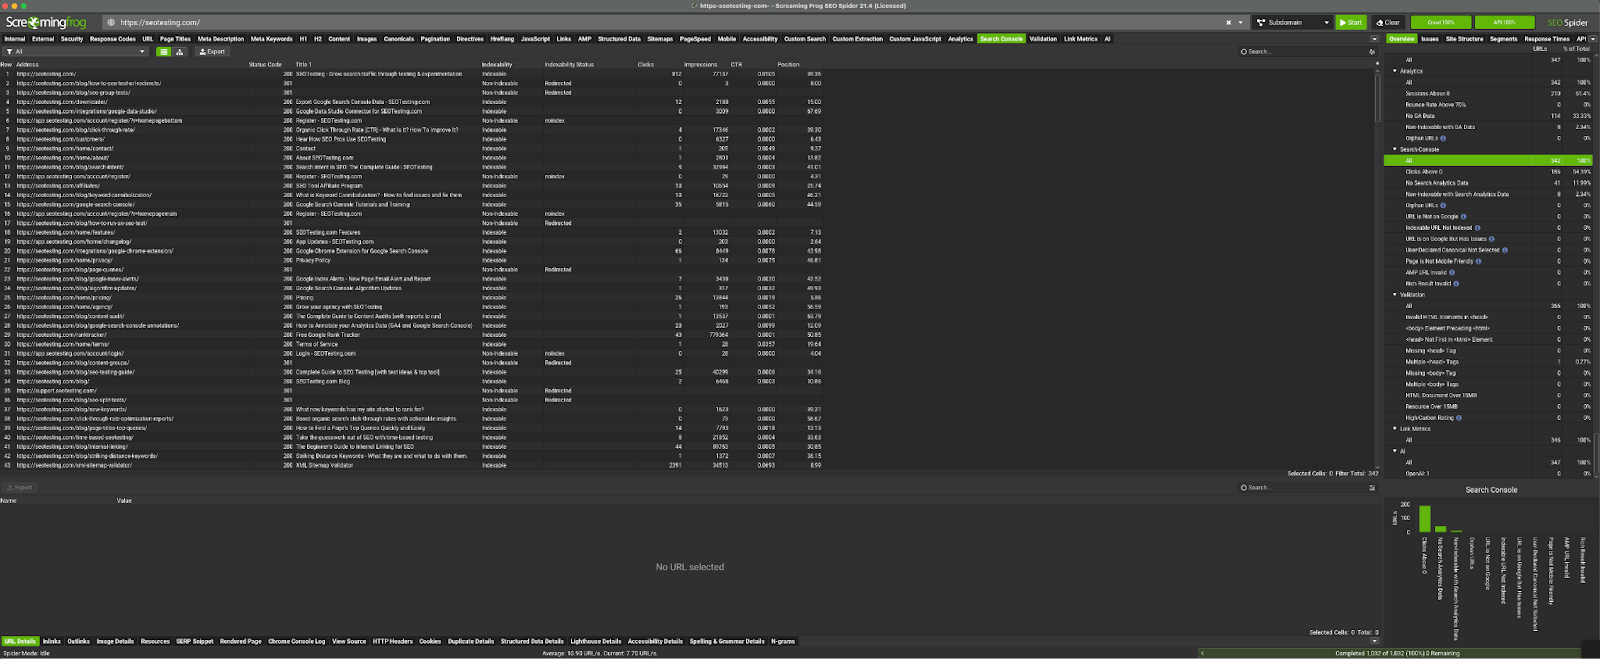
You can access either the GSC or the GA4 data post-crawl by clicking the correct tab on the top-header.
Here’s what it looks like for Analytics:
Here’s what it looks like for GSC:
Here’s an example scenario for you.
You find a blog post ranking at Position 11 for a valuable keyword, receiving 5,000 monthly impressions but only 200 clicks. This page has just 2 internal links. By adding strategic internal links to this page, you could boost its authority, potentially moving it to Page 1 and dramatically increasing traffic.
Remember the common term that the biggest graveyard for pages is Page 2 of Google? Yeah, that still applies. So, even moving the page from Position 11 to Position 10 is likely to have a huge impact!
Understanding Link Score: Your Internal PageRank
Think of Link Score as a popularity contest within your website. Pages with higher Link Scores receive more authority from your internal linking structure.
- Once the crawl has finished, click “Crawl Analysis” and let that run.
- Head to the “Internal” tab
- Select “Link Score’ from the filter dropdown
- Sort the Link Score column to identify pages with low scores
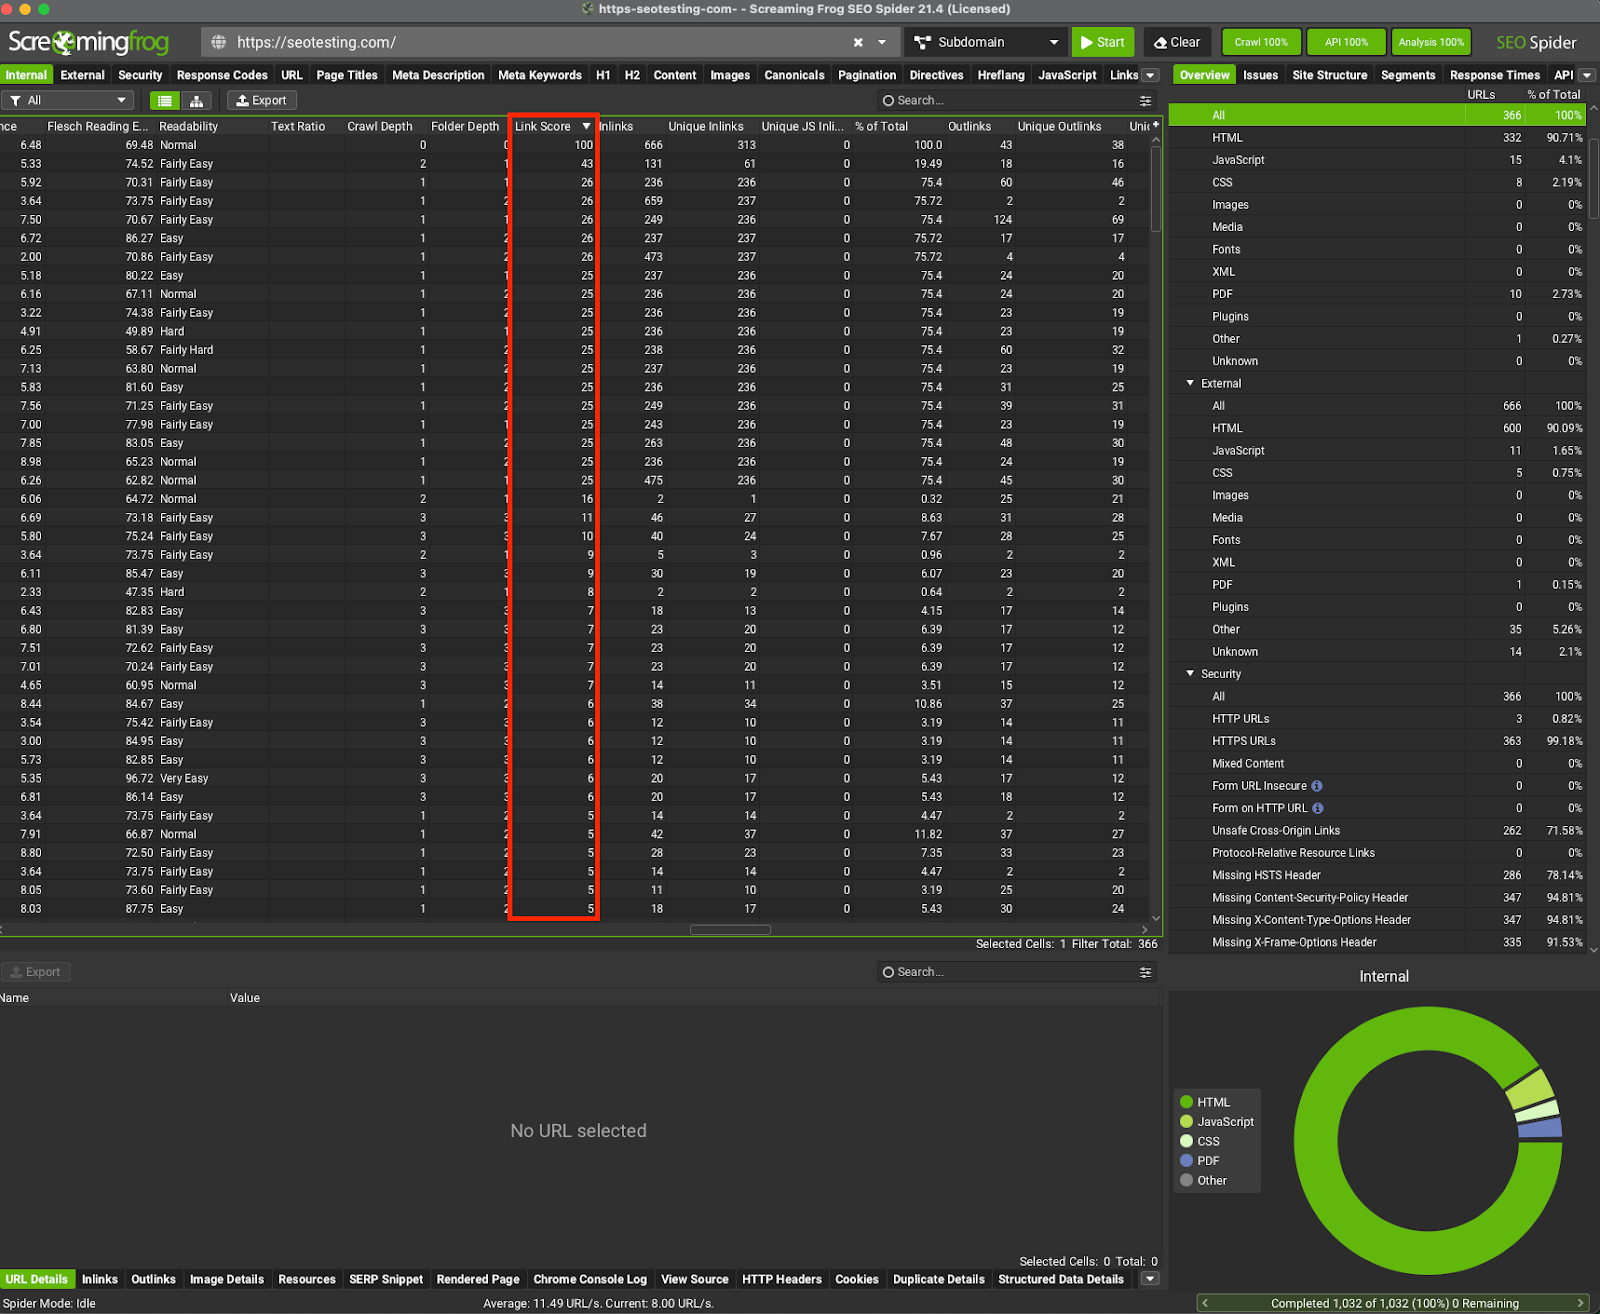
Link Score considers three key factors:
- The importance of linking pages
- How many links the source page contains
- The source page’s proximity to your homepage
Here’s a quick table to interpret your Link Score:
Note: Remember that scores vary by site, so compare similar page types against each other rather than using absolute values. Also remember that a good link score for one site might be different for another site, depending on what internal links are used, so use the above table as a guide.
Optimising Internal Link Placement
Where you place the internal links on your website matters just as much as how many you create. Let’s look at how to use the SEO Spider to analyse and improve the link placement on your site.
Strategic Link Positioning
Not all link positions are created equal. Links in prominent positions typically mass more link equity and get more clicks.
When analysing your existing links:
- In the All Inlinks export, check the “Source” column to see where links appear.
- Pay attention to whether links are in your navigation, content body, sidebars, or footers.
While I cannot give you a specific guide about where to place your internal links so they have maximum impact, I can tell you that in-content links are typically the most ‘valuable’, while links placed in sidebars and on your site’s footer might not be held in the same regard by Google’s crawlers.
Remember to look at your anchor text, too.
Ditch that generic “click here” link. Instead, try to use descriptive anchor text that includes relevant keywords (so long as it still sounds natural), accurately describes where the user will be taken if they click on that link, and creates a clear expectation for users.
Understand Crawl Depth
Crawl depth shows how many clicks it takes to reach a page from your homepage. Think of it as a way to measure how buried your content is.
There are two ways in which you can check the crawl depth of pages on your website.
The first way is to complete a crawl of your site, select the ‘Internal’ tab, and then scroll across to the ‘Crawl Depth’ tab. Here you’ll see a list of your pages and the crawl depth they have.
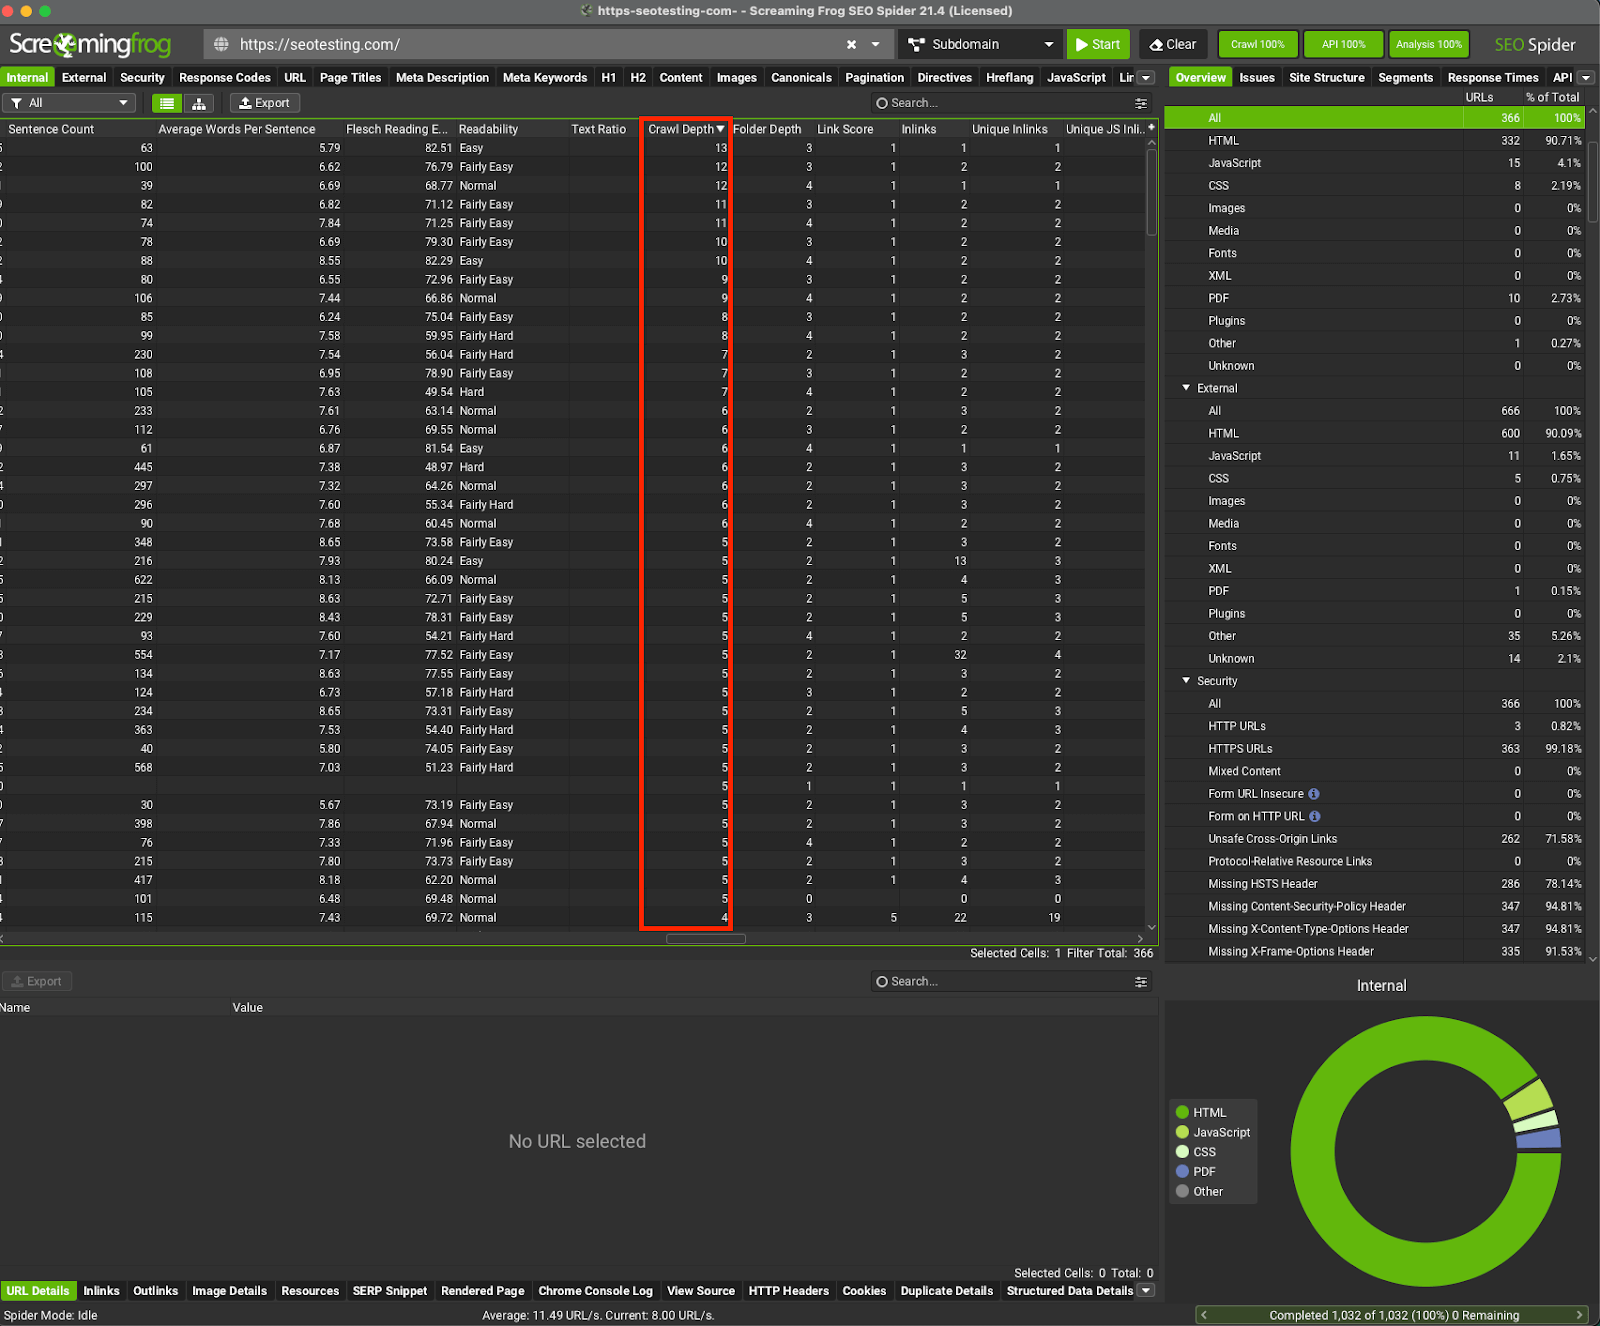
The second way is to select the ‘Links’ tab at the top of your crawl, from here you will be able to see the ‘Crawl Depth’ tab without scrolling all the way across, and you can then use the filter on the dropdown to find pages with high crawl depth, as you can see here:
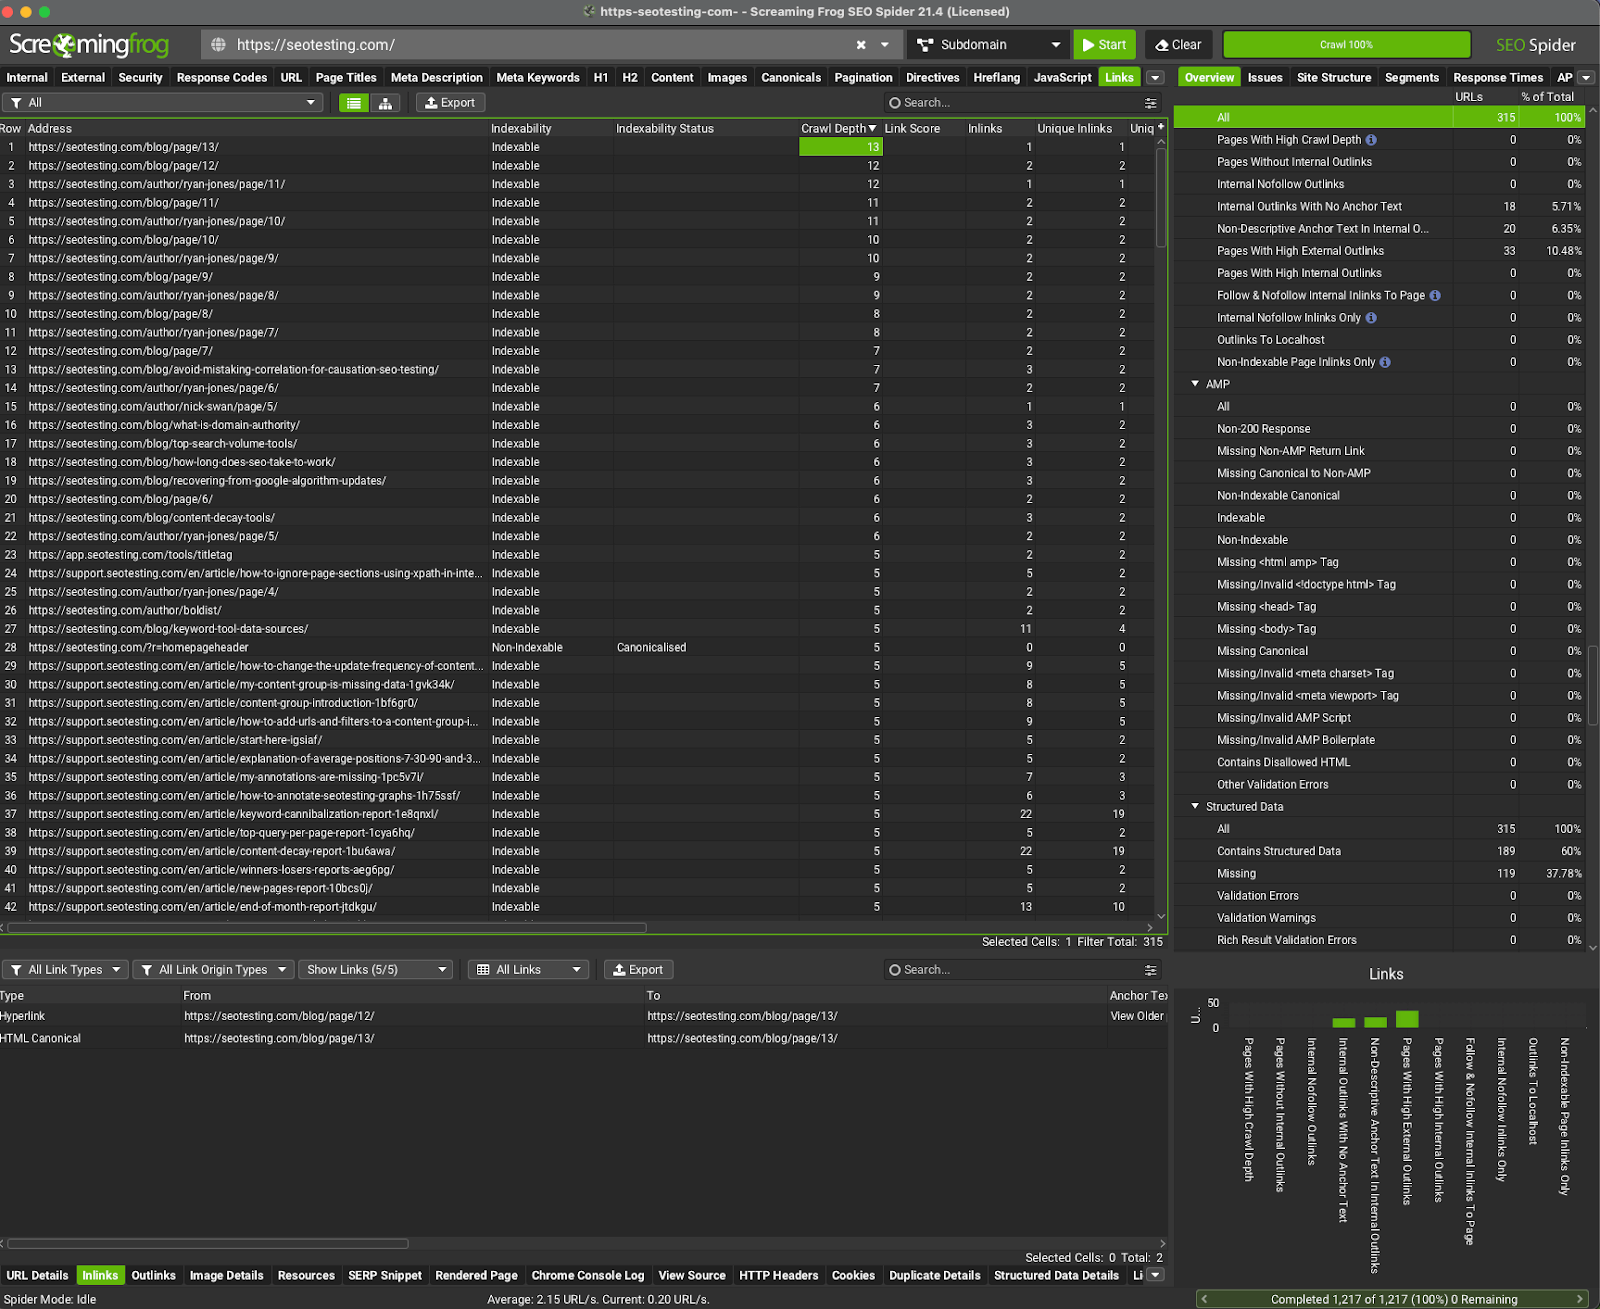
You can use the Crawl Depth metric to find pages that you consider to be important but are buried too far down within your site’s architecture. This can happen a lot on large ecommerce sites, for example. From here, you can make a list of the pages you’d like to improve and add internal links to these pages from other pages higher within your site’s architecture.
A good rule of thumb is to ensure all pages on your site (if you can’t do this, focus on the very important pages) are within three clicks of your homepage. Beyond that, users are less likely to find them when they enter your site from another page.
Here are some warning signs to look out for:
- Key product or service pages buried at depth 4+.
- Important blog content hidden deep in your site structure.
- Uneven distribution where some sections of your site are much deeper than others.
Implementing Internal Link Changes
Now that you have identified some internal link opportunities with the help of the Screaming Frog SEO Spider, it’s time to take action. Here’s how to make effective changes that will drive results:
Prioritising Your Changes
Not all internal link problems are equal. It’s best to focus your efforts where they’ll have the biggest impact. Here are some examples of high-priority, medium-priority, and lower-priority fixes that you could make on your site:
High-Priority Fixes
- Important pages with fewer than 5 internal links.
- Converting pages buried at crawl depth 3+.
- Pages ranking positions 5-15 for valuable keywords.
Medium-Priority Fixes
- Pages with poor anchor text distribution.
- Content clusters that aren’t properly interconnected.
- Category or section pages with an uneven link distribution.
Lower-Priority Fixes
- Minor crawl depth improvements.
- Link additions to already well-linked content.
- Non-strategic pages with few internal links.
The goal here is to create a list of internal link changes you want to make to your site, with the higher-priority fixes coming first.
If you’d like, you can use the PIE (Potential, Impact, and Ease) framework to prioritise where to spend the most amount of time and effort fixing issues with your internal links.
Make The Changes
I don’t want to spend too much time here as this is not the focus of the article.
Once you have created your list of internal link changes, it’s time to execute them.
Most sites use a CMS such as WordPress, Wix, or something similar. If this is the case, you will need to log into your admin dashboard, open the page you want to edit, and add your internal links.
Some sites will be custom-coded. If this is the case, you might need to contact your developers to make the changes for you, or if you have some knowledge of HTML, you can make the changes yourself.
Tracking Your Changes
I would suggest, once all of your internal link changes have been made, to create a spreadsheet that tracks the following:
- Page Modified
- Links Added (Source URL, Destination URL, Anchor Text)
- Implementation Date
- Baseline Metrics Before Changes
This documentation will be helpful if you see any major performance changes (or issues) after the changes have gone live. It will help you pinpoint the internal link change that caused this or at least give you a better idea of the type of internal link change that led to that outcome.
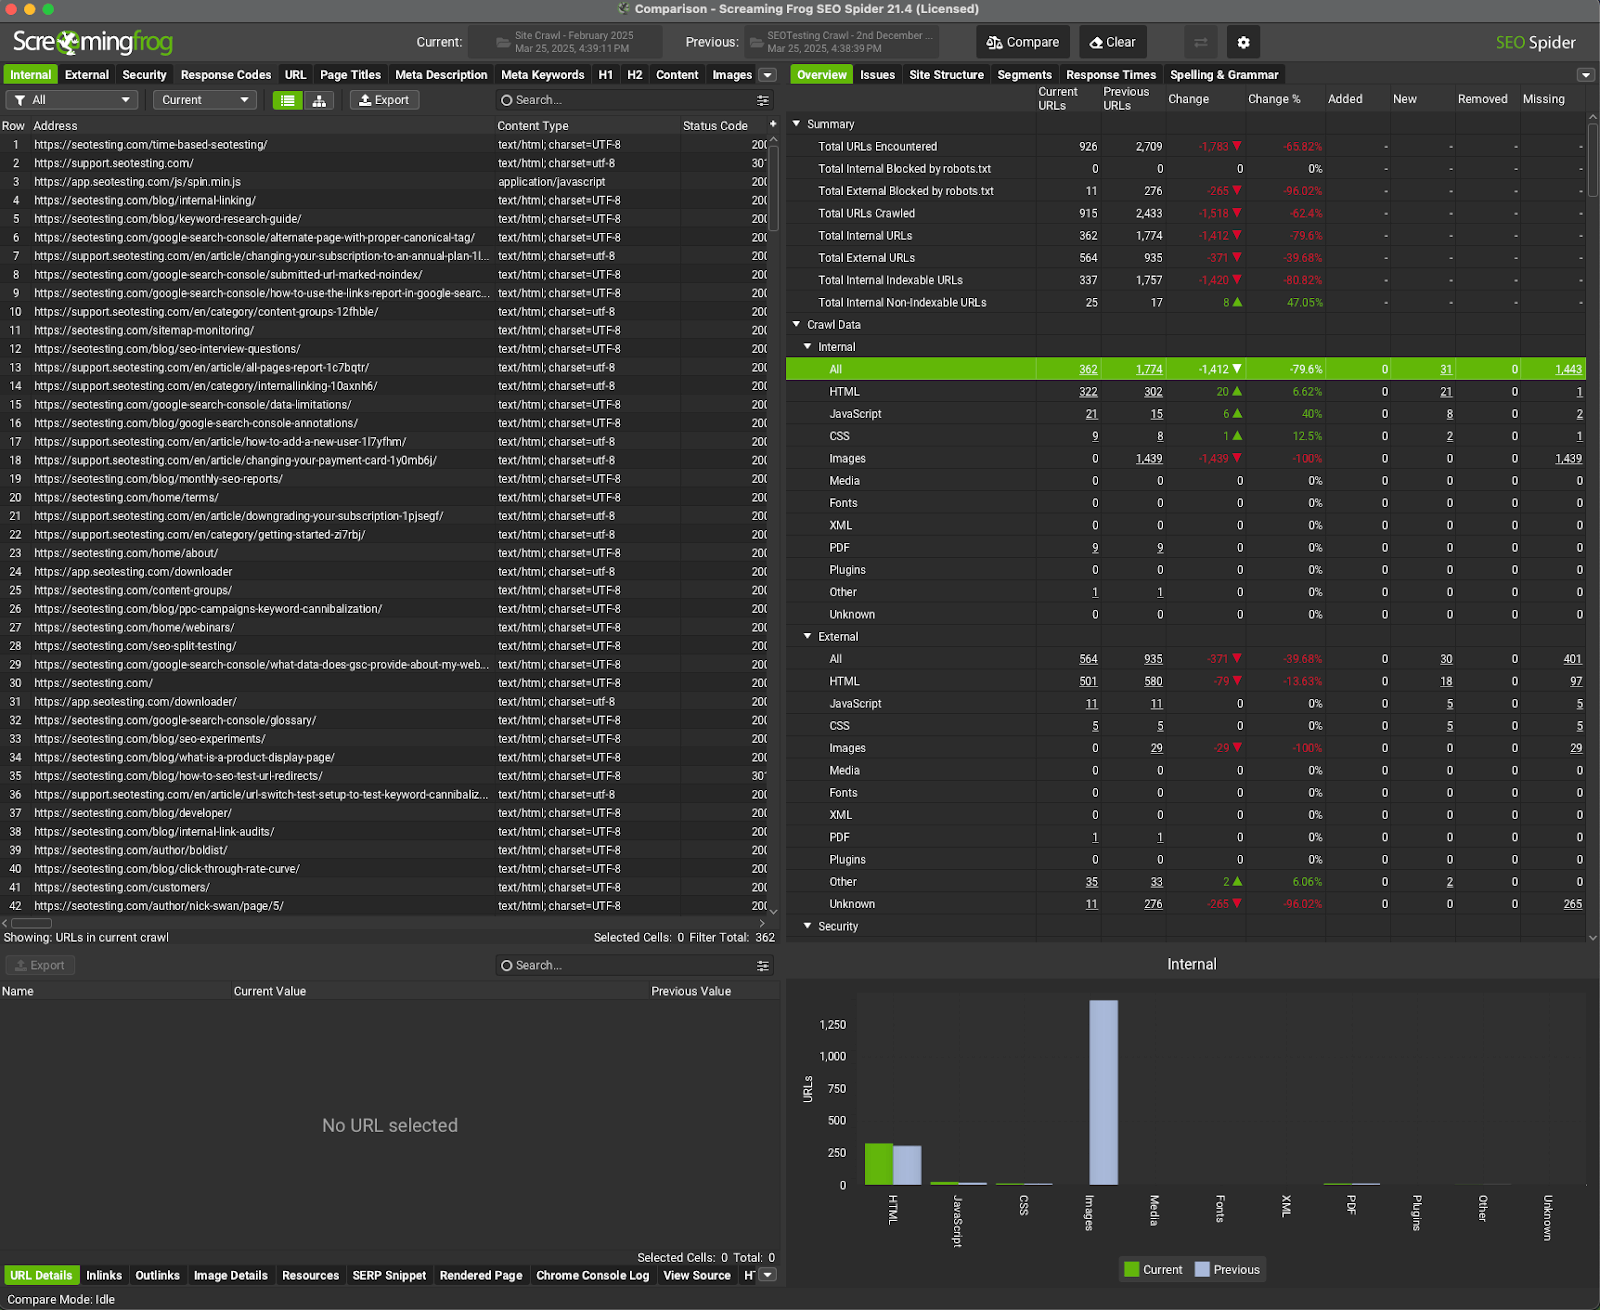
Testing Internal Link Changes with Crawl Comparison
After implementing changes and waiting 2-4 weeks, it’s time to measure their impact. This is where the Crawl Comparison feature within the SEO Spider becomes invaluable.
How to Run a Before/After Comparison
You can follow these steps for an accurate assessment:
- Baseline Preparation
- Run a complete crawl with GSC and GA4 integrations before making changes.
- Save with a descriptive file name like “Pre-Link Updates March 2025”
- Implementation Period
- Make your internal link changes.
- Allow 2–4 weeks for search engines to re-crawl and re-index your content.
- Note: You may need to run your test for longer if you are testing on a site that does not get much organic traffic. A good rule of thumb that we have come up with from running thousands of tests is to ensure you have at least 200 clicks from both before and after the change is made to your site.
- Comparison Crawl
- Run another crawl with identical settings.
- Save with a related name like ‘Post-Link Updates April 2025”
- Run the Comparison
- Go to “Crawl Analysis” > “Crawl Comparison”
- Select your baseline and new crawls.
Note: In order to use Crawl Comparison, you need to be in database storage mode within Screaming Frog. The guide linked above, and here, will show you how to do this.
How to Analyse the Results
The Crawl Comparison feature of Screaming Frog allows you to compare the pre- and post-change crawls side by side. This allows you to examine the data and make an almost instant decision about whether your internal link changes helped or hindered your progress.
Here are some of the metrics you should be looking at:
- Link Count Changes: Do your target pages now have more internal links?
- Link Score Improvements: Has the authority distribution improved?
- Crawl Depth Reductions: Are important pages now fewer clicks from the homepage?
- Performance Changes: Look for correlations between linking changes and:
- Improved Average Position
- Increased Clicks
- Higher CTR
- More Conversions
Remember the instructions on activating the integrations for Google Search Console and GA4? This was for that. Adding these integrations allows the SEO Spider Screaming Frog to crawl your site’s performance data simultaneously, so you can tie the internal link changes to actual traffic improvements.
Say, for example, that within your set of internal link changes, you added 12 new internal links to your 5 most important pages. The crawl comparison might show:
- Average Link Score increased from 23 to 41.
- Average Position improved from 8.7 to 4.2
- Organic traffic increased by 34% to those pages on average.
- Conversion rate improved by 8% on average.
This is a clear correlation confirming that the internal linking changes were effective.
Just note that the above isn’t based on real data, this is an example scenario. If you are interested in some real data, we have run 15 internal link tests (adding internal links to pages) on the SEOTesting site, and we have seen the following results:
- Average Clicks Change: +173.5% Improvement
- Average Impressions Change: +264.5% improvement.
- Average CTR Change: +0.02 percentage points improvement.
- Average Position Change: -4.87 positions (improvement in rankings).
Across those 15 tests, 80% showed positive results, whilst only 20% yielded negative results. There were no tests with a neutral outcome.
Troubleshooting Common Issues
If you’re not seeing the expected improvements, check for these common problems:
- Not enough time has passed: Sometimes, it takes 6-8 weeks to see the full impact.
- Low-quality link placements: Links in footers or on low-value pages don’t pass much link equity.
- Poor anchor text: Generic anchor text limits the SEO benefit you might see.
- Competing pages: Multiple pages targeting the same keywords can dilute results.
- Technical issues: Canonicalization or indexation problems can override benefits.
Or, as we saw in 20% of our tests, the test might indeed have yielded a negative result. In cases like these, you can still find value, as you can analyse why this might have led to a negative result and learn from that, ready for the next test.
Leveraging Screaming Frog’s OpenAI Integration for Smarter Internal Linking
The Screaming Frog OpenAI integration can also help to identify contextual linking opportunities you might otherwise miss. Here’s how you can set it up and use it within your crawls.
Setting Up the OpenAI Integration
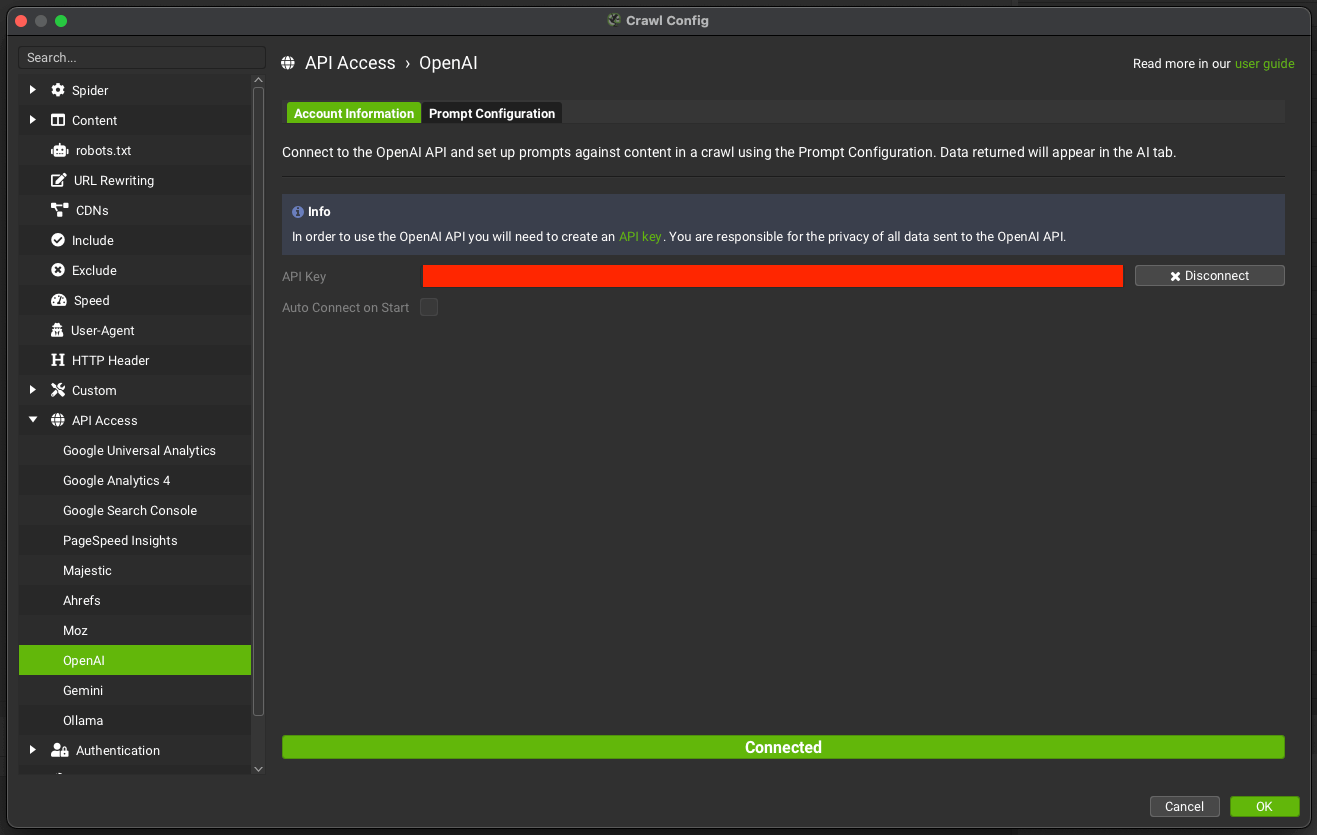
In order to configure the integration:
- Head to “Configuration” > “API Access” > “OpenAI”
- Enter your OpenAI API key
- Click Connect
- Click Ok
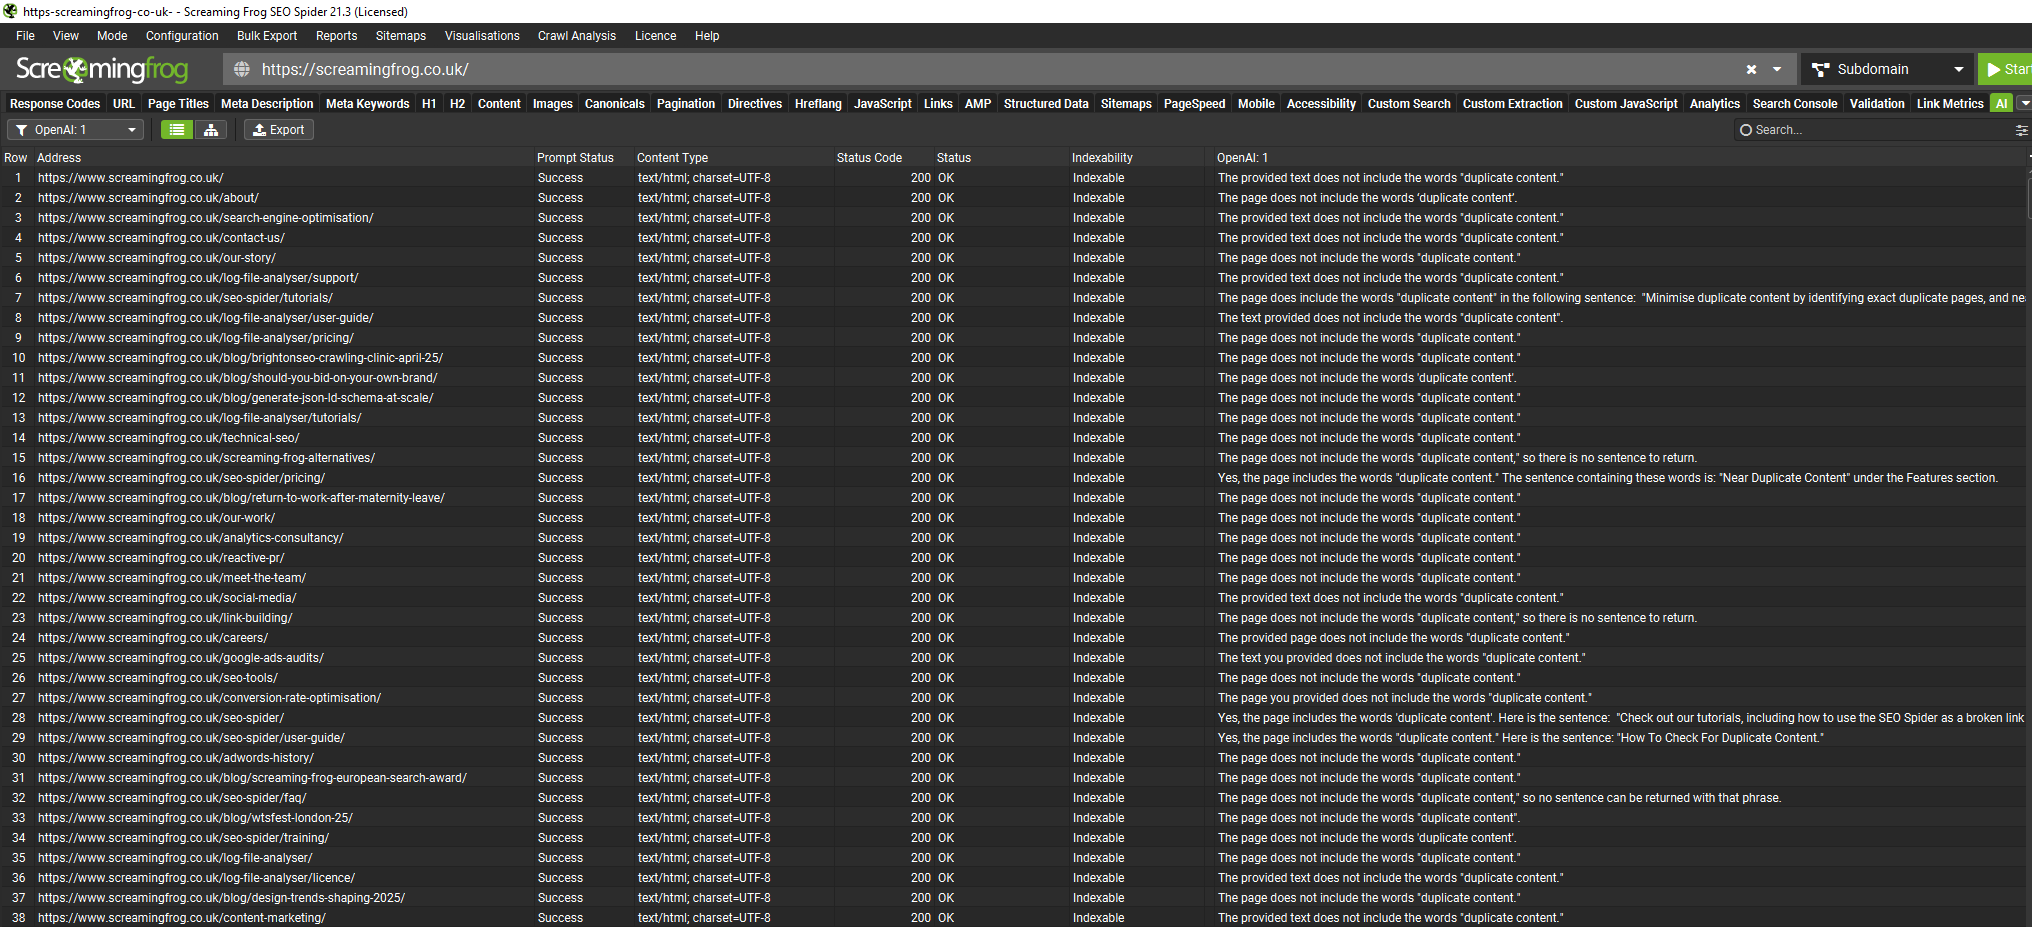
The next step is to create some prompts for the crawl:
- Within the OpenAI settings, you will see there is a tab labelled ‘Prompt Configuration’
- Click into this
- Write your prompt, and then click the “play” button to test it.

Note: You will need a paid OpenAI account with usage credits. If not, when you run the prompt tester, you may see ‘Error 429’. This means you have hit your usage limit.
An example prompt could be something as simple as:
“Tell me if the page includes the words ‘duplicate content’, and return the sentence.”
You can experiment with different prompts to see what works best for your site. There are no right or wrong answers.
Once the crawl has run:
- Go to the “AI” tab in the top navigation bar.
- You will see a column labeled “OpenAI:” along with the name of your prompt.
- This column shows the output from OpenAI for each URL.
The integration works on a URL-by-URL basis. OpenAI does not see the full crawl or wider site context. It generates responses based only on the content of each individual page. This means internal link suggestions may rely on what is present within that page, rather than the full site structure.
While this is similar to using the Custom Search feature, this AI approach can also act as a “fuzzy search” and can sometimes return opportunities you’d otherwise overlook.
Only you will know what is best for your site, and the AI may hallucinate a bit or recommend internal links based on what else it can find on the page, so always be sure to check anything it’s proposing.
You can use this information to create a list of internal link changes that you want to test. Then, following the steps I outlined earlier, you can run some crawls and use the Crawl Comparison feature to see whether the internal link changes increased search traffic and user experience metrics or were a negative test that you need to learn from.
When is the OpenAI Integration Useful?
The integration that Screaming Frog has with OpenAI can be useful in the following scenarios:
- Large Content Libraries
- Complex Product Relationships
- Content Gap Identification
- Anchor Text Optimisation
The real beauty here is that you have control of the prompt. Whether you’re looking for simple opportunities for a new page, or a comprehensive list of words to look for, you have the power to decide what to do with it.
Keep in mind this does cost money. For the purposes of this article, I used the OpenAI integration to crawl the SEOTesting website (approximately 250 URLs in total) and the crawl cost $0.86. So while it is cheap, keep in mind that this can become costly if you are crawling a site with thousands, or even millions of URLs.
Measuring Long-Term Impact
Internal linking changes often show their full potential over months, not weeks. Here’s what to track for 3-6 months after implementation:
User Behavior Metrics
These signals indicate whether your internal linking changes are helping real users:
- Pages Per Session
- Session Duration
- Bounce Rate
- User Flow
SEO Performance Indicators
These metrics show how search engines are responding to your changes:
- Indexed Page Count
- Crawl Stats
- Average Position
- Clicks
- Impressions
- Orphaned Pages
Wrapping Things Up: Your Action Plan
- Indexed Page Count
- Crawl Stats
- Average Position
- Clicks
- Impressions
- Orphaned Pages
Wrapping Things Up: Your Action Plan
Hopefully, this guide has given you some good insight into how to use Screaming Frog to assess whether an internal link test has been successful (using Crawl Comparison) and how to use its Open AI integration to find internal link suggestions and things to test.
As a parting gift, I want to give you an action plan that you can follow for the next few weeks to see if you can repeat the process that I’ve outlined in this article. Here’s the plan:
- This Week:
- Run your baseline crawl. Ensure you have the GSC and GA4 integrations on.
- Export the All Inlinks Report
- Identify your top 5–10 opportunities for improvement.
- You can also try the OpenAI integration to find internal link suggestions during your baseline crawl.
- Next Week:
- Implement the changes to high-priority pages.
- Document all of your modifications.
- After 3–4 Weeks:
- Run your comparison crawl.
- Analyze the results with Crawl Comparison.
- Implement any adjustments if needed.
- Ongoing (Quarterly):
- Audit internal linking structure.
- Check for new opportunities.
- Ensure new content is properly integrated into your linking structure.
Every internal link creates a pathway for both users and search engines. By strategically connecting your content, you’re not just improving SEO. You’re creating a better user experience that helps visitors find exactly what they need.
What internal linking opportunities will you uncover in your next Screaming Frog SEO Spider crawl?


This is easily the best guide on Internal Linking I’ve come across. Great work Ryan.
I have never seen a more thorough and comprehensive guide on internal linking. Your hard work is greatly appreciated, Ryan!
Thanks for sharing this process.
I’ve recently started testing internal link changes and found your step-by-step guide super useful. The idea of comparing crawls before and after changes is a great way to track progress. I also try to watch for traffic changes on the linked pages using Google Analytics, which helps me see if the new links are making a difference.
Has anyone seen a big traffic boost from small link tweaks?
Nice guide.
But we need a feature to crawl only some links from a specific link position. Or a Link score based on link position because sitewide links are faking the results
Super actionable guide. We’ve been using GSC + Link Score to prioritize underlinked pages, but I hadn’t thought about layering in crawl comparison post-implementation. That’s a smart way to quantify results.
Thanks for sharing, Ryan.