SEO Spider
Internal Linking Audit With the SEO Spider
Does any of the following sound familiar to you?
- Your content is optimised, but still not performing well.
- You have high performing blog posts, but your product pages seem to struggle.
- New products or pages take a long time to reach the visibility of older ones, or never do.
In all these cases, internal linking may be something to turn to. It’s a part of OnPage SEO that is still hugely undervalued, in my opinion.
Let me explain.

Why Is Internal Linking Important?
Search engines (i.e. their bots) discover web pages through links. Always have done, still do. This means that a poorly linked to new page may take longer to be discovered.
You don’t have to fully grasp the concept of PageRank to understand these facts:
- The fewer linked to a page is, the less important it is in the eyes of Google and other search engines.
- Linking structure is important for search engines and users to grasp the site architecture and topical hierarchies within your website.
- The more clicks it takes to reach a page (counted from the homepage), the less likely that page is to be crawled, indexed and ranked well.
- Links pass authority from page to page.
- You can actively use internal links to give importance to pages and get your priorities straight.
If you’d like to take a closer look at your current priorities, aka your internal linking structure, a little audit can go a long way.
Today I’ll show you how to conduct an internal linking audit and discover linking opportunities with the Screaming Frog SEO Spider.
Do keep in mind that internal linking won’t solve all your problems – it needs to be embedded in a broader SEO strategy. However, I’ve fixed internal linking issues for both my own e-commerce business as well as clients’ websites and can vouch for its impact.
You can pick and choose your playing field or do these steps one by one.
Find Deeply Buried Pages With a Crawl Depth Analysis
Remember how the number of clicks it takes to reach a certain page from the homepage matters?
That’s what we call Link Depth, or Crawl Depth. (Crawl Depth being the equivalent from a bots’ perspective.)
It depends on the size of your website, but generally, you should aim for a Link Depth of 1-3 maximum for important pages (again – 0 being the homepage itself).
Let’s calculate the Crawl Depth of each page in the SEO Spider.
- Make sure you don’t restrict crawl depth.
- By default, that should not be the case.
- To check go to ‘Configuration > Spider > Limits’. Make sure you don’t set limits on crawl depth or folder depth, or else you won’t be able to see the really problematic pages.

- For quite big websites, you should consider splitting your crawl up in segments to not strain your computer’s processing capabilities. Take a look at this guide on crawling large websites for more information.
- Run your crawl.
- Navigate to the ‘Internal’ tab or the ‘Links’ tab and look for the column called ‘Crawl Depth’.
- You can sort these numbers from high to low (note that redirects are counted as an extra +1).

- If needed, you can export the list into Excel or Google Sheets. There, you could set a filter for crawl depth higher than 3.
- In the ‘Links’ tab, you’ll also find a filter called ‘Pages with high crawl depth’. To populate that, however, you’ll have to run a crawl analysis. Go to ‘Crawl Analysis > Configure’ and tick the box ‘Links’ before starting the analysis.

Find any of your important pages buried deep within the site structure? Make them more accessible by “lifting” them out of the depths. Consider adding them to your main navigation if they’re key pages, or internally link to them from existing relevant content (more on this coming up). In general, keep your site architecture neat, your sitemap(s) up to date and your URLs under control to prevent your pages slipping into the depths and causing potential crawl budget issues.
Find Poorly Linked Pages Using Internal Link Counts
Poorly linked pages are quite common. You might not see the problem in internal linking right away, but if your newer pages, even after some time, don’t attract as much traffic as older ones, you should be looking into this.
Just imagine this. You have a small wine online business with a blog on the side. You churn out content regularly, focusing on informative, helpful guides and showcasing your products. You start to get a feeling (and numbers) for your bestsellers and include those in your blog posts more often. Since it’s going well, you expand on your range of products and offer more wines from different regions.
Now, your hero products have a head start, not just from a business, but also from an internal linking perspective. After all, you’ve been working on content all along and including these wines in your blog posts. Newer products will naturally fall short – it takes a conscious effort to pull them into the spotlight and link to them from older pages.
The Screaming Frog SEO Spider is here to help.
- Crawl your site like you normally would.
- Click on the ‘Link’ tab.
- Find the column ‘Unique Inlinks’.
- Inlinks are the number of hyperlinks that point to the selected URL. Unique inlinks only count each instance from a given URL once.
- Say your blogpost “Best dry flower bouquets for Valentine’s Day” links to your product “dry roses” three times – this counts as 1 unique inlink, but 3 total inlinks.
- In the column ‘Unique Inlinks’, you could just sort by the lowest number.
- Alternatively, you could just find the column ‘% of Total’. That’s the percentage of unique internal inlinks to each URL, compared to the total.

Find important pages shockingly low on inlinks? There you go. Your next step will be to find linking opportunities to these pages. That’s up next.
To determine weak pages, you could also use Link Score. Link Score is a metric in the Screaming Frog SEO Spider that determines how relevant a page is compared to other pages on the same website. It is based on incoming links but also takes other factors into account, such as outbound links, and it will distribute all your pages on a relative range from 0 to 100.
Find Internal Linking Opportunities With the Screaming Frog SEO Spider
Now that you’ve identified your pages low on link equity, it’s time to give them some love.
Custom Search
One way I like to identify linking opportunities in the Screaming Frog SEO Spider is via their Custom Search feature. To use it, you’ll first need to identify:
- The weak page you’d like to strengthen (see chapter above).
- The keyword(s) you’d like to use as anchor text in links to that page.
You could use Google Search Console, for example, to find these keywords.
Next you’ll use the Screaming Frog SEO Spider Custom Search to find instances of these words on your whole entire website:
- Open ‘Configuration > Custom > Custom Search’.
- Click ‘+ Add’ and add your keywords one by one.

You could add up to 100 lines here.
By default, your search is not case-sensitive. You might want to include that if you’re searching for a short, common use of letters like “PR”. Otherwise all results with “pr” within a word will show up.
You activate case sensitivity by clicking the expanding arrows next to your keyword and checking the respective box.

- Click the drop-down next to your keyword and select ‘Page Text No Anchors’.

You could search in the HTML as per default. However, if you’re already linking quite a lot within your body text or the term is part of your main nav, this will also return results of keywords already linked. To exclude these from the get-go, select ‘Page Text No Anchors’. The SEO Spider will now only return results that are not already in an anchor tag (and therefore linked).
- Add another line after your keywords.

Again, you might just run your custom search with keywords only. This additional step, however, lets you exclude URLs that already have a link to the page you’re looking to strengthen. No need to include additional links here. This exclusion, therefore, saves you a manual step afterwards.
Now enter the following text with the path of the URL you want to link to (your target page):
/your-blogpost
In this example, you’re trying to optimise the URL https://www.domain.com/your-blogpost.
Leave the default ‘HTML’ but switch the first drop-down from ‘Contains’ to ‘Does not contain’.
You’ve now told the spider to exclude any examples where you’ve linked to /your-blogpost in the HTML already, including all subfolders that follow after this path.
- Click ‘OK’ and run your crawl, and navigate to the ‘Custom Search’ tab.

You will now see unlinked mentions of your desired keywords and only have to pay attention to the ‘Does Not Contain’ results since the others already contain a link to the desired URL.
Note: By default, custom search will already exclude ‘Navigation’ and ‘Footer’ mentions of your keywords. If you’d like to refine this setting further or check on it, click ‘Configuration > Content > Content Area’ before running your crawl. Here, you can include and exclude classes and ID’s. If you’re looking to further exclude certain URLs from the search (for example admin pages, password-protected areas, category pages, tag pages etc.), use ‘Configuration > Exclude’. You can read more about content areas here.
Taking action is pretty straightforward: link the keywords from your list to the page you’d want to have some more link equity.
If your list is very long, you might consider prioritising linking from the URLs that already get a lot of links and clicks. Those are your ‘power pages’.
To find these, you can use Google Search Console . If you enable the API in the Screaming Frog SEO Spider, you can pull in the data directly: ‘Configuration > API Access > Google Search Console’.
After connecting to your Search Console account and selecting the property you need, click ‘Configuration > API Access > Request API Data’ to populate the tab.
Here’s what this looks like after having pulled the data:

N-Grams
An alternative method to find internal linking opportunities is using the N-grams analysis feature to find unlinked keywords for internal linking.
To enable this functionality, ‘Store HTML / Store Rendered HTML’ needs to be enabled under ‘Config > Spider > Extraction’. The N-grams can then be viewed in the lower N-grams tab.
Using n-grams you’re able to highlight a section of a website and filter for keywords in ‘Body Text (Unlinked)’ to identify link opportunities.
Click on the image to see a larger version.
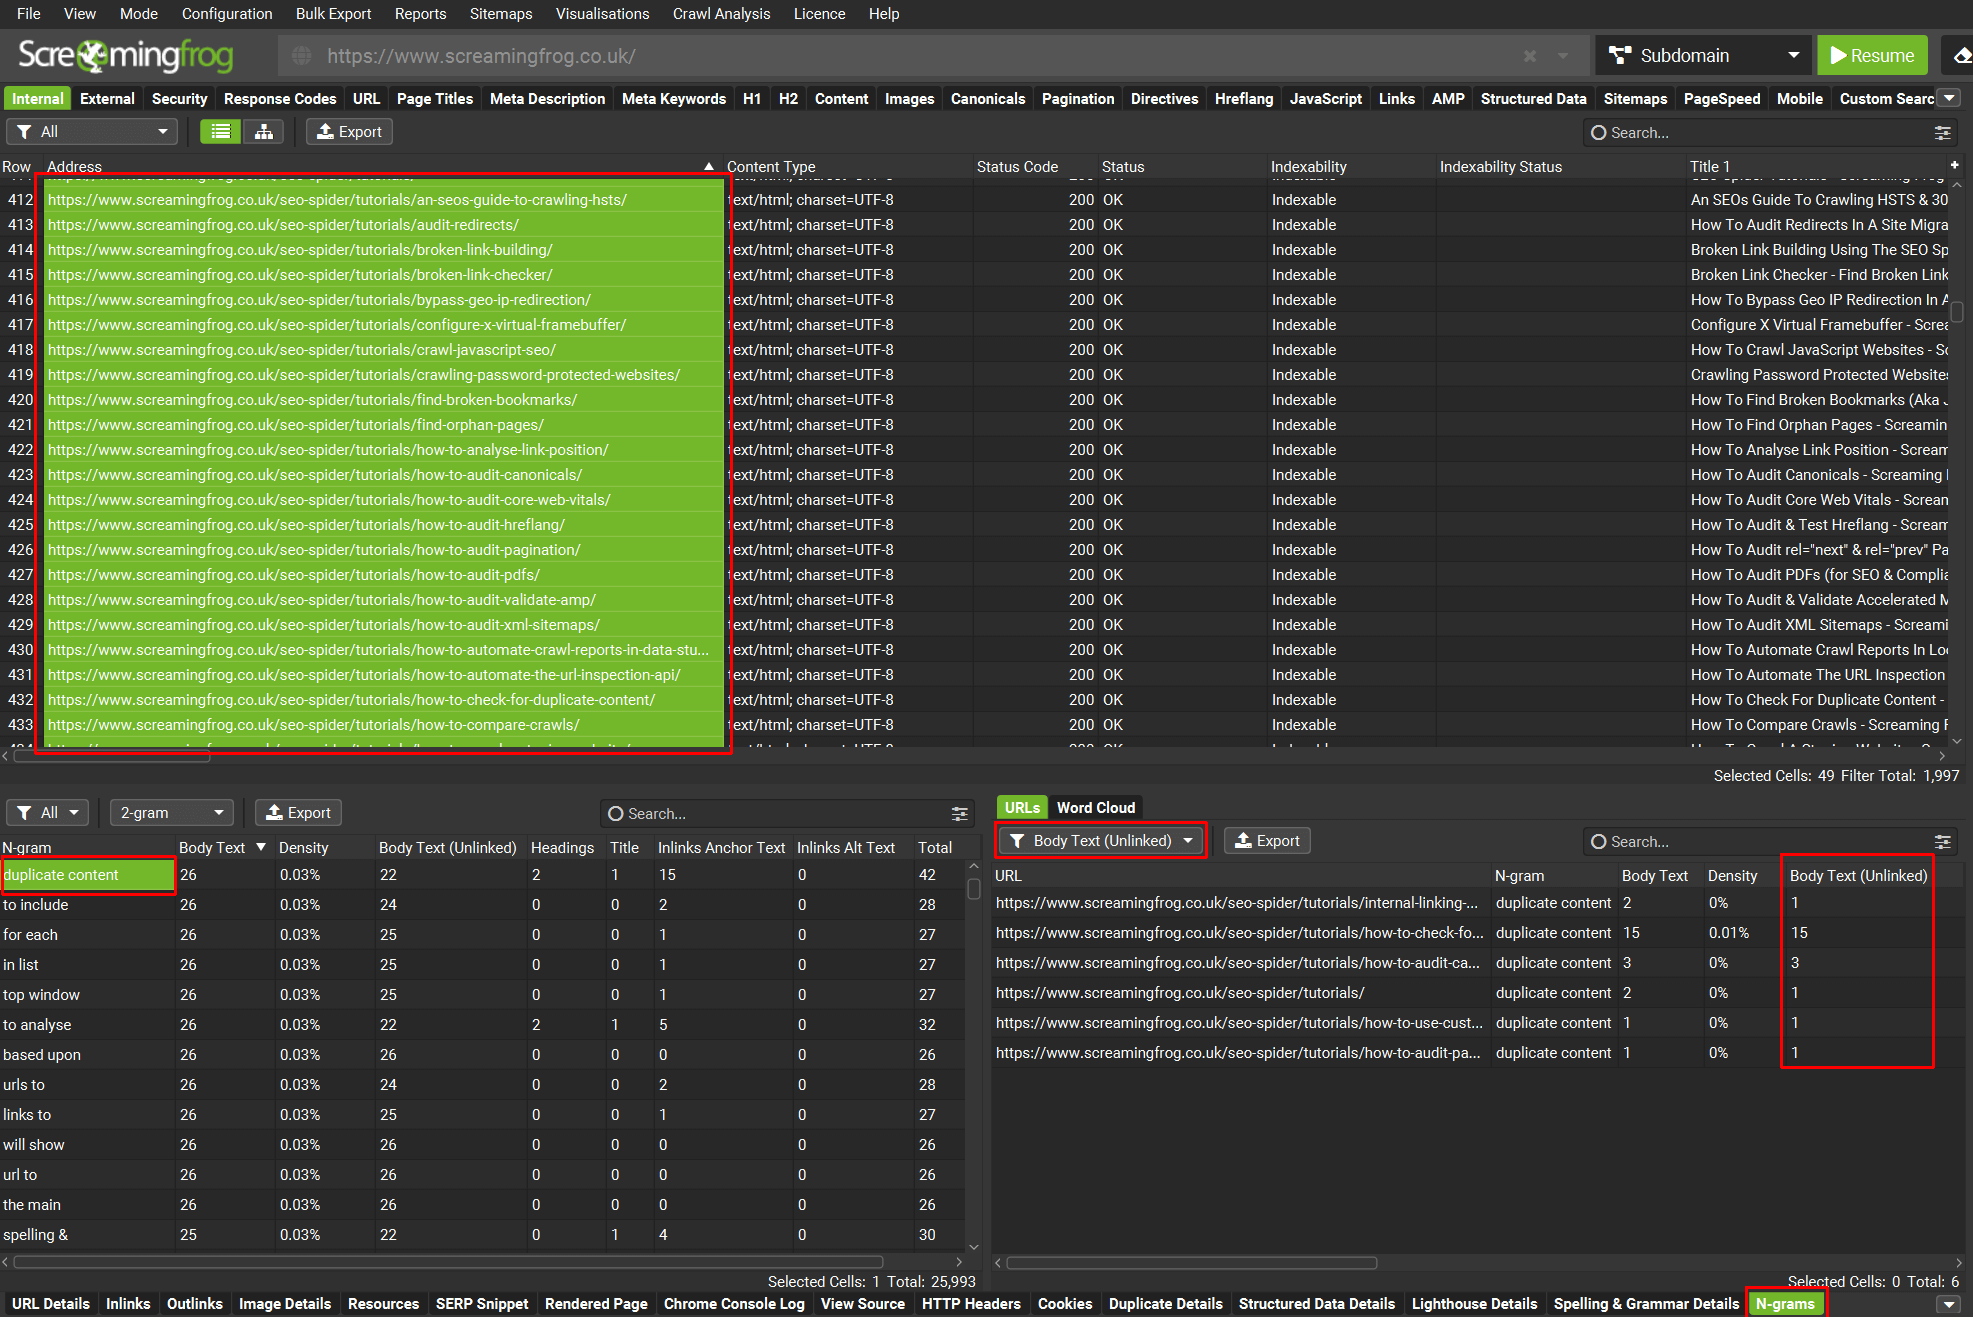
In the example above, the tutorial pages have been highlighted to search for the 2-gram ‘duplicate content’.
The right-hand side filter has been set to ‘Body Text (Unlinked)’ and the column of the same name shows the number of instances unlinked on different tutorial pages that could be considered to link to an appropriate guide on how to check for duplicate content as an example.
The n-grams search function uses regex, so it’s also easy to search for a list of phrases with the following syntax –
[N-gram] Matches Regex 'word|word2|word3'
Multiple n-grams can then be selected at a time and exported in bulk via the various options.
Find Non-descriptive Anchor Text Across Your Website
Anchor text that “speaks” about the target URL is not only important for accessibility, but for a search engine’s understanding of your site, linking structure and topical hierarchy. Therefore, it’s relevant to ranking.
Anchor text is the visible text used in hyperlinks (the typical underlined “blue links”). Best practice is to choose words that provide users and search engines with context about the content of the target page.
It sure helps to be aware of this and implement “speaking” anchor text whenever you practise internal linking. Even so, with multiple people working on a site and legacy practices, this can become an issue at scale really quickly.
You might already have seen examples of non-descriptive anchor text with no SEO value on your website: “click here”, “more” etc.
To investigate this issue further, click on ‘Configuration > Spider > Preferences’ in Screaming Frog.
You’ll already see some suggestions and can add your own terms in the field ‘Non-descriptive anchor text’.

After running your crawl and a crawl analysis with the ‘Links’ box ticked, you’ll find the results in the ‘Links’ tab in the filter “Non-Descriptive Anchor Text In Internal Outlinks”.

You can see what internal anchors are non-descriptive, by clicking on the URLs in the top window, and then the lower ‘Outlinks’ tab. Adjust the ‘All Links’ filter to ‘Anchors’ to see any outlinks from the page aggregated by anchor text.

Then use the ‘Non-Descriptive’ column to quickly identify the anchor text, and click ‘Show Links with Anchor Text’ to see what pages they are on.

Export these easily in bulk via ‘Bulk Export > Links > Non-Descriptive Anchor Text In Internal Outlinks’.
Your task now is to turn these word chunks into something of value: descriptive, helpful anchor text.
Find Orphaned Pages
An orphaned page (or orphan page) is a page that cannot be reached by following the internal links of a website.
This means that visitors to a website will probably not see the content stored there, unless they land on the URL directly via other sources (external links, newsletters, bookmarks, sitemap etc.).
Since neither crawlers nor website users can reach the page easily, orphaned pages are way less likely to be found, crawled, indexed and ranked well by search engines.
Maybe you think orphan pages aren’t all that common, but they’re often created without intention:
- They’re technically important pages, but their incoming links or corresponding pages have been deleted.
- They’re pages that should have been deleted or redirected (old campaign landing pages, discontinued products).
- They should have never existed (for example some sort of testing pages).
I’ve seen dedicated “SEO Pages” that were deliberately created to not appear in navigations or sitemaps but should serve as landing pages (with loads of internal links pointing OUT to send users on their merry way). Pages like these are simply not set up to be winners.
Let’s go find and eradicate orphaned pages. But how do we do that in a tool that follows links where there are none?
Well, we need outside references of when these pages popped up – in Google Analytics, Search Console or your own Sitemap, for example.
The SEO Spider does a splendid job at combining these sources and providing you with the orphaned pages in a neat filter.
There’s already a great guide on how to discover orphan pages with the Screaming Frog SEO Spider right here.
Your action point is pretty simple: Delete, 410 response code or redirect these pages, or alternatively fill them with life and links!
Find JavaScript Links
Google’s treating and rendering of JavaScript is its own rabbit hole.
The Screaming Frog team have put together a great guide on crawling JavaScript websites if it’s something you’re new to.
For now, it suffices to say that JS links carry the risk of not being seen or interpreted the same way as their href counterparts.
Here’s how you can find JavaScript links in the Screaming Frog SEO Spider.
- Allow JavaScript Rendering.
This isn’t selected by default because JS rendering requires a lot more resources and will take more time than your ‘Text only’ option. Go to ‘Configuration > Spider > Rendering’ and select ‘JavaScript’.

- Crawl your website.
When you now start a crawl, the SEO Spider searches both the original and the rendered HTML. This makes it possible to identify pages with content or links that are only available on the client side after rendering and to become aware of other JavaScript dependencies.
Once your crawl is finished, navigate to the ‘JavaScript’ tab. You can use the dropdown to select ‘Contains JavaScript Links’.

This selection will show you pages with links that are only visible in the rendered HTML after JavaScript has been executed.
If a page and therefore its link are important to you, make sure to include them in the raw HTML in their href form to ensure trouble-free processing.
Final Thoughts
Thank you for joining me on this wild ride through the internal linking auditing world with various functions and opportunities of the Screaming Frog SEO Spider. I hope you had fun and will have even more when trying these tips & tricks.
Do you have any questions, remarks, additions?
I’d love to hear about your thoughts and experiences with these methods! Feel free to reach out on LinkedIn.


