
SEO Spider
How To Connect The SEO Spider MCP To Claude.ai & ChatGPT Using Cloudflare Tunnel
Introduction
The Screaming Frog SEO Spider MCP Server lets AI assistants run crawls, analyse data and export reports directly from the SEO Spider. Claude and ChatGPT connect to custom MCP servers from their own cloud infrastructure, so they can’t reach the SEO Spider running on your machine at localhost.
Cloudflare Tunnel makes the SEO Spider reachable at a public hostname without opening any ports. Cloudflare Access then locks that hostname down with OAuth, so only people you approve can sign in and use it. The same set-up works for Claude (web, desktop and mobile) and ChatGPT.
This tutorial shows how to connect the SEO Spider MCP to Claude and ChatGPT using Cloudflare Tunnel, secured with Cloudflare Access and Managed OAuth.
Requirements
- The SEO Spider with the MCP Server enabled.
- A Cloudflare account with a domain on Cloudflare, and Cloudflare Zero Trust (the free plan is fine).
- Claude web interface with custom connectors, and/or ChatGPT with developer mode.
- Administrator access on the machine running the SEO Spider, to install cloudflared as a service.
1) Start the SEO Spider MCP Server
Click ‘File > Settings > MCP Server’, enable the Node.js runtime environment, and click ‘Start MCP Server’.
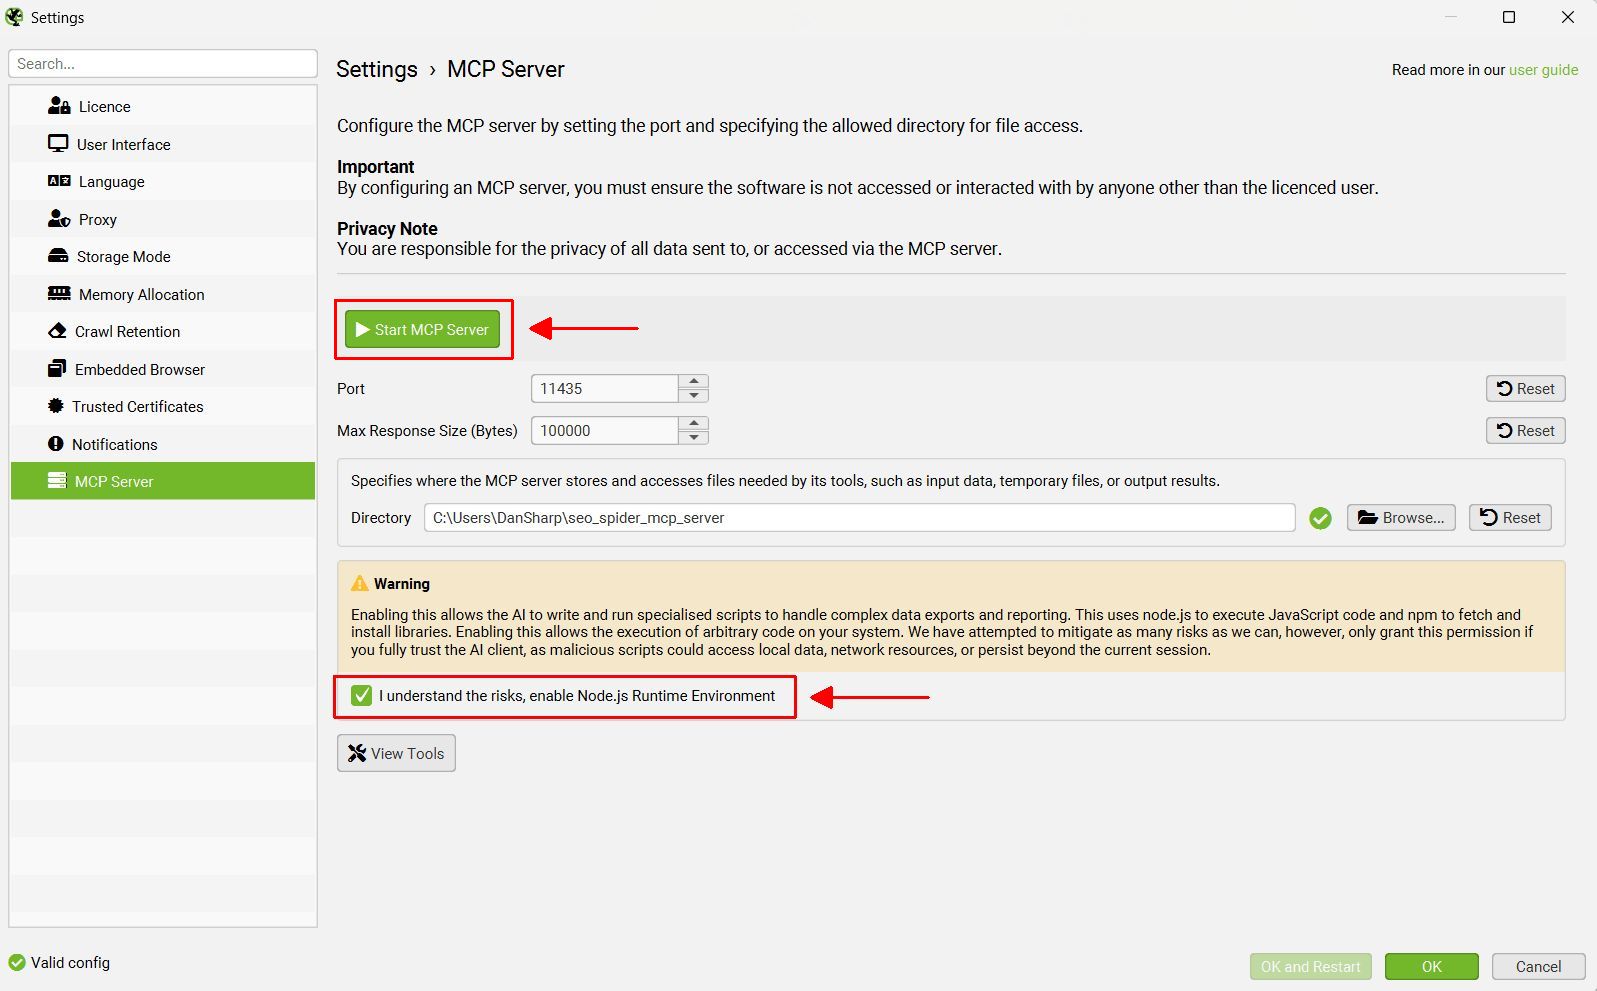
The MCP Server will run in Streamable HTTP mode at http://localhost:11435/mcp. The SEO Spider must stay open with the MCP Server running whenever you use it from Claude or ChatGPT.
2) Create a Cloudflare Tunnel
In the Cloudflare dashboard, go to ‘Zero Trust > Networking > Tunnels’ and create a new Cloudflared tunnel. Give it a name, such as ‘SEO Spider’.
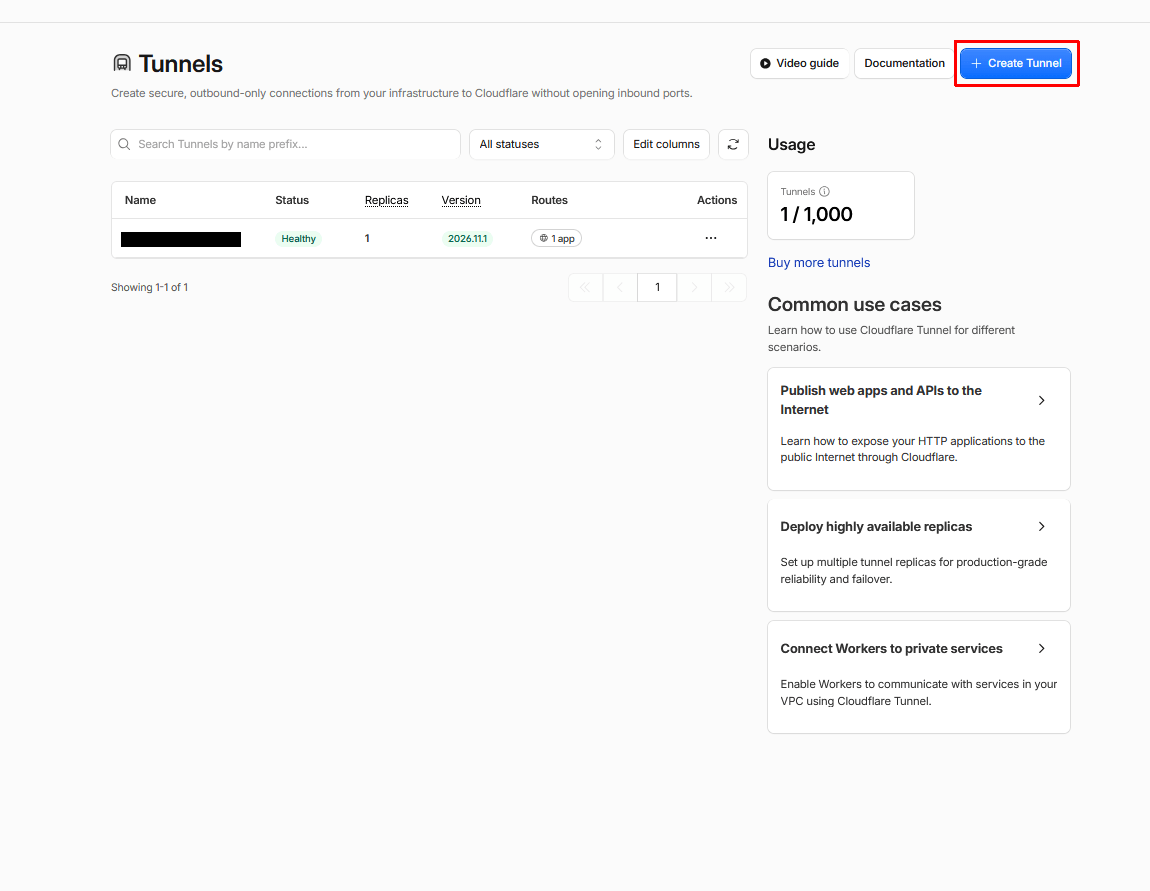
Cloudflare will show install instructions for your operating system. On Windows, download and run the cloudflared installer, then open Command Prompt as Administrator (right-click Command Prompt and select ‘Run as administrator’) and run the command shown in the dashboard. It looks like –
cloudflared.exe service install <your-token>
This installs cloudflared as a Windows service, so the tunnel starts automatically with your machine. The token is a secret, so don’t share it. If it’s ever exposed, delete the tunnel and create a new one.
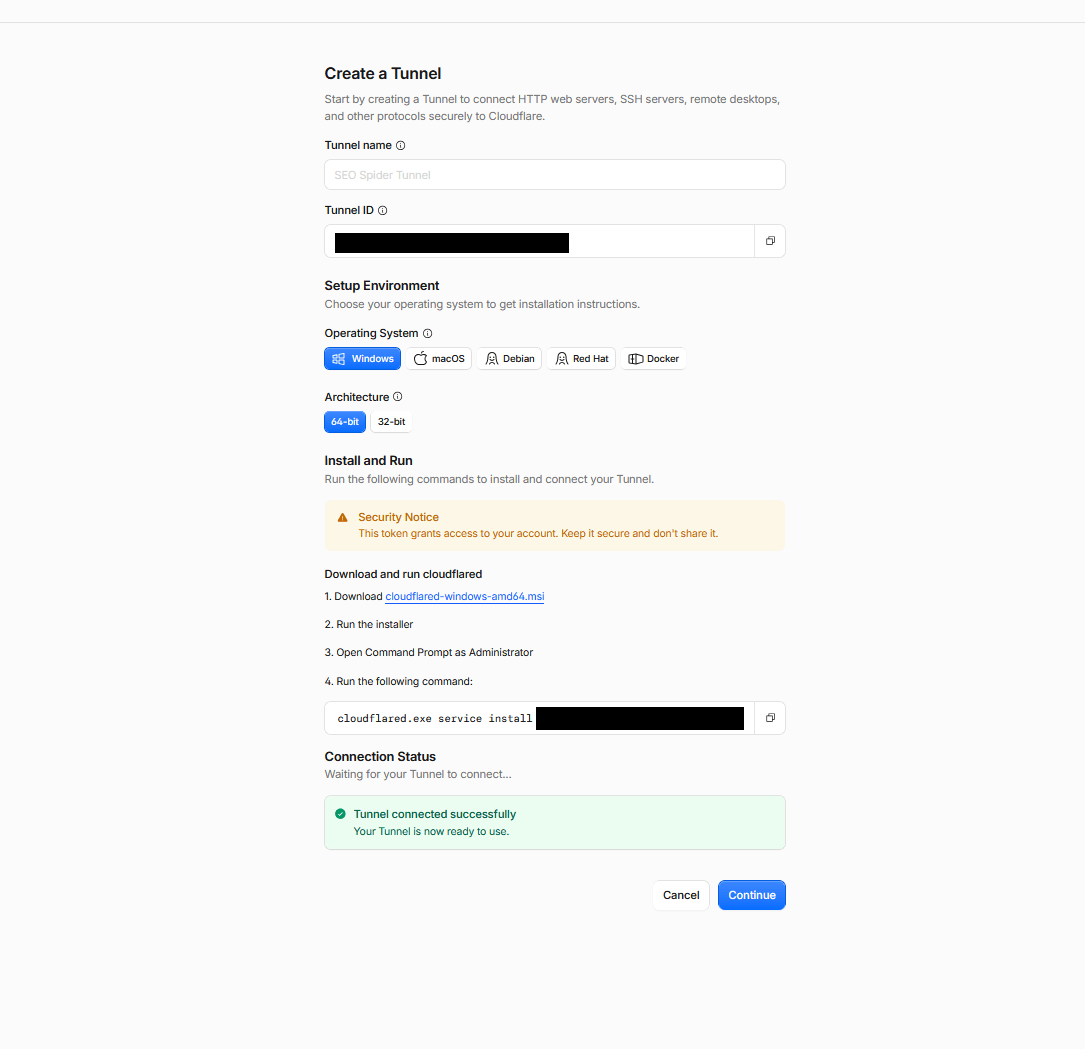
The tunnel should show as ‘Healthy’ in the dashboard within a minute and then you can click ‘Continue’.
3) Add a Public Hostname
Click the three dots to the right of the tunnel, then ‘Configure > Add Route’ and select ‘Published Application’. In the tunnel settings, add a public hostname that points to the SEO Spider –
- Subdomain – For example, sf-mcp.
- Domain – A domain you manage in Cloudflare.
- Service URL – localhost:11435
- Path – /mcp
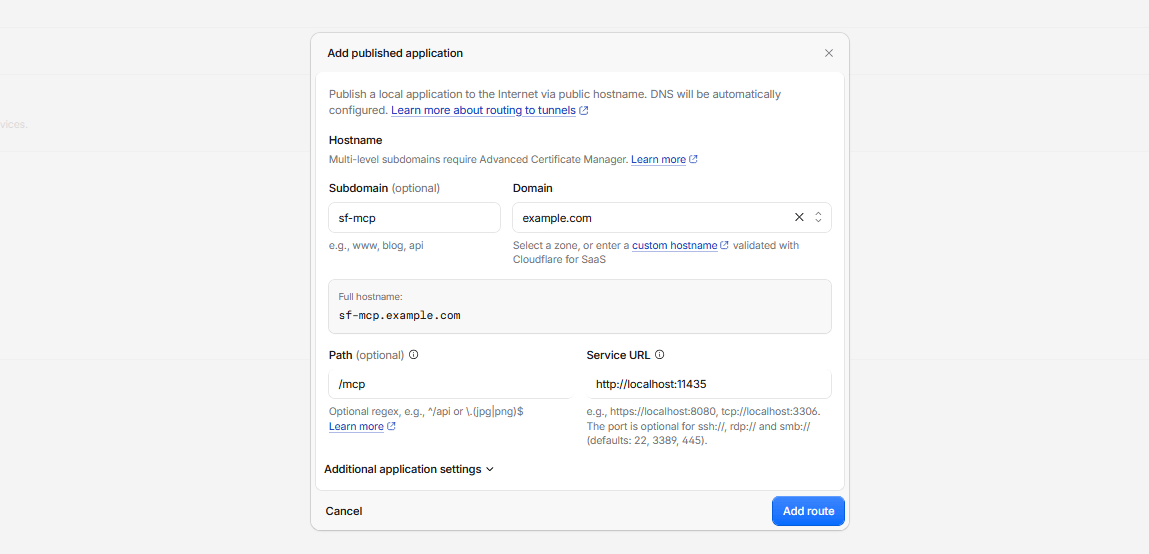
The MCP endpoint will be https://sf-mcp.yourdomain.com/mcp. It’s now publicly reachable without a login, so stop the MCP Server in the SEO Spider until you’ve completed steps 4 and 5, then start it again.
4) Protect the Hostname with Cloudflare Access
Go to ‘Zero Trust > Access controls > Applications’, click ‘Add an application’, choose ‘Self-hosted and private’ and click ‘Continue with Self-hosted and private’. Configure as outlined below –
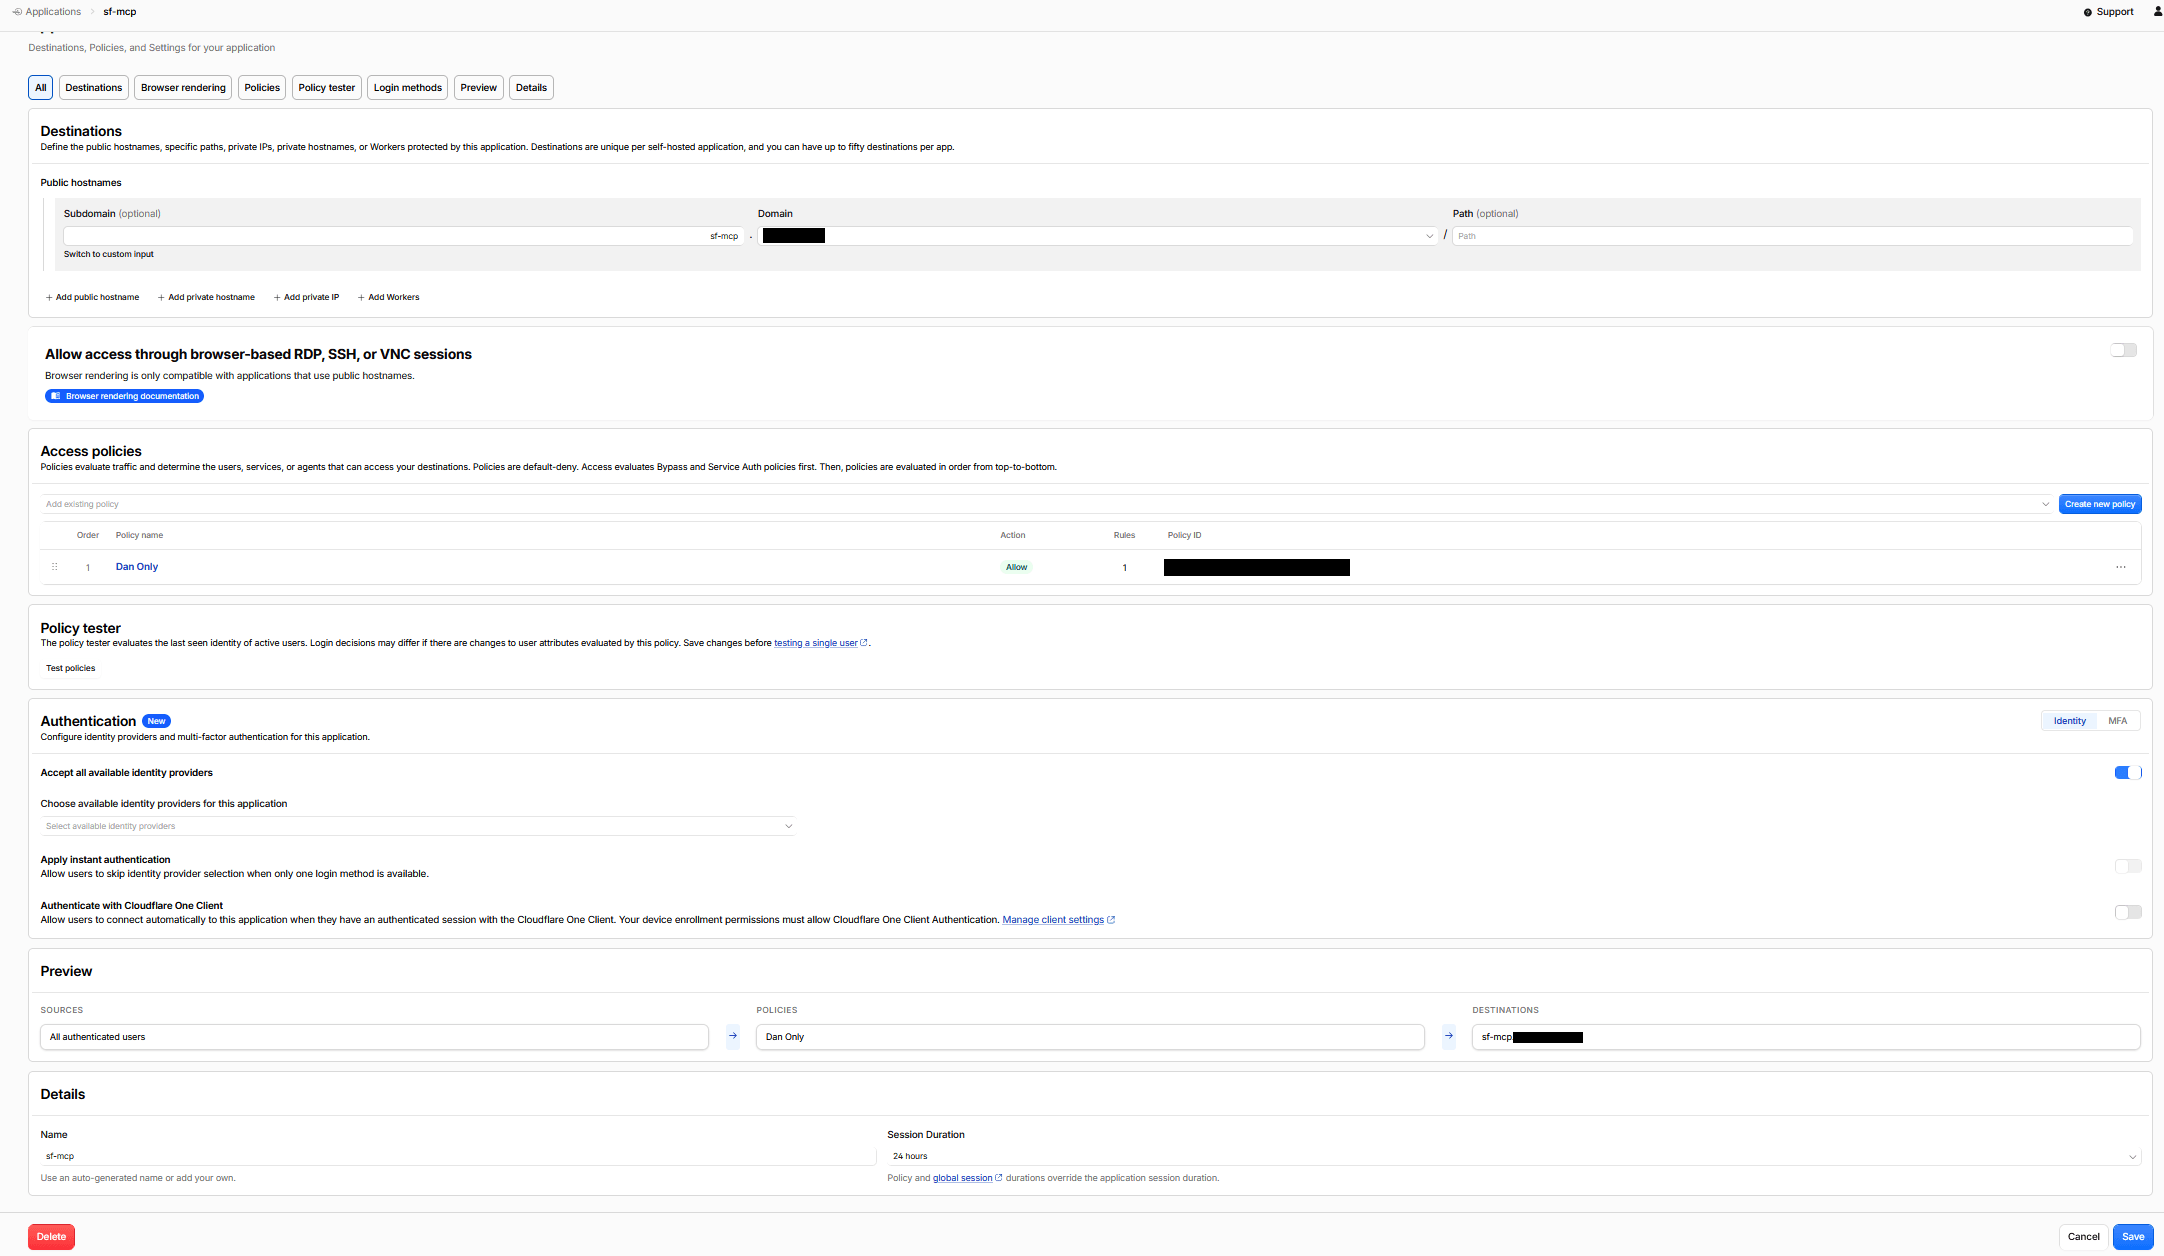
- Destinations – Add your public hostname (‘subdomain’ and ‘domain’ fields at the top). Leave the path empty, so the whole hostname is protected, including the OAuth discovery URLs.
- Access policy – Click ‘Create new policy’, set the action to ‘Allow’ and add an Include rule for ‘Emails’ with your email address.
- Authentication – Leave ‘Accept all available identity providers’ on.
- Name – For example, ‘sf-mcp’.
Click ‘Create’. Visiting the endpoint in a private browser window should now show a Cloudflare sign-in page.
Use the ‘Self-hosted’ application type, not the ‘MCP server’ type, which requires the server to validate Cloudflare’s access tokens itself.
5) Enable Managed OAuth
Managed OAuth turns Cloudflare Access into an OAuth server, which lets Claude and ChatGPT sign in through Access. The SEO Spider doesn’t need any changes.
Edit the application by clicking the 3 dots and ‘Edit’, then click ‘Additional settings’ and turn on ‘Managed OAuth’ via the toggle. Add the following to the allowed redirect URIs –
https://claude.ai/api/mcp/auth_callback

https://claude.com/api/mcp/auth_callback

https://chatgpt.com/connector/oauth/*
The first two are for Claude, and the third is for ChatGPT. The wildcard covers the callback URL ChatGPT creates for each connector, so it doesn’t need to be copied from ChatGPT separately.
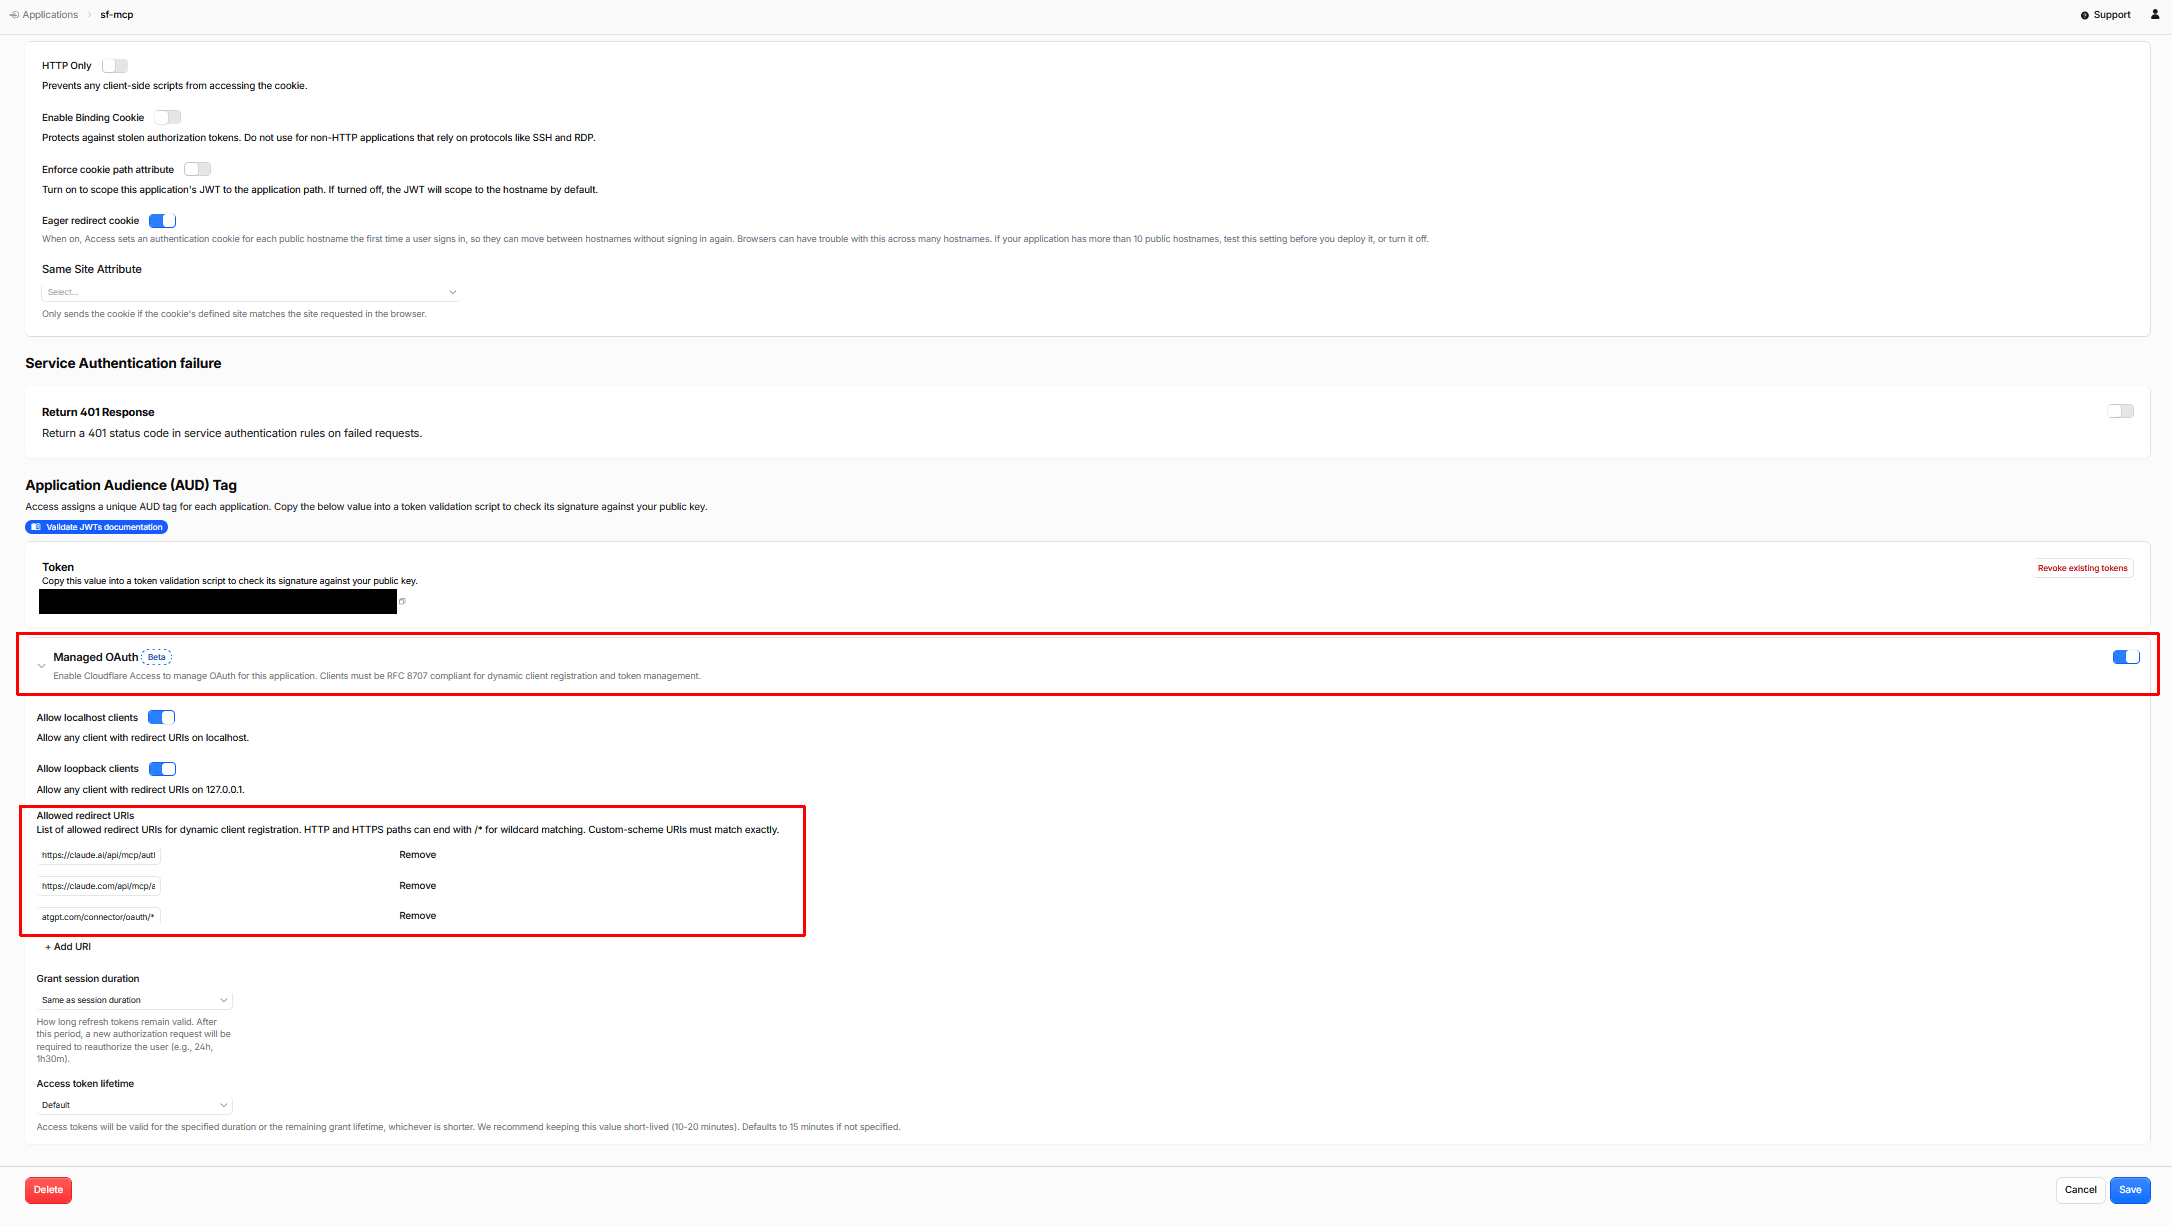
Leave ‘Allow localhost clients’ and ‘Allow loopback clients’ off, then save.
6) Connect Claude
In Claude, go to ‘Plugins > Add > Add Custom Connector’ and enter your endpoint, including /mcp –
https://sf-mcp.yourdomain.com/mcp
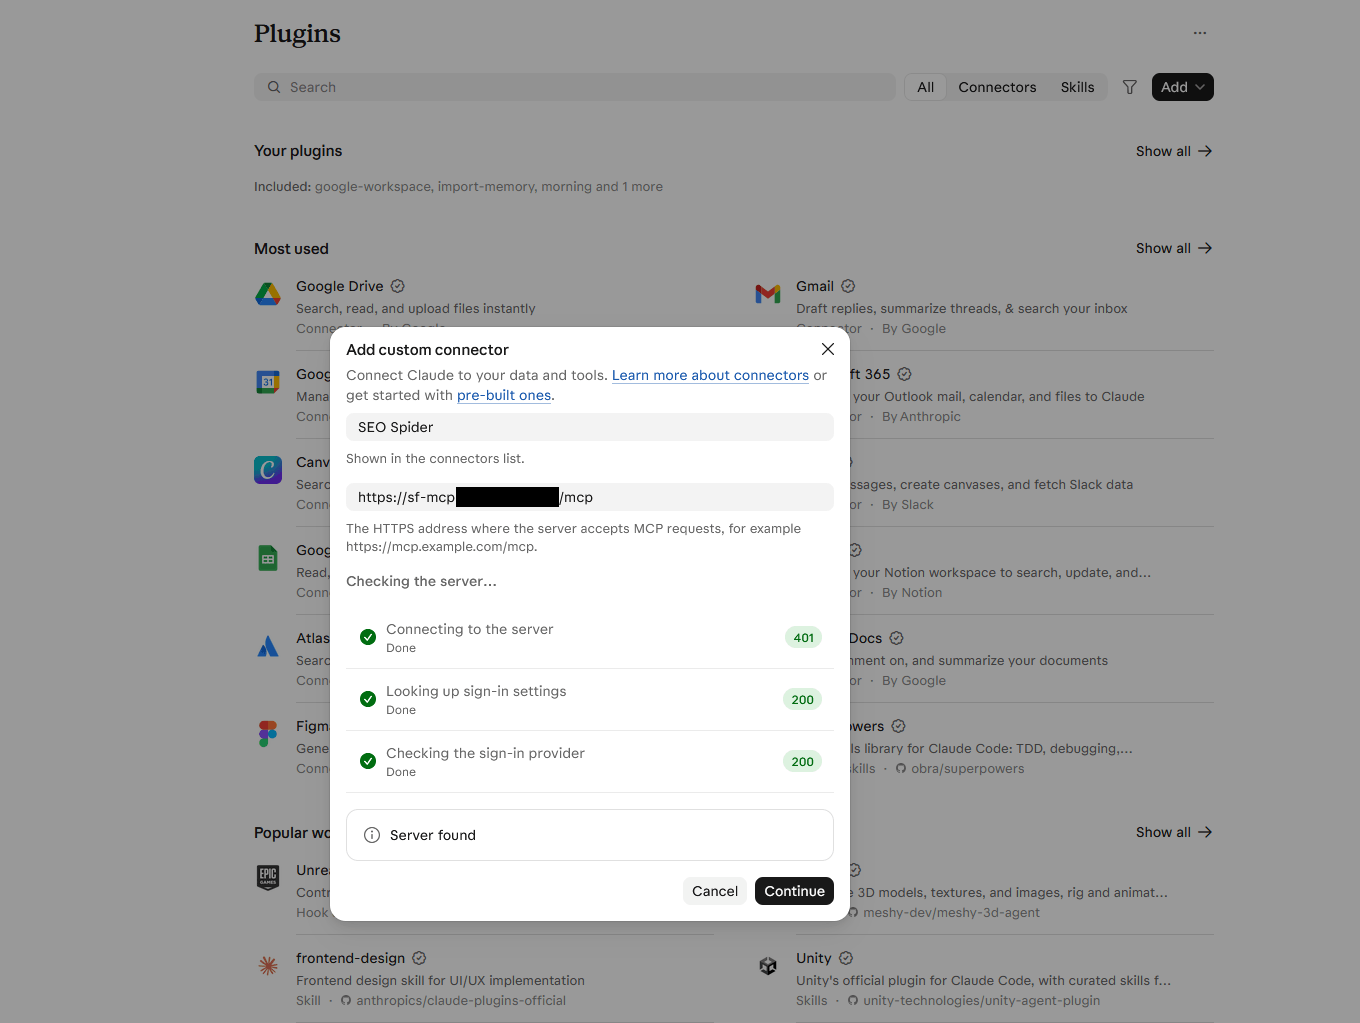
Claude should detect the OAuth settings automatically. Leave ‘Sign in now’ and ‘Register automatically’ selected, then click ‘Add’.
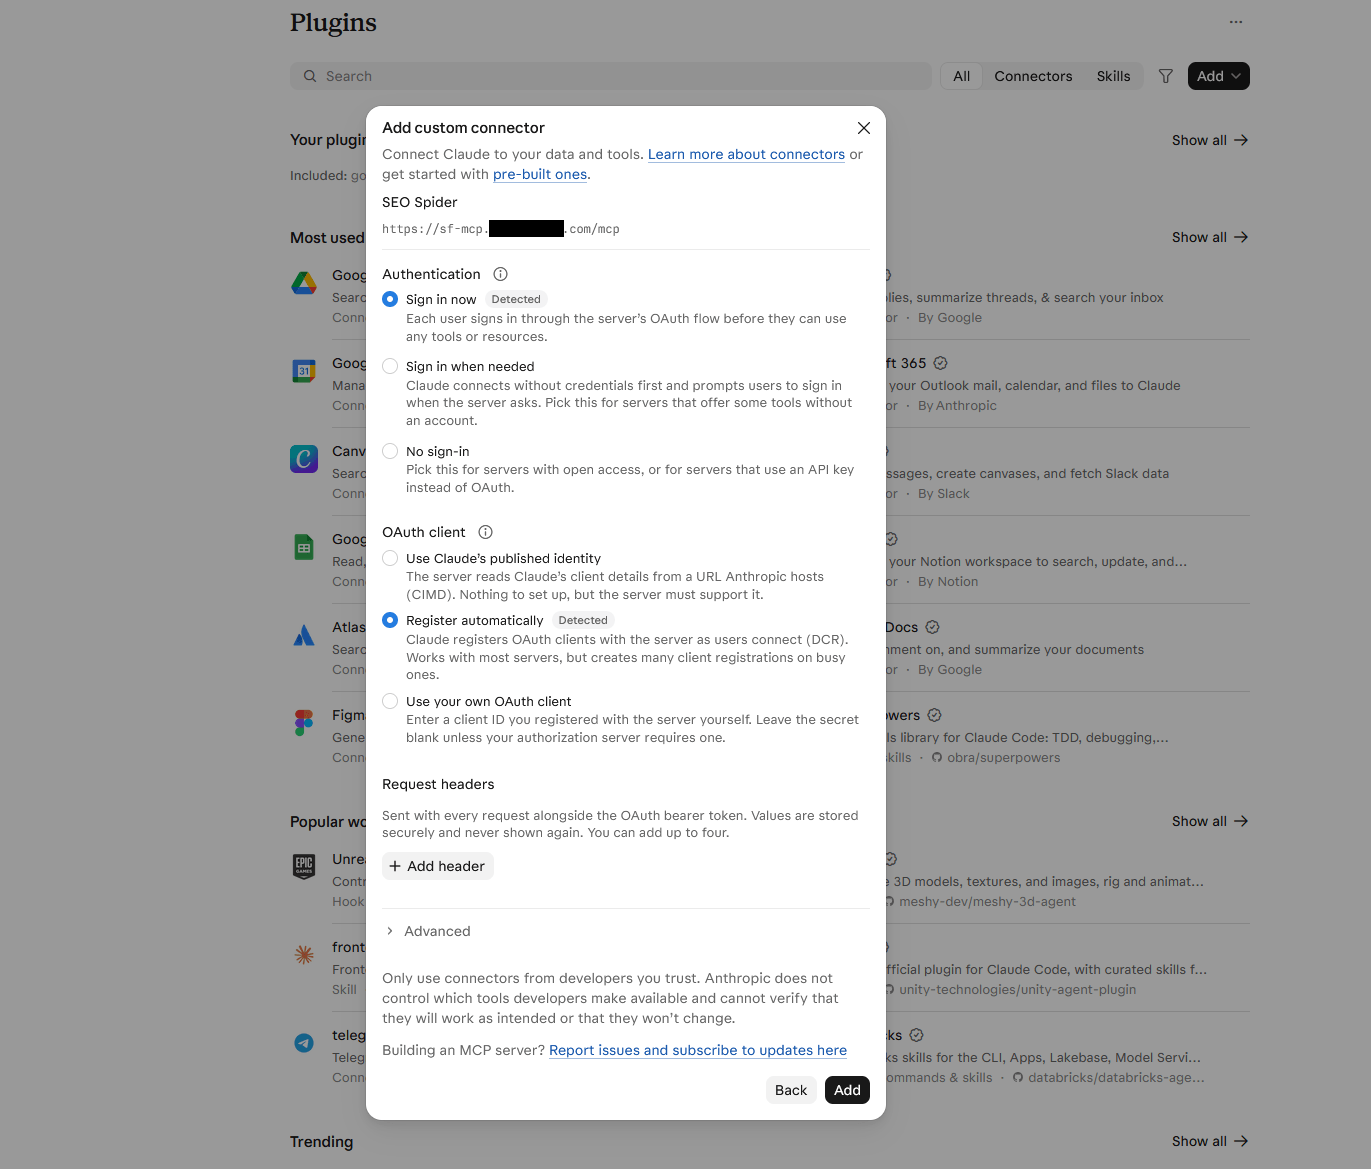
Click ‘Allow’ and sign in on the Cloudflare page that opens.
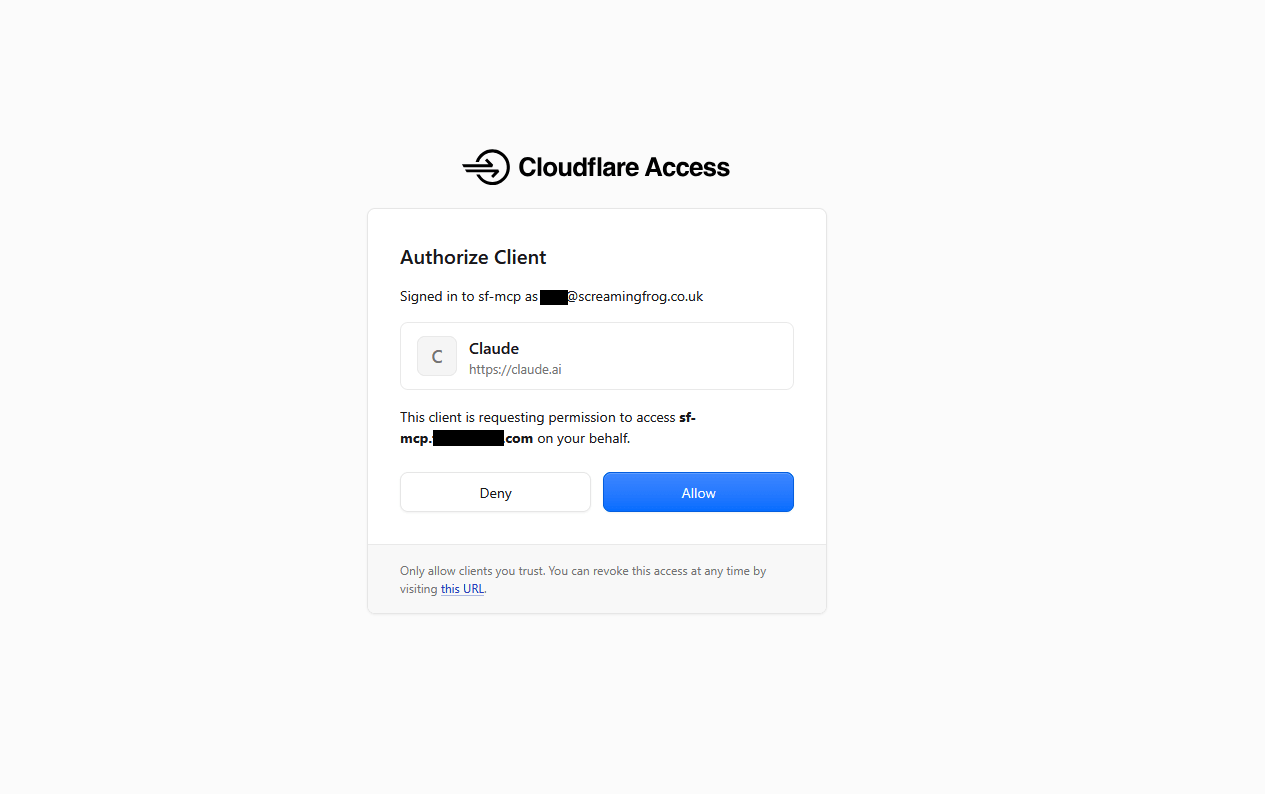
Once connected, the connector is available in new chats, and in the Claude desktop and mobile apps.
7) Connect ChatGPT
In ChatGPT, go to ‘Plugins’, click ‘Add’ and select ‘Add custom MCP server’.
- Connection – Select ‘Server URL’ (not ‘Tunnel’, which is for OpenAI’s own tunnels) and enter your endpoint, including /mcp.
- Authentication – OAuth. Under ‘Advanced OAuth settings’, ChatGPT should discover the Cloudflare OAuth endpoints, including a Registration URL.
- OIDC enabled – Leave unticked.
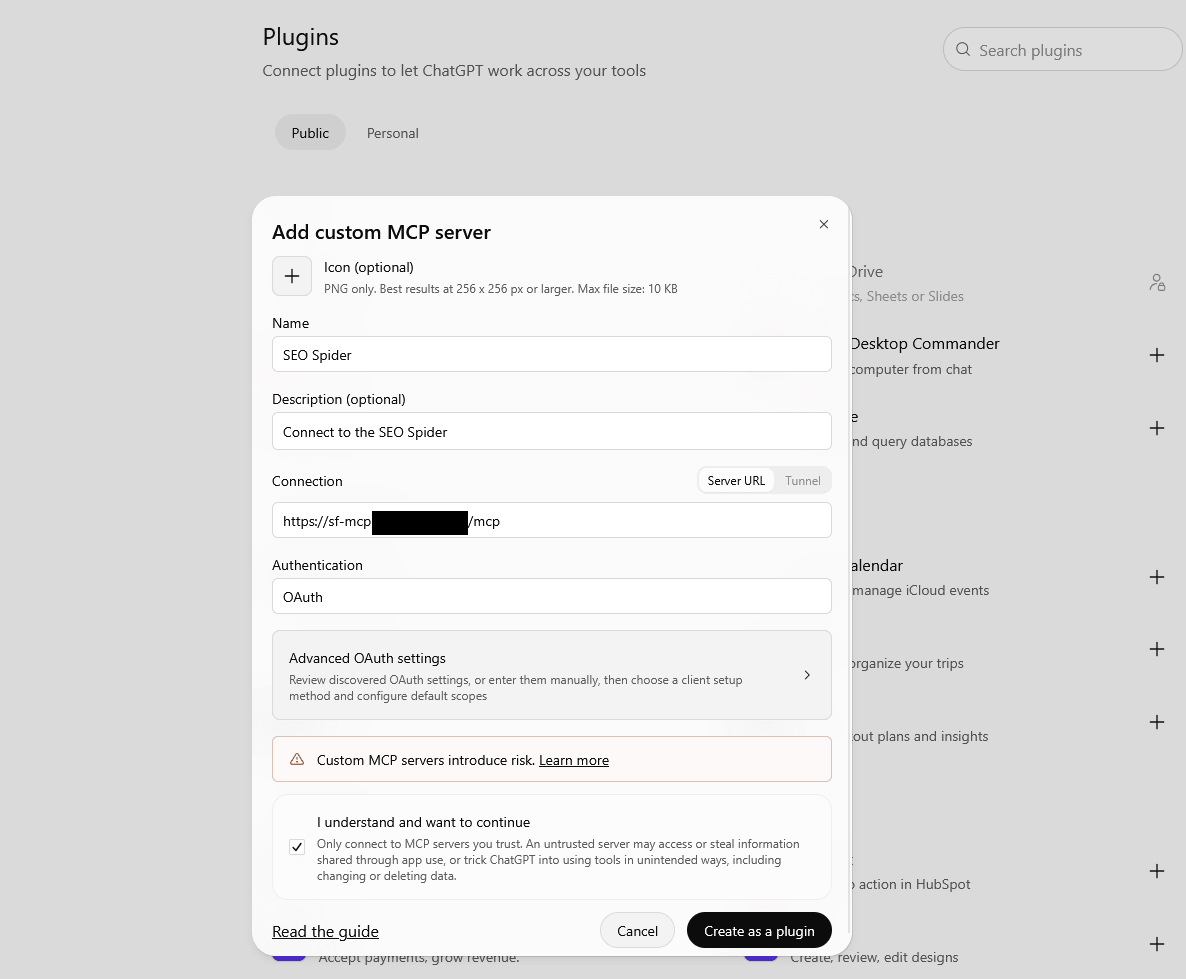
Create the plugin, then click ‘Connect’.
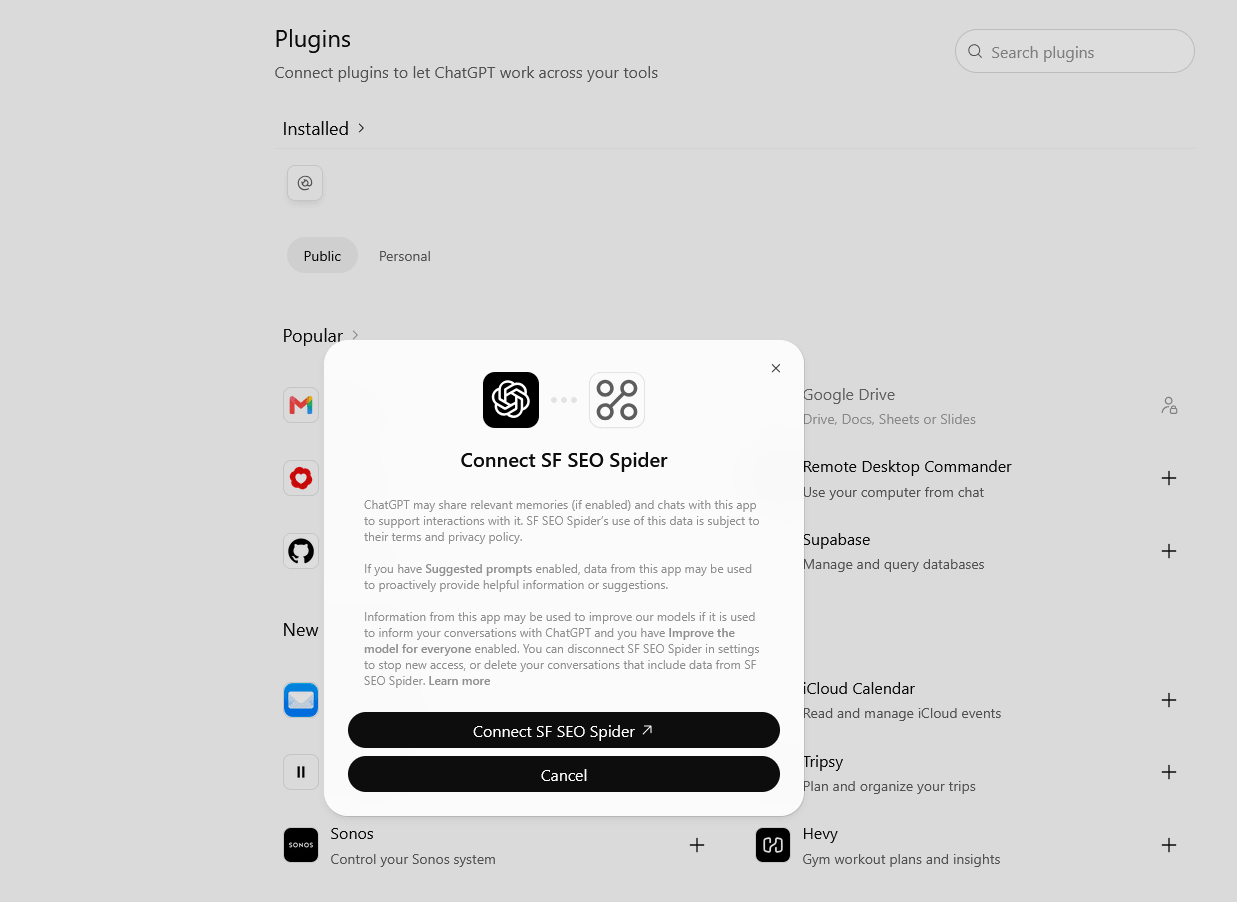
Click ‘Allow’ and sign in on the Cloudflare page that opens.
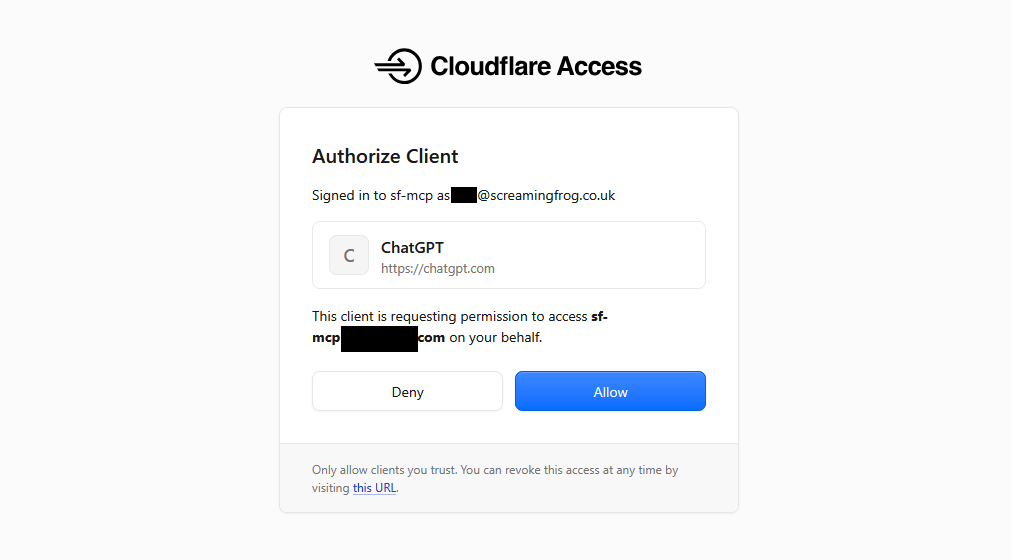
Once connected, the connector is available in new chats for ChatGPT.
8) Allow Other Users (Optional)
This step is optional. Skip it if you are the only person using the connection.
New Zero Trust accounts sign users in with their Cloudflare account by default, and this is often restricted to members of your Cloudflare account. To let someone else connect without a Cloudflare account, add the One-time PIN login method, which emails them a sign-in code –
- Go to ‘Zero Trust > Integrations > Identity providers’, click ‘Add new’ and select ‘One-time PIN’.
- Check the application’s ‘Authentication’ settings allow it. ‘Accept all available identity providers’ includes it automatically.
- Add their email address to the application’s ‘Allow’ policy.
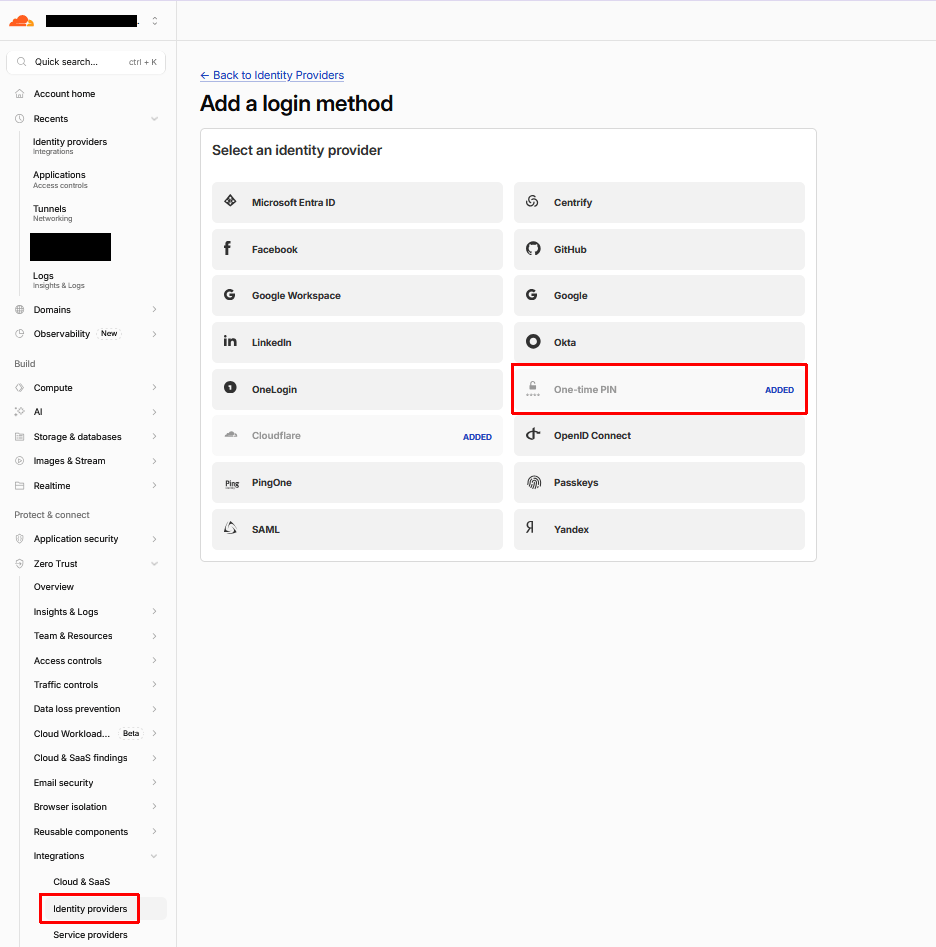
They then add the connector in their own Claude or ChatGPT account and sign in with their email and the code they receive. Google sign-in can be added in the same way, via ‘Integrations > Identity providers’.
Everyone shares the same SEO Spider instance, so changes one person makes, such as switching crawl mode or clearing a crawl, affect everyone. Check you have an SEO Spider licence for each user.
Only add people you’d trust with access to your machine. Their AI assistant can run scripts on it with your Windows permissions.
9) Test the Connection
Start a new chat, enable the SEO Spider plugin and try a simple request, such as ‘Crawl www.example.com using the SEO Spider’.
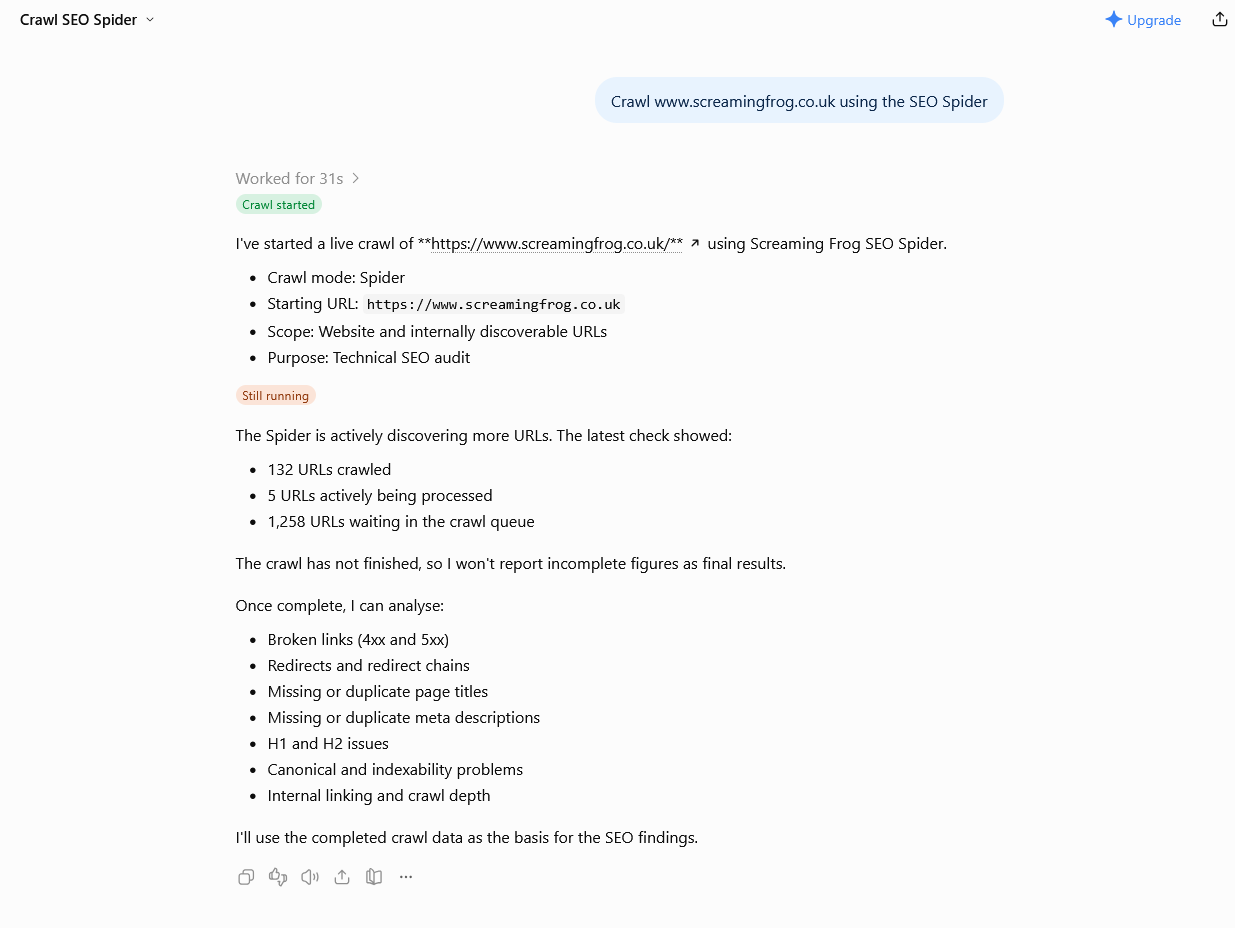
You should receive a positive response that ChatGPT or Claude.ai has connected, and started the crawl. If you’re having problems, read on.
10) Start the Connection Next Time
The set-up only needs to be completed once. As cloudflared runs as a Windows service, the tunnel starts automatically with your machine.
After restarting, open the SEO Spider, click ‘File > Settings > MCP Server’ and click ‘Start MCP Server’. If you enable ‘Auto-start MCP Server on application launch’, this step also isn’t required.
That’s it. There’s no need to add the connector in Claude or ChatGPT again. Start a new chat and enable the SEO Spider connector.
Claude or ChatGPT may occasionally ask you to sign in again when your Cloudflare session expires. Click ‘Connect’ and sign in as before.
If the connection doesn’t work, check the tunnel shows as ‘Healthy’ under ‘Zero Trust > Networking > Tunnels’. If it doesn’t, open Windows ‘Services’, find ‘Cloudflared agent’ and click ‘Start’.
Security
- Who can connect – Only people in your Access policy can sign in. Requests without a valid token are rejected by Cloudflare before they reach your machine.
- Only approve your own sign-ins – Only click ‘Allow’ on a Cloudflare prompt you started yourself by connecting Claude or ChatGPT. If someone sends you a link asking you to authorise access, decline it, as approving would connect their AI assistant to your SEO Spider.
- When it’s reachable – The tunnel runs whenever your machine is on. Stop the MCP Server or close the SEO Spider when you’re not using it. To take it offline completely, stop the ‘Cloudflared agent’ service in Windows ‘Services’.
- What the AI can do – MCP tools can write files and run scripts on your machine. Review tool calls before approving them, particularly after crawling unfamiliar websites, which may contain text designed to manipulate AI assistants.
- Where your data goes – Anything the AI reads is sent to Anthropic or OpenAI and passes through Cloudflare, including crawl data, page content and data from connected APIs such as Search Console or Analytics. Check this fits your client agreements before crawling client websites.
- Keep secrets private – Never share the cloudflared token or paste it into chats.
- Licensing – You must ensure the SEO Spider is only accessed by licensed users. Licences are per person. Each person connecting to the software requires their own licence.
- Removing access – To remove someone, delete their email from the Access policy and click ‘Revoke existing tokens’ in the application’s settings. To disconnect completely, delete the connector in Claude or ChatGPT, delete the Access application and tunnel in Cloudflare, and run cloudflared.exe service uninstall.
Support
This tutorial should help users connect the SEO Spider MCP to Claude and ChatGPT using Cloudflare Tunnel. If you run into problems, check the common issues below –
- ‘Cannot establish a connection to the service control manager: Access is denied’ – Command Prompt isn’t running as Administrator. Reopen it with ‘Run as administrator’.
- ‘Couldn’t register with sign-in service’ in Claude – Claude’s callback URLs are missing from the Managed OAuth allowed redirect URIs (step 5).
- ‘Some app settings were rejected’ in ChatGPT – Check ‘Server URL’ is selected rather than ‘Tunnel’, and that ChatGPT’s callback URLs are allowed in step 5.
- Sign-in restricted to account members – The user is signing in with the default Cloudflare login. Add the One-time PIN method (step 8).
- Cloudflare error after signing in – Sign-in happens at Cloudflare, so it can succeed even when the SEO Spider isn’t reachable. Check the SEO Spider is open with the MCP Server started, and the tunnel is ‘Healthy’.
For more detail, check out the following guides –
Alternatively please contact us via support and we can help.
This documentation is subject to our Terms of Use.


