SEO Spider General
User Guide
Installation
The Screaming Frog SEO Spider can be downloaded by clicking on the appropriate download button for your operating system and then running the installer.
The SEO Spider is available for Windows, Mac and Ubuntu Linux. The SEO Spider is not available for Windows XP.
The minimum specification is a 64-bit OS with at least 4gb of RAM available.
The SEO Spider is capable of crawling millions of URLs with the correct hardware, memory and storage. It is able to save crawl data in RAM, or to disk in a database.
For crawls under 200k URLs, then 8gb of RAM should generally be sufficient. However, to be able to crawl over 1 million URLs, an SSD and 16gb of RAM (or higher) is our recommended hardware.
If you’re new to the SEO Spider, please read our getting started guide.
Installation on Windows
These instructions were written using Windows 10 are valid for all recent versions of Windows.
Download the latest version of the SEO Spider. The downloaded file will be named ScreamingFrogSEOSpider-VERSION.exe. The file will most likely download to your Downloads directory which can easily be accessed via File Explorer. The download may pause at 100% complete while Windows performs a security scan.
Installation
The downloaded file is an executable that must be run to install the SEO Spider. Go to your Downloads folder in File Explorer, double click on the downloaded file, and you will see the following screen.
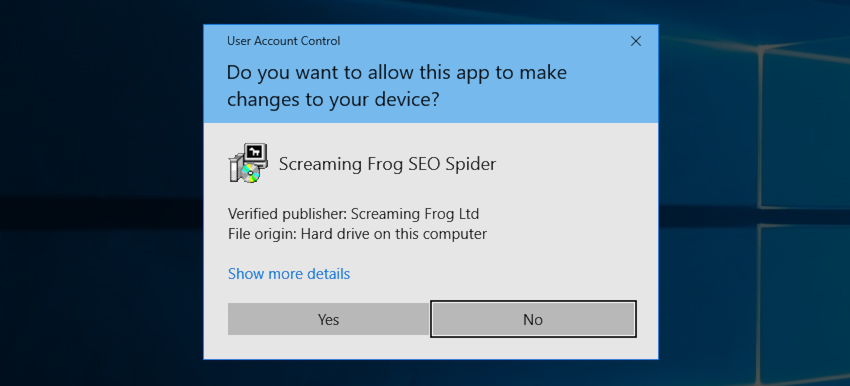
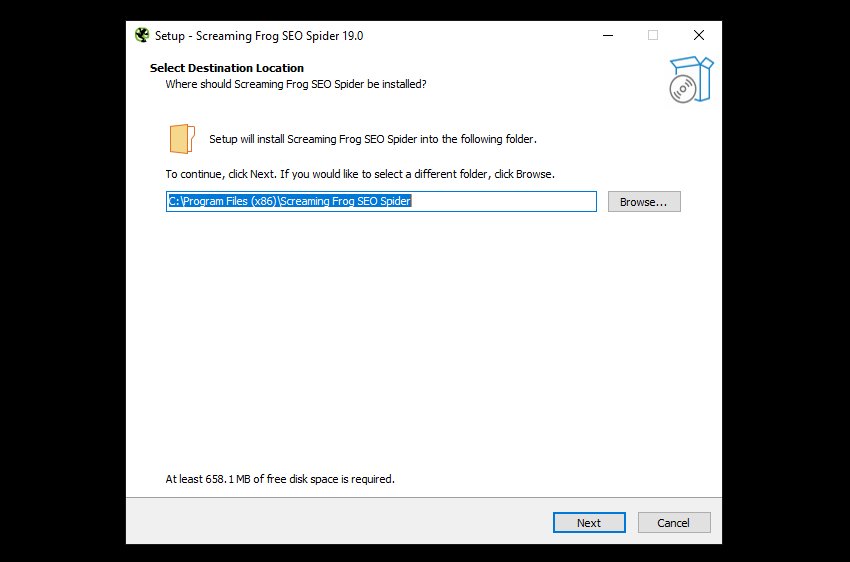
Click “Yes”, then, unless you’d like to install in anything other than the default location, choose ‘Next’ on the screen below.
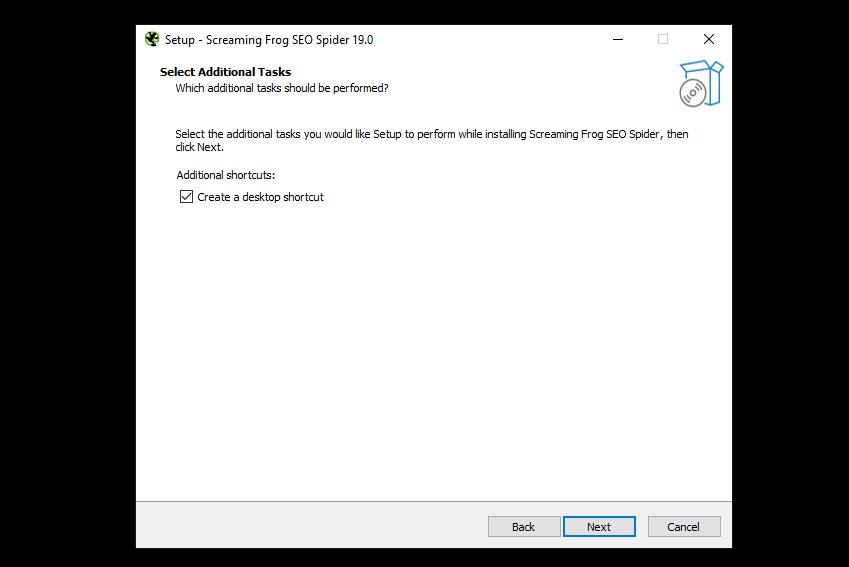
You will then be asked if you would like a desktop shortcut which is selected by default. Click ‘Next’ again.
Now click ‘Install’ to start the installation.

The installation process will start, copying files required by the SEO Spider to your computer, when complete, you will see this screen.
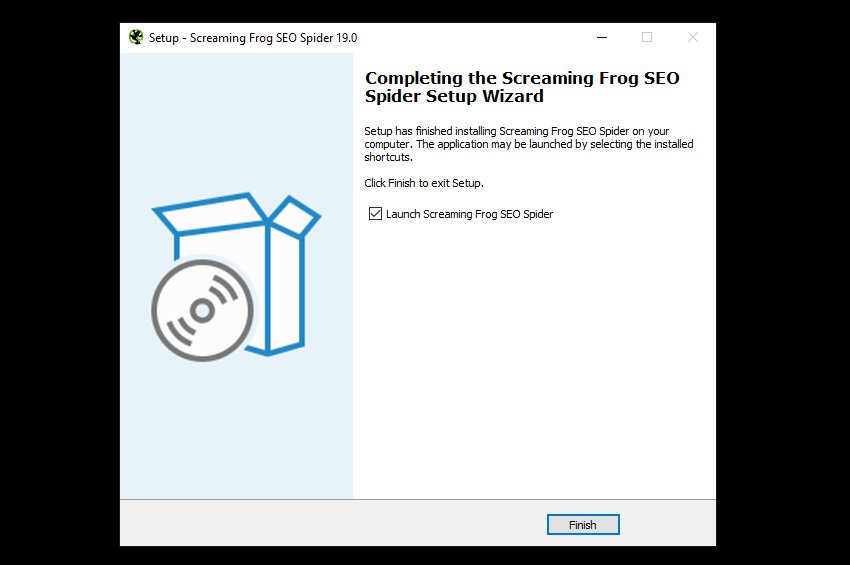
Click ‘Finish’ to launch the SEO Spider.
Command Line Installation
You can also install silently via the command line as follows.
ScreamingFrogSEOSpider-VERSION.exe /VERYSILENT
By default this will install the SEO Spider to:
C:\Program Files (x86)\Screaming Frog SEO Spider
You can choose an alternative location by using the following command:
ScreamingFrogSEOSpider-VERSION.exe /VERYSILENT /DIR=C:\My Folder
Troubleshooting
- “Error opening file for writing” – reboot your computer and retry the installation.
Uninstall
Click the Start icon in the bottom left of your screen and type ‘add’ to find ‘Add or remove programs’ in the Control panel.
Click the search box and enter “SEO” to find Screaming Frog SEO Spider in the list of app. Now click the three dots to the right and select “Uninstall” from the drop down.
During the uninstallation process you’ve be asked if you would like to delete all your crawls, setting and licence information.
Uninstall via the Command Line
You can perform a silent uninstall of the SEO Spider as follows:
"C:\Program Files (x86)\Screaming Frog SEO Spider\unins000.exe" /SUPPRESSMSGBOXES /VERYSILENT
Running the SEO Spider
The SEO Spider can be run one of two ways.
GUI
Click the Start icon in the bottom left of your screen, type “SEO Spider” to find it, then click on it to start,
Command Line
If you would like to run via the command line, please see our User Guide.
Installation on macOS
These instructions were written using macOS 11 Big Sur and are valid for all recent versions of macOS.
Download the latest version of the SEO Spider. The downloaded file will be named ScreamingFrogSEOSpider-19.0-aarch64.dmg, ScreamingFrogSEOSpider-19.0-x86_64.dmg or similar depending on version and machine architecture.
If you are not sure what version to download, see our FAQ on What version of the SEO Spider do I need for my Mac?.
The file will most likely download to your Downloads directory which can easily be accessed via Finder.
Installation
The downloaded file is a disk image containing the Screaming Frog SEO Spider application. Go to your Downloads folder in Finder, double click on the downloaded file and you will see the following screen.
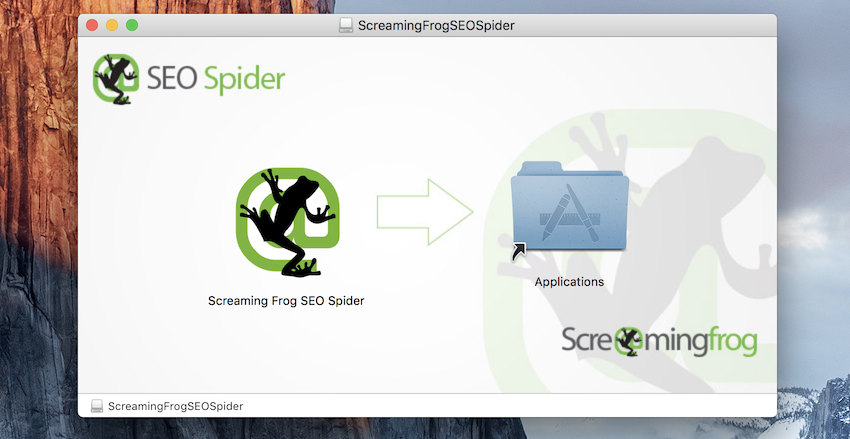
Click on the Screaming Frog SEO Spider application icon on the left and drag it onto the Applications folder on the right. This copies the Screaming Frog SEO Spider application to your Applications folder, which is where most Applications live on macOS.
Now close this window by clicking the x in the top left. Go to Finder, look under the Devices section on the left, locate ScreamingFrogSEOSpider and click the eject icon next to it.

Uninstall
Apple have an excellent guide on uninstalling apps using the finder.
Open Finder from the dock, and click on the ‘Applications’ on the left-hand side.
Next, locate the ‘Screaming Frog SEO Spider’ and right-click and ‘Move to Bin’.
Alternatively, drag the application to the bin. To delete the app after moving it to the bin, choose ‘Finder > Empty Bin’.
Running the SEO Spider
The SEO Spider can be run one of two ways.
GUI
Go to your Applications folder using Finder, locate the Screaming Frog SEO Spider icon and double click it to launch.
Command Line
If you would like to run via the command line, please see our User Guide.
Troubleshooting
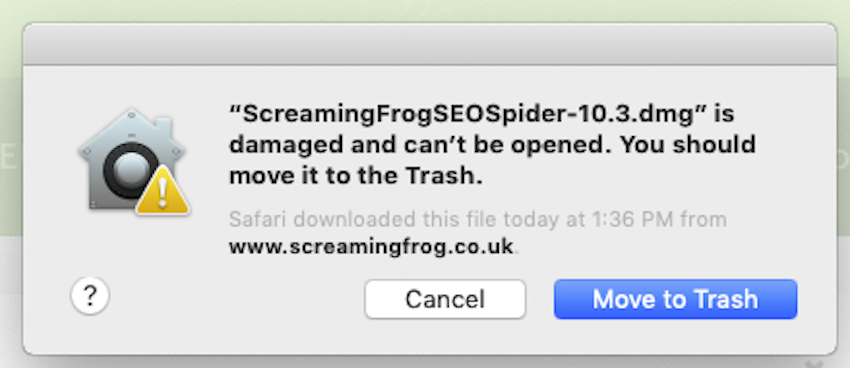
If you get a message like this when opening the .dmg please reboot your mac and try again.
Installation on Ubuntu
These instructions are for installing on Ubuntu 18.04.1.
Download the latest version of the SEO Spider. The downloaded file will be called something like screamingfrogseospider_16.7_all.deb, and will most likely be in the Downloads folder in your home directory.
Installation
You can install the SEO Spider in one of two ways.
GUI
– Double click on the .deb file.
– Choose “Install” and enter your password.
– The SEO Spider requires the ttf-mscorefonts-install to be run, so accept the licence for this when it pops up.
– Wait for the installation to complete.
Command Line
Open up a terminal and enter the following command.
sudo apt-get install ~/Downloads/screamingfrogseospider_15.2_all.deb
You will need enter your password, then enter Y when asked if you want to continue and accept the ttf-mscorefonts-install installations EULA.
Troubleshooting
E: Unable to locate package screamingfrogseospider_15.2_all.debPlease make sure you are entering an absolute path to the .deb to install as per the example.Failed to fetch http://archive.ubuntu.com/ubuntu/pool/main/u/somepackage.deb 404 Not Found [IP: 91.189.88.149 80]Please run the following and try again.sudo apt-get update
Running the SEO Spider
Irrespective of how the SEO Spider was installed you can run it one of two ways.
GUI
Click the Apps icon in the bottom left hand corner, type “seo spider” and click on the applications icon when it appears.
Command Line
Enter the following command in a terminal:
screamingfrogseospider
For more command line options see our User Guide.
Installation on Fedora
These instructions are for installing on Fedora Linux 35.
Download the latest version of the SEO Spider. The downloaded file will be called something like screamingfrogseospider-17.0-1.x86_64.rpm, and will most likely be in the Downloads folder in your home directory.
Installation
Open up a terminal and enter the following command.
sudo rpm -i ~/Downloads/screamingfrogseospider-17.0-1.x86_64.rpm
Running the SEO Spider
The SEO Spider was installed you can run it one of two ways.
GUI
Click the Activities icon in the top left hand corner, type “seo spider” and click on the applications icon when it appears.
Command Line
Enter the following command in a terminal:
screamingfrogseospider
For more command line options see our User Guide.
Crawling
The Screaming Frog SEO Spider is free to download and use for crawling up to 500 URLs at a time. For £199 a year you can buy a licence, which removes the 500 URL crawl limit.
A licence also provides access to the configuration, saving & opening crawls, and advanced features such as – JavaScript rendering, custom search, custom extraction, Google Analytics integration, Google Search Console integration, PageSpeed Insights integration, scheduling and much more!
Please see the comparison of free vs paid features on our pricing page.
If you’re a new user of the software, we recommend reading our getting started guide to the SEO Spider.
Crawling A Website (Subdomain)
In regular crawl mode, the SEO Spider will crawl the subdomain you enter and treat all other subdomains it encounters as external links by default (these appear under the ‘external’ tab).
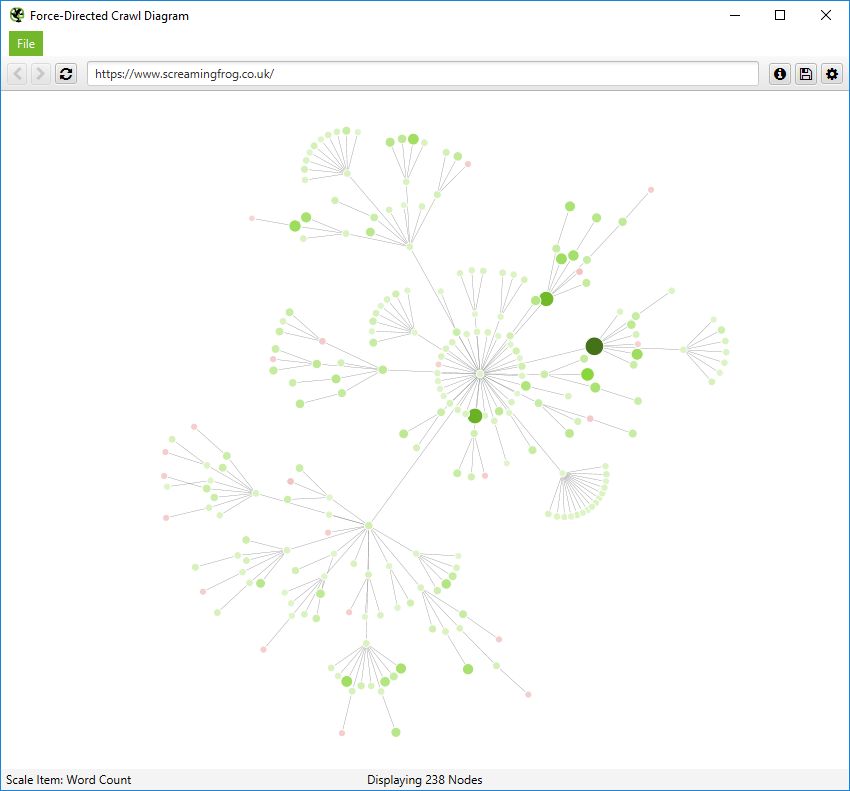
For example, by entering https://www.screamingfrog.co.uk in the ‘Enter URL to spider’ box at the top and clicking ‘Start’, the Screaming Frog www. subdomain will be crawled.

The top filter can be adjusted from ‘Subdomain’ to crawl ‘All Subdomains’.
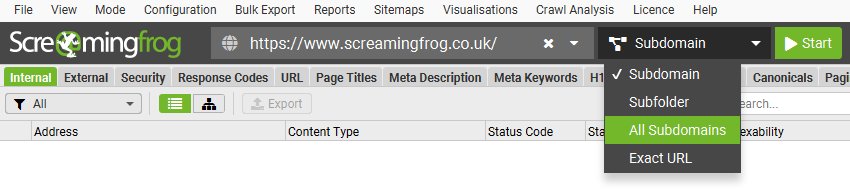
This means it would conceivably crawl other subdomains, such as us.screamingfrog.co.uk, or support.screamingfrog.co.uk if they existed and were internally linked. If you start a crawl from the root (e.g. https://screamingfrog.co.uk), the SEO Spider will by default crawl all subdomains as well.
One of the most common uses of the SEO Spider is to find errors on a website, such as broken links, redirects and server errors. Please read our guide on how to find broken links, which explains how to view the source of errors such as 404s, and export the source data in bulk to a spreadsheet.
For better control of your crawl, use the URL structure of your website by crawling a subfolder, the SEO Spiders configuration options such as crawling only HTML (images, CSS, JS etc), the exclude function, the custom robots.txt, the include function or alternatively change the mode of the SEO Spider and upload a list of URLs to crawl.
Crawling A Subfolder
To crawl a subfolder, enter the subfolder you wish to crawl and select ‘Subfolder’ from the top switcher.

By entering this directly into the SEO Spider, it will crawl all URLs contained within the /blog/ subfolder only.
If there isn’t a trailing slash on the end of the subfolder, for example ‘/blog’ instead of ‘/blog/’, the SEO Spider won’t recognise it as a subfolder and crawl within it. If the trailing slash version of a subfolder redirects to a non-trailing slash version, then the same applies.
To crawl this subfolder, you’ll need to use the include feature and input the regex of that subfolder (.*blog.* in this example).
If you have a more complicated set-up like subdomains and subfolders you can specify both. For example – http://de.example.com/uk/ to Spider the .de subdomain and UK subfolder etc.
Check out our video guide on crawling subdomains and subfolders.
Crawling A List Of URLs
As well as crawling a website by entering a URL and clicking ‘Start’, you can switch to list mode and either paste or upload a list of specific URLs to crawl.

This can be particularly useful for site migrations when auditing URLs and redirects for example. We recommend reading our guide on ‘How To Audit Redirects In A Site Migration‘ for the best approach.
If you wish to export data in list mode in the same order it was uploaded, then use the ‘Export’ button which appears next to the ‘upload’ and ‘start’ buttons at the top of the user interface.

The data in the export will be in the same order and include all of the exact URLs in the original upload, including duplicates or any fix-ups performed.
Check out our ‘How To Use List Mode‘ guide and video on more advanced crawling in list mode.
Crawling Larger Websites
The number of URLs the SEO Spider can crawl is down to the storage mode being used, as well as the memory available and memory allocation in the SEO Spider.
If you wish to perform a particularly large crawl, we recommend using database storage mode and increasing the memory allocation in the SEO Spider.
Using database storage will mean crawl data is saved to disk, rather than kept just in RAM. This allows the SEO Spider to crawl more URLs, crawls are automatically stored and can be opened quicker under the ‘File > Crawls’ menu.
This can be configured under ‘File > Settings > Storage Mode’ and choosing ‘Database Storage’.
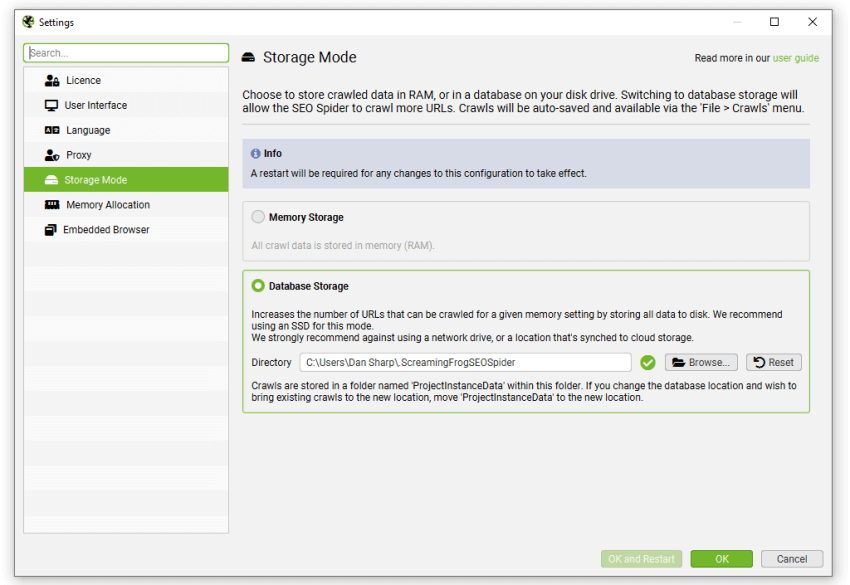
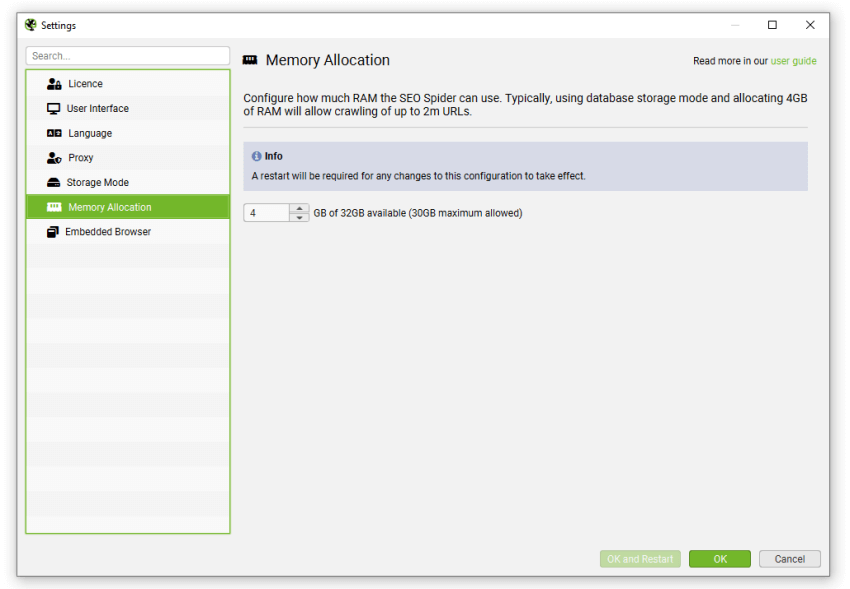
While the SEO Spider will save all data to disk, you can still increase RAM memory allocation to enable the SEO Spider to crawl more URLs. We recommend setting this to 4gb for any crawls up to 2 million URLs. This can be configured under ‘File > Settings > Memory Allocation’.
If you receive a ‘you are running out of memory for this crawl’ warning, then you can save the crawl and switch to database storage mode or increase the RAM allocation in memory storage mode, then open and resume the crawl.
For very large crawls read our guide on how to crawl large websites, which provides details on the best set-up and configuration to make it as managable and efficient as possible.
Available options include –
- Crawling by subdomain, or subfolder as discussed above.
- Narrowing the crawl by using the include function, or excluding areas you don’t need to crawl, by using the exclude or custom robots.txt features.
- Considering limiting the crawl by total URLs crawled, depth and number of query string parameters.
- Consider only crawling internal HTML, by unticking images, CSS, JavaScript, SWF and external links in the SEO Spider’s configuration.
These should all help save memory and focus the crawl on the important areas you require.
Saving, opening, exporting & importing crawls
Crawls can be saved and opened in the SEO Spider with a licence. Saving & opening crawls works a little differently, depending on your configured SEO Spider storage mode.
Watch our video or read our guide below.
Saving & Opening In Database Storage Mode
In the default database storage mode, crawls are automatically ‘saved’ and committed in the database during a crawl.
When you clear a crawl, type in a new URL or shut down the SEO Spider, the crawl will automatically be stored. If you accidentally switch off your machine, experience a crash, or power-cut, crawls should still be safely stored.
To open a crawl in database storage mode, click on ‘File > Crawls’ in the main menu.
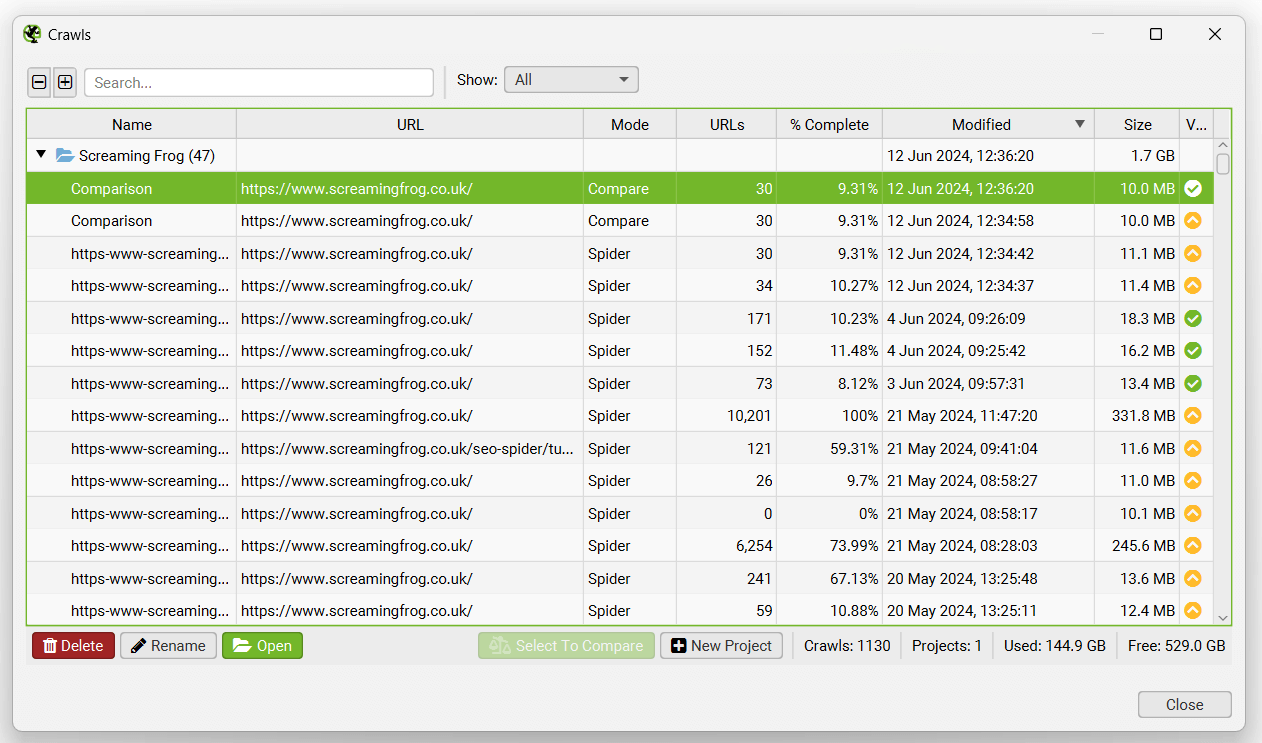
The ‘Crawls’ window displays an overview of automatically stored crawls, where you can open, rename, organise into project folders, duplicate, export, or delete them in bulk.
You can export the crawl to be opened by another user under ‘File > Export’.
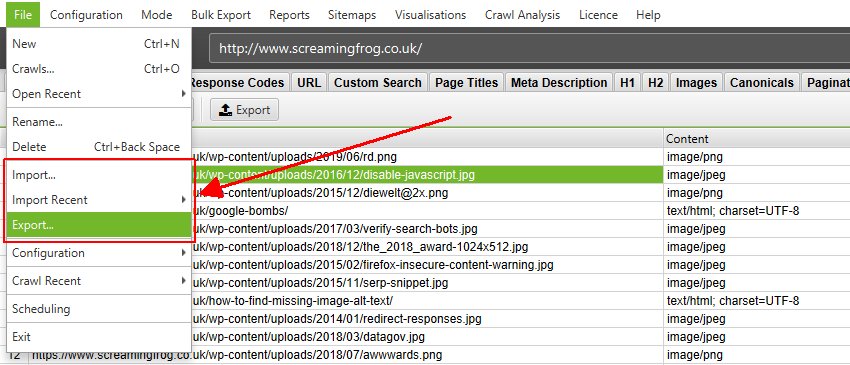
There are two options to export a crawl in database storage mode in the ‘Save As’ dialog screen and ‘Save As Type’.
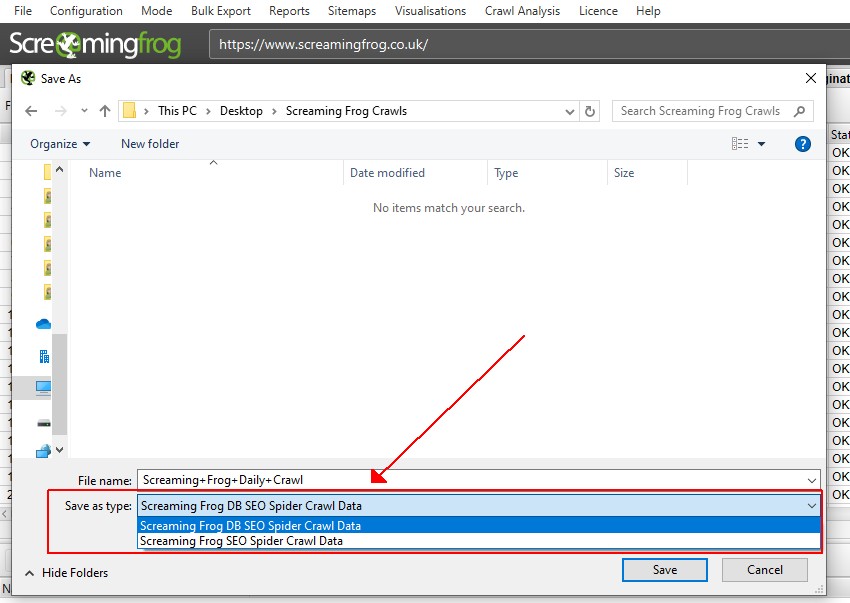
You are able to export the database file (a .dbseospider file), which can be imported into the SEO Spider in database storage. This is the recommended default option, as it’s faster.
Alternatively, the crawl can also be exported as an .seospider file, which can be imported into the SEO Spider using either memory or database storage modes.
In database storage mode, the .seospider file will be converted and committed to the database which will take longer than opening a .dbseospider file. However, once it is in the database, it will be accessible via the ‘File > Crawls’ menu and allow for more rapid opening.
To import a .dbseospider file in database storage mode, click on ‘File > Import’. A .dbseospider file can’t be opened in memory storage mode.
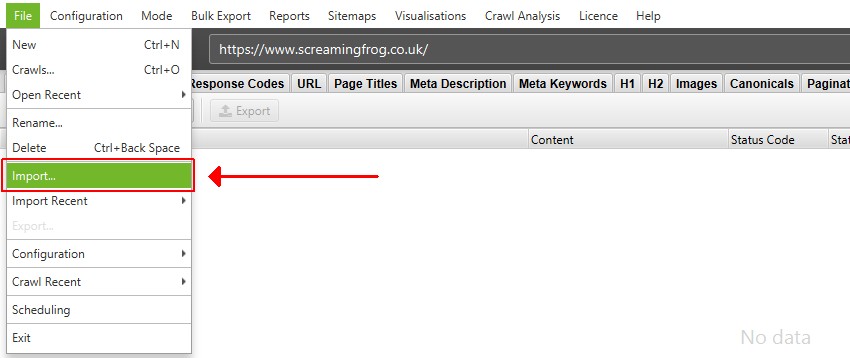
To import a .seospider file in database storage mode, click on ‘File > Import’ and switch the ‘File Type’ from ‘Screaming Frog DB SEO Spider Crawl Data’ to ‘Screaming Frog SEO Spider Crawl Data’ and click on the relevant file.

As outlined above, the .seospider file will take longer to import initially, but then be available under the ‘File > Crawls’ menu when coverted to a database.
Saving & Opening In Memory Storage Mode
Memory storage is the older storage mode which was previously the default for the SEO Spider. In memory storage mode, crawls need to be saved as an .seospider file type specific to the SEO Spider.
You can save crawls part way through by pausing the SEO Spider, or at the end of a crawl by selecting ‘File > Save’.
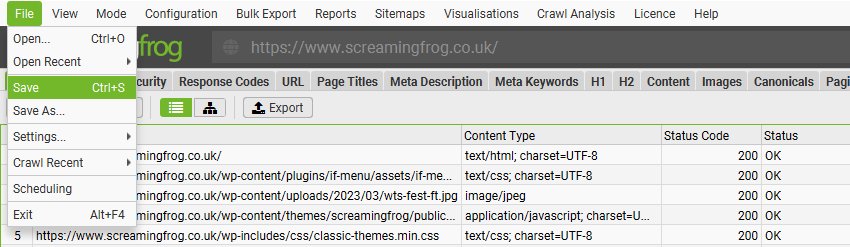
To open a crawl simply double click on the relevant .seospider file, choose ‘File > Open’ and navigate to the file, or choose one of your recent crawls under ‘File > Open Recent’. You can resume the crawl if it was paused.
Please note, saving and opening crawls can take a number of minutes or much longer, depending on the size of the crawl and amount of data. Only .seospider crawl files can be opened in memory storage mode, not .dbseospider files which are database files discussed in the next section.
If you’re planning on performing large crawls, then we recommend considering database storage mode as opening crawls is significantly quicker.
Configuration
In the licensed version of the tool you can save a default crawl configuration, and save configuration profiles, which can be loaded when required.
To save the current configuration as default choose ‘Configuration > Profiles > Save Current Configuration As Default’.
To save the configuration profile to be able to load in the future, click ‘Config > Profiles > Save As’ and adjust the file name (ideally to something descriptive!).
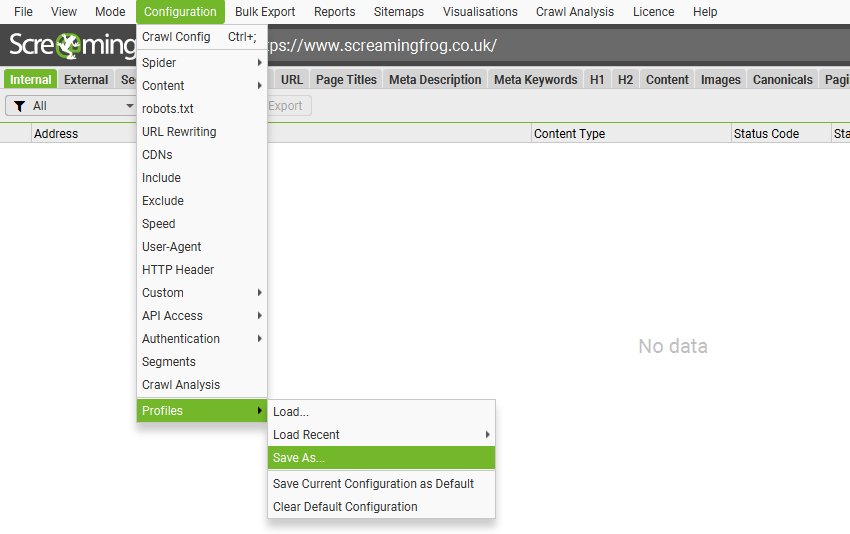
To load a configuration profile, click ‘Config > Profiles > Load’ and choose your configuration profile, or ‘Config > Profiles > Load Recent’ to select from a recent list.
To reset back to the original SEO Spider default configuration choose ‘Config > Profiles > Clear Default Configuration’.
Check out our video guide on custom configuration.
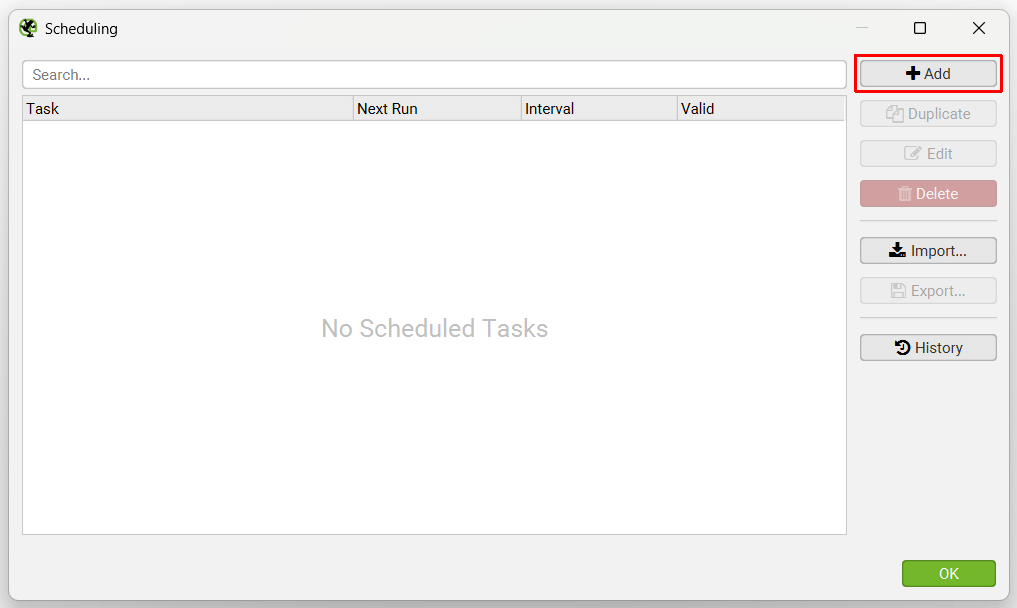
Scheduling
You’re able to schedule crawls to run automatically within the SEO Spider, as a one-off, or at chosen intervals. This feature can be found under ‘File > Scheduling’ within the app.
Click ‘Add’ to set-up a scheduled crawl.
Choose the task name, project it should be saved in, date and interval of the scheduled crawl.
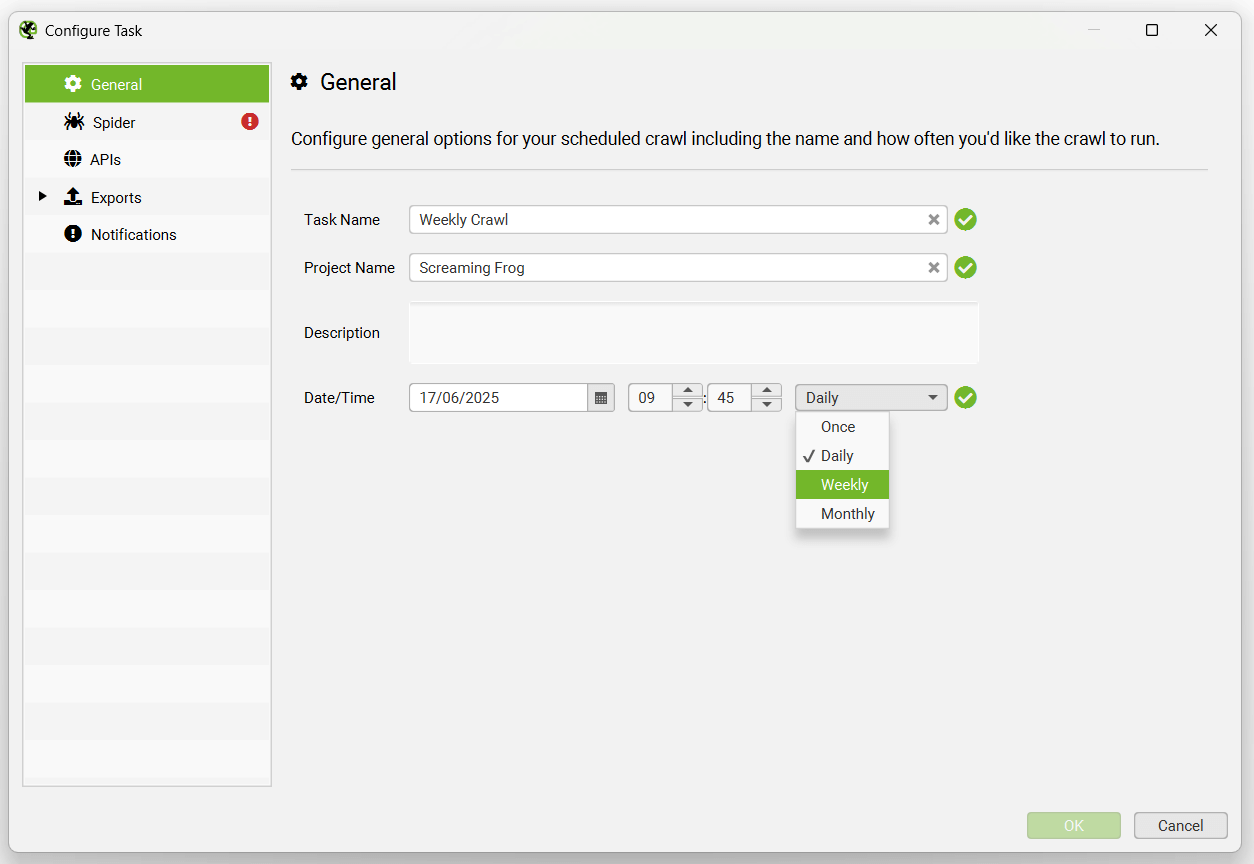
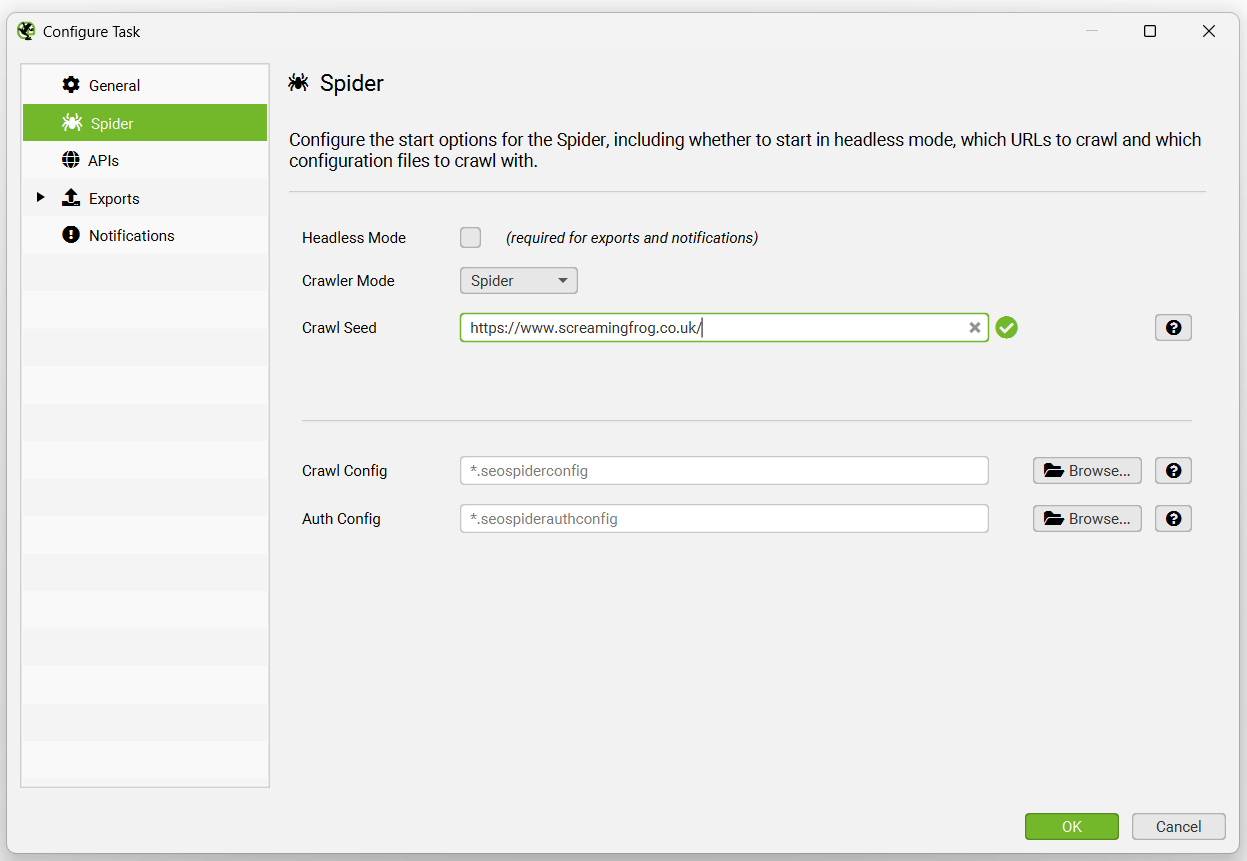
You’re able to pre select the mode (spider, or list), website address to crawl, saved configuration and authentication config for the scheduled crawl.
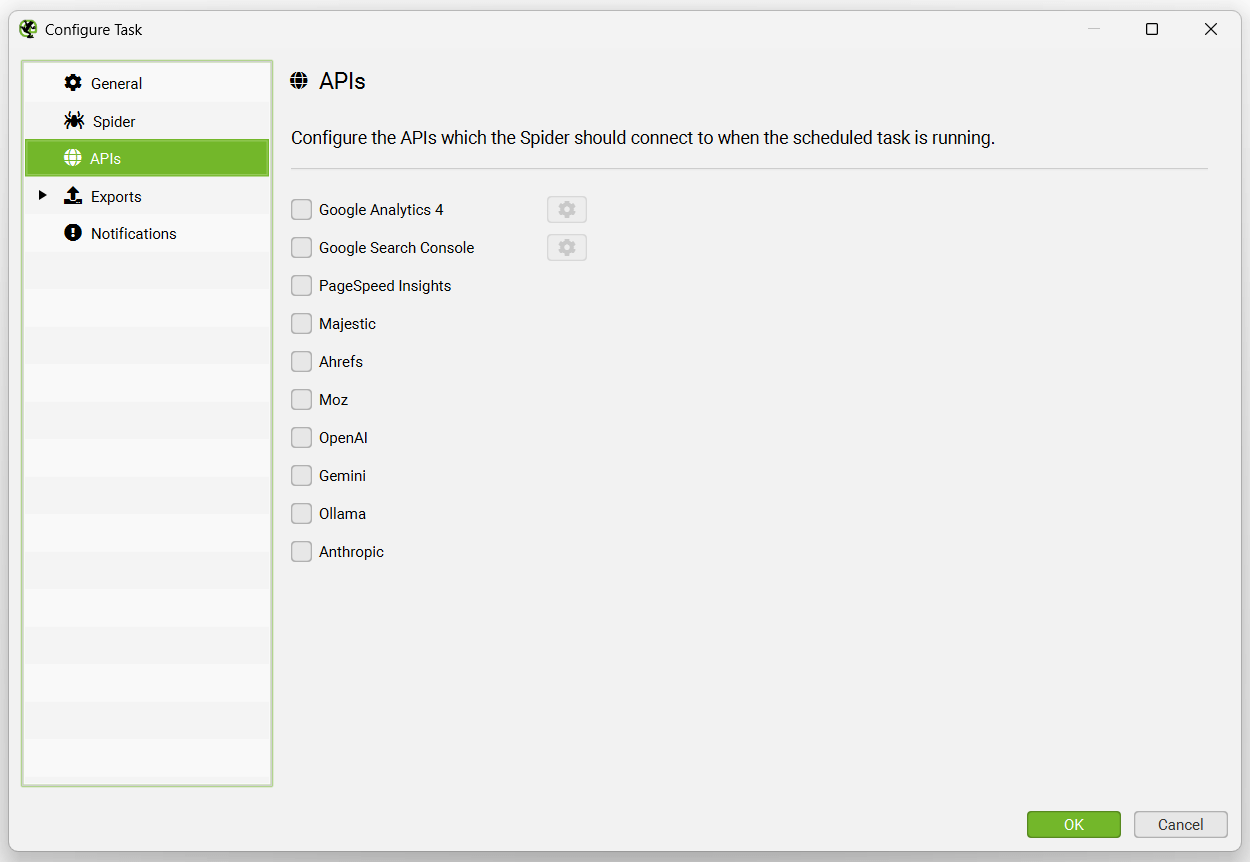
The APIs tab allows you to choose which APIs to connect to for the scheduled crawl, including (Google Analytics, Search Console, PageSpeed Insights, Majestic, Ahrefs, Moz).
The exports tab has a number of sub tabs, including Output Settings, Spreadsheets, Local Files, Looker Studio, Presets and Notifications.
Each of these tabs will display a warning at the top, that ‘Headless Mode’ needs to be configured for exports.
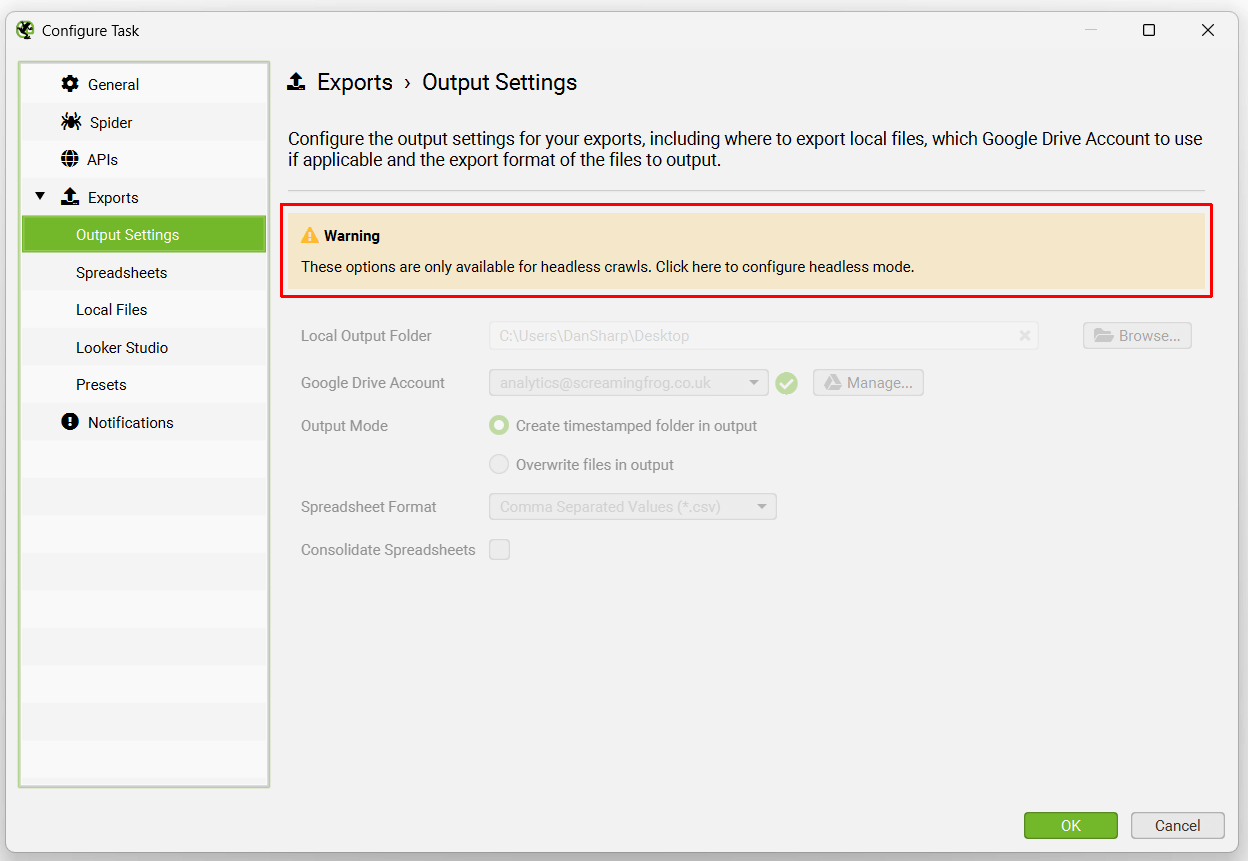
This simply means the UI won’t be visible when the SEO Spider runs the scheduled crawl. This is a requirement to avoid users clicking buttons while the scheduled crawl is performing actions, which might be confusing and result in mistakes.
Headless mode can be enabled under the ‘Spider’ tab.

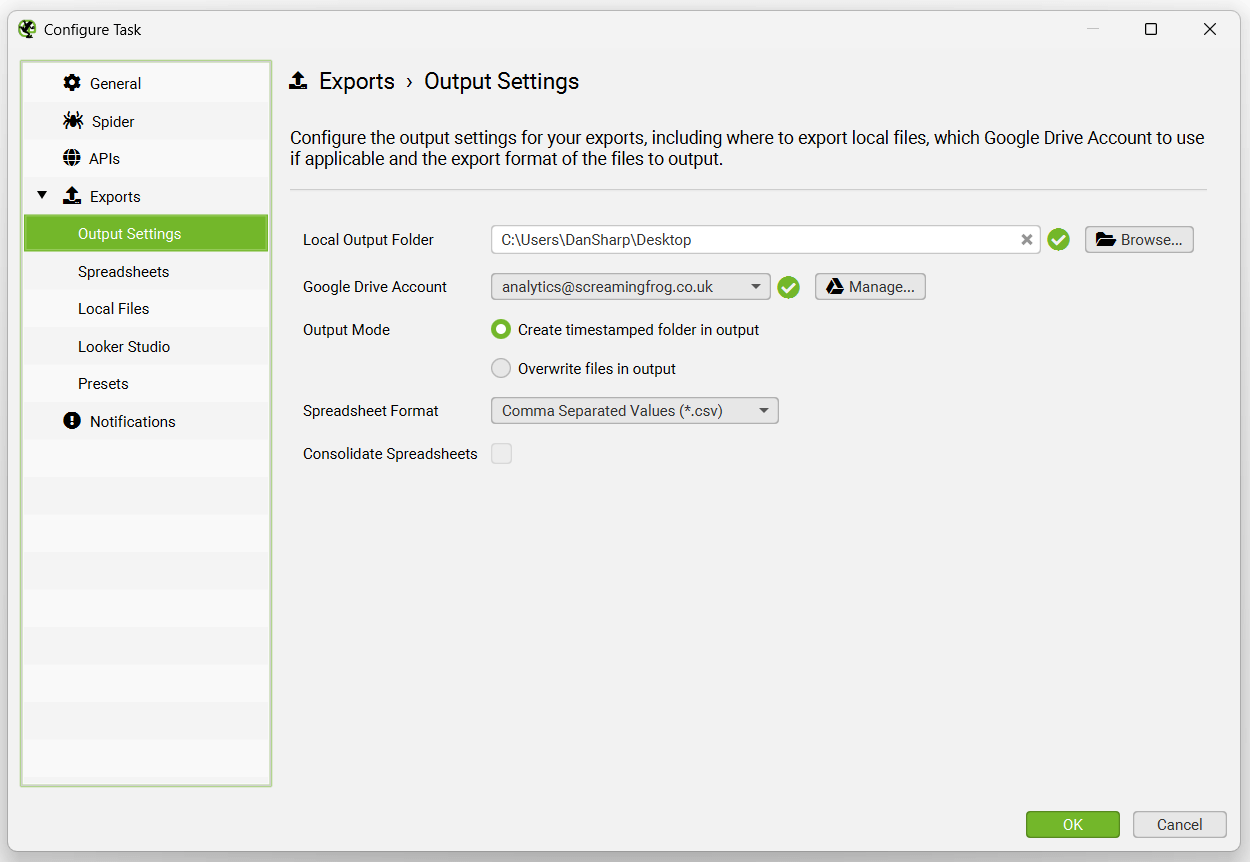
The export options when then be available for selection.
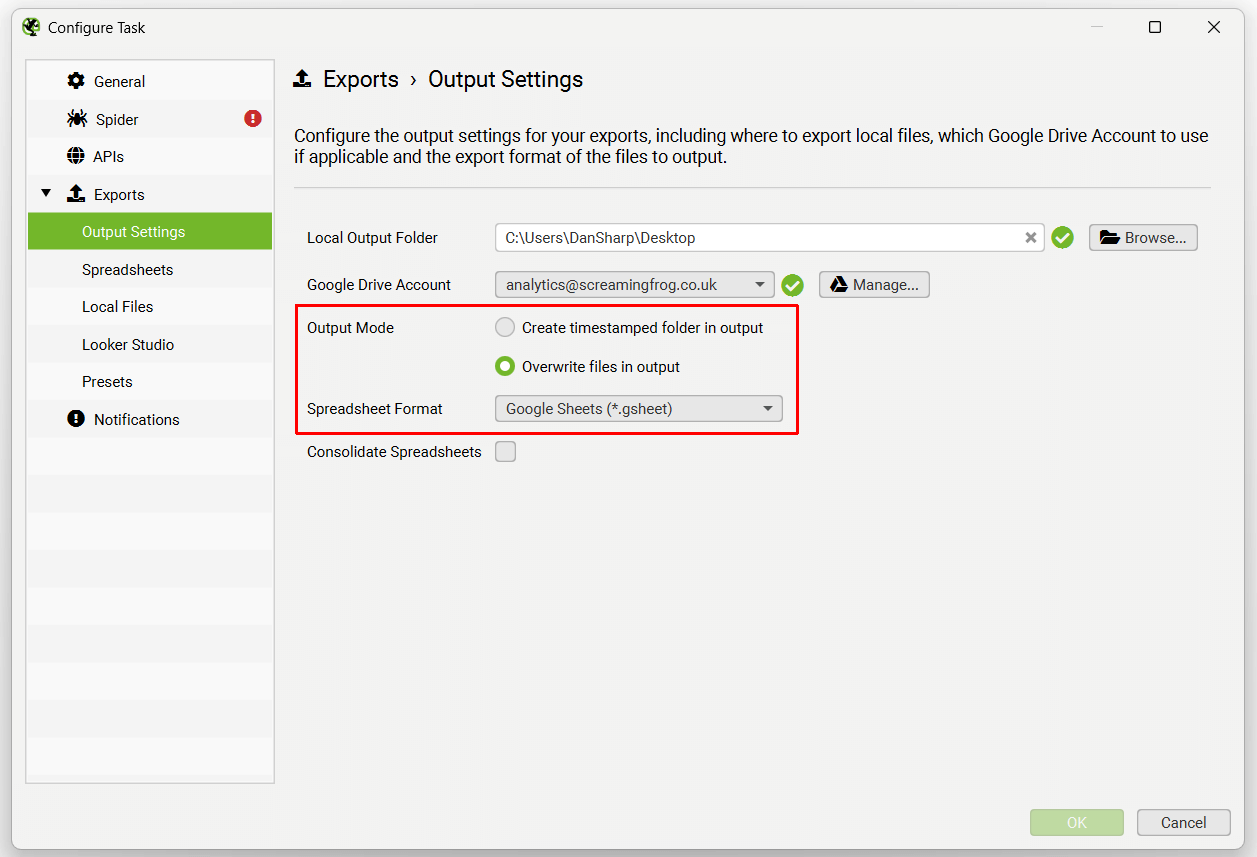
The Output Settings allow users to select how files should be exported – the local output folder, Google Drive Account, timestamped folders or overwriting, spreadsheet format (CSV, Excel, or Google Sheets), and an option to consolidated exports into tabs in a single spreadsheet.
The Spreadsheets tab allows you to select any tab and filter, bulk export and report to export.

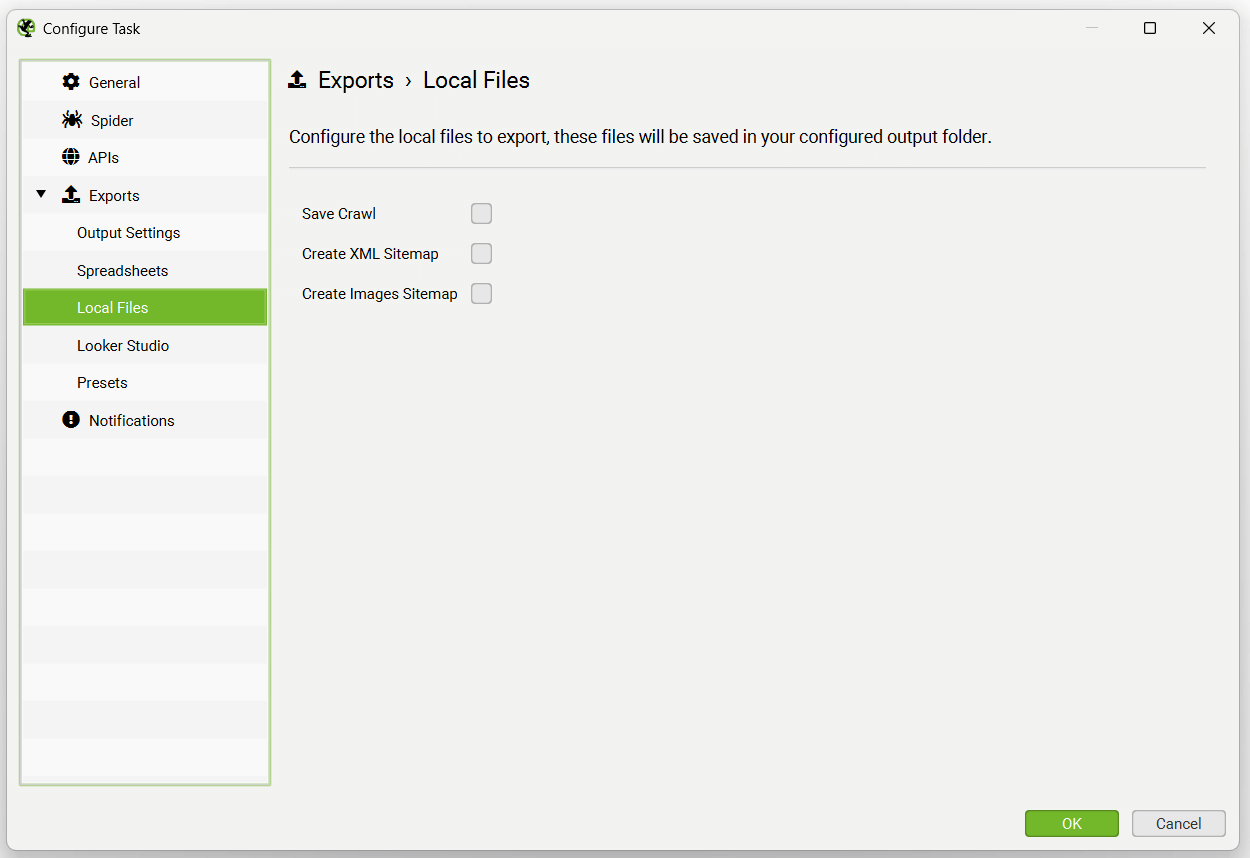
Local files options include saving a crawl (crawls are autosaved in database storage mode, so this is typically not required), creating an XML Sitemap or an Image Sitemap.
The Looker Studio tab allows users to export a timeseries report to Google Sheets that can be connected to Looker Studio.
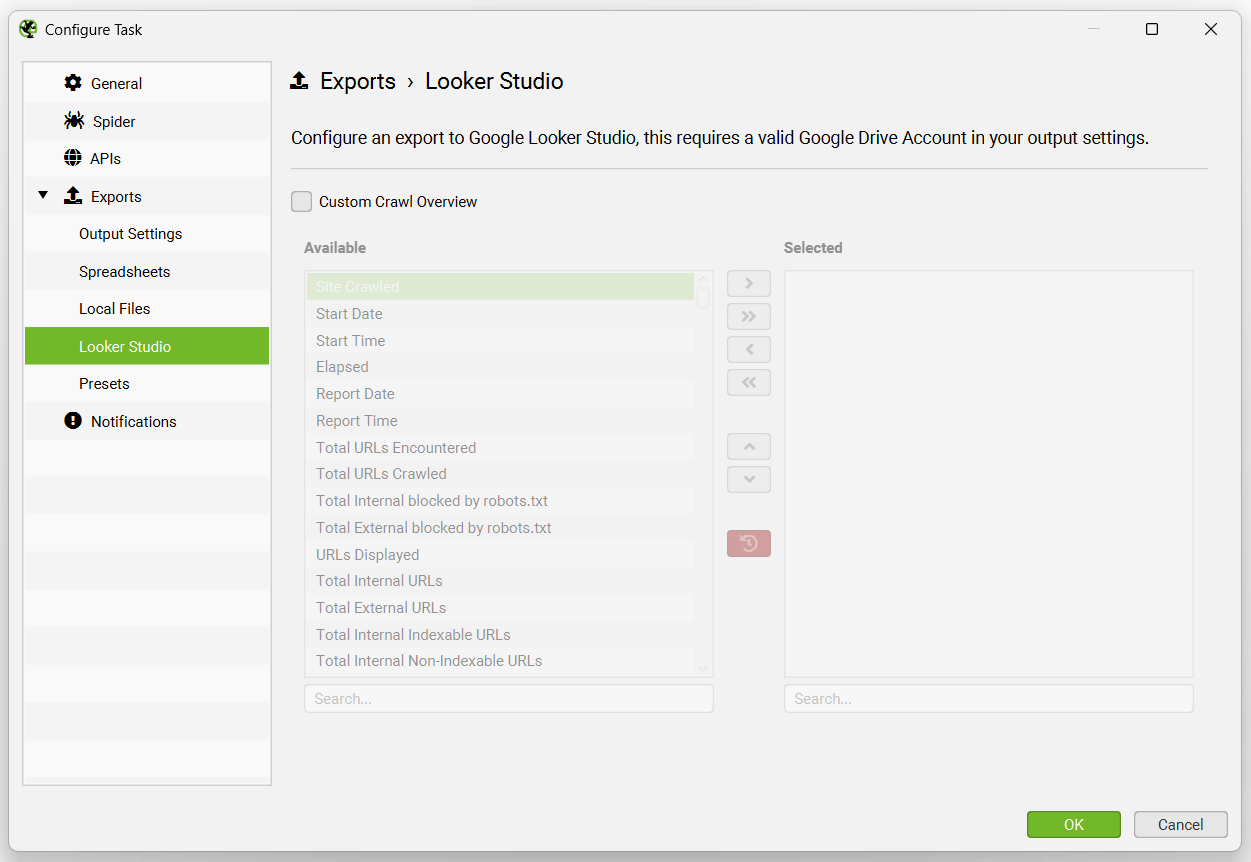
This has been purpose-built to allow users to select crawl overview data to be exported as a single summary row to Google Sheets. It will automatically append new scheduled exports to a new row in the same sheet in a time series.
Please read our tutorial on ‘How To Automate Crawl Reports In Looker Studio‘ to set this up.
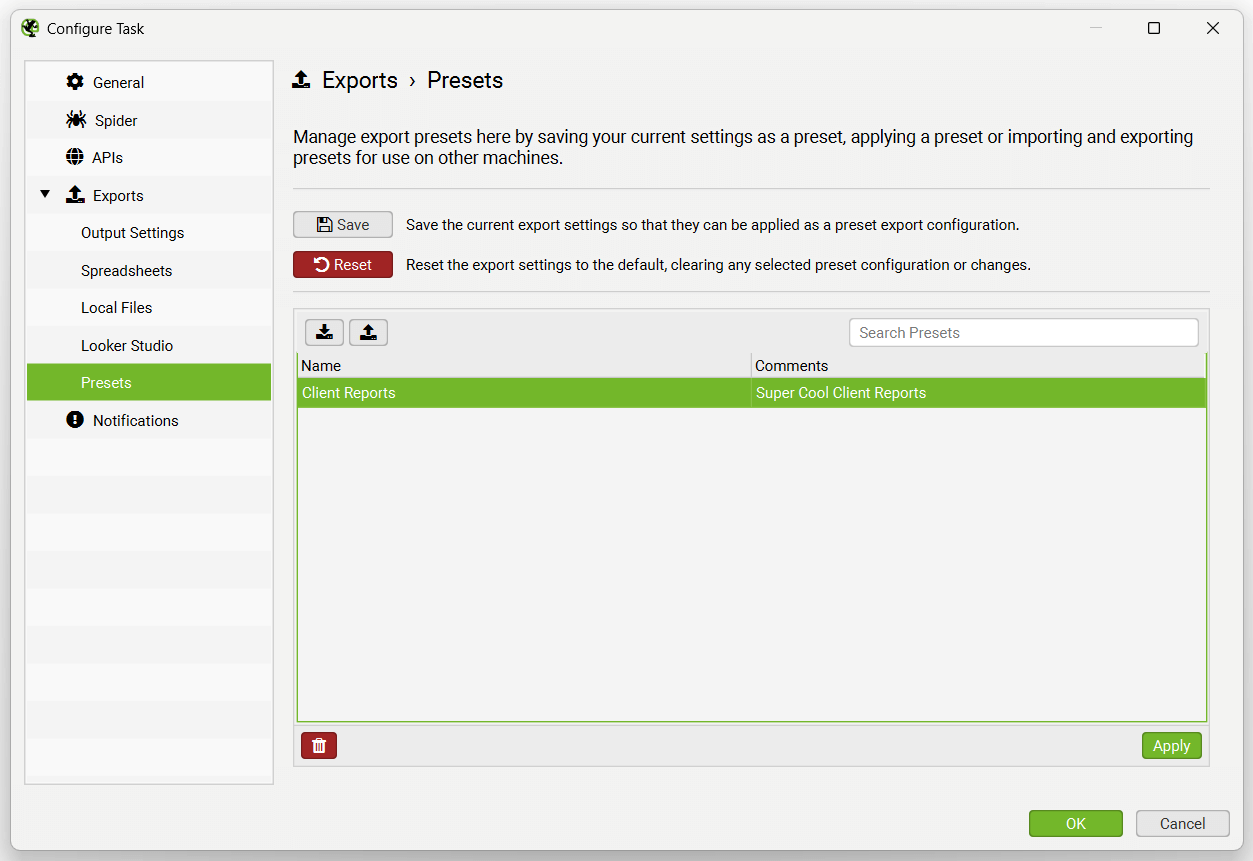
The Presets tab allows you to set up the export of multiple reports as a single preset to use across scheduled crawls to improve efficiency.
The Notifications options allow email notifications to be sent once a crawl has completed. Please note, this does not currently send exports as well.

Scheduling & Google Sheets
When selecting to export, you can choose to automatically exports any tabs, filters, exports or reports to Google Sheets by switching the ‘format’ to gsheet. This will save a Google Sheet within your Google Drive account in a ‘Screaming Frog SEO Spider’ folder.
The ‘project name’ and ‘crawl name’ used in scheduling will be used as folders for the exports. So for example, a ‘Screaming Frog’ project name and ‘Weekly Crawl’ name, will sit within Google Drive like below.

You’re also able to choose to overwrite the existing file (if present), or create a timestamped folder in Google Drive using the ‘Output Mode’ options under ‘Ouput Settings’.
Tips On Scheduling
There are a few things to remember when using scheduling.
- If you’re using database storage mode, there is no need to ‘save’ crawls in scheduling, as they are stored automatically within the SEO Spiders database. Crawls can be opened via the ‘File > Crawls’ menu in the application after the scheduled crawl has been performed. Please see our guide on saving, opening, exporting & importing crawls.
- A new instance of the SEO Spider is started for a scheduled crawl. So if there is an overlap of crawls, multiple instances of the SEO Spider will run at the same time, rather than there being a delay until the previous crawl has completed. Hence, we recommend considering your system resources and timing of crawls appropriately.
- The SEO Spider will run in headless mode (meaning without an interface) when scheduled to export data. This is to avoid any user interaction or the application starting in front of you and options being clicked, which would be a little strange.
- This scheduling is within the user interface, if you’d prefer to use the command line to operate the SEO Spider, please see our command line interface guide.
- If you experience any issues with a scheduled crawl, the first step is to look under ‘File > Scheduling’ and ensure the crawl is set up as ‘Valid’. If it’s not valid, then click through the tabs to find the issue and correct any highlighted problems. If the scheduled crawl is valid, click ‘File > Scheduling > History’ and check to see if the crawl has an ‘end’ date and time, or if there are any errors reported under the ‘error’ column.
Exporting
You can export all data from a crawl, including bulk exporting inlink and outlink data. There are three main methods to export data outlined below.
Exporting Tabs & Filters (Top Window Data)
Simply click the ‘export’ button in the top left hand corner to export data from the top window tabs and filters.

The export function in the top window section works with your current field of view in the top window. Hence, if you are using a filter and click ‘export’ it will only export the data contained within the filtered option.
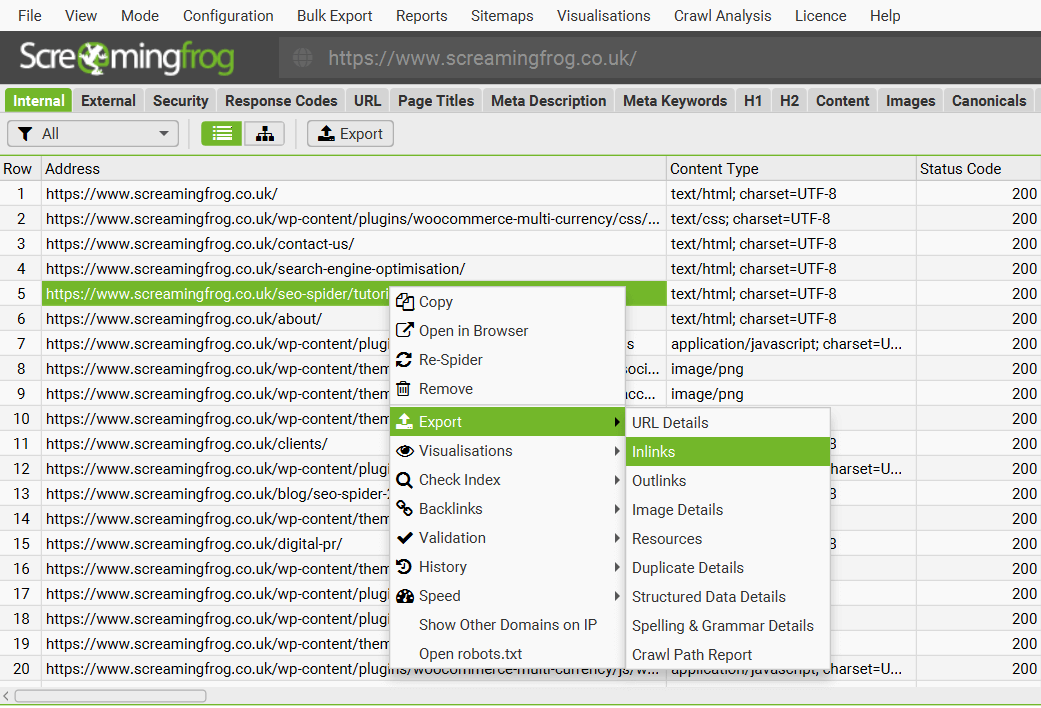
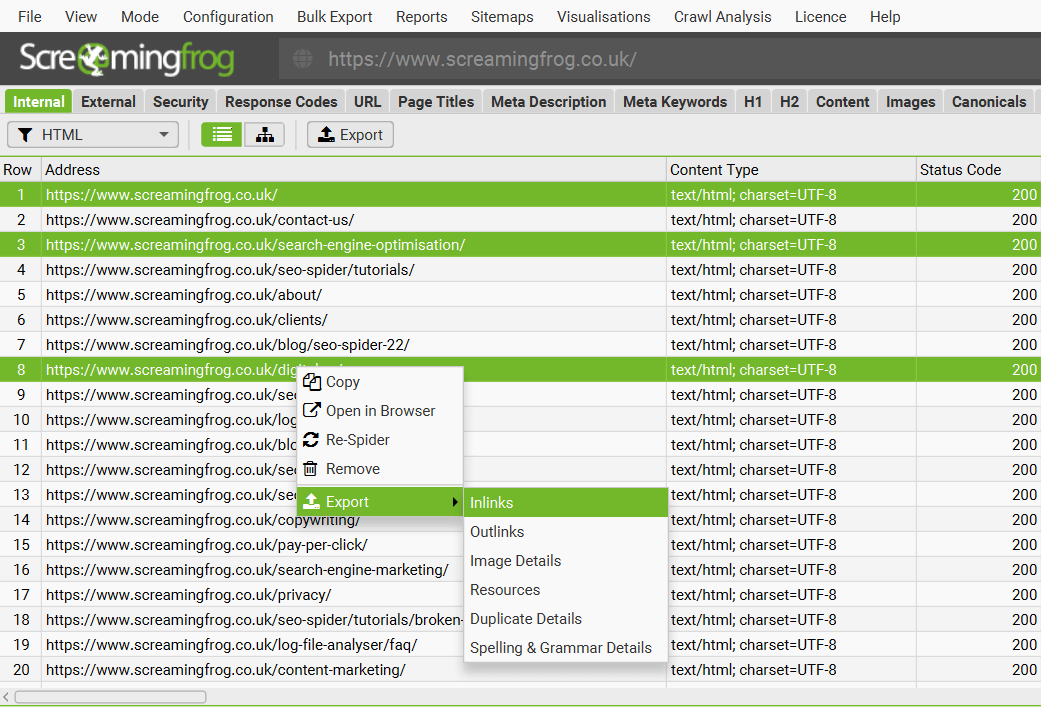
Exporting Lower Window Data
To export lower window data, simply right click on the URL that you wish to export data from in the top window, then click on one of the options.
Details from the following lower window tabs can be exported in this way:
- URL Details
- Inlinks
- Outlinks
- Image Details
- Resources
- Duplicate Details
- Structured Data Details
- Spelling & Grammar Details
- Crawl Path Report
This data can also be exported from the ‘Export’ button found in the lower window tab:
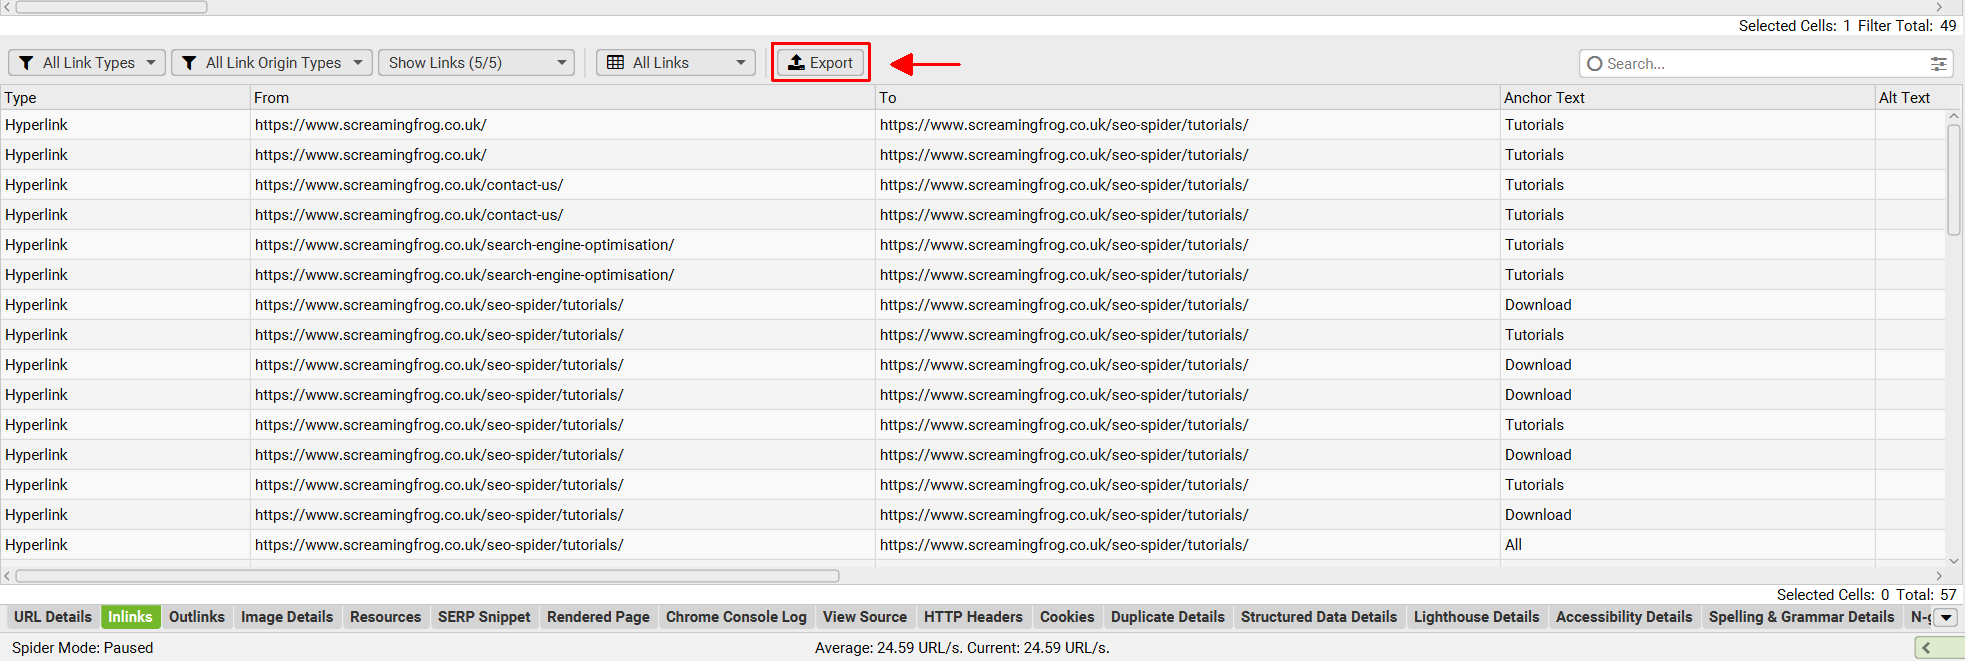
You can also multi-select URLs (by holding control or shift on your keyboard) and export data in bulk for these URLs as well. For example, you can bulk export the ‘inlinks’ to specific URLs of interest together in an export the same way.
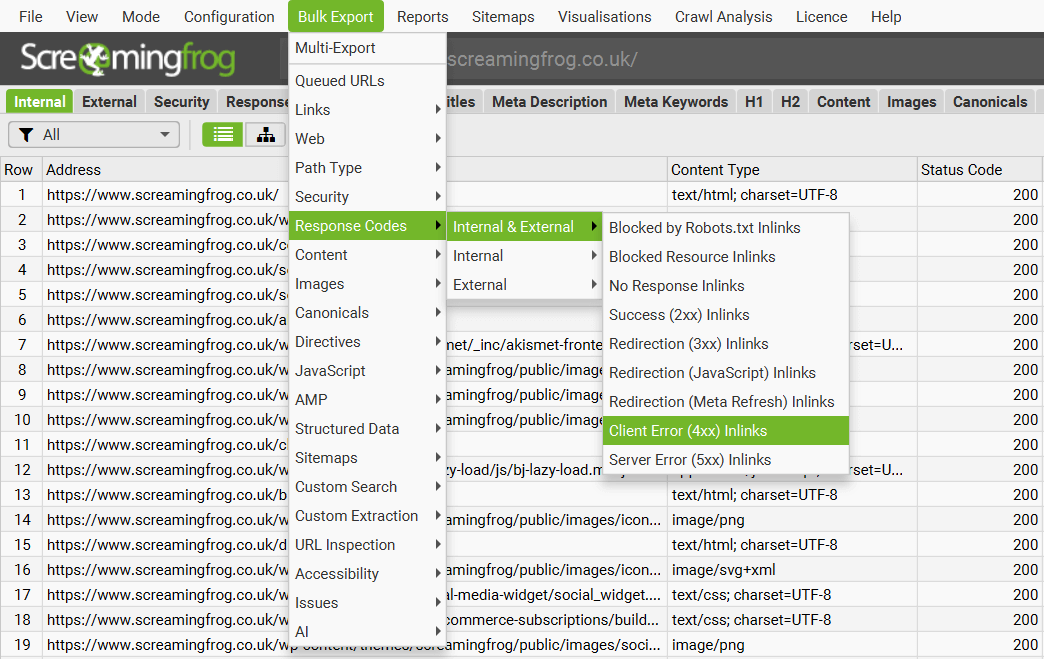
Bulk Export
The ‘Bulk Export’ is located under the top level menu and allows bulk exporting of all data. You can export all instances of a link found in a crawl via the ‘All inlinks’ option, or export all inlinks to URLs with specific status codes such as 2XX, 3XX, 4XX or 5XX responses.
For example, selecting the ‘Client Error 4XX Inlinks’ option will export all inlinks to all error pages (such as 404 error pages). You can also export all image alt text, all images missing alt text and all anchor text across the site.
Check out our video guide on exporting.
Bulk Export Options
The following export options are available under the ‘bulk export’ top level menu.
- Queued URLs: These are all URLs that have been discovered that are in the queue to be crawled. This will approx. match the number of ‘remaining’ URLs in the bottom right hand corner of the GUI.
- Links > All Inlinks: Links to every URL the SEO Spider encountered while crawling the site. This contains every link to all the URLs (not just ahref, but also to images, canonical, hreflang, rel next/prev etc) in the All filter of the Response Codes tab.
- Links > All Outlinks: All links the SEO Spider encountered during crawling. This will contain every link contained in every URL in the Response Codes tab in the ‘All’ filter.
- Links > All Anchor Text: All ahref links to URLs in the All filter in the ‘Response Codes’ tab.
- Links > External Links: All links to URLs found under the All filter of the External tab.
- Links > Internal Nofollow Outlinks: Pages that use internal nofollow outlinks as seen under the ‘Links’ tab.
- Links > Internal Outlinks With No Anchor Text: Pages that have internal outlinks with no anchor text as seen under the ‘Links’ tab.
- Links > Non-Descriptive Anchor Text In Internal Outlinks: Pages that have Non-Descriptive Anchor Text In Internal Outlinks as seen under the ‘Links’ tab.
- Links > Follow & Nofollow Internal Inlinks To Page: Pages that have Follow & Nofollow Internal Inlinks To Page as seen under the ‘Links’ tab.
- Links > Internal Nofollow Inlinks Only: Pages that have Nofollow Inlinks Only as seen under the ‘Links’ tab.
- Links > Outlinks to Localhost: Pages that contain links that reference Localhost as seen under the ‘Links’ tab.
- Web > Screenshots: An export of all the screenshots seen in the ‘Rendered Page‘ lower window tab, stored when using JavaScript rendering mode.
- Web > Archived Website: An export of all website files stored when using the archive website feature.
- Web > All Page Source: The static HTML source or rendered HTML of crawled pages. Rendered HTML is only available when in JavaScript rendering mode.
- Web > All Page Text: An export of page text from every internal HTML page with a 200 response as separate .txt files.
- Web > All HTTP Headers: All URLs and their corresponding HTTP response headers. ‘HTTP Headers‘ must be enabled to be extracted via ‘Config > Spider > Extraction’ for this to be populated.
- Web > All Cookies: All URLs and every cookie issued in a crawl. ‘Cookies‘ must be enabled to be extracted via ‘Config > Spider > Extraction’ for this to be populated. JavaScript rendering mode will also need to be configured to get an accurate view of cookies loaded on the page using JavaScript or pixel image tags.
- Path Type: This will export specific path type links with their source pages they are linked from. Path type can include absolute, protocol-relative, root-relative and path-relative links.
- Security: All links to the URLs in the corresponding filter of the Security tab. e.g. Links to all the pages on the site that contain ‘Unsafe Cross-Origin Links’.
- Response Codes: All links to the URLs in the corresponding filter of the Response Codes tab. e.g. All source links to URLs that respond with 404 errors on the site.
- Content: All links to the URLs in the corresponding filter of the Content tab. e.g. Near Duplicates and all their corresponding near duplicate URLs over the chosen similarity threshold.
- Images: All references to the image URLs in the corresponding filter of the Images tab. e.g. All the references to images that are missing alt text.
- Canonicals: All links to the URLs in the corresponding filter of the Canonicals tab. e.g. Links to URLs which have missing canonicals.
- Directives: All links to the URLs in the corresponding filter of the Directives tab. e.g. Links to all the pages on the site that contain a meta robots ‘noindex’ tag.
- AMP: All links to the URLs in the corresponding filter of the AMP tab. e.g. Pages which have amphtml links with non-200 responses.
- Structured Data: All links to the URLs in the corresponding filter of the Structured Data tab. e.g. Links to URLs with validation errors. The RDF web data format is a series of triples (subject, predicate, object) statements. This is how the bulk report is structured. The hierarchical format of JSON-LD does not fit into a spreadsheet format; whereas statements of triples does.
- Sitemaps: All references to the image URLs in the corresponding filter of the Sitemaps tab. e.g. All XML Sitemaps which contain non-indexable URLs.
- Custom Search: All links to the URLs in the corresponding filter of the Custom Search tab. e.g. Links to all the pages on the site that matched a Custom Search.
- Custom Extraction: All links to the URLs in the corresponding filter of the Custom Extraction tab. e.g. Links to pages with a particular data extraction as set up in Custom Extraction.
- URL Inspection: This includes granular ‘Rich Results’, ‘Referring Pages’ and ‘Sitemaps’ data via the URL Inspection API integration in Search Console. The ‘Rich Results’ bulk export contains rich results types, validity, severity and issue types. ‘Referring Pages’ includes up to 5 referring pages available for each URL inspected. ‘Sitemaps’ includes the inspected URL, alongside the Sitemap URL(s) it was discovered within.
- Accessibility: All violations or violations at WCAG level. Exports include detailed accessibility issues seen in the Accessibility Details tab, such as issue, guidelines, impact and location on page for all URLs.
- Issues: All issues discovered in the ‘Issues’ tab (including their ‘inlinks’ variants) as a separate spreadsheet in a folder (as a CSV, Excel and Sheets).
- AI: Export Images or Text to Speech Audio files from using the AI models in OpenAI and Gemini that are able to generate them.
Multi-Export
The ‘Multi-Export’ option under the ‘Bulk Export’ menu allows you to select any tab, bulk export or report to export in a single click.
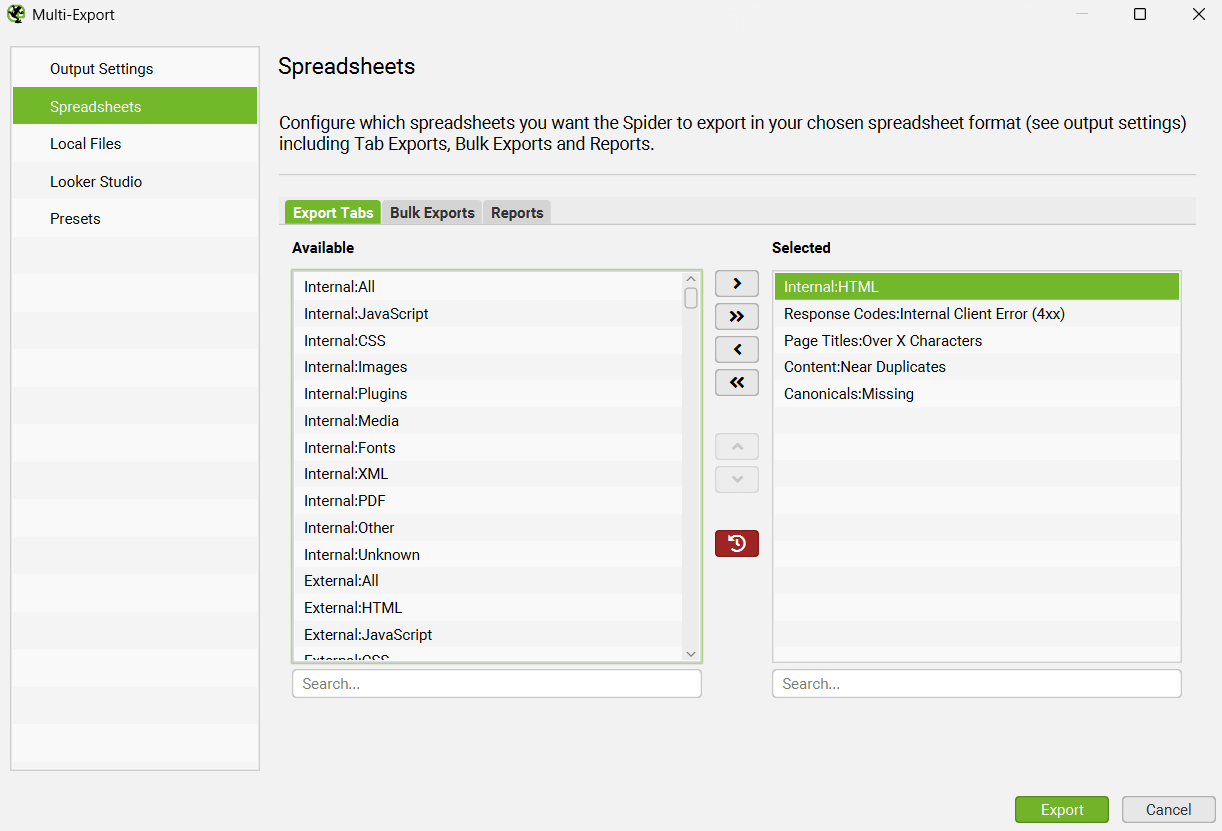
If there’s a common set of reports you use for crawls, or have specific exports for some websites, then you can save them as presets and use them when needed both manually in the UI, or in scheduling and the CLI.
This unctionality also enables you to run the Export for Looker Studio from a manual crawl, rather than only from within scheduling.
Export Format
When you choose to export, you can select the file ‘type’ to save it as. These include CSV, Excel 97-2004 Workbook, Excel Workbook and Google Sheets.
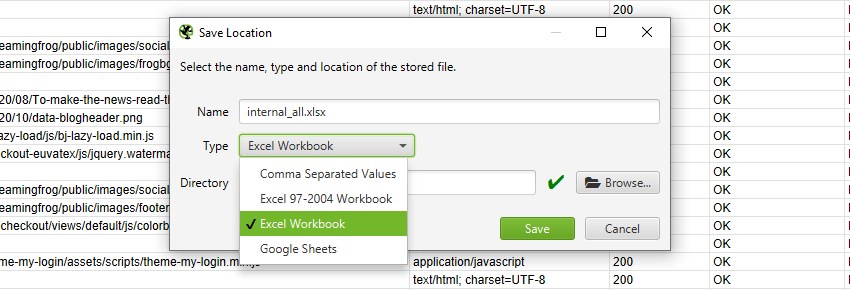
To export as a CSV, Excel 97-2004 Workbook or Excel Workbook, you can select the type and simply click ‘Save’.
To export to Google Sheets for the first time, you’ll need to select the ‘type’ as Google Sheets, and then click on ‘Manage’.

Then click ‘Add’ on the next window to add your Google account where you’d like to export.
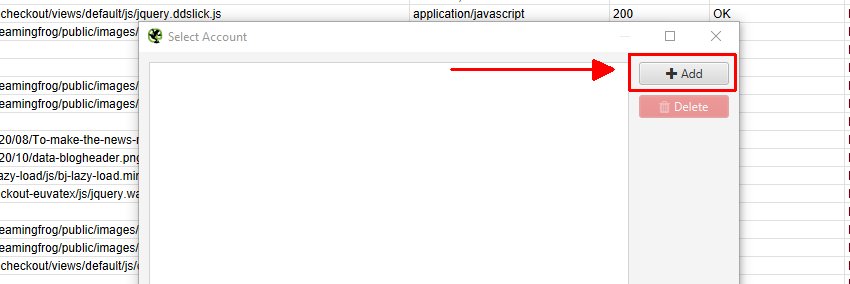
This will bring up your browser, where you can select and sign into your Google Account. You’ll need to click ‘allow’ twice, before confirming your choices to ‘allow’ the SEO Spider to export data to your Google Drive account.
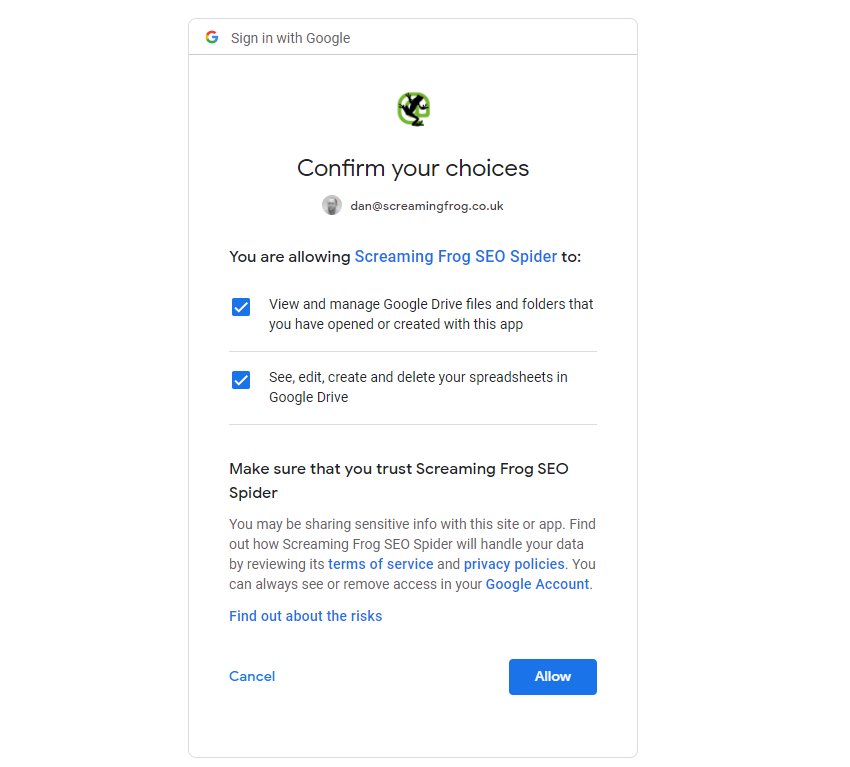
Once you have allowed it, you can click ‘OK’ and your account email will now be displayed under ‘Account’ where you can now choose to ‘save’.
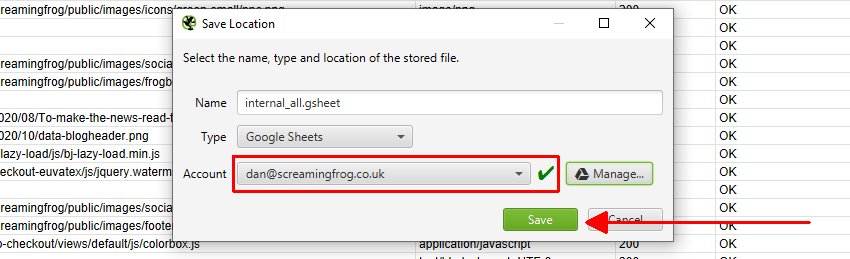
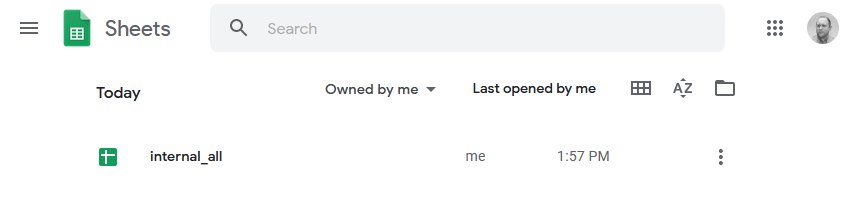
When you do save, the exports will be available in Google Sheets.
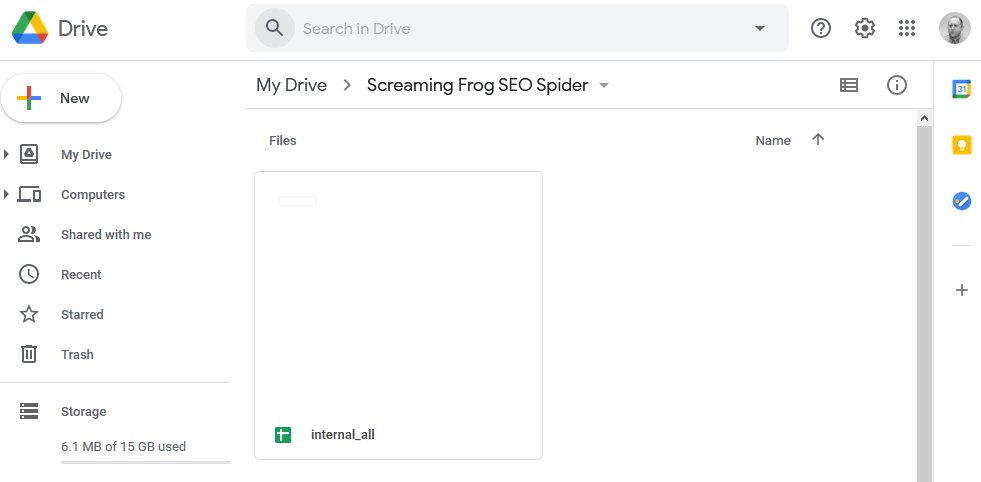
The SEO Spider will also automatically create a ‘Screaming Frog SEO Spider’ folder in your Google Drive account with the export in.
Please be aware, that Google Sheets isn’t built for scale and has a 5m cell limit. By default the SEO Spider generally has around 55 columns in the Internal tab, so is able to export up to around 90k rows before they are truncated (55 x 90,000 = 4,950,000 cells).
If you need to export more rows, either reduce the number of columns in your export, or use a different export format that’s built for the size. We had started work on writing to multiple sheets, but Google Sheets just shouldn’t be used in this way currently.
Google Sheets exporting has also been integrated into scheduling and the command line. This means you can schedule a crawl, which automatically exports any tabs, filters, exports or reports to a Sheet within Google Drive.
The ‘project name’ and ‘crawl name’ used in scheduling will be used as folders for the exports to Google Drive. So for example, a ‘Screaming Frog’ project name and ‘Weekly Crawl’ name, will sit within Google Drive like below.
You’re also able to choose to overwrite the existing file (if present), or create a timestamped folder in Google Drive.
If you wish to export to Google Sheets to connect to Google Looker Studio, then use the ‘Looker Studio’ tab and custom overview export.
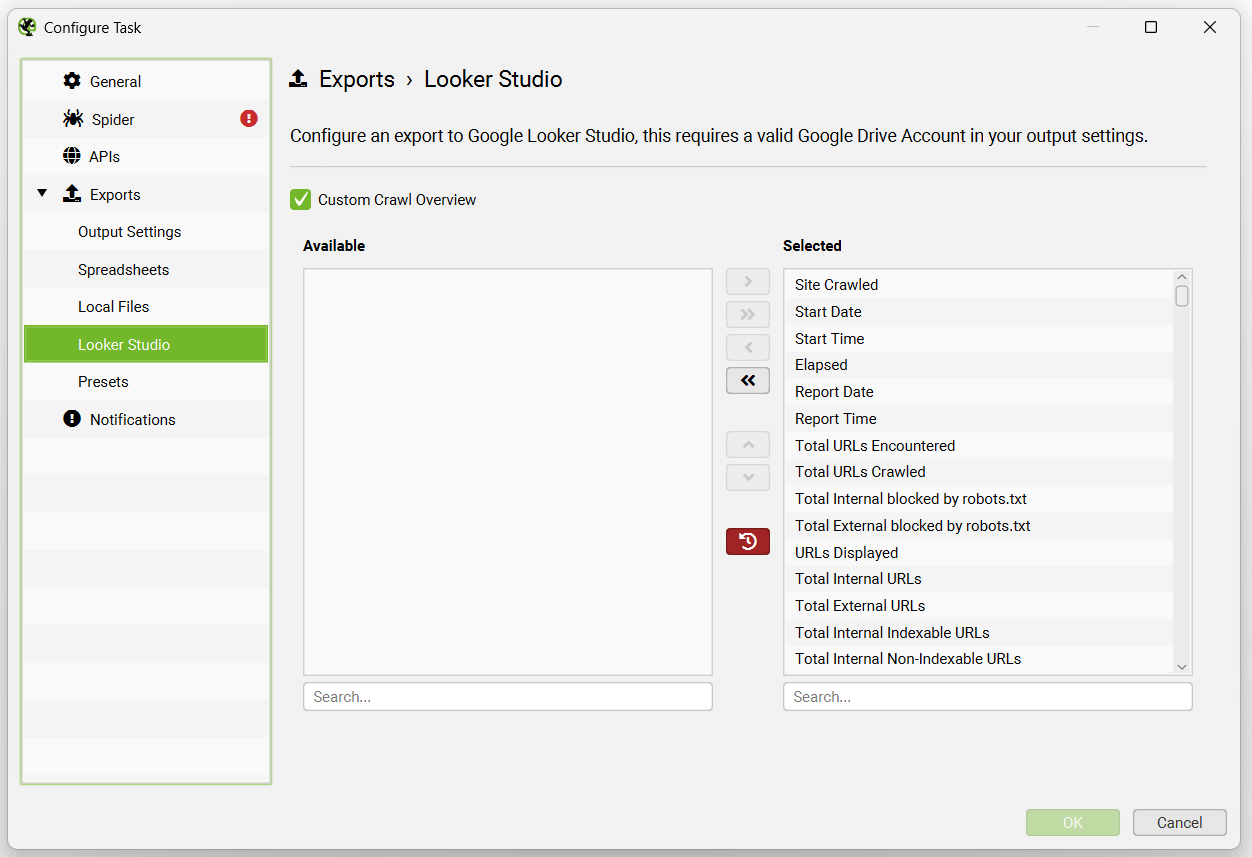
This has been purpose-built to allow users to select crawl overview data to be exported as a single summary row to Google Sheets. It will automatically append new scheduled exports to a new row in the same sheet in a time series. Please read our tutorial on ‘How To Automate Crawl Reports In Data Studio‘ to set this up.
If you’re using database storage mode, there is no need to ‘save’ crawls in scheduling, as they are stored automatically within the SEO Spiders database.
Robots.txt
The Screaming Frog SEO Spider is robots.txt compliant. It obeys robots.txt in the same way as Google.
It will check the robots.txt of the subdomain(s) and follow (allow/disallow) directives specifically for the Screaming Frog SEO Spider user-agent, if not Googlebot and then ALL robots. It will follow any directives for Googlebot currently as default. Hence, if certain pages or areas of the site are disallowed for Googlebot, the SEO Spider will not crawl them either. The tool supports URL matching of file values (wildcards * / $), just like Googlebot, too.
You can choose to ignore the robots.txt (it won’t even download it) in the paid (licensed) version of the software by selecting ‘Configuration > robots.txt > Ignore robots.txt’.
You can also view URLs blocked by robots.txt under the ‘Response Codes’ tab and ‘Blocked by Robots.txt’ filter. This will also show the matched robots.txt line of the disallow against each blocked URL.
Finally, there is also a custom robots.txt configuration, which allows you to download, edit and test a site’s robots.txt under ‘Configuration > robots.txt’ in the ‘Custom Robots’ section. Please read our user guide about using the Screaming Frog SEO Spider as a robots.txt tester.
A few things to remember with robots.txt –
- The SEO Spider only follows one set of user agent directives as per robots.txt protocol. Hence, priority is the Screaming Frog SEO Spider UA if you have any. If not, the SEO Spider will follow commands for the Googlebot UA, or lastly the ‘ALL’ or global directives.
- To reiterate the above, if you specify directives for the Screaming Frog SEO Spider, or Googlebot then the ALL (or ‘global’) bot commands will be ignored. If you want the global directives to be obeyed, then you will have to include those lines under the specific UA section for the SEO Spider or Googlebot.
- If you have conflicting directives (i.e an allow and disallow to the same file path) then a matching allow directive beats a matching disallow if it contains equal or more characters in the command.
- If the robots user agent is left blank, the SEO Spider will only obey the rules for * if present.
User agent
The SEO Spider obeys robots.txt protocol. Its user agent is ‘Screaming Frog SEO Spider’ so you can include the following in your robots.txt if you wish to block it –
User-agent: Screaming Frog SEO Spider
Disallow: /
Or alternatively if you wish to exclude certain areas of your site specifically for the SEO Spider, simply use the usual robots.txt syntax with our user-agent. Please note – There is an option to ‘ignore robots.txt‘, which is down to the responsibility of the user entirely.
Memory
TL;DR: If you have experienced a memory warning or are trying to perform large crawls, we recommend using a machine with an SSD and database storage mode. Adjust the memory allocation to 4GB for crawls up to 2m URLs.
Overview
The Screaming Frog SEO Spider uses a configurable hybrid storage engine, which can enable it to crawl millions of URLs. However, it does require the recommended hardware, and correct configuration.
The two main configurations in the SEO Spider are:
- Storage Mode – There are two storage modes in the SEO Spider, database storage mode, and memory storage mode.
- Memory Allocation – You can adjust the maximum memory the SEO Spider is able to use, which allows it to crawl more URLs.
- Switching To Database Storage Mode – If you’re not already using database storage mode, then this is our recommended first step. Database storage mode saves all crawl data to disk and allows you to crawl more URLs for the same memory allocation.
- Increasing Memory Allocation – We only recommend increasing memory allocation if you can’t move to database storage mode, or if you have reached your memory allocation in database storage mode. This increases the amount of data that can be held in RAM, to allow you to crawl more URLs.
By default the SEO Spider will start in database storage mode with just 2GB of RAM allocated. It will use your hard disk to store and process data.
This allows the SEO Spider to crawl more URLs than memory storage mode, as well auto save crawls and allow for quicker opening of saved crawls. Some legacy users may still be using the older memory storage mode.
Read on for more detail.
Database Storage Mode
The SEO Spider can be configured to save crawl data to disk, which enables it to crawl millions of URLs. Crawls are also automatically saved in database storage mode and open quicker via the ‘File > Crawls’ menu.
We recommend database storage mode as the default storage configuration for all users with Solid State Drives (SSD), as hard disk drives are significantly slower at writing and reading data.
This is the default mode, but some legacy users might be using the older memory storage mode. It can be configured by selecting Database Storage mode (under ‘File > Settings > Storage Mode’ on Windows or Linux, and ‘Screaming Frog SEO Spider > Settings > Storage Mode’ on macOS).
As a rough guide, an SSD and 4gb of RAM allocated in database storage mode should allow the SEO Spider to crawl approx. 2 million URLs.
We recommend this configuration as the default set-up for most users day to day. Memory can be allocated in the tool by selecting ‘File > Settings > Memory Allocation’ on Windows or Linux, and ‘Screaming Frog SEO Spider > Settings > Memory Allocation’ on macOS
Memory Storage Mode
Memory storage mode stores crawl data in RAM, rather than to disk. This mode is recommended for older machines without an SSD, or where there isn’t much disk space.
In memory storage mode there isn’t a set number of pages it can crawl, it is dependent on the complexity of the site and the users machine specifications. The SEO Spider sets a maximum memory of 2gb for 64-bit machines, which enables it to crawl typically between 10k-100k URLs of a site.
You can increase the SEO Spider’s memory allocation, and crawl into hundreds of thousands of URLs purely using RAM. A 64-bit machine with 8gb of RAM will generally allow you to crawl a couple of hundred thousand URLs, if the memory allocation is increased.
High Memory Usage
If you reach the memory limit set, you will receive a ‘high memory usage’ warning message –
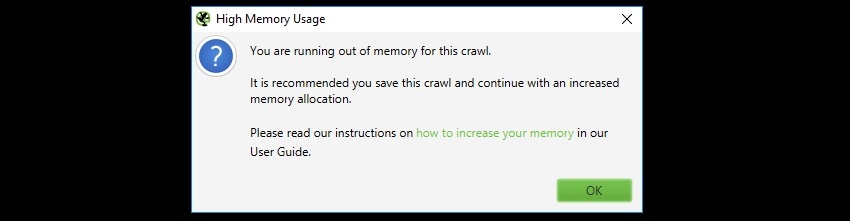
Or if you are experiencing slow down in a crawl or of the app on a large crawl, this might be due to reaching the memory allocation.
This is warning you that the SEO Spider has reached the current memory allocation and to be able to crawl more URLs, there are two options.
These options can also be combined to improve performance.
Switching To Database Storage
As outlined above, legacy users can switch to database storage mode to increase the number of URLs that can be crawled.
We recommend using an SSD for this storage mode, and it can be quickly configured within the application via ‘File > Settings > Storage Mode’ on Windows or Linux, and ‘Screaming Frog SEO Spider > Settings > Storage Mode’ on macOS.
We recommend this as the default storage for users with an SSD, and for crawling at scale. Database storage mode allows for more URLs to be crawled for a given memory setting, with close to RAM storage crawling speed for set-ups with an SSD.
The default crawl limit is 5 million URLs, but it isn’t a hard limit – the SEO Spider is capable of crawling more (with the right set-up). For crawls under 2 million URLs, we recommend database storage and allocating just 4gb of RAM.
We do not recommend using regular hard disk drives (HDD) in database storage mode, as the writing and reading speed of a hard drive is too slow and will be a bottleneck in crawling.
To import a crawl from memory storage mode, please read our guide on saving, opening, exporting and importing crawls.
Increasing Memory Allocation
You’re able set memory allocation within the app by selecting ‘File > Settings > Memory Allocation’ on Windows or Linux, and ‘Screaming Frog SEO Spider > Settings > Memory Allocation’ on macOS.
This will allow the SEO Spider to crawl more URLs, even in database storage mode.
The SEO Spider will communicate your physical memory installed on the system, and allow you to configure it quickly. We recommend allowing at least 2-4gb of free RAM for your system. For example, if you have 8gb of RAM, we’d recommend allocating between 4-6gb of RAM maximum.
For crawls up to 2m URLs, we recommend allocating 4GB of RAM.
Please remember to restart the application for the changes to take place. You can verify you setting have taken affect by following the guide here.
To open a saved crawl, please read our guide on saving, opening, exporting and importing crawls.
Checking memory allocation
After updating your memory settings you can verify the changes have taken affect by going to ‘Help > Debug’ and looking at the ‘Memory’ line.
The SEO Spider will allocate 2gb of RAM by default, so you the line will look something like this:
Memory: Physical=16.0GB, Used=170MB, Free=85MB, Total=256MB, Max=2048MB, Using 8%
The Max figure will always be a little less than the amount allocated. Allocating 4GB will look like this:
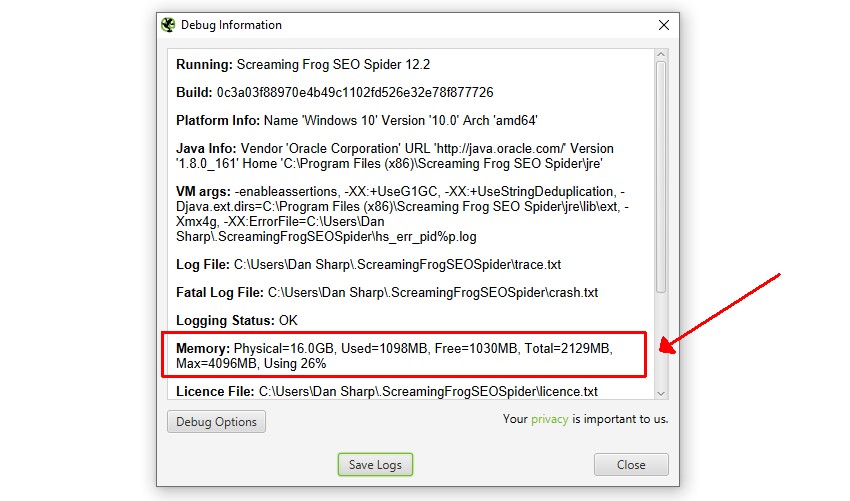
In this case ‘Max=4096MB’ indicates that 4gb of RAM has been correctly allocated.
Please note, the figures shown here aren’t exact as the VM overhead varies between Operating system and Java version.
Troubleshooting
- Check that C:\Program Files (x86)\Screaming Frog SEO Spider\ScreamingFrogSEOSpider.l4j.ini doesn’t have an extra -Xmx line in it.
- If changing memory settings has no effect on this output please check you don’t have a _JAVA_OPTS environment variable set.
XML sitemap creation
The Screaming Frog SEO Spider allows you to create an XML sitemap or a specific image XML sitemap, located under ‘Sitemaps’ in the top level navigation.

The ‘XML Sitemap’ feature allows you to create an XML Sitemap with all HTML 200 response pages discovered in a crawl, as well as PDFs and images. The ‘Images Sitemap’ is a little bit different to the ‘XML Sitemap’ option and including ‘images’. This option includes all images with a 200 response and ONLY pages that have images on them.
If you have over 49,999 URLs the SEO Spider will automatically create additional sitemap files and create a sitemap index file referencing the sitemap locations. The SEO Spider conforms to the standards outlined in sitemaps.org protocol.
Read our detailed tutorial on how to use the SEO Spider as an XML Sitemap Generator, or continue below for a quick overview of each of the XML Sitemap configuration options.
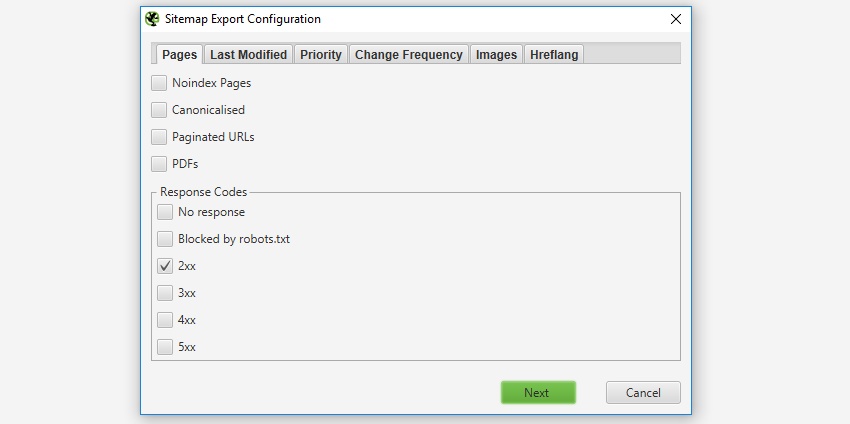
Adjusting Pages To Include
By default, only HTML pages with a ‘200’ response from a crawl will be included in the sitemap, so no 3XX, 4XX or 5XX responses. Pages which are ‘noindex’, ‘canonicalised’ (the canonical URL is different to the URL of the page), paginated (URLs with a rel=“prev”) or PDFs are also not included as standard, but this can be adjusted within the XML Sitemap ‘pages’ configuration.
If you have crawled URLs which you don’t want included in the XML Sitemap export, then simply highlight them in the user interface, right click and ‘remove’ before creating the XML sitemap. Alternatively you can export the ‘internal’ tab to Excel, filter and delete any URLs that are not required and re-upload the file in list mode before exporting the sitemap. Alternatively, simply block them via the exclude feature or robots.txt before a crawl.
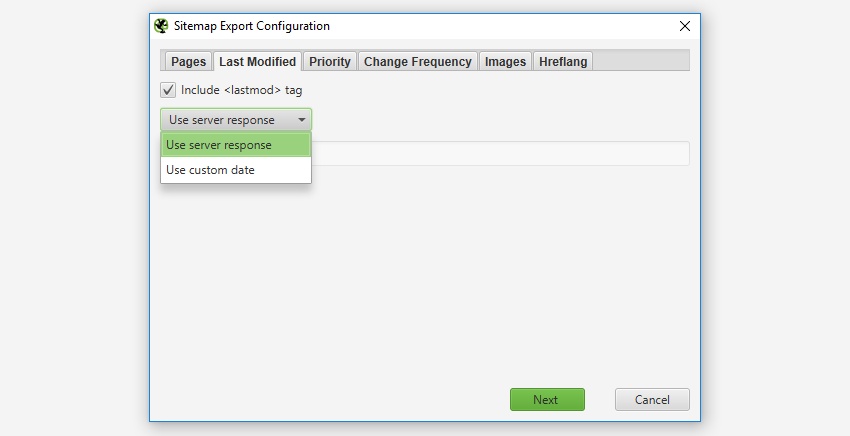
Last Modified
It’s optional whether to include the ‘lastmod’ attribute in a XML Sitemap, so this is also optional in the SEO Spider. This configuration allows you to either use the server response, or a custom date for all URLs.
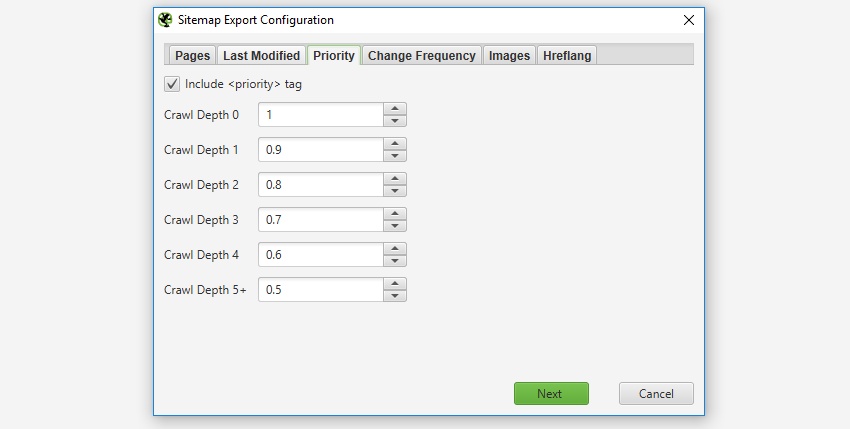
Priority
‘Priority’ is an optional attribute to include in an XML Sitemap. You can ‘untick’ the ‘include priority tag’ box, if you don’t want to set the priority of URLs.
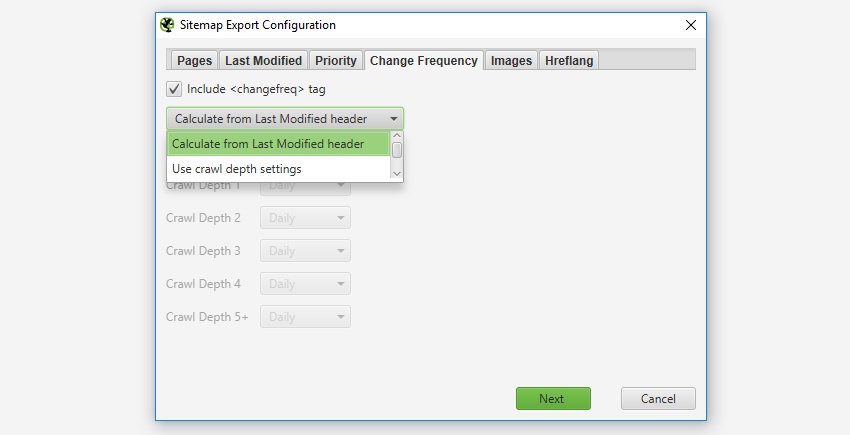
Change Frequency
It’s optional whether to include the ‘changefreq’ attribute and the SEO Spider allows you to configure these based from the ‘last modification header’ or ‘level’ (depth) of the URLs. The ‘calculate from last modified header’ option means if the page has been changed in the last 24 hours, it will be set to ‘daily’, if not, it’s set as ‘monthly’.
Images
It’s entirely optional whether to include images in the XML sitemap. If the ‘include images’ option is ticked, then all images under the ‘Internal’ tab (and under ‘Images’) will be included by default. As shown in the screenshot below, you can also choose to include images which reside on a CDN and appear under the ‘external’ tab within the UI.
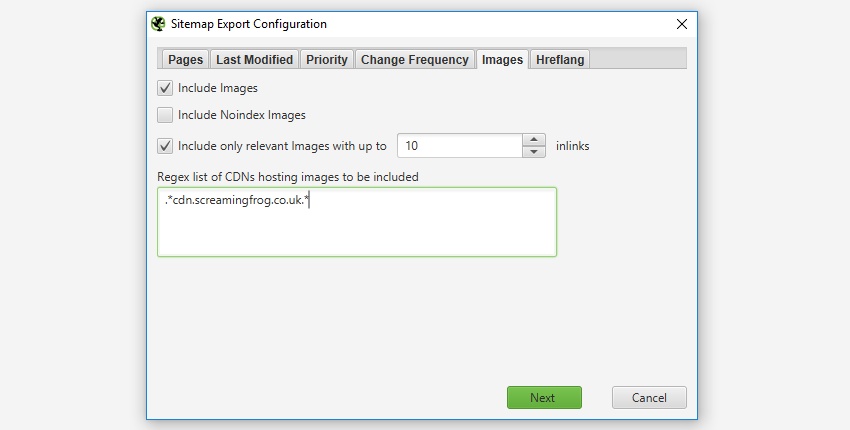
Typically images like logos or social profile icons are not included in an image sitemap, so you can also choose to only include images with a certain number of source attribute references to help exclude these. Often images like logos are linked to sitewide, while images on product pages for example might only be linked to once or twice. There is a IMG Inlinks column in the ‘images’ tab which shows how many times an image is referenced to help decide the number of ‘inlinks’ which might be a suitable for inclusion.
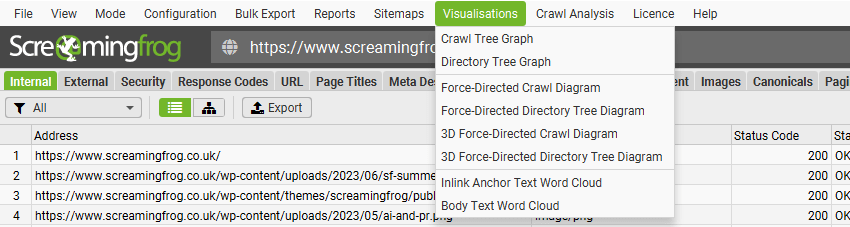
Visualisations
There are three main types of visualisation available within the top level menu of the SEO Spider, crawl visualisations, directory tree visualisations and word clouds.
Crawl visualisations are useful for viewing internal linking, while directory tree visualisations are more useful for understanding URL structure and organisation. Word clouds allow you to visualise how much a word is used for linking to or in the text of a particular page.
There are a force-directed diagram, 3D force-directed diagram and tree graph version of the crawl and directory tree visualisation available via the ‘Visualisations’ top-level menu.
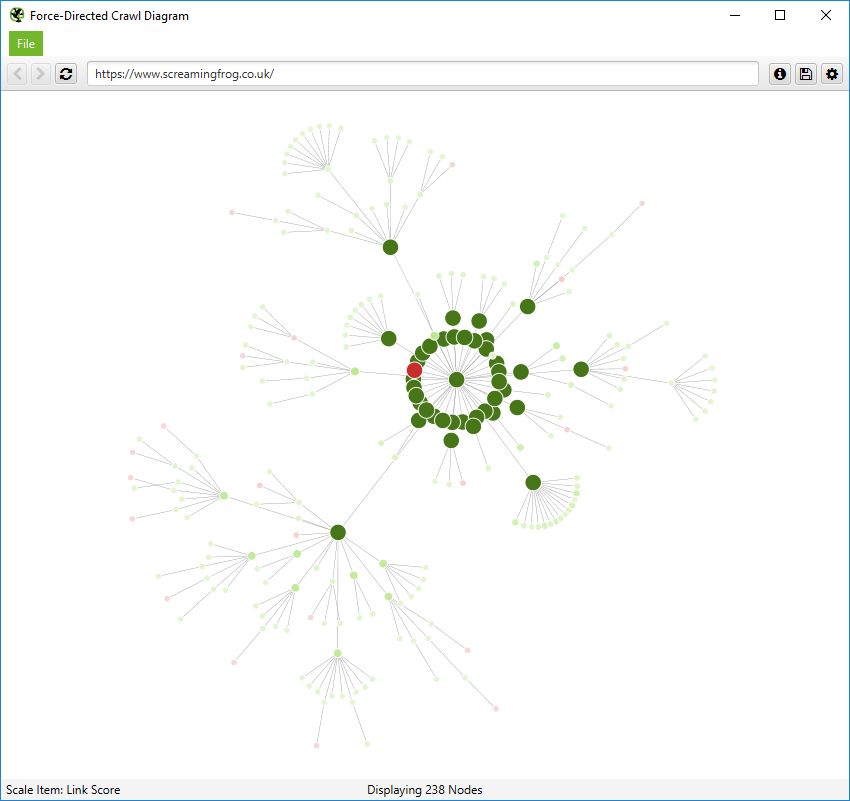
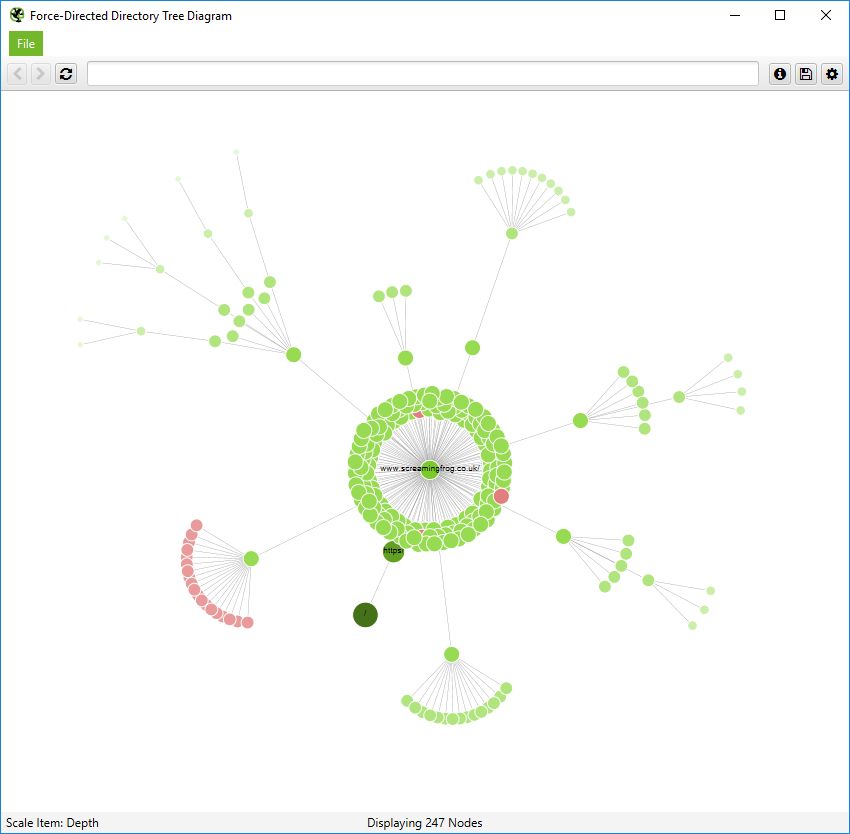
Crawl Visualisations
Crawl visualisations include the ‘Force-Directed Crawl Diagram’, ‘3D Force-Directed Crawl Diagram’ and ‘Crawl Tree Graph’.
These crawl visualisations are useful for analysis of internal linking, as they provide a view of how the SEO Spider has crawled the site, by the first link to a page. If there are multiple shortest paths to a page (i.e. a URL is linked to from two URLs at the same crawl depth), then the first URL crawled (often the first in the source) is used.
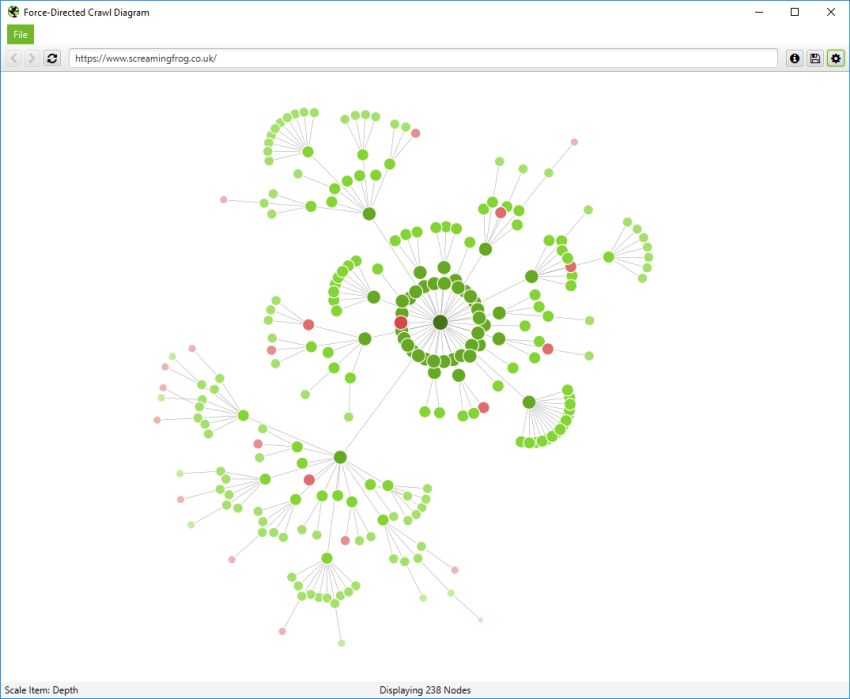
If you click on the ‘i’ symbol in the top right-hand corner of the visualisation, it explains what each colour represents.
Indexable pages are represented by the green nodes, the darkest, largest circle in the middle is the start URL (the homepage), and those surrounding it are the next level deep, and they get further away, smaller and lighter with increasing crawl depth (like a heatmap).
The pastel red highlights URLs that are non-indexable, which makes it quite easy to spot problematic areas of a website. There are valid reasons for non-indexable pages, but visualising their proportion and where they are, can be useful in quickly identifying areas of interest to investigate further.
The visualisation will show up to 10k URLs at a time, as they are extremely memory intensive. However, you are able to view them from any URL to view from that point.
You’re also able to right-click and ‘focus’ to expand on particular areas of a site to show more URLs in that section (up to another 10k URLs at a time). You can use the browser as navigation, typing in a URL directly, and moving forwards and backwards.
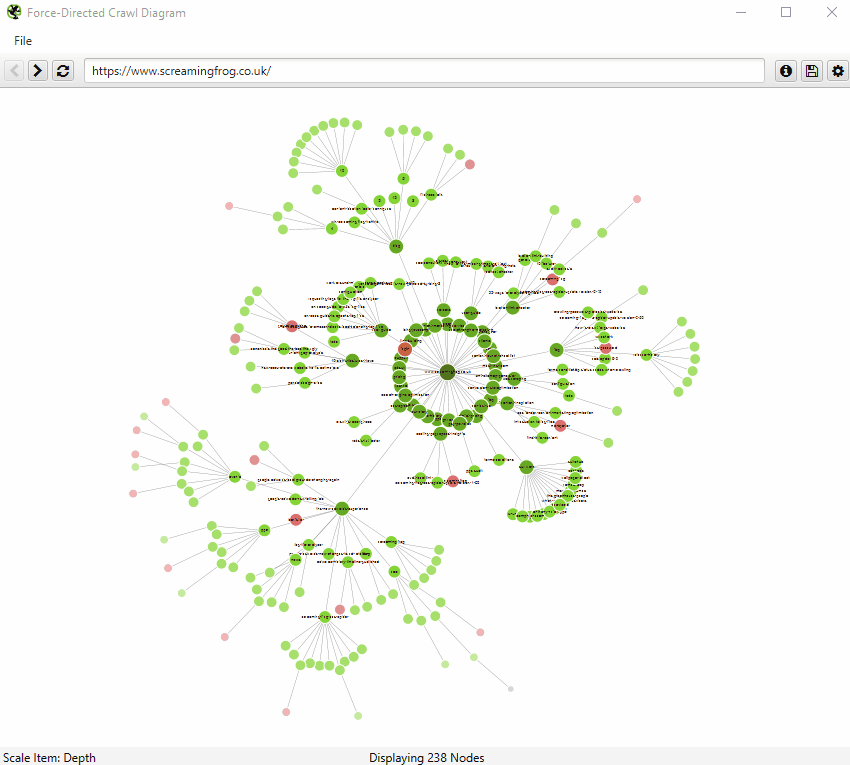
You can also type a URL directly into the browser, or right-click on any URL in a crawl, and open up a visualisation from that point as a visual URL explorer.

When a visualisation has reached the 10k URL limit, it lets you know when a particular node has children that are being truncated (due to size limits), by colouring the nodes grey. You can then right click and ‘explore’ to see the children. This way, every URL in a crawl can be visualised.
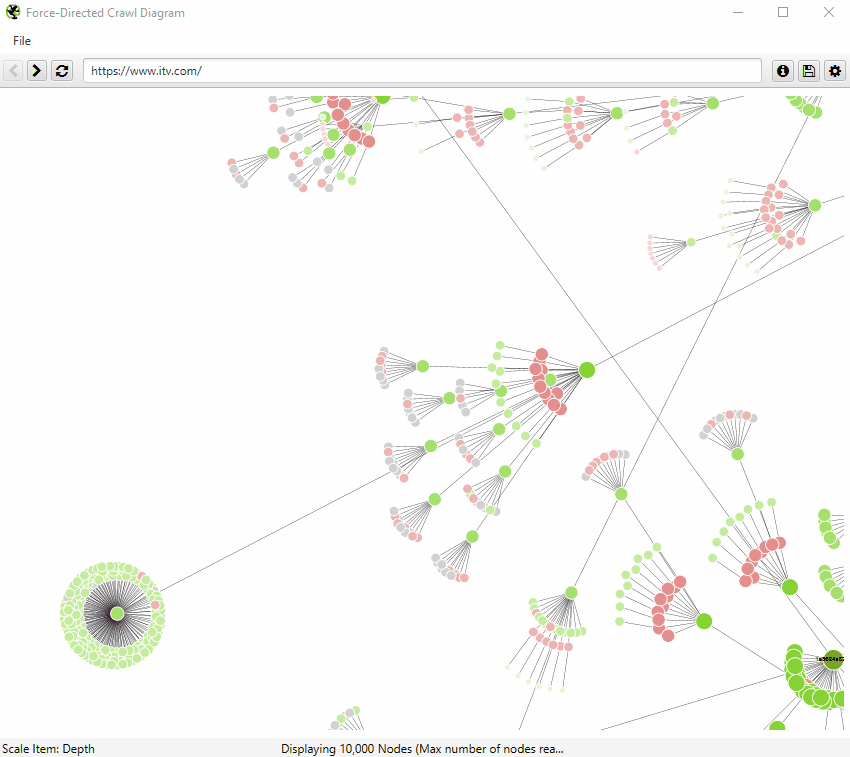
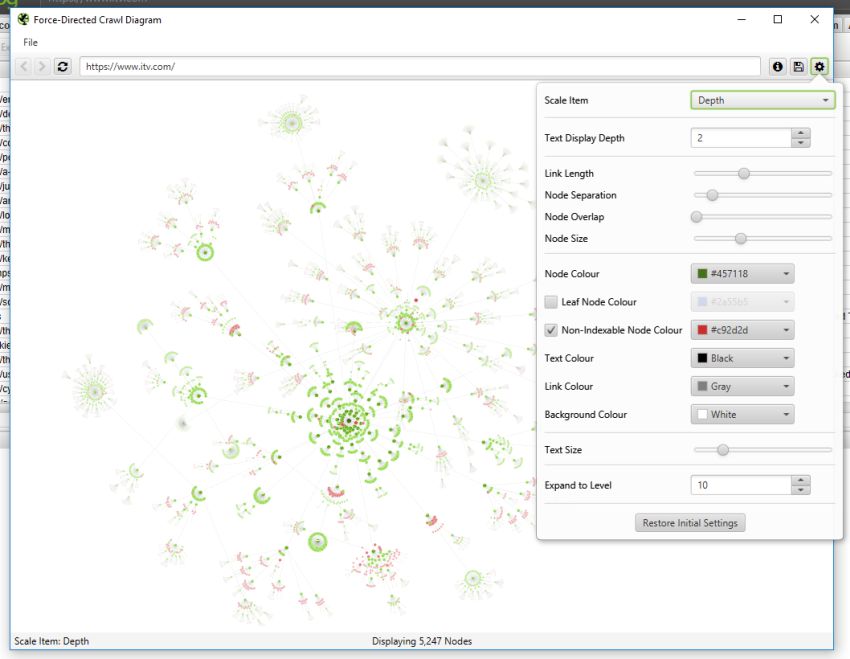
You’re also able to configure the size of nodes, overlap, separation, colour, link length and when to display text.
You’re therefore able to produce colourful visualisations, like the below.
You’re also able to scale visualisations by other metrics to provide greater insight, such as unique inlinks, word count, GA Sessions, GSC Clicks, Link Score, Moz Page Authority and more.
The size and colour of nodes will scale based upon these metrics, which can help visualise many different things alongside internal linking, such as sections of a site which might have thin content.
Or highest value by link score.
The 3D force-directed crawl diagram will open in your default browser, rather than within our inbuilt browser.
This diagram can scale up to 100k URLs. Right-click functionality isn’t available, but the inbuilt browser URL bar can still be used to navigate if required.
The left mouse click will rotate, the wheel will zoom, and right click will pan in the 3D Visualisation. The right-hand configuration allows you to adjust the diagram or search for specific URLs, in a similar way to the 2D diagram.
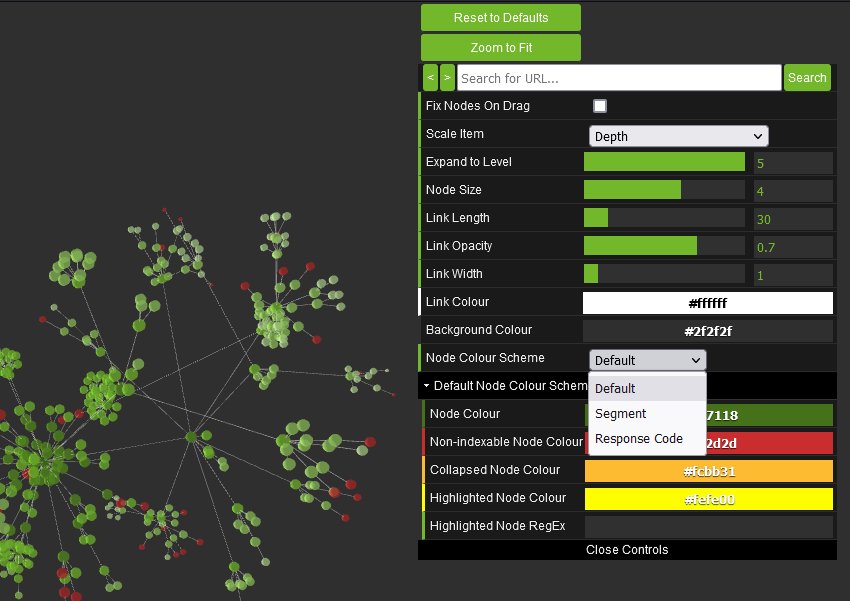
You’re able to adjust node colours to be based upon response codes, or segments as well.
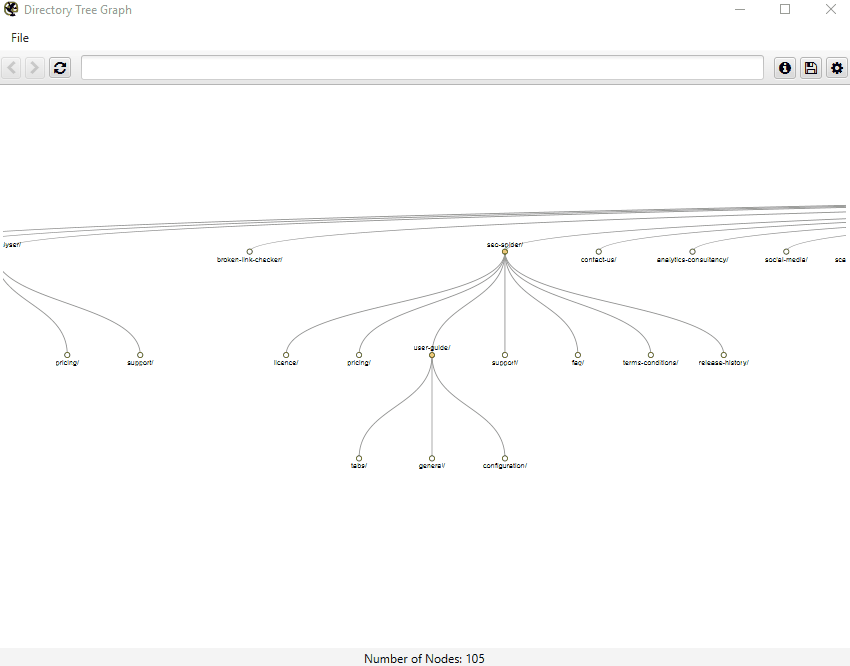
You can also view internal linking in a more simplistic crawl tree graph, which can be configured to display left to right, or top to bottom.
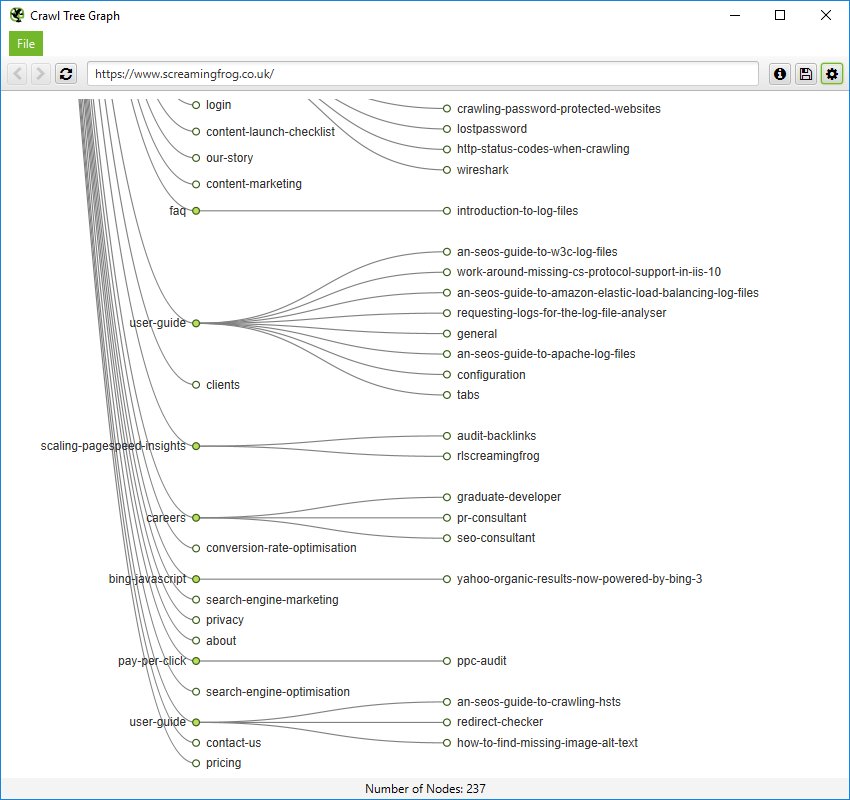
You can right click and ‘focus’ on particular areas of the site. You can also expand or collapse up to a particular crawl depth, and adjust the level and node spacing.
Like the force-directed diagrams, all the colours can also be adjusted.
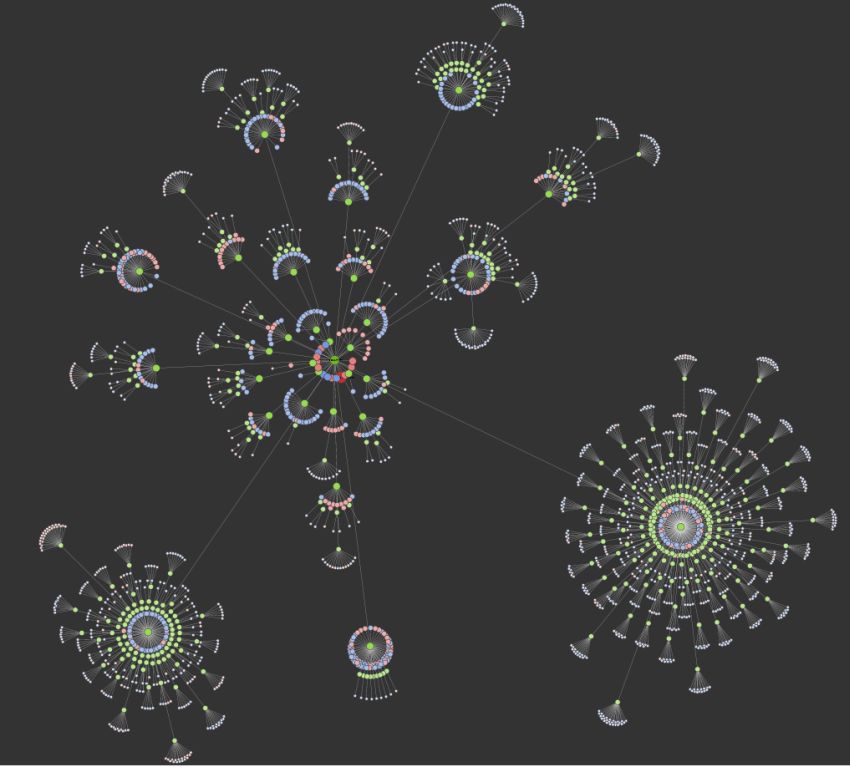
Directory Tree Visualisations
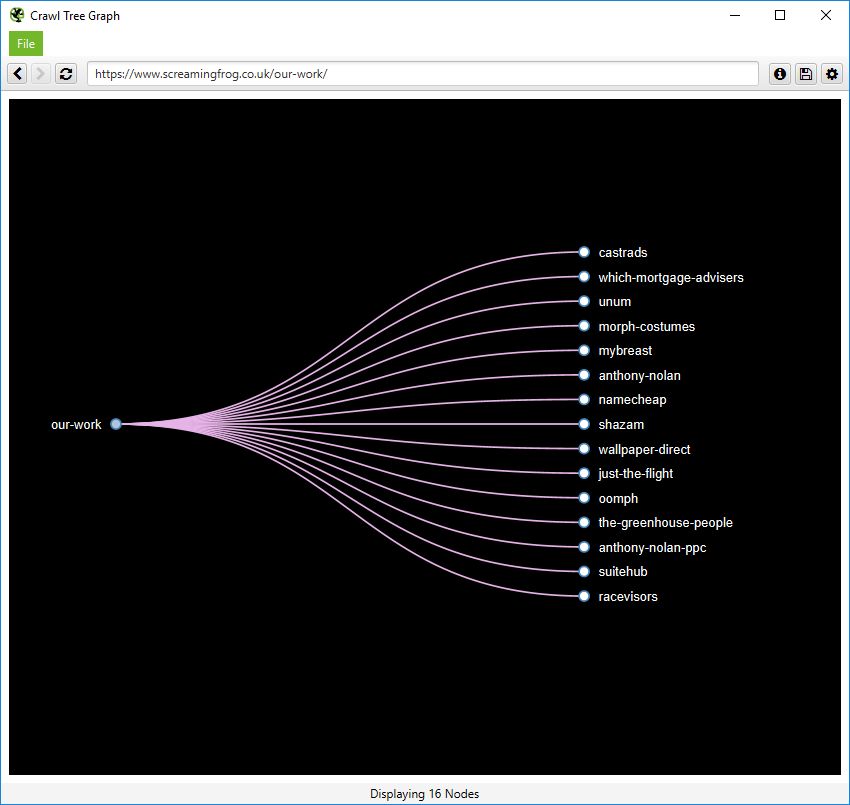
Directory Tree visualisations include the ‘Force-Directed Directory Tree Diagram’, ‘3D Force-Directed Directory Tree Diagram’ and ‘Directory Tree Graph’.
The ‘Directory Tree’ view helps to understand a site’s URL architecture, and the way it’s organised, as opposed to internal linking of the crawl visualisations. This can be useful, as these groupings often share the same page templates and SEO issues.
The force-directed directory tree diagram is unique to the SEO Spider (and you can see it’s very different for a crawl of our site than the previous crawl diagram), and easier to visualise potential problems.
Notice how the non-indexable red nodes are organised together, as they have the same template, whereas in the crawl diagram they are distributed throughout. This view often makes it easier to see patterns.
This can also be viewed in the 3D force-directed directory tree diagram.
Or the simplistic directory tree graph format, too. These graphs are interactive and here’s a zoomed in, top-down view of a section of our website.
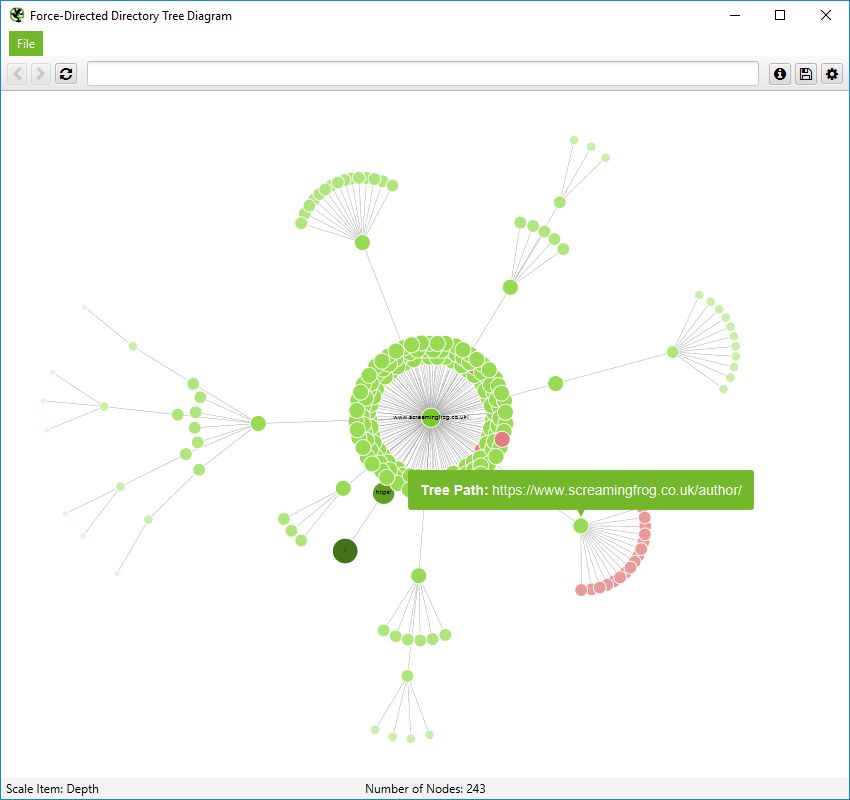
It’s important to remember that nodes don’t always represent a URL in this directory tree view. They can merely represent a path, which doesn’t exist as a URL. An example, of this, is the subfolder /author/ for the Screaming Frog website. It has URLs contained within the subfolder (/author/name/) which exist, but the /author/ path itself doesn’t.
However, in a directory tree view, this is still shown to enable grouping. However, only the ‘path’ is shown when you hover over it –
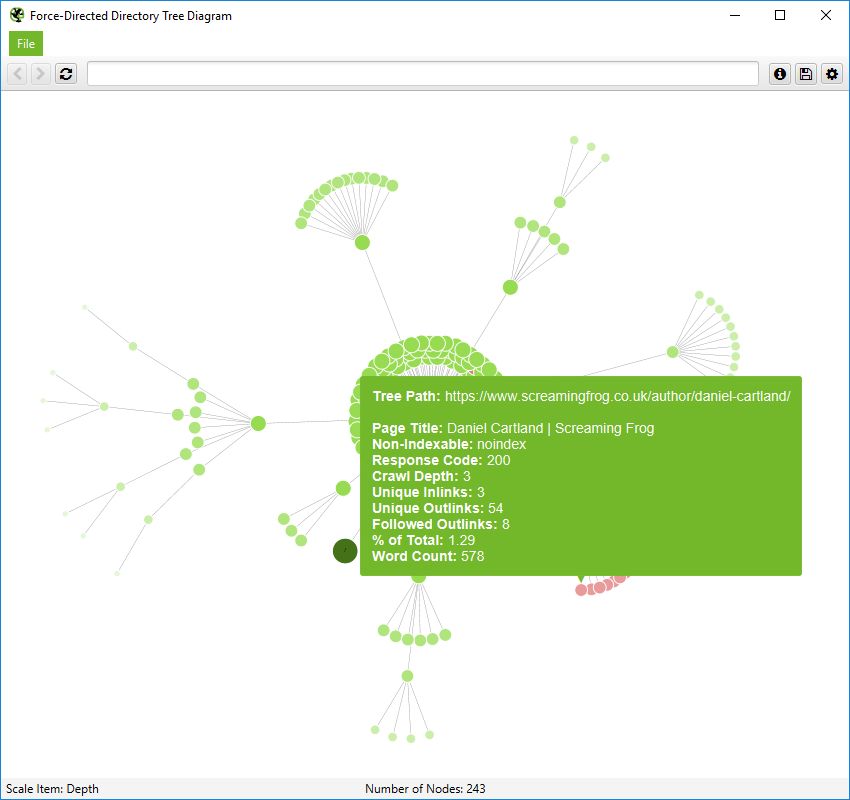
A URL will contain more information like this –
Inlink Anchor Text & Body Text Word Clouds
The options in the top navigation will show the word clouds for the URL entered as the starting point of the crawl. To see these for any page URL right-click the URL in the main window and go to ‘Visualisations’.
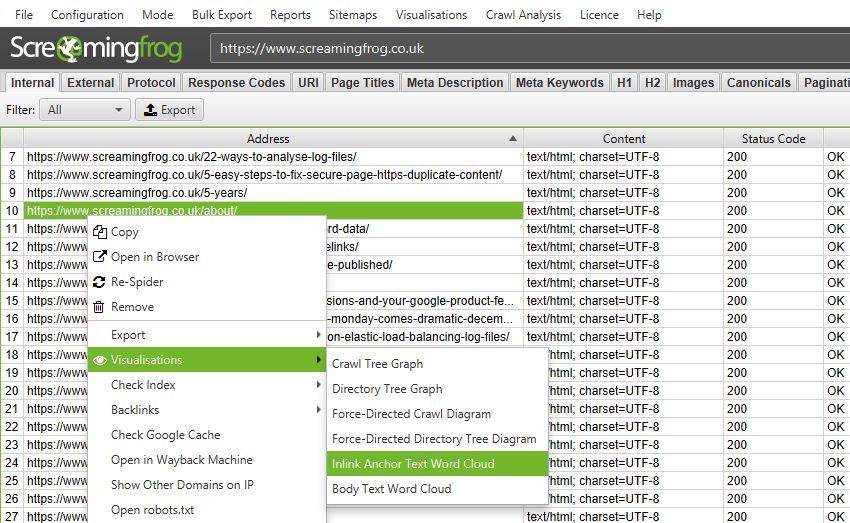
The ‘Inlink Anchor Text Word Cloud’ includes all internal anchor text to a given URL and image alt text of hyperlinked images to a page.
The ‘Body Text Word Cloud’ includes all text within the HTML body of a page. To view this visualisation, the ‘Store HTML‘ configuration must be enabled.

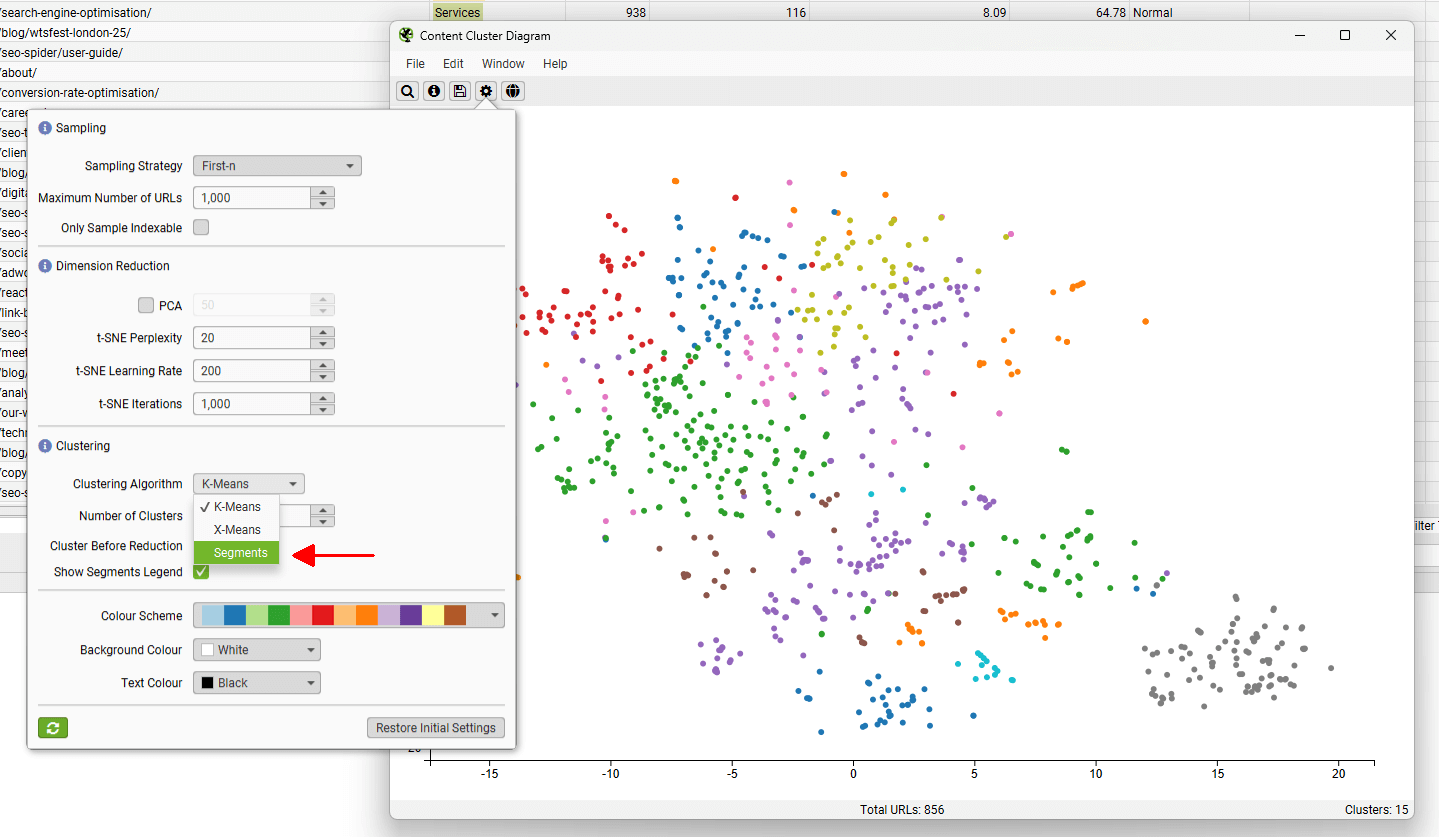
Content Cluster Diagram
The Content Cluster Diagram is a two-dimensional visualisation of URLs from the crawl, plotted and clustered from embeddings data. Please read ‘How to Identify Semantically Similar Pages & Outliers‘ to set this up.
It can be used to identify patterns and relationships in your website’s content, where semantically similar content is clustered together.
The diagram can display up to 10,000 pages at a time. The closer the nodes are together, the more semantically similar they are to each other.
The example diagram above highlights the semantic relationship of an animal website.
Tiger populations are tightly grouped together, with the nearest neighbour, the Liger hybrid between the Tiger and the Lion, and then other big cats such as Leopards, Jaguars, and Cheetahs as the next neighbours and so on.
The diagrams can visualise the scale of clusters of content on a site, or identify potential topical clusters that are semantically related – yet might be distantly integrated for the user.
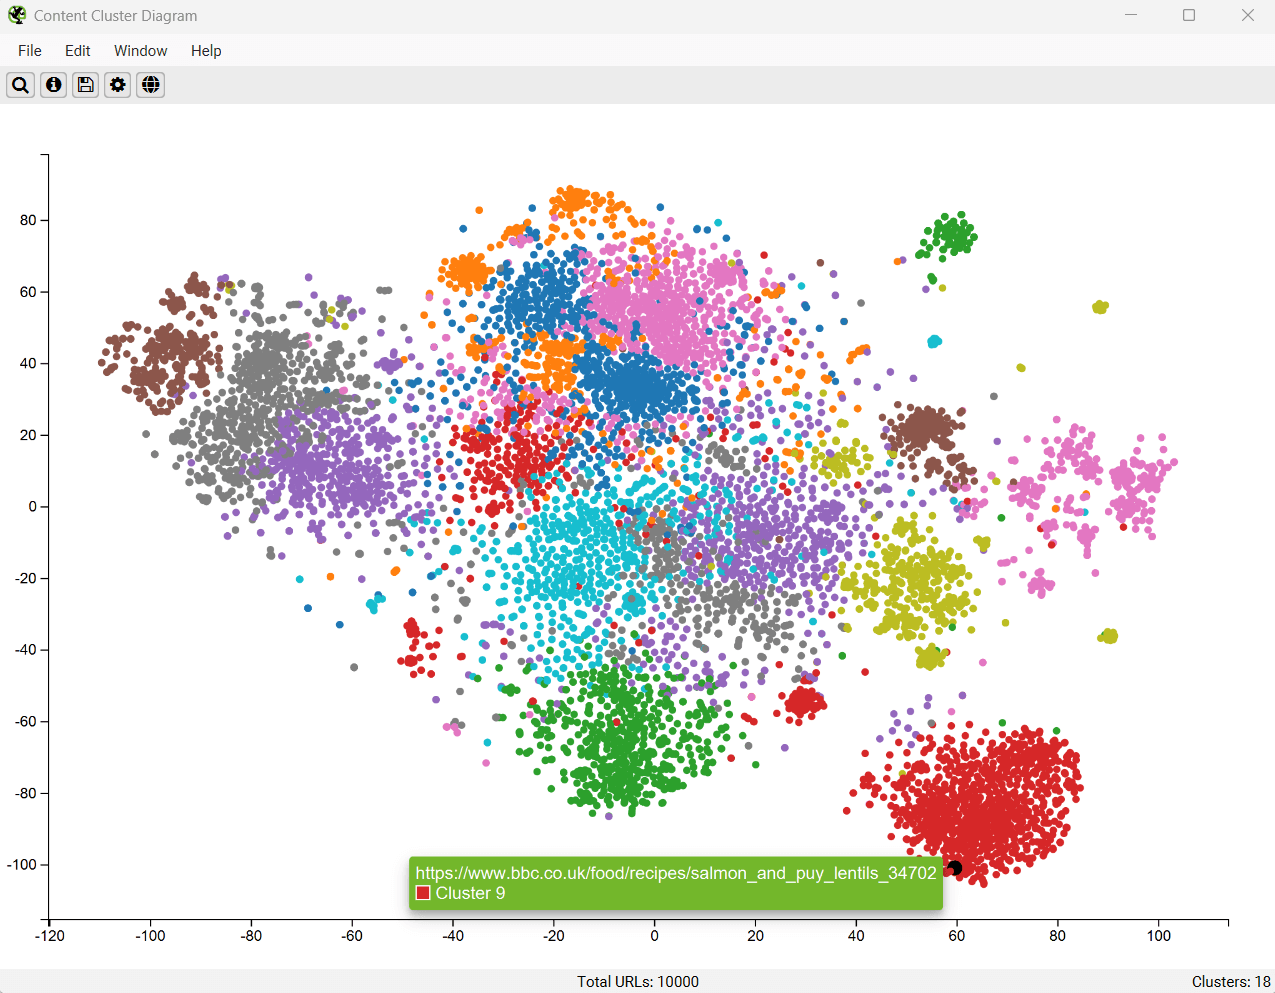
Low-relevance content and outliers can be easily identified as isolated nodes on the edges of the diagram.
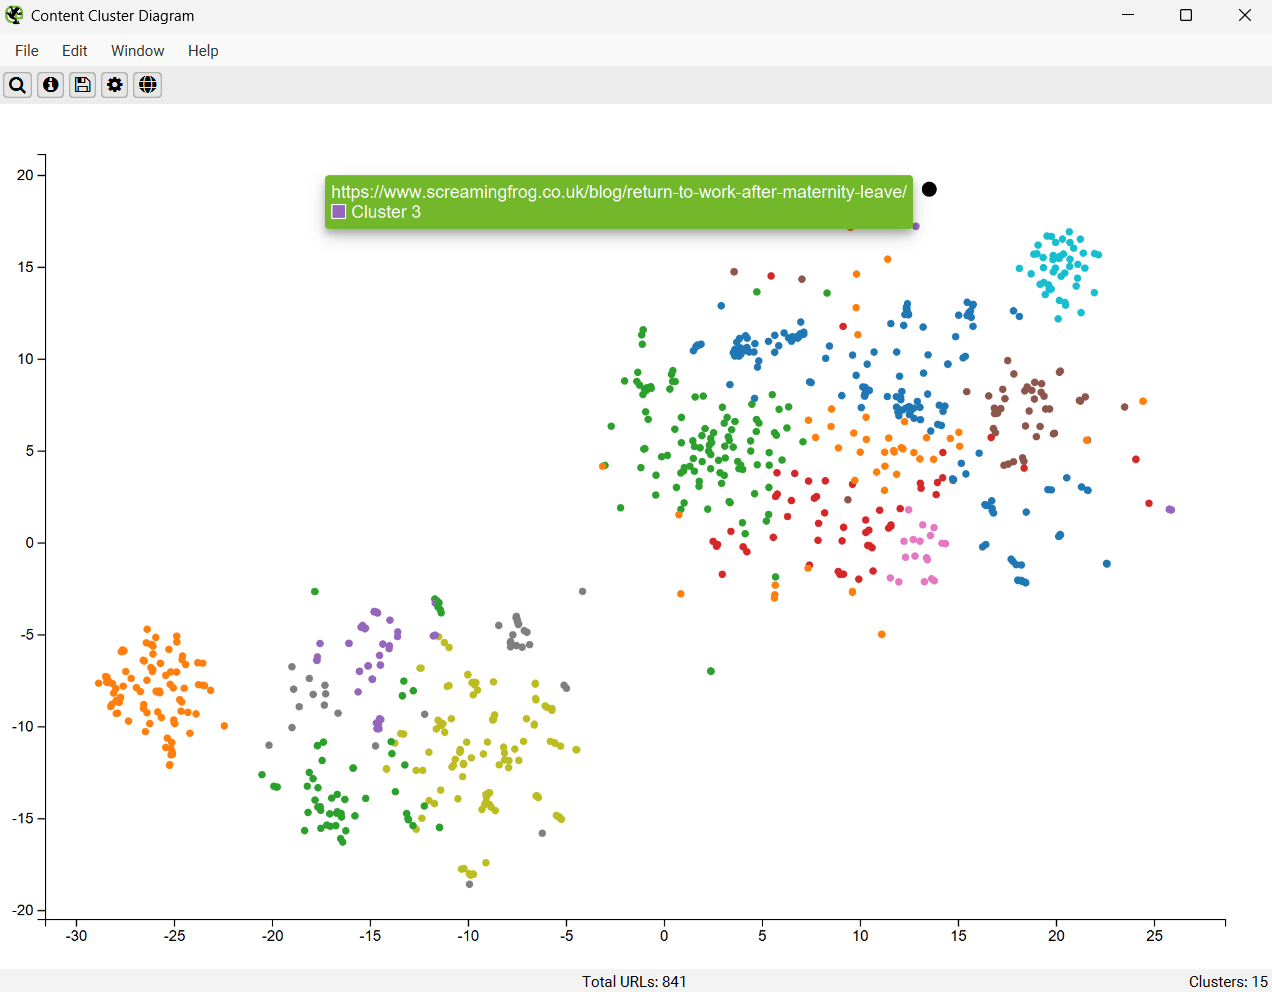
The cog allows you to adjust the sampling, dimension reduction, number of clusters and colour schemes used. You can select to use ‘segments’ as clustering node colour scheme as well.
This can be helpful to spot when two semantically similar pages are in different segments, which could be considered for internal linking to each other.
In the case of the above, the two pages that cover the same subject are in different sections of the website – tutorials and our issues library, and should refer to each other with internal links.
Troubleshooting
- When exporting as an .svg this will have the current view port at the time of the export. No information is lost, but you’ll need to use a proper SVG capable application to adjust the view, such as Adobe Illustrator or Inkscape.
Reports
There’s a variety of reports which can be accessed via the ‘reports’ top level navigation. These include as follows below.
Crawl Overview Report
This report provides a summary of the crawl, including data such as, the number of URLs encountered, those blocked by robots.txt, the number crawled, the content type, response codes etc. It provides a top level summary of the numbers within each of the tabs and respective filters.
The ‘total URI description’ provides information on what the ‘Total URI’ column number is for each individual line to (try and) avoid any confusion.
All Redirects, Redirect Chains & Redirect & Canonical Chains Reports
These reports detail redirects discovered on the website and the source URLs they are found on.

The ‘All Redirects’ report shows all singular redirects and chains discovered, ‘Redirect Chains’ reports redirects with 2+ redirects in a chain, and ‘Redirect & Canonical Chains’ shows any 2+ redirects or canonicals in a chain.
The ‘redirect chains’ and ‘redirect & canonical chains’ reports map out chains of redirects and canonicals, the number of hops along the way and will identify the source, as well as if there is a loop. In Spider mode (Mode > Spider) these reports will show all redirects, from a single hop upwards. It will communicate the ‘number of redirects’ in a column and the ‘type of chain’ identified, whether it’s an HTTP Redirect, JavaScript Redirect, Canonical etc. It also flags redirect loops. If the reports is empty, it means you have no loops or redirect chains that can be shortened.
The ‘redirects’, ‘redirect chains’ and ‘redirect & canonical chains’ reports can also all be used in list mode (Mode > List). They will show a line for every URL supplied in the list. By ticking the ‘Always follow redirects‘ and ‘always follow canonicals‘ options the SEO Spider will continue to crawl redirects and canonicals in list mode and ignore crawl depth, meaning it will report back upon all hops until the final destination. Please see our guide on auditing redirects in a site migration.
Please note – If you only perform a partial crawl, or some URLs are blocked via robots.txt, you may not receive all response codes for URLs in this report.
Canonicals Reports
The ‘Canonical Chains’ and ‘Non-Indexable Canonicals’ reports highlight errors and issues with canonical link elements or HTTP canonicals implementation within the crawl. Please read How To Audit Canonicals for our step-by-step guide.
The ‘Canonical Chains’ report highlight any URLs that have a 2+ canonicals in a chain. This is where a URL has a canonical URL to a different location (and is ‘canonicalised’), which then has a canonical URL to another URL again (a chain of canonicals).
The ‘Non-Indexable Canonicals’ report highlights errors and issues with canonicals. In particular, this report will show any canonicals which have a no response, are blocked by robots.txt, 3XX redirect, 4XX or 5XX error (anything other than a 200 ‘OK’ response).
This report also provides data on any URLs which are discovered only via a canonical and are not linked to from the site (in the ‘unlinked’ column when ‘true’).
Pagination Reports
The ‘Non-200 Pagination URLs’ and ‘Unlinked Pagination URLs’ reports highlight errors and issues with rel=”next” and rel=”prev” attributes, which are of course used to indicate paginated content. Please read How To Audit rel=”next” and rel=”prev” Pagination Attributes for our step-by-step guide.
The ‘Non-200 Pagination URLs’ report will show any rel=”next” and rel=”prev” URLs which have a no response, blocked by robots.txt, 3XX redirect, 4XX, or 5XX error (anything other than a 200 ‘OK’ response).
The ‘Unlinked Pagination URLs’ report provides data on any URLs which are discovered only via a rel=”next” and rel=”prev” attribute and are not linked-to from the site (in the ‘unlinked’ column when ‘true’).
Hreflang Reports
The Hreflang reports relate to the implementation of hreflang discovered on the website. Please read How To Audit Hreflang for our step-by-step guide.
There are 7 hreflang reports which allow data to be exported in bulk, which include the following –
- All Hreflang URLs – This is a 1:1 report of all URLs & hreflang URLs including region and language values discovered in a crawl.
- Non-200 Hreflang URLs – This report shows any URLs in hreflang annotations which are not a 200 response (no response, blocked by robots.txt, 3XX, 4XX or 5XX responses).
- Unlinked Hreflang URLs – This report shows any hreflang URLs which are not linked to via a hyperlink on the site.
- Missing Confirmation Links – This report shows the page missing a confirmation link, and which page is not confirming.
- Inconsistent Language Confirmation Links – This report shows confirmation pages which use different language codes to the same page.
- Non Canonical Confirmation Links – This report shows the confirmation links which are to non canonical URLs.
- Noindex Confirmation Links – This report shows the confirmation links which are to noindex URLs.
Insecure Content Report
The insecure content report will show any secure (HTTPS) URLs which have insecure elements on them, such as internal HTTP links, images, JS, CSS, SWF or external images on a CDN, social profiles etc. When you’re migrating a website to secure (HTTPS) from non secure (HTTP), it can be difficult to pick up all insecure elements and this can lead to warnings in a browser –
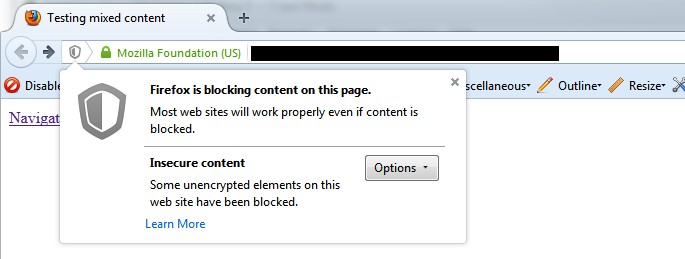
Here’s a quick example of how a report might look (with insecure images in this case) –

SERP Summary Report
This report allows you to quickly export URLs, page titles and meta descriptions with their respective character lengths and pixel widths.
This report can also be used for a template to re-upload back into the SEO Spider in ‘SERP’ mode.
Orphan Pages Report
The orphan pages report provides a list of URLs collected from the Google Analytics API, Google Search Console (Search Analytics API) and XML Sitemap that were not matched against URLs discovered within the crawl.
This report will be blank, unless you have connected to Google Analytics, Search Console or configured to crawl an XML Sitemap and pull in data during a crawl.
You can see orphan page URLs directly in the SEO Spider as well, but it does require the correct configuration. We recommend reading our guide on how to find orphan pages.
The orphan pages report ‘source’ column shows exactly the source the URL was discovered, but not matched against a URL in the crawl. These include –
- GA – The URL was discovered via the Google Analytics API.
- GSC – The URL was discovered in Google Search Console, by the Search Analytics API.
- Sitemap – The URL was discovered via the XML Sitemap.
- GA & GSC & Sitemap – The URL was discovered in Google Analytics, Google Search Console & the XML Sitemap.
This report can include any URLs returned by Google Analytics for the query you select in your Google Analytics configuration. Hence, this can include logged in areas, or shopping cart URLs, so often the most useful data for SEOs is returned by querying the landing page path dimension and ‘organic traffic’ segment. This can then help identify –
- Orphan Pages – These are pages that are not linked to internally on the website, but do exist. These might just be old pages, those missed in an old site migration or pages just found externally (via external links, or referring sites). This report allows you to browse through the list and see which are relevant and potentially upload via list mode.
- Errors – The report can include 404 errors, which sometimes include the referring website within the URL as well (you will need the ‘all traffic’ segment for these). This can be useful for chasing up websites to correct external links, or just 301 redirecting the URL which errors, to the correct page! This report can also include URLs which might be canonicalised or blocked by robots.txt, but are actually still indexed and delivering some traffic.
- GA or GSC URL Matching Problems – If data isn’t matching against URLs in a crawl, you can check to see what URLs are being returned via the GA or GSC API. This might highlight any issues with the particular Google Analytics view, such as filters on URLs, such as ‘extended URL’ hacks etc. For the SEO Spider to return data against URLs in the crawl, the URLs need to match up. So changing to a ‘raw’ GA view, which hasn’t been touched in anyway, might help.
Structured Data Reports
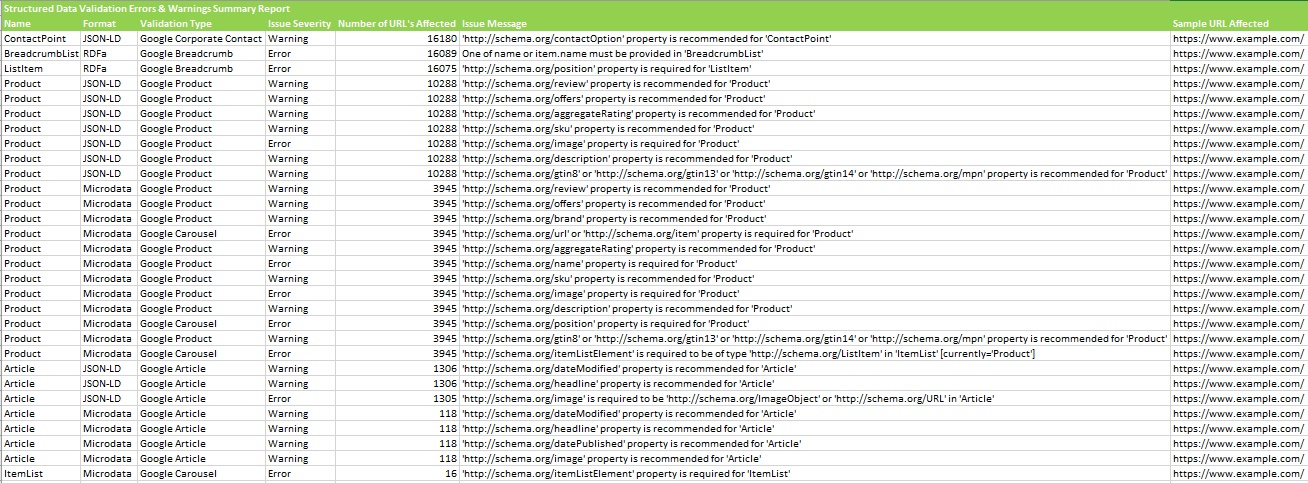
The ‘Validation Errors & Warnings Summary’ report aggregates structured data to unique validation errors and warnings discovered (rather than reporting every instance) and shows the number of URLs affected by each issue, with a sample URL with the specific issue. An example report can be seen below.
The ‘Validation Errors & Warnings’ report shows every structured data validation error and warning at URL level, including the URL, the property name (Organization etc), format (JSON-LD etc), issue severity (error or warning), validation type (Google Product etc) and issue message (/review property is required etc).
The ‘Google Rich Results Features Summary’ report aggregates by Google Rich Results Features detected across a crawl, and shows the number of URLs that have each feature.
The ‘Google Rich Results Features’ report maps every URL against every available feature, and shows which ones have been detected for each URL.
PageSpeed Reports
The PageSpeed reports relate to the filters outlined in the PageSpeed tab, which covers the meaning of each. These reports provide a way to export the pages and their specific resources with speed opportunities or diagnostics.
They require the PageSpeed Insights integration to be set-up and connected.
The ‘PageSpeed Opportunities Summary’ report summaries all the unique opportunities discovered across the site, the number of URLs it affects, and the average and total potential saving in size and milliseconds to help prioritise them at scale.
The ‘CSS Coverage Summary’ report highlights how much of each CSS file is unused across a crawl, and the potential savings that could be made by removing unused code that is loading across the site.
The ‘JavaScript Coverage Summary’ report highlights how much of each JS file is unused across a crawl, and the potential savings that could be made by removing unused code that is loading across the site.
HTTP Header Summary Report
This shows an aggregated view of all HTTP response headers discovered during a crawl. It shows every unique HTTP response header and the number of unique URLs that responded with the header.
‘HTTP Headers‘ must be enabled to be extracted via ‘Config > Spider > Extraction’ for this to be populated.
More granular details of the URLs and headers can be seen in the lower window ‘HTTP Headers’ tab, and via the ‘Bulk Export > Web > All HTTP Headers’ export.
Alternatively, HTTP headers can be queried in the Internal tab, where they are appended in separate unique columns.
Cookie Summary Report
This shows an aggregated view of unique cookies discovered during a crawl, considering their name, domain, expiry, secure and HttpOnly values. The number of URLs each unique cookie was issued on will also be displayed. The cookie value itself is discounted in this aggregation (as they are unique!).
‘Cookies‘ must be enabled to be extracted via ‘Config > Spider > Extraction’ for this to be populated. JavaScript rendering mode will also need to be configured to get an accurate view of cookies which are loaded on the page using JavaScript or pixel image tags.
This aggregated report is extremely helpful for GDPR. More granular details of the URLs and cookies found on them can be seen in the lower window ‘Cookies’ tab, and via the ‘Bulk Export > Web > All Cookies’ export.
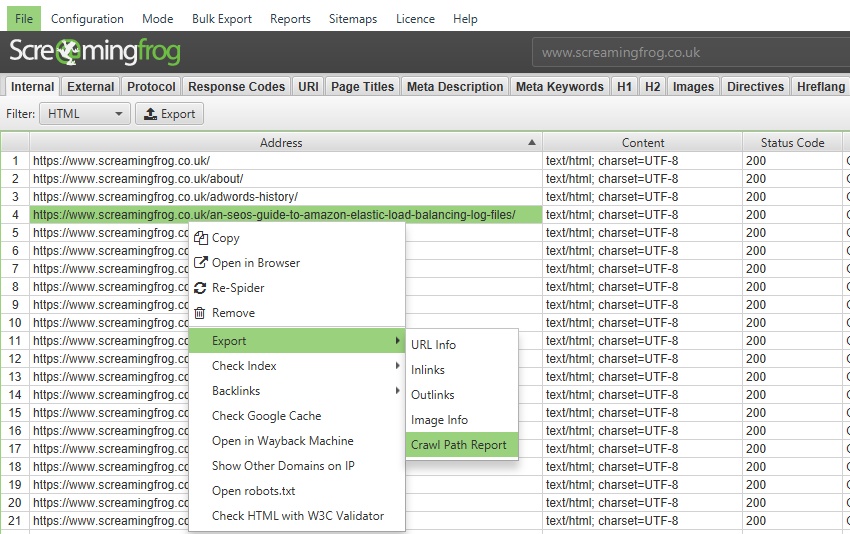
Crawl Path Report
This report is not under the ‘reports’ drop down in the top level menu, it’s available upon right-click of a URL in the top window pane and then the ‘export’ option. For example –
This report shows you the shortest path the SEO Spider crawled to discover the URL which can be really useful for deep pages, rather than viewing ‘inlinks’ of lots of URLs to discover the original source URL (for example, for infinite URLs caused by a calendar).
The crawl path report should be read from bottom to top. The first URL at the bottom of the ‘source’ column is the very first URL crawled (with a ‘0’ level). The ‘destination’ shows which URLs were crawled next, and these make up the following ‘source’ URLs for the next level (1) and so on, upwards.
The final ‘destination’ URL at the very top of the report will be the URL of the crawl path report.
Command line interface set-up
If you are running on a platform that won’t allow you to run the user interface at all, then you’ll need to follow the instructions in this guide before running the SEO Spider via the Command Line.
If you can run the User Interface, please do so before running on the Command Line. This will allow you to accept the End User Licence Agreement (EULA), enter your licence key and select a storage mode.
When the User Interface is not available to perform the initial run, you have to edit a few configuration files. The location of these varies depending on platform:
Windows
C:\Users\USERNAME\.ScreamingFrogSEOSpider\
macOS:
~/.ScreamingFrogSEOSpider/
Ubuntu:
~/.ScreamingFrogSEOSpider/
From now on we’ll refer to this as the .ScreamingFrogSEOSpider directory.
Entering Your Licence Key
Create a file in your .ScreamingFrogSEOSpider directory called licence.txt. Enter (copy and paste to avoid typos) your licence username on the first line and your licence key on the second line, and save the file.
Accepting the EULA
Create or edit the file spider.config in your .ScreamingFrogSEOSpider directory. Locate and edit or add the following line:
eula.accepted=15
Save the file and exit. Please note, the number value may need to be adjusted to a later version.
Choosing Storage Mode
The default storage mode is memory. If you are happy to use memory storage you don’t need to change anything. To change to database storage mode edit the file spider.config in your .ScreamingFrogSEOSpider directory. Add or edit the storage.mode property to be:
storage.mode=DB
The default path is a directory called db in your .ScreamingFrogSEOSpider directory. If you would like to change this add or edit the storage.db_dir property. Depending on your OS the path will have to be entered differently.
Windows:
storage.db_dir=C\:\\Users\\USERNAME\\dbfolder
macOS:
storage.db_dir=/Users/USERNAME/dbfolder
Ubuntu:
storage.db_dir=/home/USERNAME/dbdir
Disabling the Embedded Browser
embeddedBrowser.enable=false
Memory Allocation
We recommend changing memory allocation within the SEO Spider interface under ‘File > Settings > Memory Allocation’. Then running the SEO Spider via the CLI once it’s set.
However, users that are running truly headless (with no monitor attached) tend to run on Linux based operating systems. So, to configure this on a Linux operating system you need to modify or create a file named ‘.screamingfrogseospider’ in the home directory (i.e.’~/.screamingfrogseospider’).
Add or modify the following line accordingly (shown for 8gb configuration):
-Xmx8g
Connecting To APIs
To utilise APIs we recommend using the user interface to set-up and authorise credentials, before using the CLI. However, when the user interface is not available then the APIs can be utilised by copying across required folders set-up on another machine, or editing the spider.config file, depending on the API.
For Google Analytics and Google Search Console both require connecting and authorising using the user interface due to OAuth. So a different machine which is able to use the SEO Spider interface should be used to set these up. Once authorised, the credentials can then be copied over to the machine where the user interface is not available.
Please navigate to the respective local Screaming Frog SEO Spider user folder –
Windows
C:\Users\USERNAME\.ScreamingFrogSEOSpider\
macOS:
~/.ScreamingFrogSEOSpider/
Ubuntu:
~/.ScreamingFrogSEOSpider/
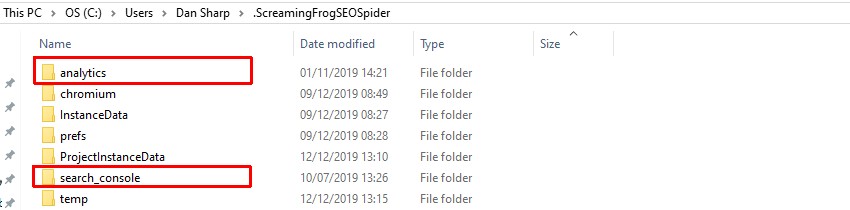
And copy the ‘analytics’ and ‘search_console’ folders.
And paste those into the Screaming Frog SEO Spider user folder on the machine without a user interface. The APIs can then be utilised using the CLI as normal with the following commands.
Use the Google Analytics API during crawl.
--use-google-analytics "google account" "account" "property" "view" "segment"
Use the Google Search Console API during crawl.
--use-google-search-console "google account" "website"
For PSI, Ahrefs, Majestic and Moz, they all require the ‘spider.config’ file to be edited and updated with their respective API keys. The spider.config file can be found in the Screaming Frog SEO Spider user folder as shown above.
To use each API, simply paste in the relevant API line and replace ‘APIKEY’ with the API key provided by each provider.
PSI.secretkey=APIKEY
ahrefs.authkey=APIKEY
majestic.authkey=APIKEY
moz.secretkey=APIKEY
The APIs can then be utilised using the CLI as normal with the following commands.
Use the PageSpeed Insights API during crawl.
--use-pagespeed
Use the Ahrefs API during crawl.
--use-ahrefs
Use the Majestic API during crawl.
--use-majestic
Use the Mozscape API during crawl.
--use-mozscape
Exporting to Google Drive
To utilise Google Drive exports in CLI the machine will require appropriate credentials, similar to any other API.
These credentials can be authorised via the user-interface or by copying the ‘google_drive’ folder from another machine as described above.
Configuring A Crawl
If a feature or configuration option isn’t available as a specific command line option (like exclude, or JavaScript rendering), you will need to use the user interface to set the exact configuration you wish, and save the configuration file.
You can then supply that configuration file when using the CLI to utilise those features.
When the user interface is not available then we recommend setting up the configuration file on a machine where it is available first, transferring over the saved .seospiderconfig file and then supplying it via command line. The command line for supercool-config.seospiderconfig would be as follows –
--config "C:\Users\Your Name\Desktop\supercool-config.seospiderconfig"
Command line interface
You’re able to operate the SEO Spider entirely via command line.
This includes launching, full configuration, saving and exporting of almost any data and reporting. The SEO Spider can also be run headless using the CLI.
This guide provides a quick overview of how to use the command line for the three OS supported, and the arguments available.
Windows
macOS
Linux
Command Line Options
Troubleshooting
Windows
Open a command prompt (Start button, then type ‘cmd’ or search programs and files for ‘Windows Command Prompt’). Move into the SEO Spider directory (64-bit) by entering:
cd "C:\Program Files (x86)\Screaming Frog SEO Spider"
Or for 32-bit:
cd "C:\Program Files\Screaming Frog SEO Spider"
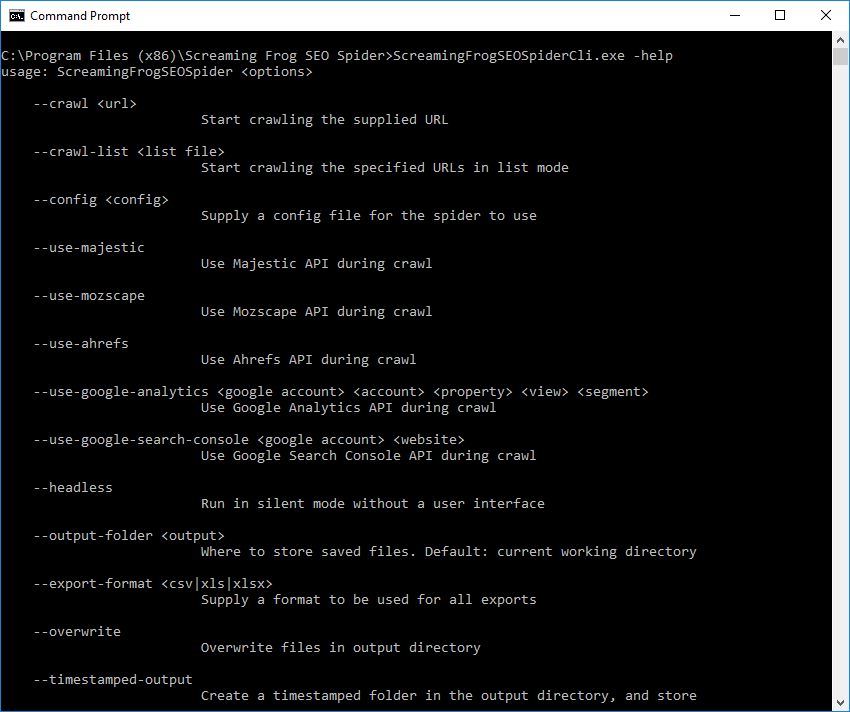
On Windows, there is a separate build of the SEO Spider called ScreamingFrogSEOSpiderCli.exe (rather than the usual ScreamingFrogSEOSpider.exe). This can be run from the Windows command line and behaves like a typical console application. You can type –
ScreamingFrogSEOSpiderCli.exe --help
To view all arguments and see all logging come out of the CL. You can also type
–-help export-tabs, –-help bulk-export, –-help save-report, or –-help export-custom-summary
To see a full list of arguments available for each export type.
To auto start a crawl:
ScreamingFrogSEOSpiderCli.exe --crawl https://www.example.com
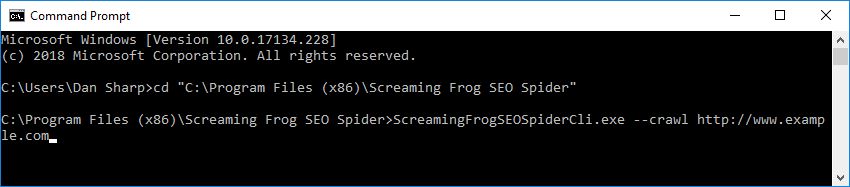
Then additional arguments can merely be appended with a space.
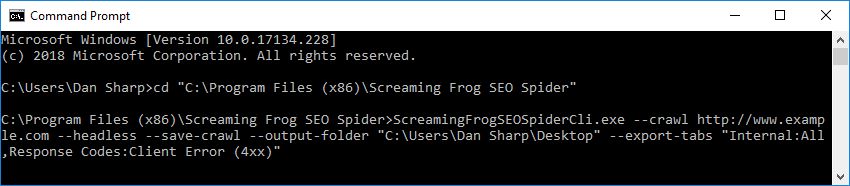
For example, the following will mean the SEO Spider runs headless, saves the crawl, outputs to your desktop and exports the internal and response codes tabs, and client error filter.
ScreamingFrogSEOSpiderCli.exe --crawl https://www.example.com --headless --save-crawl --output-folder "C:\Users\Your Name\Desktop" --export-tabs “Internal:All,Response Codes:Client Error (4xx)”
To load a saved crawl:
ScreamingFrogSEOSpiderCli.exe --headless --load-crawl "C:\Users\Your Name\Desktop\crawl.dbseospider"
The crawl has to be an absolute path to either a .seospider or dbseospider file.
Loading a crawl alone isn’t useful, so additional arguments are required to export data, such as the following to export the ‘Internal’ tab to the desktop.
ScreamingFrogSEOSpiderCli.exe --headless --load-crawl "C:\Users\Your Name\Desktop\crawl.dbseospider" --output-folder "C:\Users\Your Name\Desktop\" --export-tabs “Internal:All”

Please see the full list of command line options available to supply as arguments for the SEO Spider.
macOS
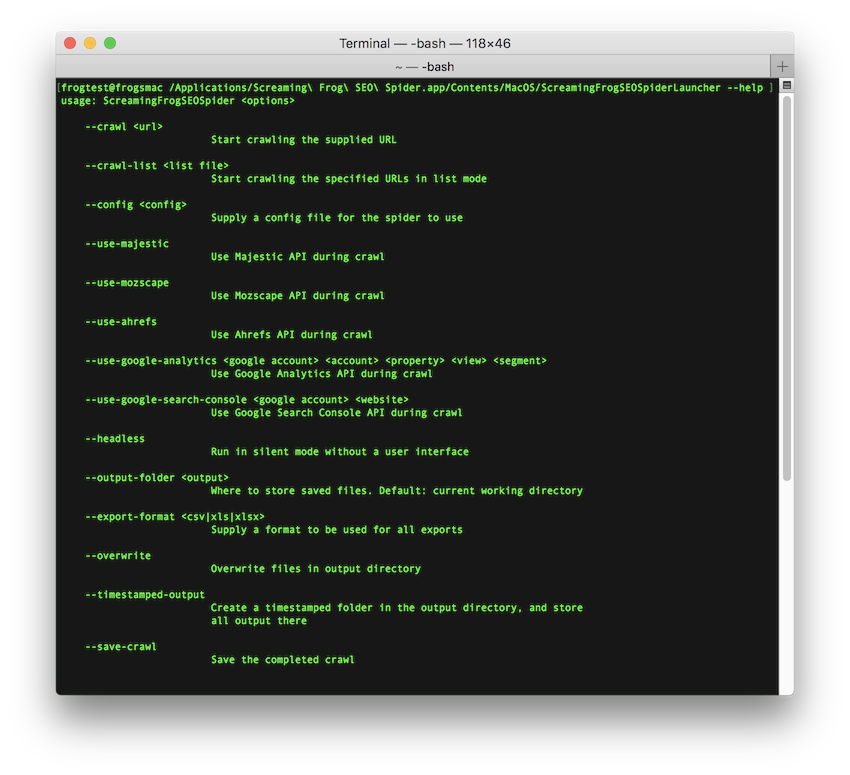
Open a terminal, found in the Utilities folder in the Applications folder, or directly using spotlight and typing: ‘Terminal’.
There are two ways to start the SEO Spider from the command line. You can use either the open command or the ScreamingFrogSEOSpiderLauncher script. The open command returns immediately allowing you to close the Terminal after. The ScreamingFrogSEOSpiderLauncher logs to the Terminal until the SEO Spider exits, closing the Terminal kills the SEO Spider.
To start the UI using the open command:
open "/Applications/Screaming Frog SEO Spider.app"
To start the UI using the ScreamingFrogSEOSpiderLauncher script:
/Applications/Screaming\ Frog\ SEO\ Spider.app/Contents/MacOS/ScreamingFrogSEOSpiderLauncher
To see a full list of the command line options available:
/Applications/Screaming\ Frog\ SEO\ Spider.app/Contents/MacOS/ScreamingFrogSEOSpiderLauncher --help
The following examples we show both ways of launching the SEO Spider.
To open a saved crawl file:
open "/Applications/Screaming Frog SEO Spider.app" --args /tmp/crawl.seospider
/Applications/Screaming\ Frog\ SEO\ Spider.app/Contents/MacOS/ScreamingFrogSEOSpiderLauncher /tmp/crawl.seospider
To load a saved crawl file and export the ‘Internal’ tab to the desktop.
open "/Applications/Screaming Frog SEO Spider.app" --args --headless --load-crawl "C:\Users\Your Name\Desktop\crawl.dbseospider" --output-folder "C:\Users\Your Name\Desktop\" --export-tabs “Internal:All”
/Applications/Screaming\ Frog\ SEO\ Spider.app/Contents/MacOS/ScreamingFrogSEOSpiderLauncher --headless --load-crawl "/Users/Your Name/Desktop/crawl.dbseospider" --output-folder "/Users/Your Name/Desktop" --export-tabs "Internal:All"
To start the UI and immediately start crawling:
open "/Applications/Screaming Frog SEO Spider.app" --args --crawl https://www.example.com/
/Applications/Screaming\ Frog\ SEO\ Spider.app/Contents/MacOS/ScreamingFrogSEOSpiderLauncher --crawl https://www.example.com/
To start headless, immediately start crawling and save the crawl along with Internal->All and Response Codes->Client Error (4xx) filters:
open "/Applications/Screaming Frog SEO Spider.app" --args --crawl https://www.example.com --headless --save-crawl --output-folder /tmp/cli --export-tabs "Internal:All,Response Codes:Client Error (4xx)"
/Applications/Screaming\ Frog\ SEO\ Spider.app/Contents/MacOS/ScreamingFrogSEOSpiderLauncher --crawl https://www.example.com --headless --save-crawl --output-folder /tmp/cli --export-tabs "Internal:All,Response Codes:Client Error (4xx)"
Please see the full list of command line options available to supply as arguments for the SEO Spider.
Linux
This screamingfrogseospider binary is placed in your path during installation. To run this open a terminal and follow the examples below.
To start normally:
screamingfrogseospider
To open a saved crawl file:
screamingfrogseospider /tmp/crawl.seospider
To see a full list of the command line options available:
screamingfrogseospider --help
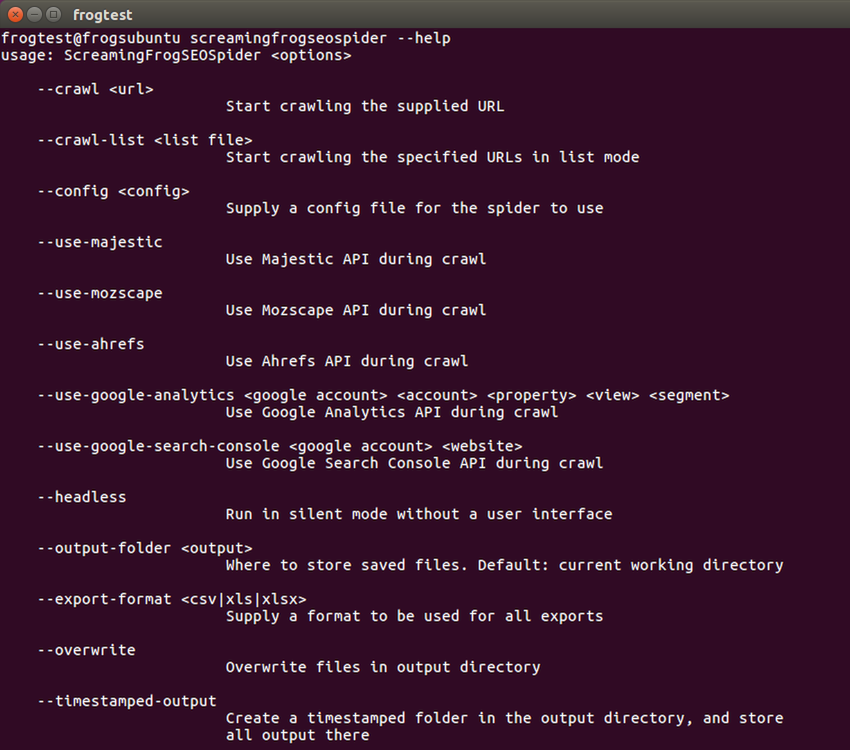
To start the UI and immediately start crawling:
screamingfrogseospider --crawl https://www.example.com/
To start headless, immediately start crawling and save the crawl along with Internal->All and Response Codes->Client Error (4xx) filters:
screamingfrogseospider --crawl https://www.example.com --headless --save-crawl --output-folder /tmp/cli --export-tabs "Internal:All,Response Codes:Client Error (4xx)"
To load a saved crawl file and export the ‘Internal’ tab to the desktop.:
screamingfrogseospider --headless --load-crawl ~/Desktop/crawl.seospider --output-folder ~/Desktop/ --export-tabs "Internal:All"
In order to utilize JavaScript Rendering when running headless in Linux a display is required. You can use a Virtual Frame Buffer to simulate having a display attached. See full details here.
Please see the full list of command line options below.
Command Line Options
Please see the full list of command line options available to supply as arguments for the SEO Spider by using –-help in the app, as well as our list below.
Supply ‘–-help export-tabs’, ‘–-help bulk-export’, ‘–-help save-report’, or ‘–-help export-custom-summary’ to see a full list of arguments available for each export type.
Start crawling the supplied URL.
--crawl https://www.example.com
Start crawling the specified URLs in list mode.
--crawl-list "list file"
Load a saved .seospider or .dbseospider crawl. Example: –load-crawl “C:\Users\Your Name\Desktop\crawl.dbseospider”.
--load-crawl "crawl file"
Load a database crawl. The crawl ID is available in ‘File > Crawls’ and using right click ‘Copy Database ID’. Example: –load-crawl “65a6a6a5-f1b5-4c8e-99ab-00b906e306c7”.
--load-crawl "database crawl ID"
Alternatively, it is possible to view database crawl IDs in the CLI.
--list-crawls
Supply a saved configuration file for the SEO Spider to use. Example: –config “C:\Users\Your Name\Desktop\supercool-config.seospiderconfig”.
--config "config"
Supply a saved authentication configuration file for the SEO Spider to use. Example: –auth-config “C:\Users\Your Name\Desktop\supercool-auth-config.seospiderauthconfig”.
--auth-config "authconfig"
Run in silent mode without an user interface.
--headless
Save the completed crawl.
--save-crawl
Store saved files. Default: current working directory. Example: –output-folder “C:\Users\Your Name\Desktop”.
--output-folder "output"
Overwrite files in output directory.
--overwrite
Set the project name to be used for storing the crawl in database storage mode and for the folder name in Google Drive. Exports will be stored in a ‘Screaming Frog SEO Spider’ Google Drive directory by default, but using this argument will mean they are stored within ‘Screaming Frog SEO Spider > Project Name’. Example: –project-name “Awesome Project”.
--project-name "Name"
Set the task name to be used for the crawl name in database storage mode. This will also be used as folder for Google Drive, which is a child of the project folder. For example, ‘Screaming Frog SEO Spider > Project Name > Task Name’ when supplied with project name. Example: –task-name “Awesome Task”
--task-name "Name"
Create a timestamped folder in the output directory, and store all output there. This will also create a timestamped directory in Google Drive.
--timestamped-output
Supply a comma separated list of tabs and filters to export. You need to specify the tab and the filter name separated by a colon. Tab names are as they appear on the user interface, except for those configurable via Configuration->Spider->Preferences where X is used. Eg: Meta Description:Over X Characters. Example: –export-tabs “Internal:All”.
--export-tabs "tab:filter,..."
Supply a comma separated list of bulk exports to perform. The export names are the same as in the Bulk Export menu in the UI. To access exports in a submenu, use ‘Submenu Name:Export Name’. Example: –bulk-export “Response Codes:Internal & External:Client Error (4xx) Inlinks”.
--bulk-export "submenu:export,..."
Supply a comma separated list of reports to save. The report names are the same as in the Reports menu in the UI. To access reports in a submenu, use ‘Submenu Name:Report Name’. Example: –save-report “Redirects:All Redirects”.
--save-report "submenu:report,..."
Supply a comma separated list of items for the ‘Export For Data Studio’ Custom Crawl Overview report for automated Data Studio crawl reports.
The configurable report items for the custom crawl overview can be viewed in the CLI using ‘–help export-custom-summary’ and are the same names in the scheduling UI when in English. This requires you to also use your Google Drive Account. Example: –export-custom-summary “Site Crawled,Date,Time” –google-drive-account “yourname@example.com”.
--export-custom-summary "item 1,item 2,item 3..."
Creates a sitemap from the completed crawl.
--create-sitemap
Creates an images sitemap from the completed crawl.
--create-images-sitemap
Supply a format to be used for all exports. For Google Sheet, you’ll need to supply your Google Drive account as well. Example: –export-format csv.
--export-format csv xls xlsx gsheet
Use a Google Drive account for Google Sheets exporting. Example: –google-drive-account “yourname@example.com”.
--google-drive-account "google account"
Use the Google Universal Analytics API during crawl. Please remember the quotation marks as shown below. Example: –use-google-analytics “yourname@example.com” “Screaming Frog” “https://www.screamingfrog.co.uk/” “All Web Site Data” “Organic Traffic”.
--use-google-analytics "google account" "account" "property" "view" "segment"
Use the Google Analytics 4 API during crawl. Please remember the quotation marks as shown below. Example: –use-google-analytics-4 “yourname@example.com” “Screaming Frog” “Screaming Frog – GA4” “All Data Streams”.
--use-google-analytics-4 "google account" "account" "property" "data stream"
Use the Google Search Console API during crawl. Example: –use-google-search-console “yourname@example.com” “https://www.screamingfrog.co.uk/”
--use-google-search-console "google account" "website"
Use the PageSpeed Insights API during crawl.
--use-pagespeed
Use the Majestic API during crawl.
--use-majestic
Use the Mozscape API during crawl.
--use-mozscape
Use the Ahrefs API during crawl.
--use-ahrefs
View this list of options.
--help
Use Saved Configurations
If a feature or configuration option isn’t available as a specific command line option outlined above (like the exclude, or JavaScript rendering), you will need to use the user interface to set the exact configuration you wish, and save the configuration file.
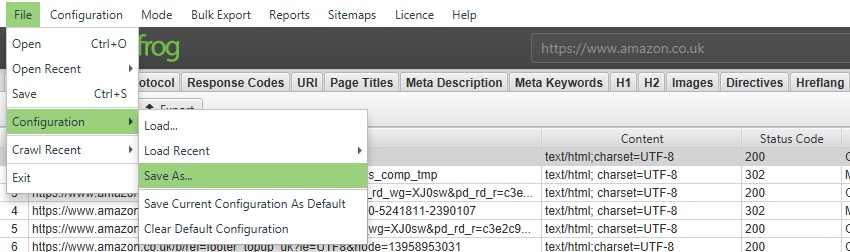
You can then supply the saved configuration file when using the CLI to utilise those features.
Troubleshooting
- If a headless crawl fails to export any results make sure that –output-folder exists and is either empty or you are using the –timestamped-output option.
- When quoting an argument don’t finish with a \ before the quote as it will be escaped.
User Interface
Theme
File > Settings > User Interface (Windows, Linux)
Screaming Frog SEO Spider > Settings > User Interface (macOS)
The SEO Spider has two themes, a Light mode and a Dark mode. This can be modified under:
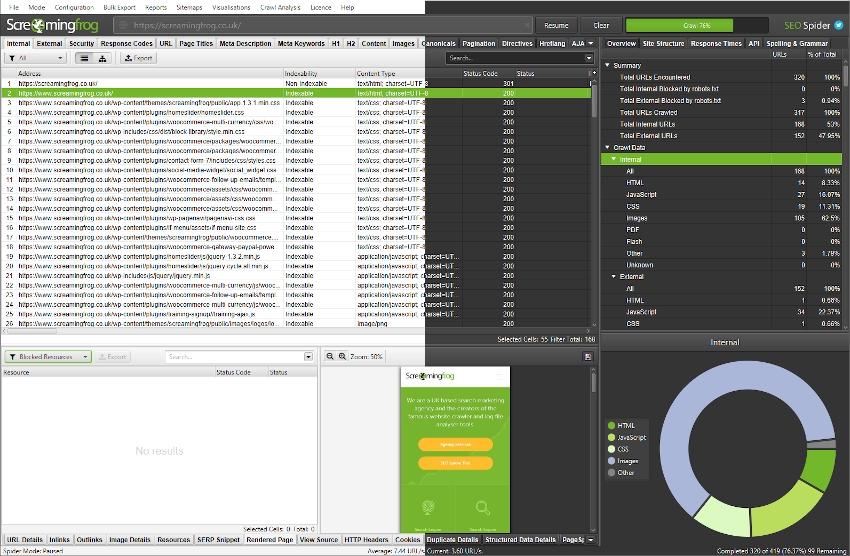
Tabs
Tabs can re-ordered by dragging and dropping them into new positions with the mouse. This is applicable to the tabs in the lower window as well as the main window.

These can be hidden by right clicking on any tab and choosing ‘Close’, Close Others’ will hide all tabs but the selected one, and ‘Close All’ will hide all the tabs.

Tab visibility can be managed from the ⌄ menu to the right of the tabs.
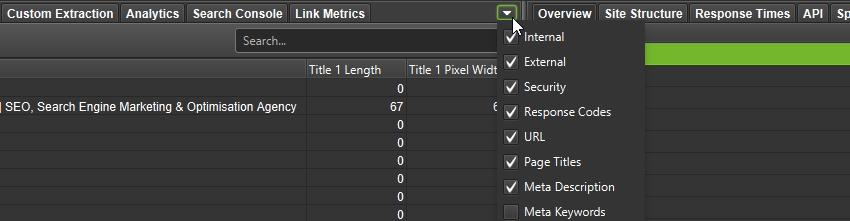
Tabs can be reset to their default visibility and position via ‘View > Reset Tabs’.

Columns
Columns can be repositioned by dragging and dropping them to a desired position.
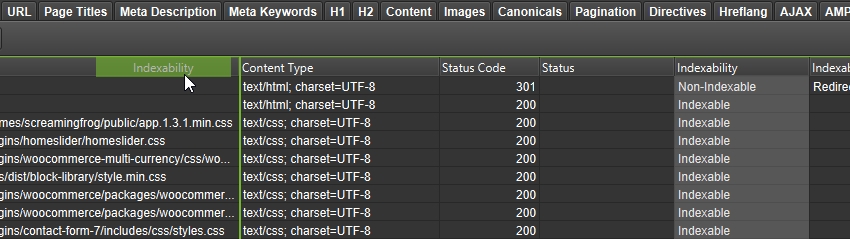
These can be hidden by using the + menu to the right of the column row in the main window.
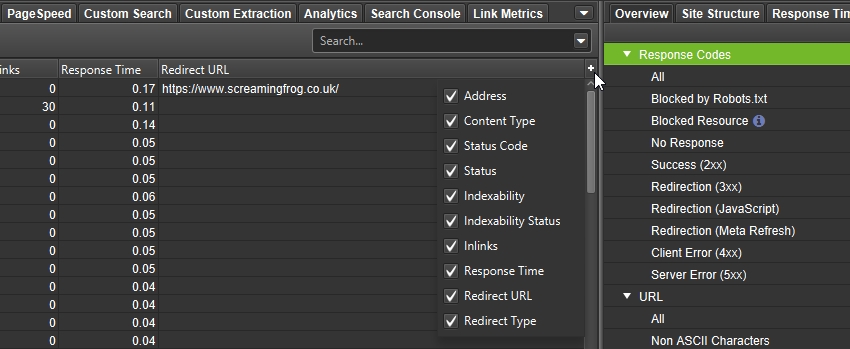
Columns can be reset to their default visibility and position via ‘View > Reset Columns for All Tables’.

Resize Panes
It’s possible to resize the right and lower windows by selecting the panes between them and dragging them to a preferred size.
Focus Mode
View > Focus Mode
‘Focus mode’ automatically hides tabs that are not in use to help reduce clutter.

By default, regardless of configuration, all tabs are displayed in the UI.
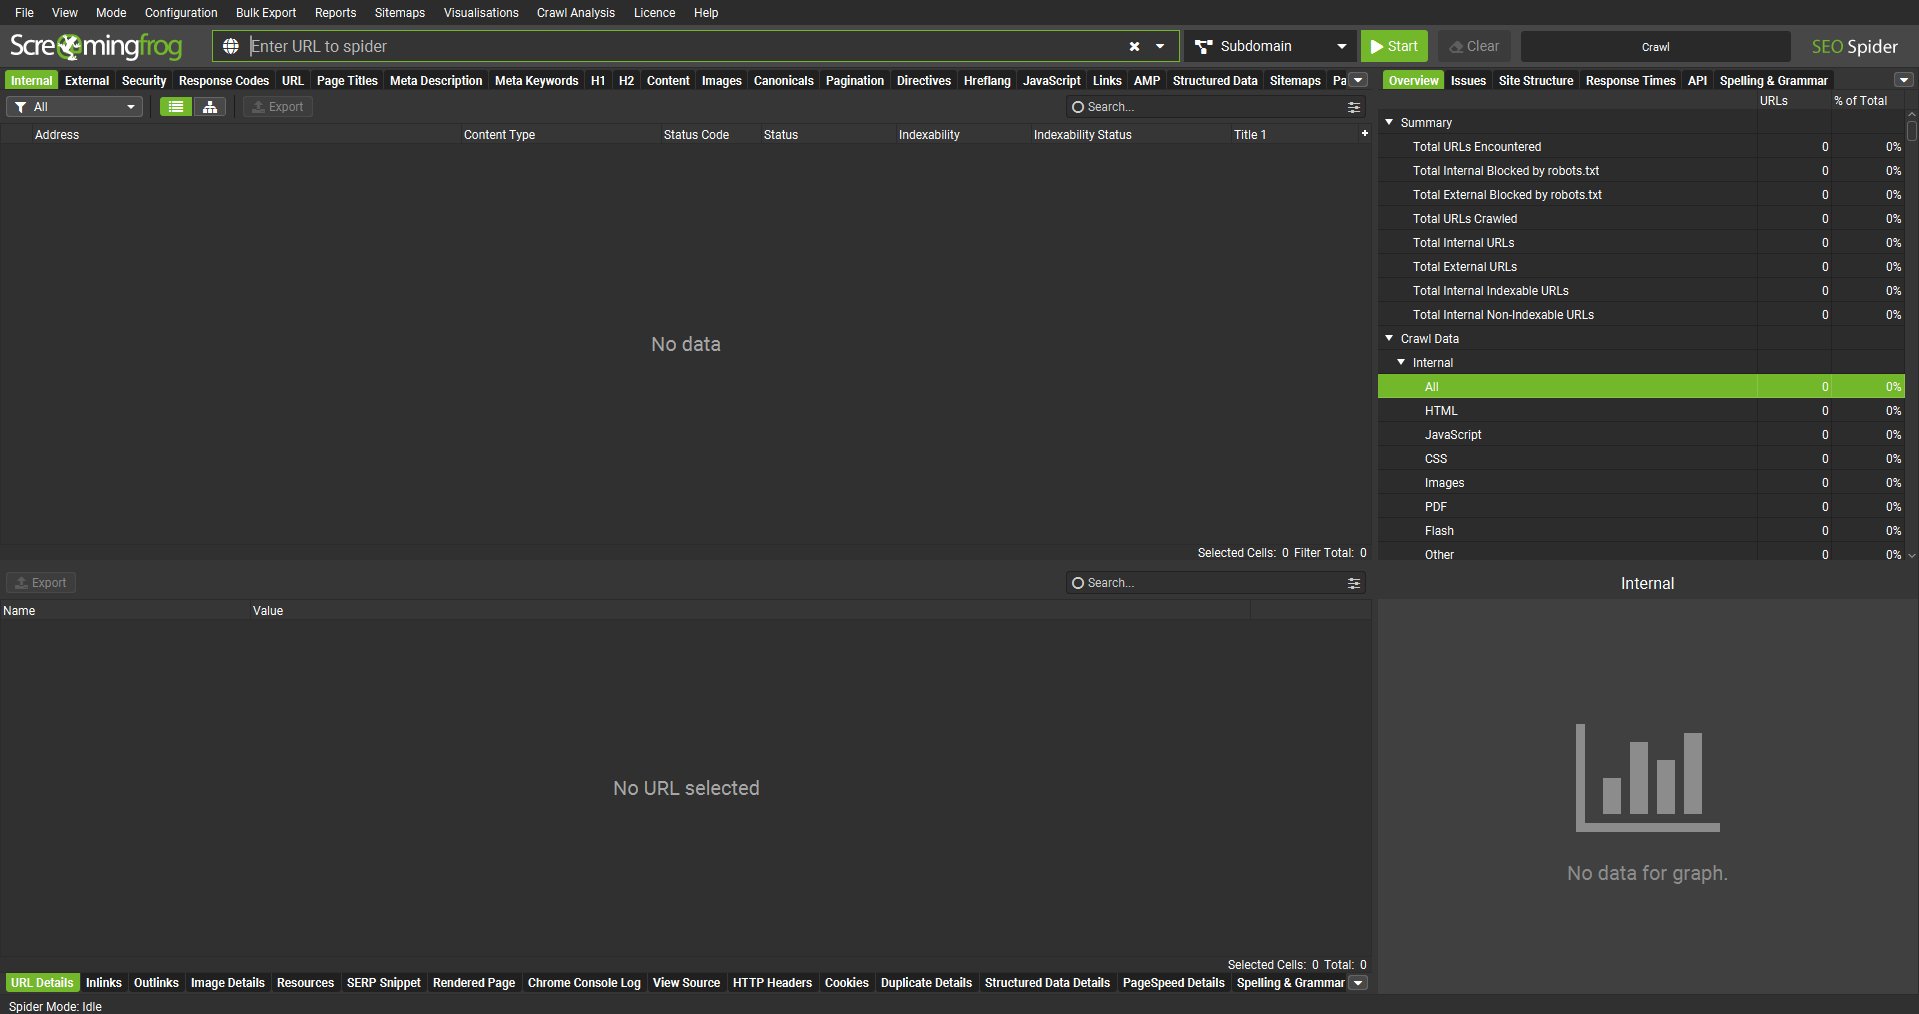
However, when ‘focus mode’ is enabled, only tabs that are required based upon the config will remain open. So tabs such as ‘Stuctured Data’, ‘Sitemaps’, or ‘Custom Extraction’ will be hidden if their respective configs are not enabled.
This reduces the number of main window tabs, and lower details tabs.

If a config is enabled for a hidden tab, then the tab will be automatically displayed again.
Search function
The search box in the top right of the interface allows you to search all visible columns. It defaults to regular text search of the ‘Address’ column, but allows you to switch to regex, choose from a variety of predefined filters (including a ‘does not match regex’), combine rules (and/or) and select the columns.
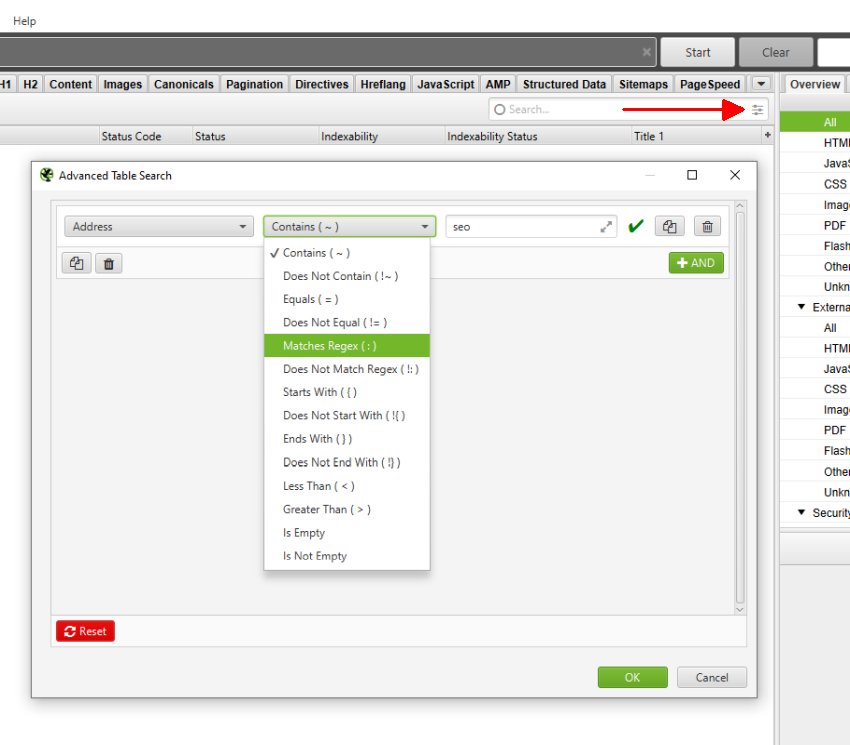
After typing the search, hit enter and only rows containing matching cells will be displayed.
If you would like to make this search case insensitive, you can click the arrow to the right of the search query box and enable ‘Case Sensitive’:
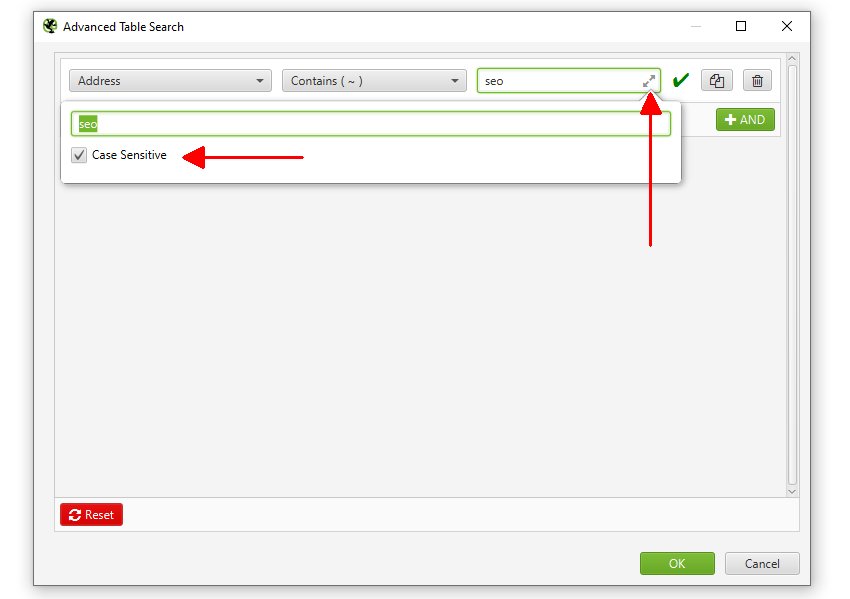
The search bar displays the syntax used by the search and filter system, so this can be formulated by power users to build common searches and filters quickly, without having to click the buttons to run searches.

The syntax can just be pasted or written directly into the search box to run searches.
To search for duplicate or repeating words, you can use case sensitive capture groups:
(keyword)(.*\1+)
An additional search box with the same features and functionality can be found in the majority of lower window tabs that include tabled data.
There is also search function in the ‘View Source’ tab that searches any stored HTML.
Auto Updates
By default the SEO Spider will automatically check for updates. You can enable/disable this behaviour via the menu item Help->Debug->Auto Check for Updates.
To do this without the UI you can update the spider.config file that lives in:
Windows
C:\Users\USERNAME\.ScreamingFrogSEOSpider\
macOS:
~/.ScreamingFrogSEOSpider/
Ubuntu:
~/.ScreamingFrogSEOSpider/
and add/modify the following line:
updatechecker.enabled=false
SEO Spider General
Table of Contents


