11 Little-Known Features In The SEO Spider
Dan Sharp
Posted 8 January, 2019 by Dan Sharp in Screaming Frog SEO Spider
11 Little-Known Features In The SEO Spider
The Screaming Frog SEO Spider has evolved a great deal over the past 8 years since launch, with many advancements, new features and a huge variety of different ways to configure a crawl.
This post covers some of the lesser-known and hidden-away features, that even more experienced users might not be aware exist. Or at least, how they can be best utilised to help improve auditing. Let’s get straight into it.
1) Export A List In The Same Order Uploaded
If you’ve uploaded a list of URLs into the SEO Spider, performed a crawl and want to export them in the same order they were uploaded, then use the ‘Export’ button which appears next to the ‘upload’ and ‘start’ buttons at the top of the user interface.

The standard export buttons on the dashboard will otherwise export URLs in order based upon what’s been crawled first, and how they have been normalised internally (which can appear quite random in a multi-threaded crawler that isn’t in usual breadth-first spider mode).
The data in the export will be in the exact same order and include all of the exact URLs in the original upload, including duplicates, normalisation or any fix-ups performed.
2) Crawl New URLs Discovered In Google Analytics & Search Console
If you connect to Google Analytics or Search Console via the API, by default any new URLs discovered are not automatically added to the queue and crawled. URLs are loaded, data is matched against URLs in the crawl, and any orphan URLs (URLs discovered only in GA or GSC) are available via the ‘Orphan Pages‘ report export.
If you wish to add any URLs discovered automatically to the queue, crawl them and see them in the interface, simply enable the ‘Crawl New URLs Discovered in Google Analytics/Search Console’ configuration.

This is available under ‘Configuration > API Access’ and then either ‘Google Analytics’ or ‘Google Search Console’ and their respective ‘General’ tabs.
This will mean new URLs discovered will appear in the interface, and orphan pages will appear under the respective filter in the Analytics and Search Console tabs (after performing crawl analysis).

3) Switching to Database Storage Mode
The SEO Spider has traditionally used RAM to store data, which has enabled it to crawl lightning-fast and flexibly for virtually all machine specifications. However, it’s not very scalable for crawling large websites. That’s why early last year we introduced the first configurable hybrid storage engine, which enables the SEO Spider to crawl at truly unprecedented scale for any desktop application while retaining the same, familiar real-time reporting and usability.
So if you need to crawl millions of URLs using a desktop crawler, you really can. You don’t need to keep increasing RAM to do it either, switch to database storage instead. Users can select to save to disk by choosing ‘database storage mode’, within the interface (via ‘Configuration > System > Storage).
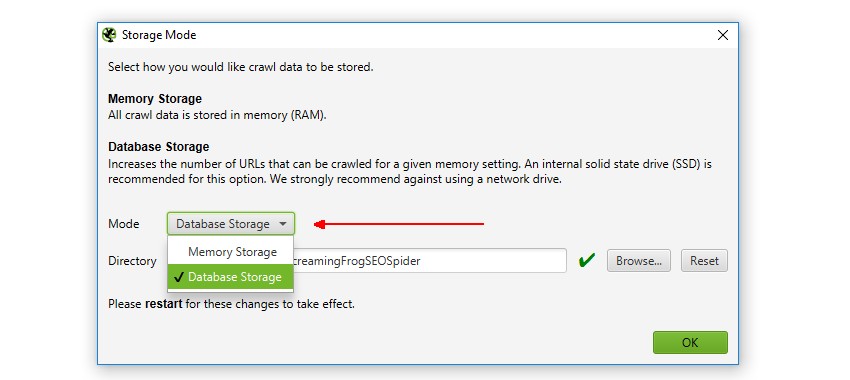
This means the SEO Spider will hold as much data as possible within RAM (up to the user allocation), and store the rest to disk. We actually recommend this as the default setting for any users with an SSD (or faster drives), as it’s just as fast and uses much less RAM.
Please see our guide on how to crawl very large websites for more detail.
4) Request Google Analytics, Search Console & Link Data After A Crawl
If you’ve already performed a crawl and forgot to connect to Google Analytics, Search Console or an external link metrics provider, then fear not. You can connect to any of them post crawl, then click the beautifully hidden ‘Request API Data’ button at the bottom of the ‘API’ tab.
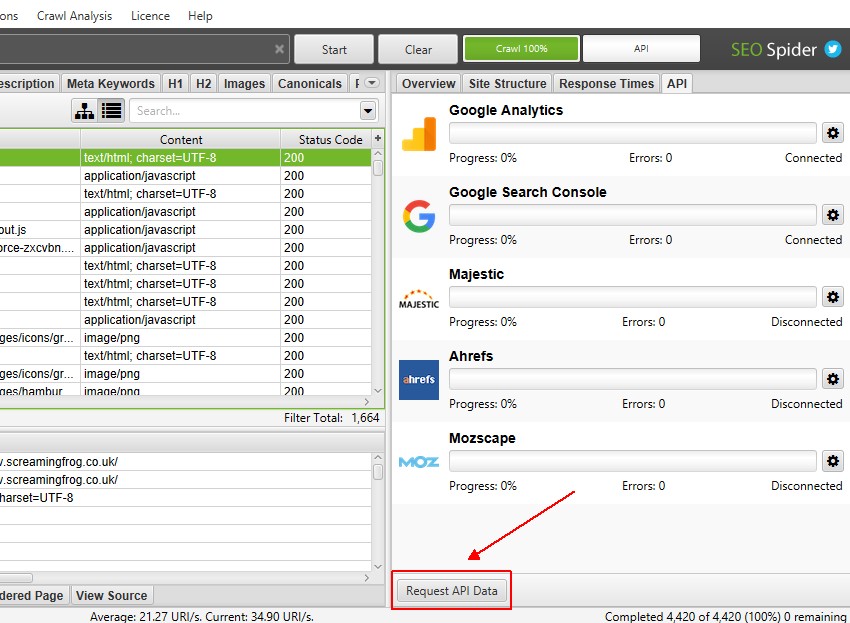
Alternatively, ‘Request API Data’ is also available in the ‘Configuration > API Access’ main menu.
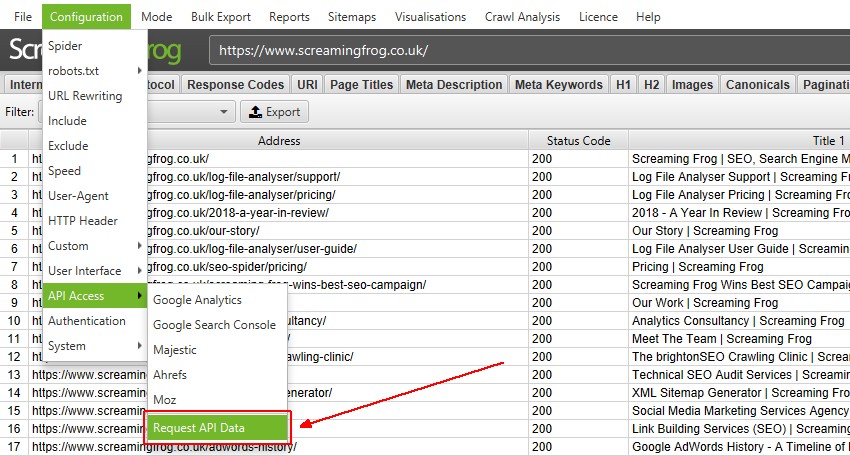
This will mean data is pulled from the respective APIs and matched against the URLs that have already been crawled.
5) Disable HSTS To See ‘Real’ Redirect Status Codes
HTTP Strict Transport Security (HSTS) is a standard by which a web server can declare to a client that it should only be accessed via HTTPS. By default the SEO Spider will respect HSTS and if declared by a server and an internal HTTP link is discovered during a crawl, a 307 status code will be reported with a status of “HSTS Policy” and redirect type of “HSTS Policy”. Reporting HSTS set-up is useful when auditing security, and the 307 response code provides an easy way to discover insecure links.
Unlike usual redirects, this redirect isn’t actually sent by the web server, it’s turned around internally (by a browser and the SEO Spider) which simply requests the HTTPS version instead of the HTTP URL (as all requests must be HTTPS). A 307 status code is reported however, as you must set an expiry for HSTS. This is why it’s a temporary redirect.
While HSTS declares that all requests should be made over HTTPS, a site wide HTTP -> HTTPS redirect is still needed. This is because the Strict-Transport-Security header is ignored unless it’s sent over HTTPS. So if the first visit to your site is not via HTTPS, you still need that initial redirect to HTTPS to deliver the Strict-Transport-Security header.
So if you’re auditing an HTTP to HTTPS migration which has HSTS enabled, you’ll want to check the underlying ‘real’ sitewide redirect status code in place (and find out whether it’s a 301 redirect). Therefore, you can choose to disable HSTS policy by unticking the ‘Respect HSTS Policy’ configuration under ‘Configuration > Spider > Advanced’ in the SEO Spider.
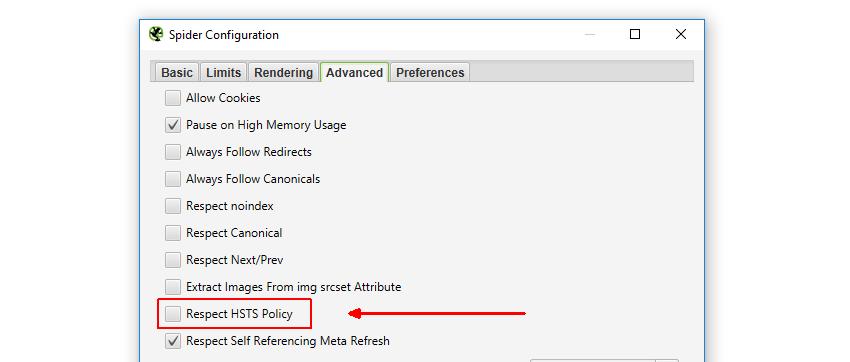
This means the SEO Spider will ignore HSTS completely and report upon the underlying redirects and status codes. You can switch back to respecting HSTS when you know they are all set-up correctly, and the SEO Spider will just request the secure versions of URLs again. Check out our SEOs guide to crawling HSTS.
6) Compare & Run Crawls Simultaneously
At the moment you can’t compare crawls directly in the SEO Spider. However, you are able to open up multiple instances of the software, and either run multiple crawls, or compare crawls at the same time.
On Windows, this is as simple as just opening the software again by the shortcut. For macOS, to open additional instances of the SEO Spider open a Terminal and type the following:
open -n /Applications/Screaming\ Frog\ SEO\ Spider.app/
You can now perform multiple crawls, or compare multiple crawls at the same time.
7) Crawl Any Web Forms, Logged In Areas & By-Pass Bot Protection
The SEO Spider has supported basic and digest standards-based authentication for a long-time, which are often used for secure access to development servers and staging sites. However, the SEO Spider also has the ability to login to any web form that requires cookies, using its in-built Chromium browser.
This nifty feature can be found under ‘Configuration > Authentication > Forms Based’, where you can load virtually any password-protected website, intranet or web application, login and crawl it. For example you can login and crawl your precious fantasy football if you really wanted to ruin (or perhaps improve) your team.
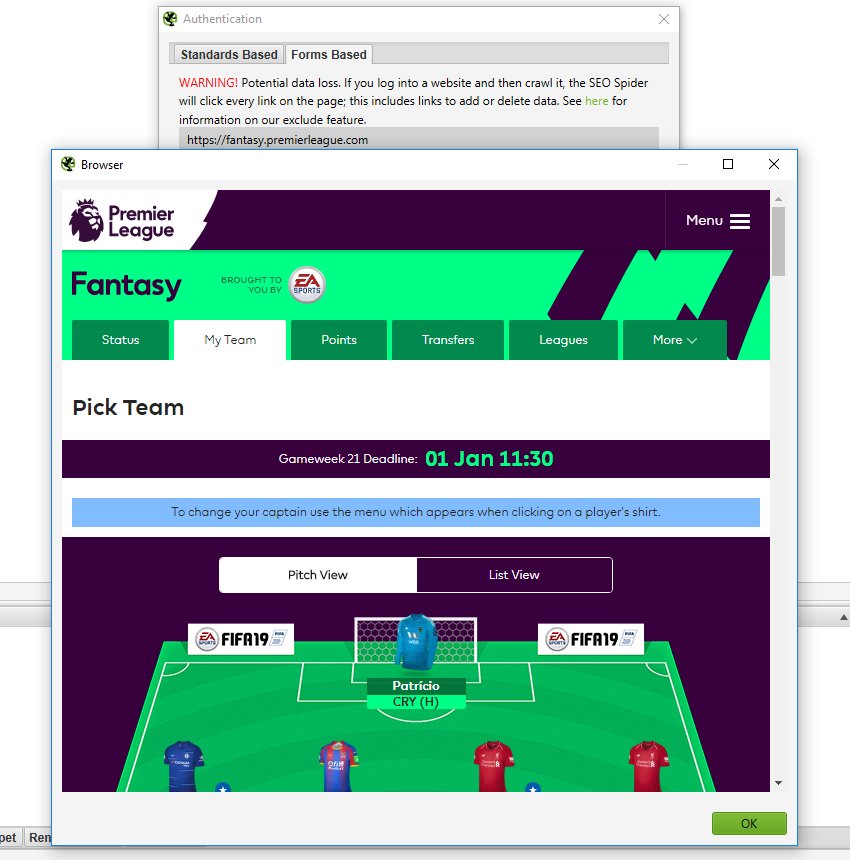
This feature is super powerful because it provides a way to set cookies in the SEO Spider, so it can also be used for scenarios such as bypassing geo IP redirection, or if a site is using bot protection with reCAPTCHA or the like.
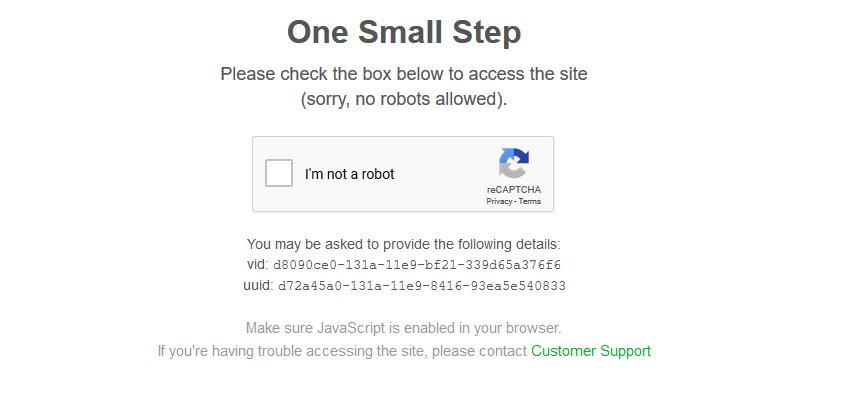
You can just load the page in the in-built browser, confirm you’re not a robot – and crawl away. If you load the page initially pre-crawling, you probably won’t even see a CAPTCHA, and will be issued the required cookies. Obviously you should have permission from the website as well.
However, with great power comes great responsibly, so please be careful with this feature.
During testing we let the SEO Spider loose on our test site while signed in as an ‘Administrator’ for fun. We let it crawl for half an hour; in that time it installed and set a new theme for the site, installed 108 plugins and activated 8 of them, deleted some posts, and generally made a mess of things.
With this in mind, please read our guide on crawling password protected websites responsibly.
8) Crawl (& Remove) URL Fragments Using JavaScript Rendering Mode
(Please note – The behaviour described below has changed. Fragments are not crawled by default in any mode. To crawl fragments (regardless of mode), enable ‘Crawl Fragment Identifiers’ via ‘Config > Spider > Advanced’)
Occasionally it can be useful to crawl URLs with fragments (/page-name/#this-is-a-fragment) when auditing a website, and by default the SEO Spider will crawl them in JavaScript rendering mode.
You can see our FAQs which use them below.
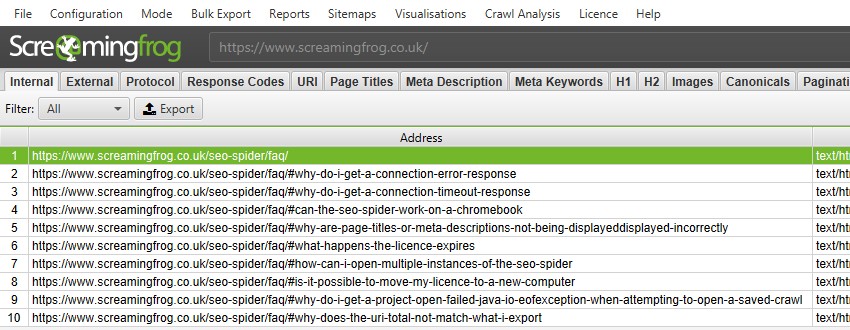
While this can be helpful, the search engines will obviously ignore anything from the fragment and crawl and index the URL without it. Therefore, generally you may wish to switch this behaviour using the ‘Regex replace’ feature in URL Rewriting. Simply include #.* within the ‘regex’ filed and leave the ‘replace’ field blank.

This will mean they will be crawled and indexed without fragments in the same way as the default HTML text only mode.
9) Utilise ‘Crawl Analysis’ For Link Score, More Data (& Insight)
While some of the features discussed above have been available for sometime, the ‘crawl analysis‘ feature was released more recently in version 10 at the end of September (2018).
The SEO Spider analyses and reports data at run-time, where metrics, tabs and filters are populated during a crawl. However, ‘link score’ which is an internal PageRank calculation, and a small number of filters require calculation at the end of a crawl (or when a crawl has been paused at least).
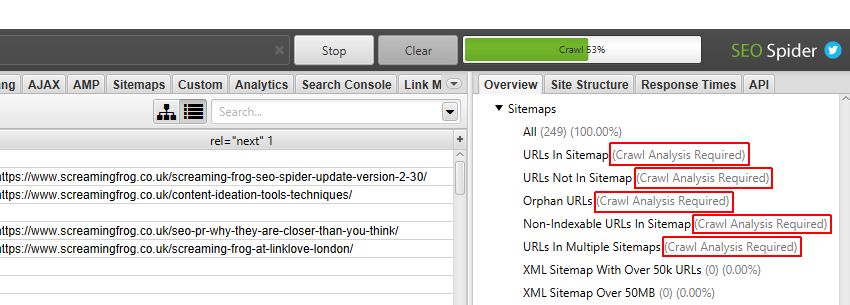
The full list of 13 items that require ‘crawl analysis’ can be seen under ‘Crawl Analysis > Configure’ in the top level menu of the SEO Spider, and viewed below.

All of the above are filters under their respective tabs, apart from ‘Link Score’, which is a metric and shown as a column in the ‘Internal’ tab.
In the right hand ‘overview’ window pane, filters which require post ‘crawl analysis’ are marked with ‘Crawl Analysis Required’ for further clarity. The ‘Sitemaps’ filters in particular, mostly require post-crawl analysis.
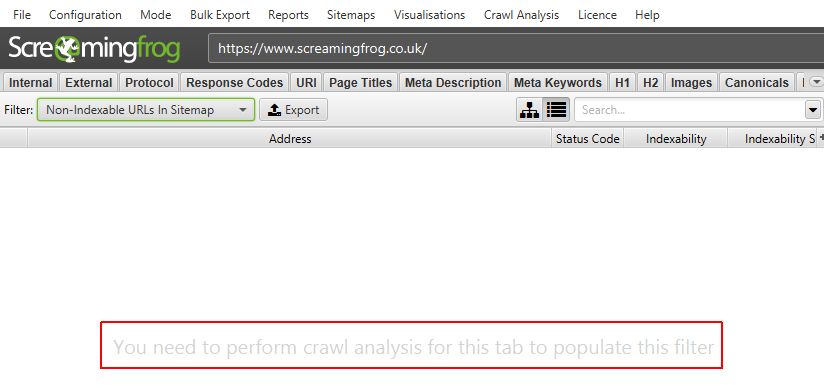
They are also marked as ‘You need to perform crawl analysis for this tab to populate this filter’ within the main window pane.
This analysis can be automatically performed at the end of a crawl by ticking the respective ‘Auto Analyse At End of Crawl’ tickbox under ‘Configure’, or it can be run manually by the user.
To run the crawl analysis, simply click ‘Crawl Analysis > Start’.

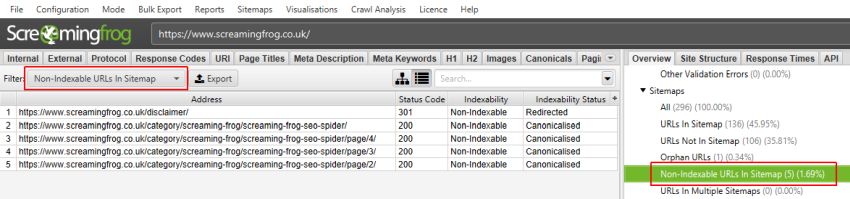
When the crawl analysis is running you’ll see the ‘analysis’ progress bar with a percentage complete. The SEO Spider can continue to be used as normal during this period.

When the crawl analysis has finished, the empty filters which are marked with ‘Crawl Analysis Required’, will be populated with lots of lovely insightful data.
The ‘link score’ metric is displayed in the Internal tab and calculates the relative value of a page based upon its internal links.
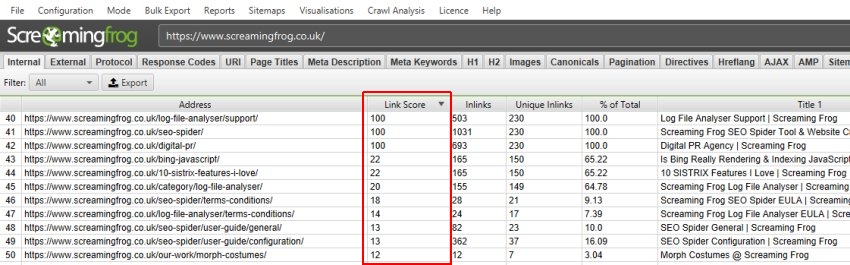
This uses a relative 0-100 point scale from least to most value for simplicity, which allows you to determine where internal linking might be improved for key pages. It can be particularly powerful when utlised with other internal linking data, such as counts of inlinks, unique inlinks and % of links to a page (from accross the website).
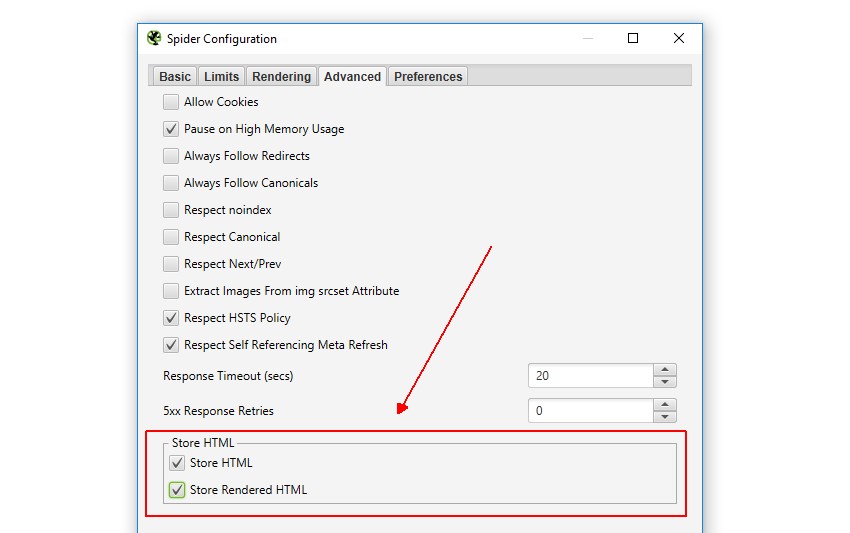
10) Saving HTML & Rendered HTML To Help Debugging
We occasionally receive support queries from users reporting a missing page title, description, canonical or on-page content that’s seemingly not being picked up by the SEO Spider, but can be seen to exist in a browser, and when viewing the HTML source.
Often this is assumed to be a bug of somekind, but most of the time it’s just down to the site responding differently to a request made from a browser rather than the SEO Spider, based upon the user-agent, accept-language header, whether cookies are accepted, or if the server is under load as examples.
Therefore an easy way to self-diagnose and investigate is to see exactly what the SEO Spider can see, by choosing to save the HTML returned by the server in the response.
By navigating to ‘Configuration > Spider > Advanced’ you can choose to store both the original HTML and rendered HTML to inspect the DOM (when in JavaScript rendering mode).
When a URL has been crawled, the exact HTML that was returned to the SEO Spider when it crawled the page can be viewed in the lower window ‘view source’ tab.
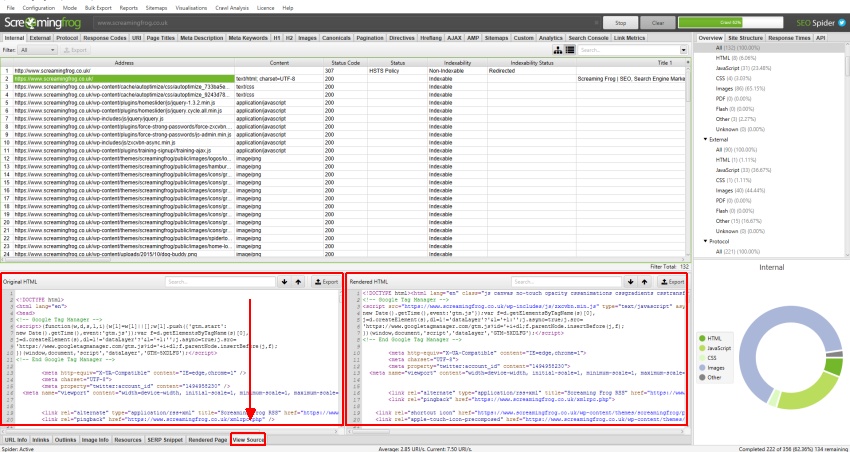
By viewing the returned HTML you can debug the issue, and then adjusting with a different user-agent, or accepting cookies etc. For example, you would see the missing page title, and then be able to identify the conditions under which it’s missing.
This feature is a really powerful way to diagnose issues quickly, and get a better understanding of what the SEO Spider is able to see and crawl.
11) Using Saved Configuration Profiles With The CLI
In the latest update, version 10 of the SEO Spider, we introduced the command line interface. The SEO Spider can be operated via command line, including launching, saving and exporting, and you can use –help to view the full arguments available.
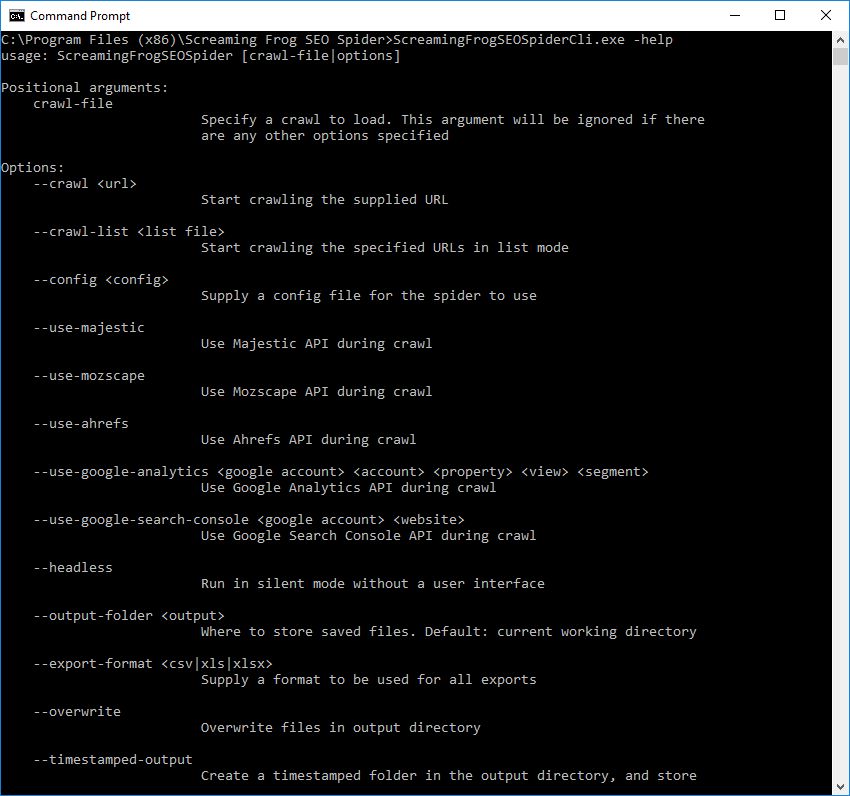
However, not all configuration options are available, as there would be hundreds of arguments if you consider the full breath available. So the trick is to use saved configuration profiles for more advanced scenarios.
Open up the SEO Spider GUI, select your options, whether that’s basic configurations, or more advanced features like custom search, extraction, and then save the configuration profile.
To save the configuration profile, click ‘File > Save As’ and adjust the file name (ideally to something descriptive!).
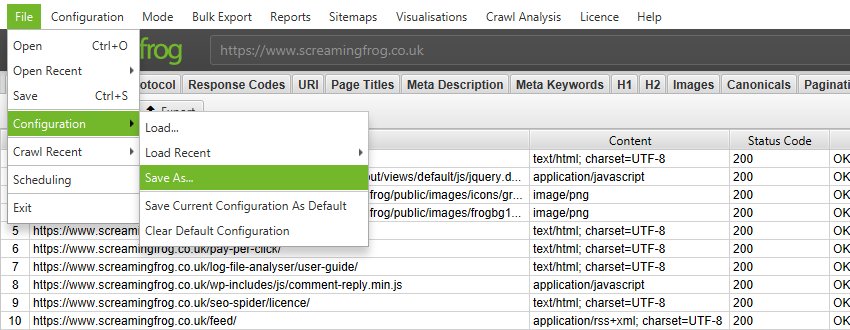
You can then supply the config argument to set your configuration profile for the command line crawl (and use in the future).
--config "C:\Users\Your Name\Crawls\super-awesome.seospiderconfig"
This really opens up the possibilites for utlising the SEO Spider via the command line.
What Have We Missed?
We’d love to hear any other little known features and configurations that you find helpful, and are often overlooked or just hidden away.


Useful tips! Thank you!
“At the moment you can’t compare crawls directly in the SEO Spider.” Holding my breath for this.
Useful.. Thanks a lot
Eric Wilson
Thanks for the tips guys!
Hello everyone, please i heard about this site and ive been trying to register on it and check the seo status of my sites, but i dont seem to see anything like register button, just log in. Any help please? like link?
You don’t need to register :-)
You can simply download it here – https://www.screamingfrog.co.uk/seo-spider/
Cheers.
Dan
I completely missed the command line interface feature – that’s amazing!
Hey, do you know if it is possible to crawl only specific data? In our case, we only need to know the URL and a custom extraction, we don’t need Meta Descriptions, H1s etc … Is there a way to configure the spider to ignore the ones not needed? Point is to get the data we want faster by avoiding all the irrelevant data and reduce the size of the crawl file.
Hi Ananda,
You can’t configure all elements just yet, but that’s coming soon :-)
Cheers.
Dan
Thanx guys! I’m using Screaming Frog SEO Spider for a couple of years know and I can’t imagine a life without it. Didn’t know a couple of these tricks yet.
Hi!
I’m wondering if there is a way to crawl a site and then checking the result against a list of predefined values. The idea is to have automatic controlling to find errors.
Hi Mathias,
Have you got an example?
Cheers.
Dan
Let’s say we have a product list with a filter. The filter creates many (many) possible urls, like /shoes/adidas/red or /shoes/red/adidas and /shoes/red/adidas/nike/.
We want to make sure the titles, descriptions and canonicals behave the way they should, so if we could define tests and run peridically to catch errors it would be great!
I could define a url and an expected result and then run the test.
url: /shoes/red/adidas
should give:
Red Adidas Shoes
Do you understand? :-)
Oh, the tags in the example got stripped.
url: /shoes/red/adidas
should have:
(titel)Red Adidas Shoes(/title)
(meta name=”description” value=”Buy your new adidas shoes from…”>
Do you understand? :-)
Hi Mathias,
Yeah, thanks for the example.
So, you can obviously upload a list of URLs, export the data and match it against pre-defined rules in a spread sheet.
But there isn’t anything built in, so you can’t define tests like this currently within the application.
Will give it some thought for a potential feature – appreciate the feedback!
Cheers.
Dan
Your explanation is impressive, but please i need to ask, can i use this tool to check my link profile? and is it free?
Hi Kwesta,
No, it doesn’t check your backlink profile like ahrefs, moz or Majestic.
It is free for crawling up to 500 URLs each time.
Thanks,
Dan
Really excited about the CLI!
This keeps getting better and better.
Thank you
Mike
Yes I agree with you everything keeps getting better and better
How can I run a crawl to just check the status code of each URL and no other information about page? Which will be faster than full crawl?
Hi Nilesh,
You can’t currently, but you will be able to soon.
It’s not really much faster than a full crawl, the speed is largely defined by how quickly the server can respond.
Thanks,
Dan
Hi Dan,
Thank you for your response.
Waiting for that feature to release. Keep us posted.
Thanks,
Nilesh Shirke
This is such an amazing tool.
I would be lost without it now. It makes SEO much easier to sell :o)
I love Screaming Frog,
In a full version can i use this tool to check backlinks?
Like majestic for example.
Thanks and Regards
Joshua
Hi Joshua,
Good to hear! No, I am afraid it doesn’t crawl the whole web, so can’t help with backlink analysis.
You can connect to the Majestic, Ahrefs or Moz APIs and pull in link data for URLs in a crawl though (like the number of LRD they have etc). This can be pretty useful for content audits etc.
Cheers.
Dan
On point 8, although I would suggest SF by default to not crawl fragment URLs as per default search engine behaviour, SF should be crawling shebang / hashbang URLs, like Google does.
Thus to leave hashbang URLs untouched a more correct regex replace would be:
#[^!].*|#$
Also for JS crawling, it would be good if there was an option to use a common blacklist of external URLs to not request (adobe, GA, facebook and all other 3rd party tools), which would be another nice hidden little feature.
Keep up the good work!
Cheers,
Aldert
Hi guys, 10) store html and store rendered html is under ‘extraction’ in the latest version fyi.
Used 3 features out of 11 and collected more precise data. Very good features. Thank you team
Love SF, but I have one suggestion that I think most people would find very useful:
and its the option to add a note to any URL crawled so we know if we have to make a change or already made one so we can monitor these changes and compare them over time. This option would be amazing, either to add a note or commentary to any given URL
thanks!
Ahhh – so excited to try out the Command Line, thank you, Dan! This is going to be awesome. :-)
CLI option is really great advantage! Thank you so much for this. Keep up the good work :)
This is such an amazing tool.
Could I suggest a feature request? How about adding rendered HTML DOM size count functionality? It would be super useful for counting (sitewide) DOM sizes. Or maybe there’s some custom extraction XPath wizardry somebody knows?
Is there a way to export reports from EXISTING crawls in command line?
Hi Christie,
No, unfortunately not. We’ve got this on the ‘todo’ list!
Cheers.
Dan