SEO Spider Configuration
User Guide
Spider Crawl Tab
Images
Configuration > Spider > Crawl > Images
You can choose to store and crawl images independently.
Unticking the ‘store’ configuration will mean image files within an img element will not be stored and will not appear within the SEO Spider.
<img src="image.jpg">
Unticking the ‘crawl’ configuration will mean image files within an img element will not be crawled to check their response code.
Images linked to via any other means will still be stored and crawled, for example, using an anchor tag.
The exclude or custom robots.txt can be used for images linked in anchor tags.
Please read our guide on How To Find Missing Image Alt Text & Attributes.
Media
Configuration > Spider > Crawl > Media
You can choose to store and crawl media files independently. Enabling both will mean files in <video> and <audio> elements will be crawled.
For example:
<video width="320" height="240" controls>

  <source src="movie.mp4" type="video/mp4">

</video>
Unticking the ‘store’ configuration will mean files in video and audio elements will not be stored and will not appear within the SEO Spider.
Unticking the ‘crawl’ configuration will mean in video and audio elements will not be crawled to check their response code.
CSS
Configuration > Spider > Crawl > CSS
This allows you to store and crawl CSS files independently.
Unticking the ‘store’ configuration will mean CSS files will not be stored and will not appear within the SEO Spider.
Unticking the ‘crawl’ configuration will mean stylesheets will not be crawled to check their response code.
JavaScript
Configuration > Spider > Crawl > JavaScript
You can choose to store and crawl JavaScript files independently.
Unticking the ‘store’ configuration will mean JavaScript files will not be stored and will not appear within the SEO Spider.
Unticking the ‘crawl’ configuration will mean JavaScript files will not be crawled to check their response code.
SWF
Configuration > Spider > Crawl > SWF
You can choose to store and crawl SWF (Adobe Flash File format) files independently.
Unticking the ‘store’ configuration will mean SWF files will not be stored and will not appear within the SEO Spider.
Unticking the ‘crawl’ configuration will mean SWF files will not be crawled to check their response code.
Internal hyperlinks
Configuration > Spider > Crawl > Internal Hyperlinks
By default the SEO Spider will crawl and store internal hyperlinks in a crawl.
Internal is defined as URLs on the same subdomain as entered within the SEO Spider. Hyperlinks are URLs contained within HTML anchor tags.
By disabling ‘crawl’, URLs contained within anchor tags that are on the same subdomain as the start URL will not be followed and crawled.
Disabling both ‘store’ and ‘crawl’ can be useful in list mode, when removing the crawl depth. It allows the SEO Spider to crawl the URLs uploaded and any other resource or page links selected, but not anymore internal links.
For example, you can supply a list of URLs in list mode, and only crawl them and the hreflang links. Or you could supply a list of desktop URLs and audit their AMP versions only. You could upload a list of URLs, and just audit the images on them, or external links etc.
External links
Configuration > Spider > Crawl > External Links
You can choose to store and crawl external links independently. External links are URLs encountered while crawling that are from a different domain (or subdomain with default configuration) to the one the crawl was started from.
Unticking the ‘store’ configuration will mean any external links will not be stored and will not appear within the SEO Spider.
Unticking the ‘crawl’ configuration will mean external links will not be crawled to check their response code.
Please note, this can include images, CSS, JS, hreflang attributes and canonicals (if they are external).
Canonicals
Configuration > Spider > Crawl > Canonicals
By default the SEO Spider will store and crawl canonicals (in canonical link elements or HTTP header) and use the links contained within for discovery.
Unticking the ‘store’ configuration will mean canonicals will not be stored and will not appear within the SEO Spider.
Unticking the ‘crawl’ configuration will mean URLs discovered in canonicals will not be crawled. If ‘store’ is selected only, then they will continue to be reported in the interface, but they just won’t be used for discovery.
Please read our guide on How To Audit Canonicals.
Pagination (rel next/prev)
Configuration > Spider > Crawl > Pagination (Rel Next/Prev)
By default the SEO Spider will not crawl rel=”next” and rel=”prev” attributes or use the links contained within it for discovery.
Unticking the ‘store’ configuration will mean rel=”next” and rel=”prev” attributes will not be stored and will not appear within the SEO Spider.
Unticking the ‘crawl’ configuration will mean URLs discovered in rel=”next” and rel=”prev” will not be crawled.
Please read our guide on How To Audit rel=”next” and rel=”prev” Pagination Attributes.
Hreflang
Configuration > Spider > Crawl > Hreflang
By default the SEO Spider will extract hreflang attributes and display hreflang language and region codes and the URL in the hreflang tab.
However, the URLs found in the hreflang attributes will not be crawled and used for discovery, unless ‘Crawl hreflang’ is ticked. With this setting enabled hreflang URLs’s will be extracted from an XML sitemap uploaded in list mode.
Unticking the ‘store’ configuration will mean hreflang attributes will not be stored and will not appear within the SEO Spider.
Unticking the ‘crawl’ configuration will mean URLs discovered in hreflang will not be crawled.
Please read our guide on How To Audit Hreflang.
AMP
Configuration > Spider > Crawl > AMP
By default the SEO Spider will not extract details of AMP URLs contained within rel=”amphtml” link tags, that will subsequently appear under the AMP tab.
Unticking the ‘store’ configuration will mean URLs contained within rel=”amphtml” link tags will not be stored and will not appear within the SEO Spider.
Unticking the ‘crawl’ configuration will mean URLs contained within rel=”amphtml” link tags will not be crawled.
We recommend enabling both configuration options when auditing AMP. Please read our guide on How To Audit & Validate Accelerated Mobile Pages (AMP).
Meta refresh
Configuration > Spider > Crawl > Meta Refresh
By default the SEO Spider will store and crawl URLs contained within a meta refresh.
<meta http-equiv="refresh" content="4; URL='www.screamingfrog.co.uk/meta-refresh-url'"/>
Unticking the ‘store’ configuration will mean meta refresh details will not be stored and will not appear within the SEO Spider.
Unticking the ‘crawl’ configuration will mean URLs discovered within a meta refresh will not be crawled.
iframes
Configuration > Spider > Crawl > iframes
By default the SEO Spider will store and crawl URLs contained within iframes.
<iframe src="https://www.screamingfrog.co.uk/iframe/"/>
Unticking the ‘store’ configuration will mean iframe details will not be stored and will not appear within the SEO Spider.
Unticking the ‘crawl’ configuration will mean URLs discovered within an iframe will not be crawled.
Mobile alternate
Configuration > Spider > Crawl > Mobile Alternate
By default the SEO Spider will not crawl or store URLs contained within rel=”alternate” link elements.
<link rel="alternate" media="only screen and (max-width: 640px)" href="http://m.example.com/">
Unticking the ‘store’ configuration will mean mobile alternate details will not be stored and will not appear within the SEO Spider.
Unticking the ‘crawl’ configuration will mean URLs discovered within mobile alternate link elements will not be crawled.
Check links outside of start folder
Configuration > Spider > Crawl > Check Links Outside of Start Folder
Untick this box if you do not want to crawl links outside of a sub folder you start from. This option provides you the ability to crawl within a start sub folder, but still crawl links that those URLs link to which are outside of the start folder.
Crawl outside of start folder
Configuration > Spider > Crawl > Crawl Outside of Start Folder
By default the SEO Spider will only crawl the subfolder (or sub directory) you crawl from forwards. However, if you wish to start a crawl from a specific sub folder, but crawl the entire website, use this option.
Crawl all subdomains
Configuration > Spider > Crawl > Crawl All Subdomains
By default the SEO Spider will only crawl the subdomain you crawl from and treat all other subdomains encountered as external sites. These will only be crawled to a single level and shown under the External tab.
For example, if https://www.screamingfrog.co.uk is entered as the start URL, then other subdomains discovered in the crawl such as https://cdn.screamingfrog.co.uk or https://images.screamingfrog.co.uk will be treated as ‘external’, as well as other domains such as www.google.co.uk etc.
To crawl all subdomains of a root domain (such as https://cdn.screamingfrog.co.uk or https://images.screamingfrog.co.uk), then this configuration should be enabled.
The CDNs configuration option can be used to treat external URLs as internal.
Please note – If a crawl is started from the root, and a subdomain is not specified at the outset (for example, starting the crawl from https://screamingfrog.co.uk), then all subdomains will be crawled by default. This is similar to behaviour of a site: query in Google search.
Follow internal or external ‘nofollow’
Configuration > Spider > Crawl > Follow Internal/External “Nofollow”
By default the SEO Spider will not crawl internal or external links with the ‘nofollow’, ‘sponsored’ and ‘ugc’ attributes, or links from pages with the meta nofollow tag and nofollow in the X-Robots-Tag HTTP Header.
If you would like the SEO Spider to crawl these, simply enable this configuration option.
Crawl linked XML sitemaps
Configuration > Spider > Crawl > Crawl Linked XML Sitemaps
The SEO Spider will not crawl XML Sitemaps by default (in regular ‘Spider’ mode). To crawl XML Sitemaps and populate the filters in the Sitemaps tab, this configuration should be enabled.
When the ‘Crawl Linked XML Sitemaps’ configuration is enabled, you can choose to either ‘Auto Discover XML Sitemaps via robots.txt’, or supply a list of XML Sitemaps by ticking ‘Crawl These Sitemaps’, and pasting them into the field that appears.
Please note – Once the crawl has finished, a ‘Crawl Analysis‘ will need to be performed to populate the Sitemap filters. Please read our guide on ‘How To Audit XML Sitemaps‘.
Spider Extraction Tab
Page details
Configuration > Spider > Extraction > Page Details
The following on-page elements are configurable to be stored in the SEO Spider.
- Page Titles
- Meta Descriptions
- Meta Keywords
- H1
- H2
- Indexability (& Indexability Status)
- Word Count
- Readability
- Text to Code Ratio
- Hash Value
- Page Size
- Forms
- Accessibility – JavaScript rendering is also required for this feature via ‘Config > Spider > Rendering’. This will enable the open-source AXE accessibility rule set for automated accessibility validation seen in the Accessibility tab and filters.
Disabling any of the above options from being extracted will mean they will not appear within the SEO Spider interface in respective tabs, columns or filters.
Some filters and reports will obviously not work anymore if they are disabled. For example, if the ‘hash value’ is disabled, then the ‘URL > Duplicate’ filter will no longer be populated, as this uses the hash value as an algorithmic check for exact duplicate URLs.
A small amount of memory will be saved from not storing the data of each element.
URL details
Configuration > Spider > Extraction > URL Details
The following URL Details are configurable to be stored in the SEO Spider.
- Response Time – Time in seconds to download the URL. More detailed information can be found in our FAQ.
- Last-Modified – Read from the Last-Modified header in the servers HTTP response. If there server does not provide this the value will be empty.
- HTTP Headers – This will store full HTTP request and response headers which can be seen in the lower ‘HTTP Headers’ tab. The full response headers are also included in the Internal tab to allow them to be queried alongside crawl data. They can be bulk exported via ‘Bulk Export > Web > All HTTP Headers’ and an aggregated report can be exported via ‘Reports > HTTP Header > HTTP Headers Summary.
- Cookies – This will store cookies found during a crawl in the lower ‘Cookies’ tab. JavaScript rendering mode will need to be used to get an accurate view of cookies which are loaded on the page using JavaScript or pixel image tags. Cookies can be bulk exported via ‘Bulk Export > Web > All Cookies’ and an aggregated report can be exported via ‘Reports > Cookies > Cookie Summary. Please note, when you choose to store cookies, the auto exclusion performed by the SEO Spider for Google Analytics tracking tags is disabled to provide an accurate view of all cookies issued. This means it will affect your analytics reporting, unless you choose to exclude any tracking scripts from firing by using the exclude configuration (‘Config > Exclude’) or filter out the ‘Screaming Frog SEO Spider’ user-agent similar to excluding PSI.
Disabling any of the above options from being extracted will mean they will not appear within the SEO Spider interface in respective tabs and columns.
A small amount of memory will be saved from not storing the data of each element.
Directives
Configuration > Spider > Extraction > Directives
The following directives are configurable to be stored in the SEO Spider.
- Meta Robots
- X-Robots-Tag
Disabling any of the above options from being extracted will mean they will not appear within the SEO Spider interface in respective tabs, columns or filters.
A small amount of memory will be saved from not storing the data.
Structured data
Configuration > Spider > Extraction > Structured Data
Structured Data is entirely configurable to be stored in the SEO Spider. Please see our detailed guide on How To Test & Validate Structured Data, or continue reading below to understand more about the configuration options.
By default the SEO Spider will not extract and report on structured data. The following configuration options will need to be enabled for different structured data formats to appear within the ‘Structured Data’ tab.
- JSON-LD – This configuration option enables the SEO Spider to extract JSON-LD structured data, and for it to appear under the ‘Structured Data’ tab.
- Microdata – This configuration option enables the SEO Spider to extract Microdata structured data, and for it to appear under the ‘Structured Data’ tab.
- RDFa – This configuration option enables the SEO Spider to extract RDFa structured data, and for it to appear under the ‘Structured Data’ tab.
You can also select to validate structured data, against Schema.org and Google rich result features.
Schema.org Validation
This configuration option is only available, if one or more of the structured data formats are enabled for extraction.
If enabled, then the SEO Spider will validate structured data against Schema.org specifications. It checks whether the types and properties exist and will show ‘errors’ for any issues encountered.
For example, it checks to see whether http://schema.org/author exists for a property, or http://schema.org/Book exist as a type. It validates against main and pending Schema vocabulary from their latest versions. The Structured Data tab and filter will show details of validation errors.
Additionally, this validation checks for out of date schema use of Data-Vocabulary.org.
Google Rich Result Feature Validation
This configuration option is only available, if one or more of the structured data formats are enabled for extraction.
If enabled, then the SEO Spider will validate structured data against Google rich result feature requirements according to their own documentation. Validation issues for required properties will be classed as errors, while issues around recommended properties will be classed as warnings, in the same way as Google’s own Structured Data Testing Tool.
The Structured Data tab and filter will show details of Google feature validation errors and warnings.
The full list of Google rich result features that the SEO Spider is able to validate against can be seen in our guide on How To Test & Validate Structured Data.
HTML
Configuration > Spider > Extraction > Store HTML / Rendered HTML
Store HTML
This allows you to save the static HTML of every URL crawled by the SEO Spider to disk, and view it in the ‘View Source’ lower window pane (on the left hand side, under ‘Original HTML’). They can be bulk exported via ‘Bulk Export > Web > All Page Source’.
This enables you to view the original HTML before JavaScript comes into play, in the same way as a right click ‘view source’ in a browser. This is great for debugging, or for comparing against the rendered HTML.
Store rendered HTML
This allows you to save the rendered HTML of every URL crawled by the SEO Spider to disk, and view in the ‘View Source’ lower window pane (on the right hand side, under ‘Rendered HTML’). They can be bulk exported via ‘Bulk Export > Web > All Page Source’.
This enables you to view the DOM like ‘inspect element’ (in Chrome in DevTools), after JavaScript has been processed.
Please note, this option will only work when JavaScript rendering is enabled.
Configuration > Spider > Extraction > PDF
Store PDF
This allows you to save PDFs to disk during a crawl. They can be bulk exported via ‘Bulk Export > Web > All PDF Documents’, or just the content can be exported as .txt files via ‘Bulk Export > Web > All PDF Content’.
When PDFs are stored, the PDF can be viewed in the ‘Rendered Page’ tab and the text content of the PDF can be viewed in the ‘View Source’ tab and ‘Visible Content’ filter.
Extract PDF Properties
By default the PDF title and keywords will be extracted. These will appear in the ‘Title’ and ‘Meta Keywords’ columns in the Internal tab of the SEO Spider.
Google will convert the PDF to HTML and use the PDF title as the title element and the keywords as meta keywords, although it doesn’t use meta keywords in scoring.
By enabling ‘Extract PDF properties’, the following additional properties will also be extracted.
- Subject
- Author
- Creation Date
- Modification Date
- Page Count
- Word Count
These new columns are displayed in the Internal tab.
Extract Link Text
When this setting is enabled, the SEO Spider will attempt to locate the text associated with links within PDFs. When this is disabled, the columns will be blank.
The anchor text can be viewed in the lower Outlinks (and Inlinks) tabs associated with links.
Depending on the format of the PDF, this can be inaccurate, slow and memory intensive.
Spider Limits Tab
Limit crawl total
Configuration > Spider > Limits > Limit Crawl Total
The free version of the software has a 500 URL crawl limit. If you have a licensed version of the tool this will be replaced with 5 million URLs, but you can include any number here for greater control over the number of pages you wish to crawl.
Limit crawl depth
Configuration > Spider > Limits > Limit Crawl Depth
You can choose how deep the SEO Spider crawls a site (in terms of links away from your chosen start point).
Limit URLs per crawl depth
Configuration > Spider > Limits > Limit URLs Per Crawl Depth
Control the number of URLs that are crawled at each crawl depth.
Limit max folder depth
Configuration > Spider > Limits > Limit Max Folder Depth
Control the number of folders (or subdirectories) the SEO Spider will crawl.
The Spider classifies folders as part of the URL path after the domain that end in a trailing slash:
- https://www.screamingfrog.co.uk/ – folder depth 0
- https://www.screamingfrog.co.uk/seo-spider/ – folder depth 1
- https://www.screamingfrog.co.uk/seo-spider/#download – folder depth 1
- https://www.screamingfrog.co.uk/seo-spider/fake-page.html – folder depth 1
- https://www.screamingfrog.co.uk/seo-spider/user-guide/ – folder depth 2
Limit number of query strings
Configuration > Spider > Limits > Limit Number of Query Strings
Excludes from the crawl any URLs containing more than the configured number of query strings. e.g., if set to ‘2’, example.com/?query1&query2&query3 won’t be crawled.
Max redirects to follow
Configuration > Spider > Limits > Limit Max Redirects to Follow
This option provides the ability to control the number of redirects the SEO Spider will follow.
Limit max URL length to crawl
Configuration > Spider > Limits > Limit Max URL Length
Control the length of URLs that the SEO Spider will crawl.
There’s a default max URL length of 2,000, due to the limits of the database storage.
Limit by URL path
Configuration > Spider > Limits > Limit by URL Path
Control the number of URLs that are crawled by URL path. Enter a list of URL patterns and the maximum number of pages to crawl for each.
Spider Rendering Tab
Rendering
Configuration > Spider > Rendering
This configuration allows you to set the rendering mode for the crawl:
- Text Only: The SEO Spider will crawl and extract from the raw HTML only. It ignores the AJAX Crawling Scheme, and client-side JavaScript.
- Old AJAX Crawling Scheme: The SEO Spider will obey Google’s long deprecated AJAX Crawling Scheme if discovered. If not present, it will crawl the raw HTML like default ‘Text Only’ mode.
- JavaScript: The SEO Spider will execute client-side JavaScript by rendering the page in its headless Chrome browser, crawling and extracting from the rendered HTML for content and links. Like Google, it will also discover any links in the raw HTML.
Please note: To emulate Googlebot as closely as possible our rendering engine uses the Chromium project. The following operating systems are supported:
- Windows 10
- Windows 11
- Windows Server 2016
- Windows Server 2022
- Ubuntu 14.04+ (64-bit only)
- macOS 11+
Please note: If you are running a supported OS and are still unable to use rendering, it could be you are running in compatibility mode.
To check this, go to your installation directory (C:\Program Files (x86)\Screaming Frog SEO Spider\), right click on ScreamingFrogSEOSpider.exe, select ‘Properties’, then the ‘Compatibility’ tab, and check you don’t have anything ticked under the ‘Compatibility Mode’ section.
Rendered page screen shots
Configuration > Spider > Rendering > JavaScript > Rendered Page Screenshots
This configuration is enabled by default when selecting JavaScript rendering and means screenshots are captured of rendered pages, which can be viewed in the ‘Rendered Page‘ tab, in the lower window pane.
You can select various window sizes from Googlebot desktop, Googlebot Smartphone and various other devices.
These can be customised with the following options:
- Width & Height – Used to set custom window sizes.
- Scaling Factor – Increases the scaling used for the screenshots. Better emulates devices with higher pixel densities.
- Mobile – Chrome flag to indicate the screen is for a mobile device.
- Touch Enabled – Chrome flag to indicate the device is touch enabled.
- Resize to Content – When enabled the Spider will resize the browser window the screenshot is taken in to try and capture the full page length in the screenshot (up to 8192 pixels). When unchecked this will just screenshot the top of the page in a window at the specified resolution.
- Window Resize Time – How long after the window is resized the screenshot of the page is taken is taken.
The rendered screenshots are viewable within the ‘C:\Users\User Name\.ScreamingFrogSEOSpider\screenshots-XXXXXXXXXXXXXXX’ folder, and can be exported via the ‘Bulk Export > Web > Screenshots’ top level menu, to save navigating, copying and pasting.
JavaScript error reporting
Configuration > Spider > Rendering > JavaScript > JavaScript Error Reporting
This setting enables JavaScript error reporting to be captured and reported under respective filters in the ‘JavaScript’ tab.
Detailed JavaScript errors, warnings and issues can be viewed in the lower ‘Chrome Console Log’ tab and bulk exported via ‘Bulk Export > JavaScript > Pages With JavaScript Issues’.
Flatten Shadow DOM
Configuration > Spider > Rendering > JavaScript > Flatten Shadow DOM
Google is able to flatten and index Shadow DOM content as part of the rendered HTML of a page. This configuration is enabled by default, but can be disabled.
Flatten iframes
Configuration > Spider > Rendering > JavaScript > Flatten iframes
Google will inline iframes into a div in the rendered HTML of a parent page, if conditions allow. These include the height being set, having a mobile viewport, and not being noindex. We try to mimic Google’s behaviour. This configuration is enabled by default, but can be disabled.
Archive website
Configuration > Spider > Rendering > JavaScript > Archive Website
When enabled, the SEO Spider will download and store all HTML and resources found during a crawl and save the files locally.
There are two options –
- Hierarchical URL Archive – The website will be stored locally based upon the the directory file path of the website. These files are not compressed.
- WARC – The Web ARChive standard format for archiving websites. The WARC file format can be viewed in many open source tools and is compressed.
The archived files can be viewed in C:\Users\Your Name\.ScreamingFrogSEOSpider\ProjectInstanceData\
You can view an archived page in the app by right clicking and choosing ‘Open Archived Page in Browser’ to view an offline version.
AJAX timeout
Configuration > Spider > Rendering > JavaScript > AJAX Timeout
This is how long, in seconds, the SEO Spider should allow JavaScript to execute before considering a page loaded. This timer starts after the Chromium browser has loaded the web page and any referenced resources, such as JS, CSS and Images.
In reality, Google is more flexible than the 5 second mark mentioned above, they adapt based upon how long a page takes to load content, considering network activity and things like caching play a part. However, Google obviously won’t wait forever, so content that you want to be crawled and indexed, needs to be available quickly, or it simply won’t be seen.
The 5 second rule is a reasonable rule of thumb for users, and Googlebot.
Window size
Configuration > Spider > Rendering > JavaScript > Window Size
This sets the viewport size in JavaScript rendering mode, which can be seen in the rendered page screen shots captured in the ‘Rendered Page‘ tab.
For both ‘Googlebot Mobile: Smartphone’ and ‘Googlebot Desktop’ window sizes, the SEO Spider emulates Googlebot behaviour and re-sizes the page – so it’s really long to capture as much data as possible. Google will stretch the page, to load and capture any additional content.
The SEO Spider will load the page with 411×731 pixels for mobile or 1024×768 pixels for desktop, and then re-size the length up to 8,192px. This is the limit we are currently able to capture in the in-built Chromium browser. Google are able to re-size up to a height of 12,140 pixels.
In rare cases the window size can influence the rendered HTML. For example some websites may not have certain elements on smaller viewports, this can impact results like the word count and links.
For other device window sizes, the viewport chosen will be used for rendering any content, links and screenshots – without resizing to a longer viewport.
Spider Advanced Tab
Ignore non-indexable URLs for Issues
Configuration > Spider > Advanced > Ignore Non-Indexable URLs for Issues
When enabled, the SEO Spider will only populate issue-related filters if the page is Indexable. This includes all filters under Page Titles, Meta Description, Meta Keywords, H1 and H2 tabs and the following other issues –
- ‘Low Content Pages’ in the Content tab.
- ‘Missing’, ‘Validation Errors’ and ‘Validation Warnings’ in the Structured Data tab.
- ‘Orphan URLs’ in the Sitemaps tab.
- ‘No GA Data’ in the Analytics tab.
- ‘No Search Analytics Data’ in the Search Console tab.
- ‘Pages With High Crawl Depth’ in the Links tab.
E.g. This means URLs won’t be considered as ‘Duplicate’, or ‘Over X Characters’ or ‘Below X Characters’ if for example they are set as ‘noindex’, and hence non-indexable.
We recommend disabling this feature if you’re crawling a staging website which has a sitewide noindex.
Ignore paginated URLs for duplicate filters
Configuration > Spider > Advanced > Ignore Paginated URLs for Duplicate Filters
When enabled, URLs with rel=”prev” in the sequence will not be considered for ‘Duplicate’ filters under Page Titles, Meta Description, Meta Keywords, H1 and H2 tabs. Only the first URL in the paginated sequence, with a rel=”next” attribute will be considered.
This means paginated URLs won’t be considered as having a ‘Duplicate’ page title with the first page in the series for example. It’s normal and expected behaviour and hence, this configuration means this will not be flagged as an issue.
Always follow redirects
Configuration > Spider > Advanced > Always Follow Redirects
This feature allows the SEO Spider to follow redirects until the final redirect target URL in list mode, ignoring crawl depth. This is particularly useful for site migrations, where URLs may perform a number of 3XX redirects, before they reach their final destination.
To view redirects in a site migration, we recommend using the ‘all redirects‘ report.
Please see our guide on ‘How To Use List Mode‘ for more information on how this configuration can be utilised.
Always follow canonicals
Configuration > Spider > Advanced > Always Follow Canonicals
This feature allows the SEO Spider to follow canonicals until the final redirect target URL in list mode, ignoring crawl depth. This is particularly useful for site migrations, where canonicals might be canonicalised multiple times, before they reach their final destination.
To view the chain of canonicals, we recommend enabling this configuration and using the ‘canonical chains‘ report.
Please see our guide on ‘How To Use List Mode‘ for more information on how this configuration can be utilised like ‘always follow redirects’.
Respect noindex
Configuration > Spider > Advanced > Respect Noindex
This option means URLs with ‘noindex’ will not be reported in the SEO Spider. These URLs will still be crawled and their outlinks followed, but they won’t appear within the tool.
Respect canonical
Configuration > Spider > Advanced > Respect Canonical
This option means URLs which have been canonicalised to another URL, will not be reported in the SEO Spider. These URLs will still be crawled and their outlinks followed, but they won’t appear within the tool.
Respect next/prev
Configuration > Spider > Advanced > Respect Next/Prev
This option means URLs with a rel=”prev” in the sequence, will not be reported in the SEO Spider. Only the first URL in the paginated sequence with a rel=”next” attribute will be reported.
These URLs will still be crawled and their outlinks followed, but they won’t appear within the tool.
Respect HSTS policy
Configuration > Spider > Advanced > Respect HSTS Policy
HTTP Strict Transport Security (HSTS) is a standard, defined in RFC 6797, by which a web server can declare to a client that it should only be accessed via HTTPS.
The client (in this case, the SEO Spider) will then make all future requests over HTTPS, even if following a link to an HTTP URL. When this happens the SEO Spider will show a Status Code of 307, a Status of “HSTS Policy” and Redirect Type of “HSTS Policy”.
You can disable this feature and see the ‘true’ status code behind a redirect (such as a 301 permanent redirect for example). Please see more details in our ‘An SEOs guide to Crawling HSTS & 307 Redirects‘ article.
Respect self referencing meta refresh
Configuration > Spider > Advanced > Respect Self Referencing Meta Refresh
You can disable the ‘Respect Self Referencing Meta Refresh’ configuration to stop self referencing meta refresh URLs being considered as ‘non-indexable’.
It’s fairly common for sites to have a self referencing meta refresh for various reasons, and generally this doesn’t impact indexing of the page. However, it should be investigated further, as it’s redirecting to itself, and this is why it’s flagged as ‘non-indexable’.
Extract images from img srcset attribute
Configuration > Spider > Advanced > Extract Images From IMG SRCSET Attribute
If enabled will extract images from the srcset attribute of the <img> tag. In the example below this would be image-1x.png and image-2x.png as well as image-src.png.
<img src="image-src.png" srcset="image-1x.png 1x, image-2x.png 2x" alt="Retina friendly images" />
Crawl fragment identifiers
Configuration > Spider > Advanced > Crawl Fragment Identifiers
If enabled the SEO Spider will crawl URLs with hash fragments and consider them as separate unique URLs.
https://www.screamingfrog.co.uk/#this-is-treated-as-a-separate-url/
By default, the SEO Spider will ignore anything from the hash value like a search engine. But this can be useful when analysing in-page jump links and bookmarks for example.
Perform HTML validation
Configuration > Spider > Advanced > Perform HTML Validation
If enabled the SEO Spider will check for basic HTML errors that might cause crawling and indexing issues. This configuration will populate the Validation tab filters and various ‘Outside <head>’ filters in tabs such as Page Titles, Meta Description, Canonicals and more.
Green hosting carbon calculation
Configuration > Spider > Advanced > Green Hosting Carbon Calculation
This configuration is used for the carbon footprint calculation and rating. Enable the configuration if your website hosting is run on green energy.
You can check this manually currently via the Green Web Check at the Green Web Foundation.
Assume pages are HTML
Configuration > Spider > Advanced > Assume Pages are HTML
When enabled, any URL without a content-type will be assumed to be HTML and crawled.
Response timeout
Configuration > Spider > Advanced > Response Timeout (secs)
The SEO Spider will wait 20 seconds to get any kind of HTTP response from a URL by default. You can increase the length of waiting time for very slow websites.
5XX response retries
Configuration > Spider > Advanced > 5XX Response Retries
This option provides the ability to automatically re-try 5XX responses. Often these responses can be temporary, so re-trying a URL may provide a 2XX response.
Spider Preferences Tab
Page title & meta description width
Configuration > Spider > Preferences > Page Title/Meta Description Width
This option provides the ability to control the character and pixel width limits in the SEO Spider filters in the page title and meta description tabs.
For example, changing the minimum pixel width default number of ‘200’ for page title width, would change the ‘Below 200 Pixels’ filter in the ‘Page Titles’ tab. This allows you to set your own character and pixel width based upon your own preferences.
Please note – This does not update the SERP Snippet preview at this time, only the filters within the tabs.
Links preferences
Configuration > Spider > Preferences > Links
These options provide the ability to control when the ‘Pages With High External Outlinks’, ‘Pages With High Internal Outlinks’, ‘Pages With High Crawl Depth’, and ‘Non-Descriptive Anchor Text In Internal Outlinks’ filters are triggered under the ‘Links’ tab.
For example, changing the ‘High Internal Outlinks’ default from 1,000 to 2,000 would mean that pages would need 2,000 or more internal outlinks to appear under this filter in the Links tab.
Other character preferences
Configuration > Spider > Preferences > Other
These options provide the ability to control the character length of URLs, h1, h2, image alt text, max image size and low content pages filters in their respective tabs.
For example, if the ‘Max Image Size Kilobytes’ was adjusted from 100 to ‘200’, then only images over 200kb would appear in the ‘Images > Over X kb’ tab and filter.
Other Configuration Options
Content area
Configuration > Content > Area
You can specify the content area used for word count, near duplicate content analysis and spelling and grammar checks. This can help focus analysis on the main content area of a page, avoiding known boilerplate text.
The content area settings do not impact link discovery, it is just for content.
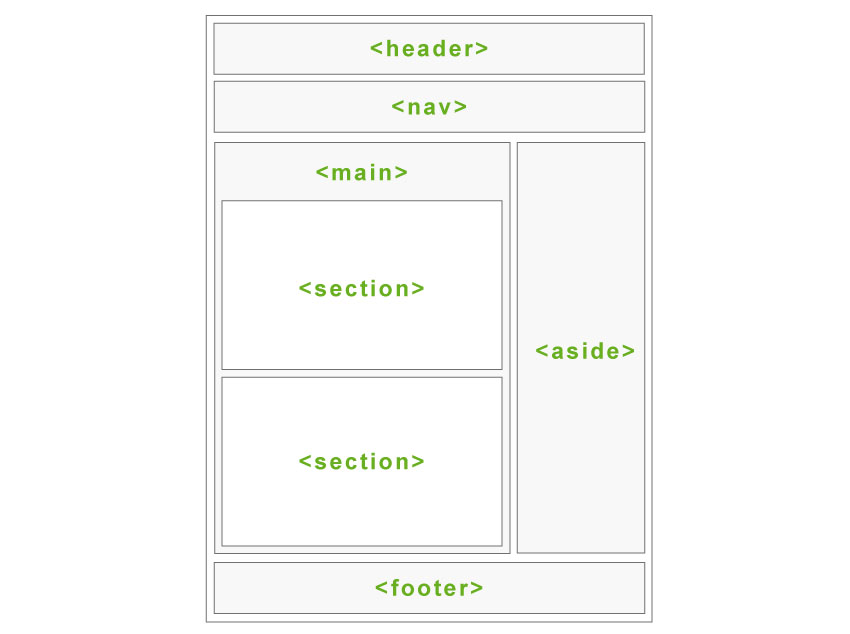
By default the SEO Spider will only consider text contained within the body HTML element of a web page. By default both the nav and footer HTML elements are excluded to help focus the content area used to the main content of the page.
However, not all websites are built using these HTML5 semantic elements, and sometimes it’s useful to refine the content area used in the analysis further. You’re able to add a list of HTML elements, classes or ID’s to exclude or include for the content used.
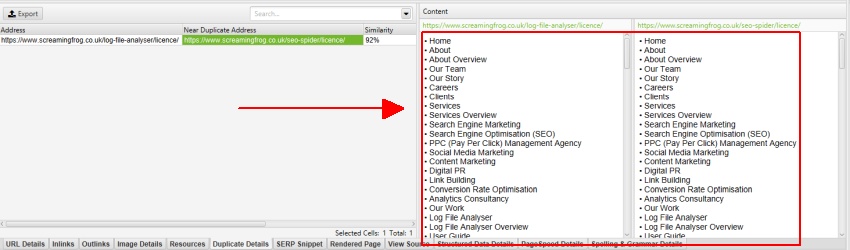
For example, the Screaming Frog website has a mobile menu outside the nav element, which is included within the content analysis by default. The mobile menu can be seen in the content preview of the ‘duplicate details’ tab shown below when checking for duplicate content (as well as the ‘Spelling & Grammar Details’ tab).
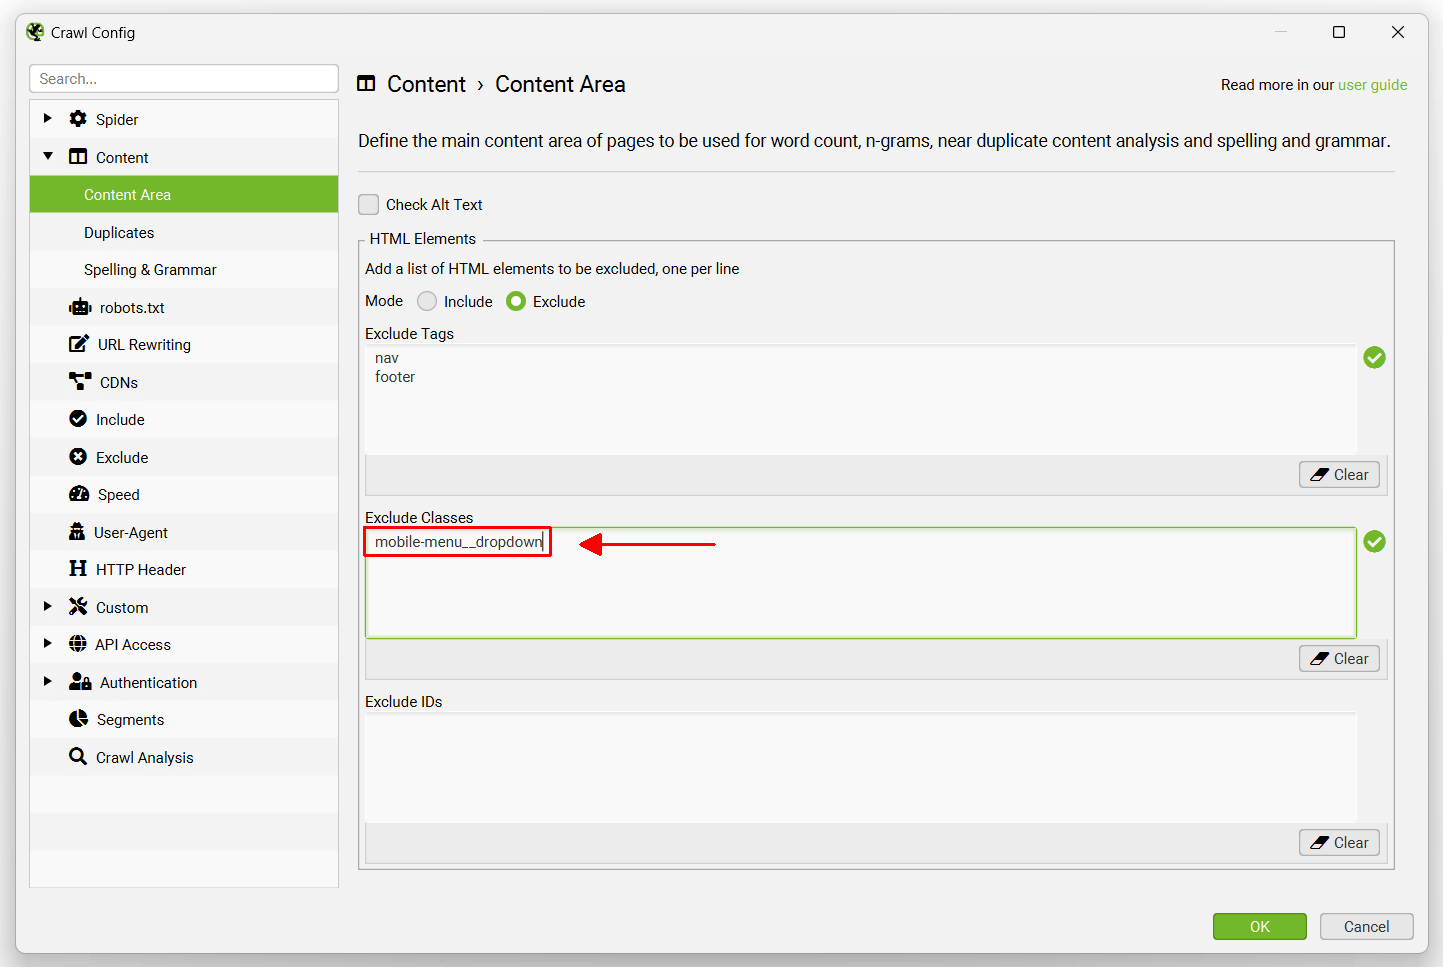
By right clicking and viewing source of the HTML of our website, we can see this menu has a ‘mobile-menu__dropdown’ class. The ‘mobile-menu__dropdown’ can then be excluded in the ‘Exclude Classes’ box –
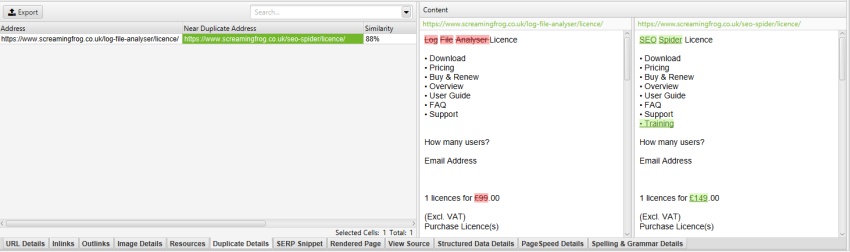
The mobile menu is then removed from near duplicate analysis and the content shown in the duplicate details tab (as well as Spelling & Grammar and word counts).
Content area settings can be adjusted post-crawl for near duplicate content analysis and spelling and grammar. Near duplicates will require ‘crawl analysis‘ to be re-run to update the results, and spelling and grammar requires its analysis to be refreshed via the right hand ‘Spelling & Grammar’ tab or lower window ‘Spelling & Grammar Details’ tab.
Please see our tutorials on finding duplicate content and spelling and grammar checking.
Duplicates
Configuration > Content > Duplicates
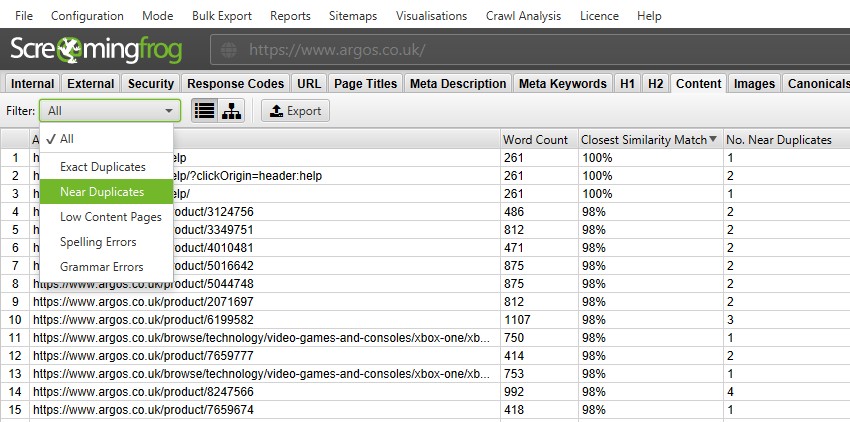
The SEO Spider is able to find exact duplicates where pages are identical to each other, and near duplicates where some content matches between different pages. Both of these can be viewed in the ‘Content’ tab and corresponding ‘Exact Duplicates’ and ‘Near Duplicates’ filters.
Exact duplicate pages are discovered by default. To check for ‘near duplicates’ the configuration must be enabled, so that it allows the SEO Spider to store the content of each page.
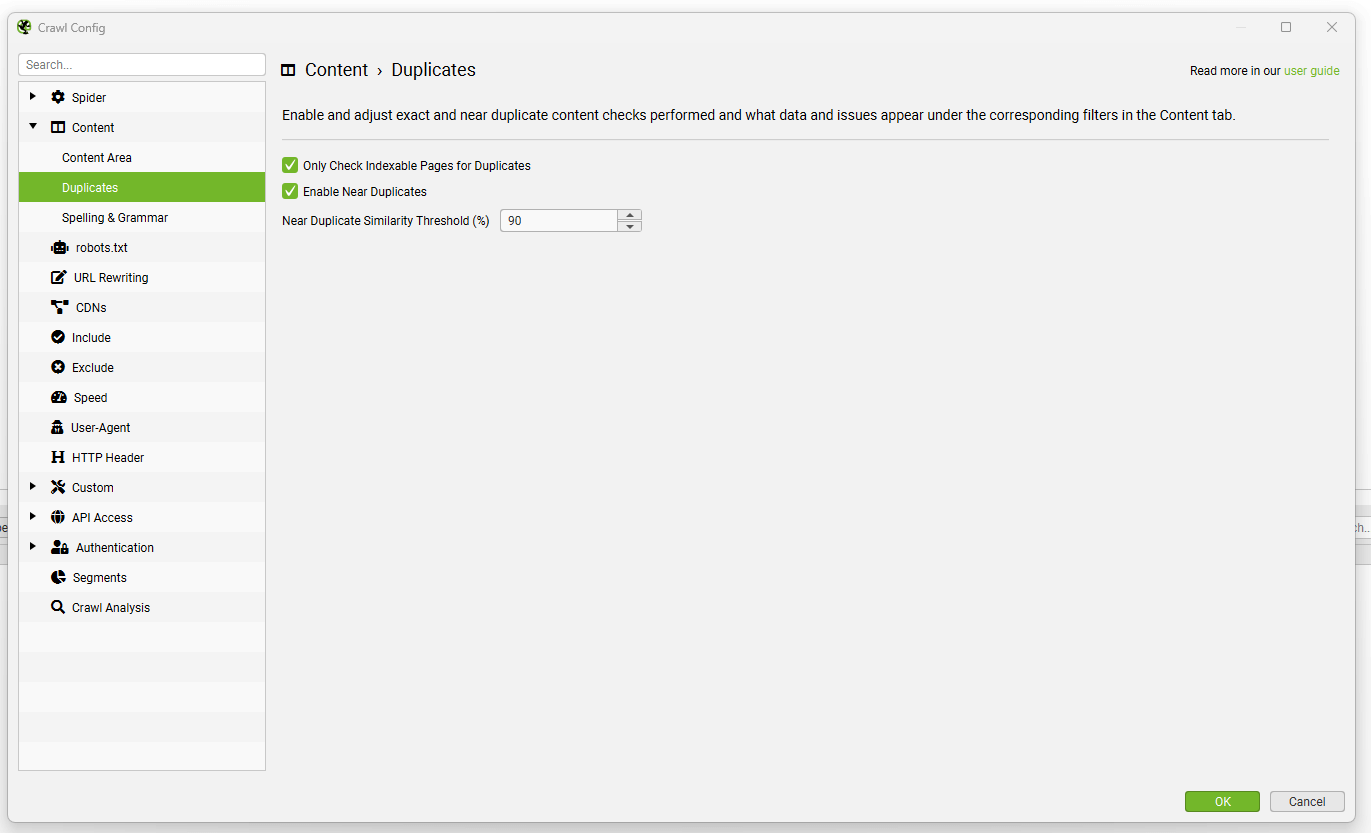
The SEO Spider will identify near duplicates with a 90% similarity match using a minhash algorithm, which can be adjusted to find content with a lower similarity threshold.
The SEO Spider will also only check ‘Indexable’ pages for duplicates (for both exact and near duplicates).
This means if you have two URLs that are the same, but one is canonicalised to the other (and therefore ‘non-indexable’), this won’t be reported – unless this option is disabled.
Near duplicates requires post crawl analysis to be populated, and more detail on the duplicates can be seen in the ‘Duplicate Details’ lower tab. This displays every near duplicate URL identified, and their similarity match.
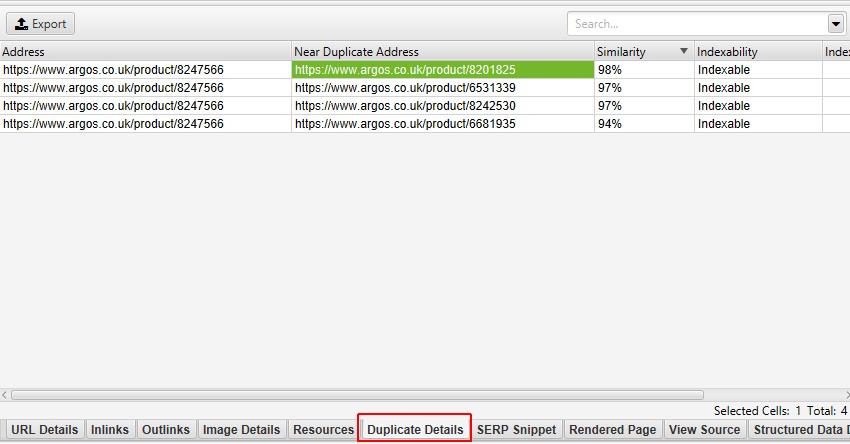
Clicking on a ‘Near Duplicate Address’ in the ‘Duplicate Details’ tab will also display the near duplicate content discovered between the pages and highlight the differences.

The content area used for near duplicate analysis can be adjusted via ‘Configuration > Content > Area’. You’re able to add a list of HTML elements, classes or ID’s to exclude or include for the content used.
The near duplicate content threshold and content area used in the analysis can both be updated post crawl and crawl analysis can be re-run to refine the results, without the need for re-crawling.
Spelling & grammar
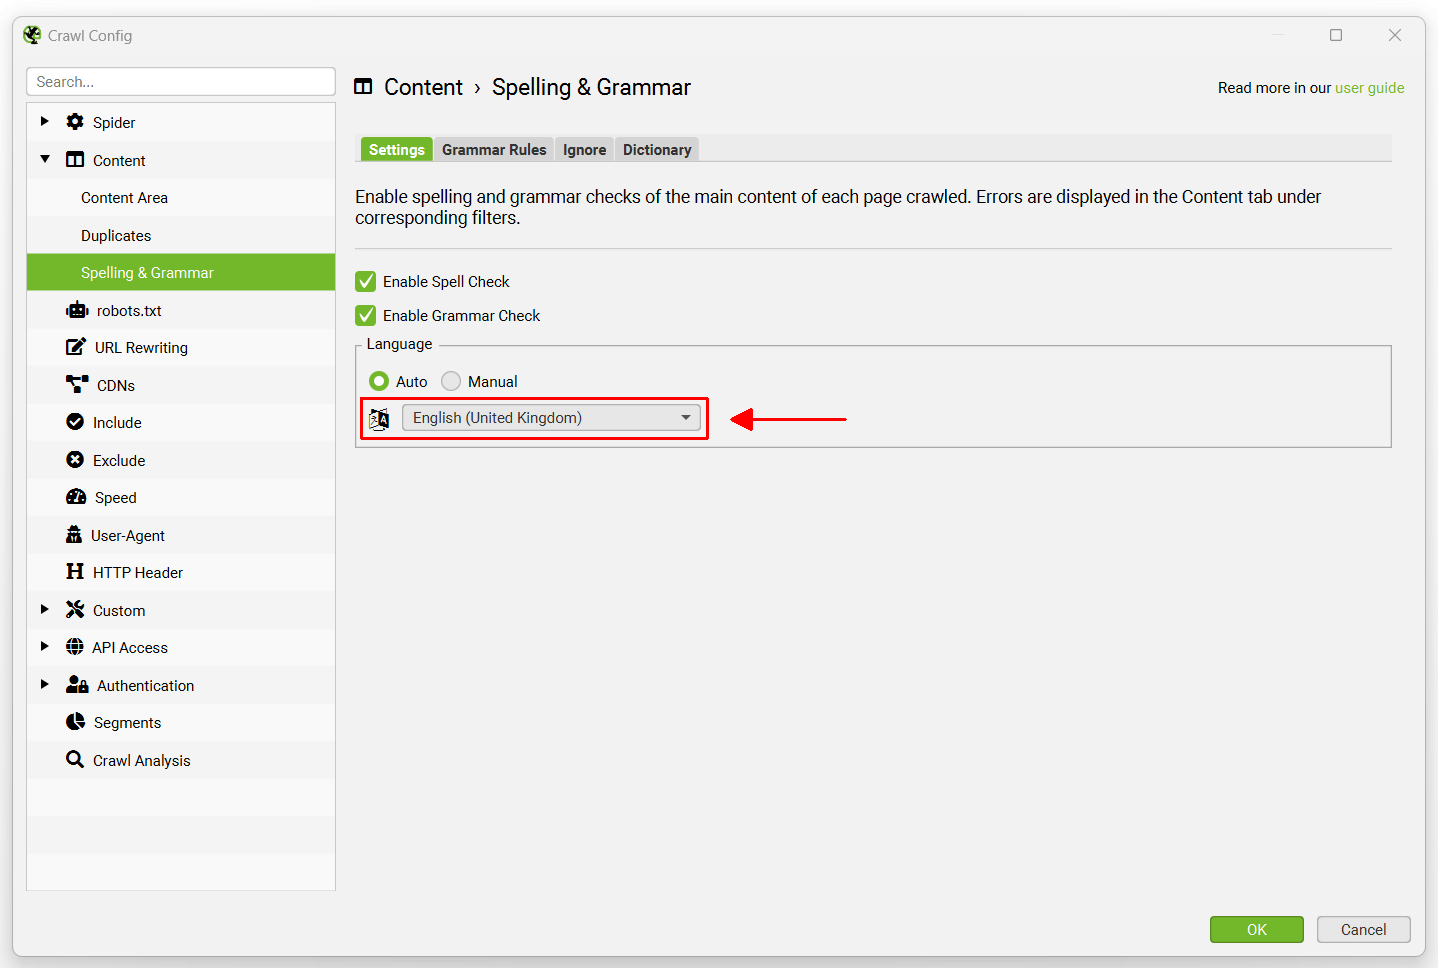
Configuration > Content > Spelling & Grammar
The SEO Spider is able to perform a spelling and grammar check on HTML pages in a crawl. Other content types are currently not supported, but might be in the future.
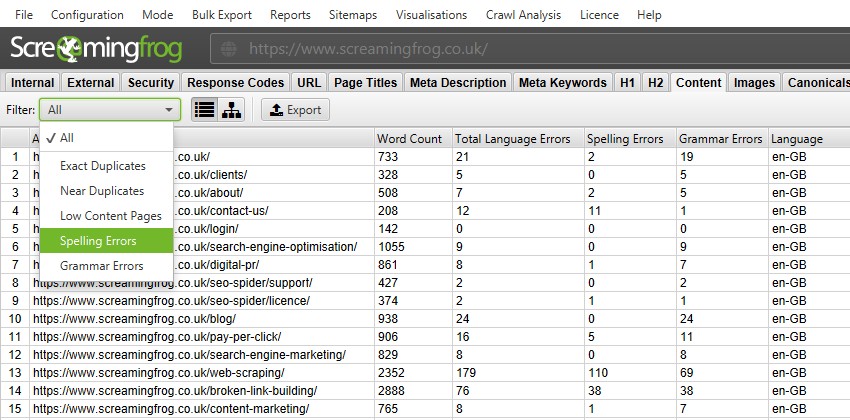
The spelling and and grammar checks are disabled by default and need to be enabled for spelling and grammar errors to be displayed in the ‘Content’ tab, and corresponding ‘Spelling Errors’ and ‘Grammar Errors’ filters.
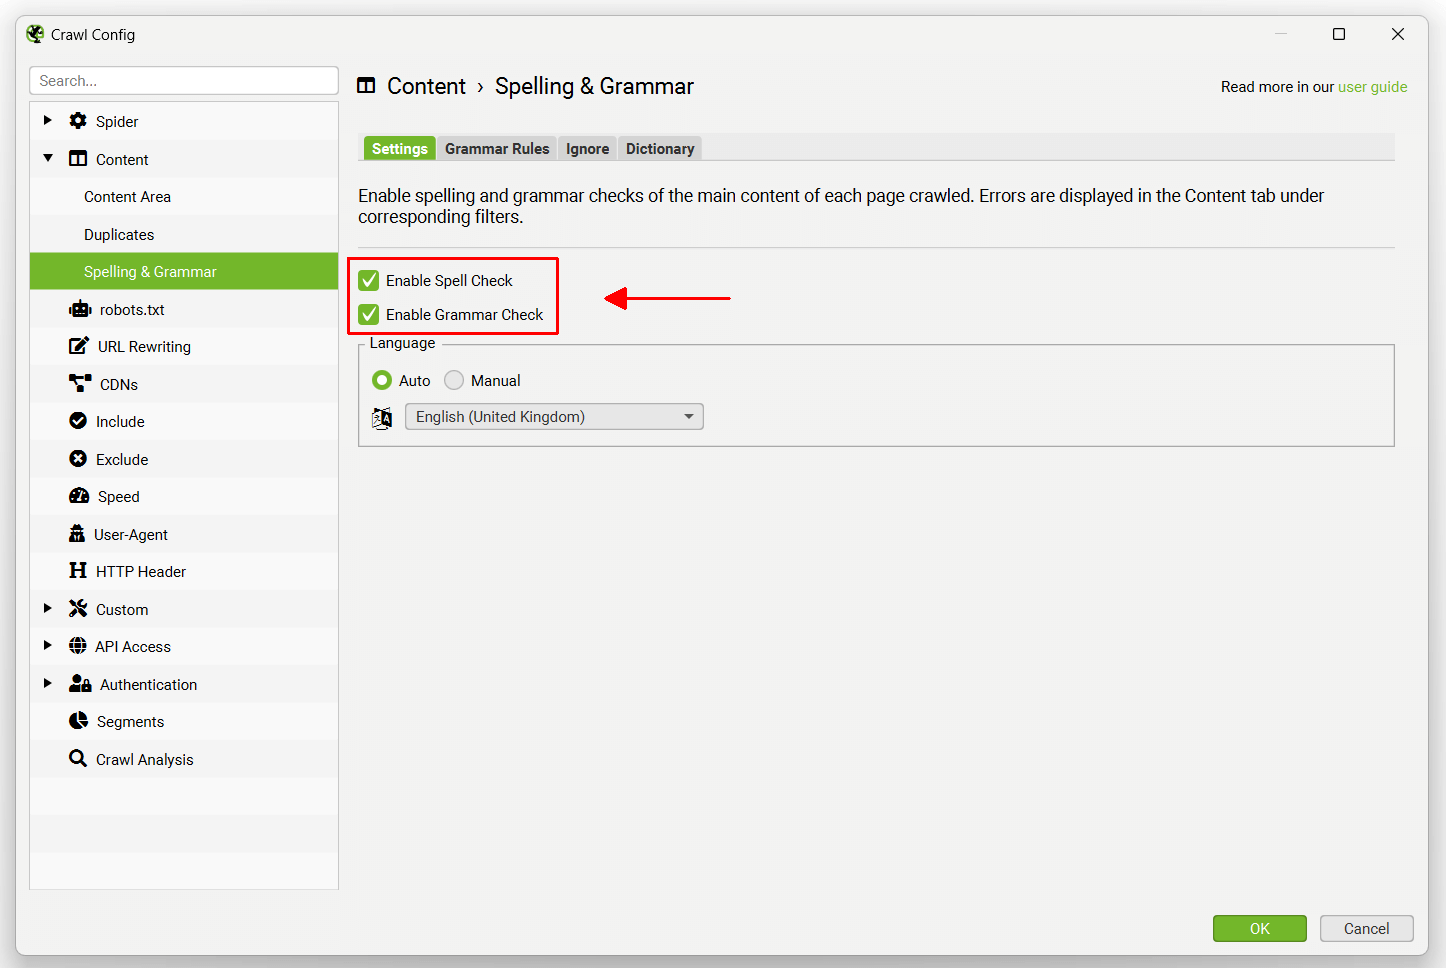
The spelling and grammar feature will auto identify the language used on a page (via the HTML language attribute), but also allow you to manually select language where required within the configuration.
It supports 39 languages, which include –
- Arabic
- Asturian
- Belarusian
- Breton
- Catalan
- Chinese
- Danish
- Dutch
- English (Australia, Canada, New Zealand, South Africa, USA, UK)
- French
- Galician
- German (Austria, Germany, Switzerland)
- Greek
- Italian
- Japanese
- Khmer
- Persian (Afghanistan, Iran)
- Polish
- Portuguese (Angola, Brazil, Mozambique, Portgual)
- Romanian
- Russian
- Slovak
- Solvenian
- Spanish
- Swedish
- Tagalog
- Tamil
- Ukranian
Please see our FAQ if you’d like to see a new language supported for spelling and grammar.
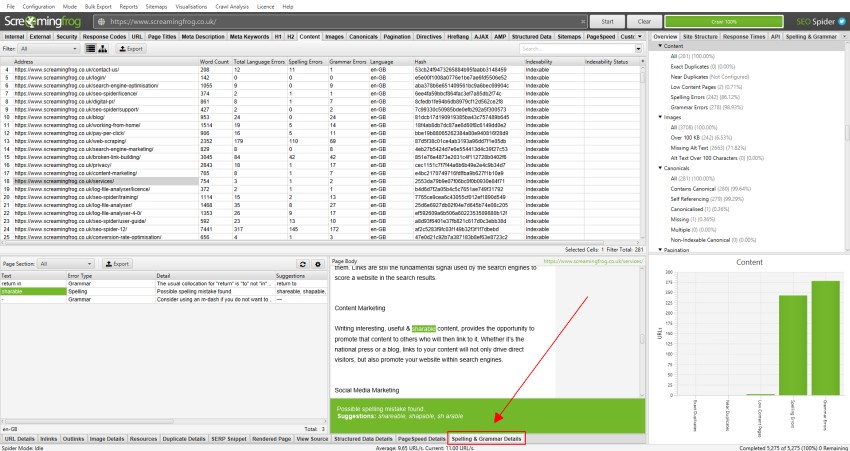
The lower window ‘Spelling & Grammar Details’ tab shows the error, type (spelling or grammar), detail, and provides a suggestion to correct the issue. The right hand-side of the details tab also show a visual of the text from the page and errors identified.
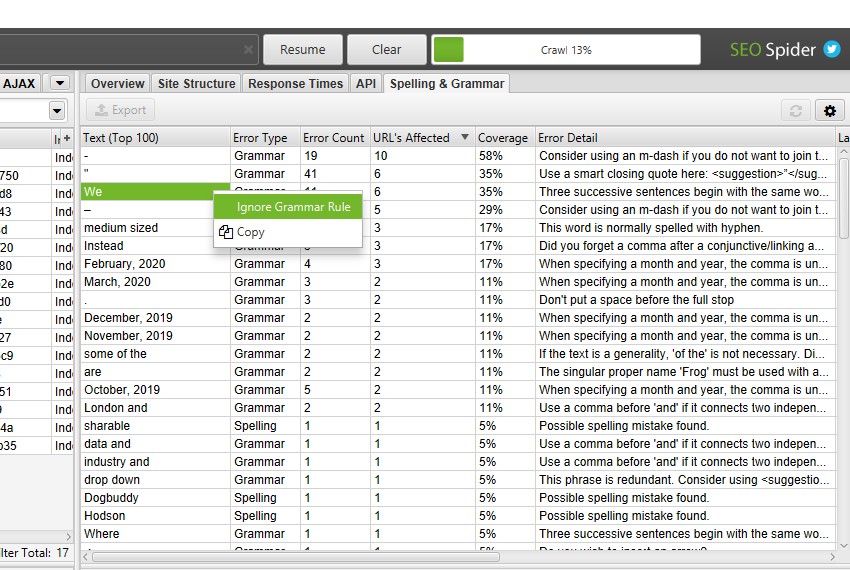
The right-hand pane ‘Spelling & Grammar’ tab displays the top 100 unique errors discovered and the number of URLs it affects. This can be helpful for finding errors across templates, and for building your dictionary or ignore list. You can right click and choose to ‘Ignore grammar rule’, ‘Ignore All’, or ‘Add to Dictionary’ where relevant.
Spelling & Grammar Configurations
The ‘grammar rules’ configuration allows you to enable and disable specific grammar rules used. You’re able to right click and ‘Ignore grammar rule’ on specific grammar issues identified during a crawl.
The ‘Ignore’ configuration allows you to ignore a list of words for a crawl. This is only for a specific crawl, and not remembered accross all crawls. You’re able to right click and ‘Ignore All’ on spelling errors discovered during a crawl.
The ‘dictionary’ allows you to ignore a list of words for every crawl performed. This list is stored against the relevant dictionary, and remembered for all crawls performed. Words can be added and removed at anytime for each dictionary. You’re able to right click and ‘Add to Dictionary’ on spelling errors identified in a crawl.
The content area used for spelling and grammar can be adjusted via ‘Configuration > Content > Area’. You’re able to add a list of HTML elements, classes or ID’s to exclude or include for the content analysed.
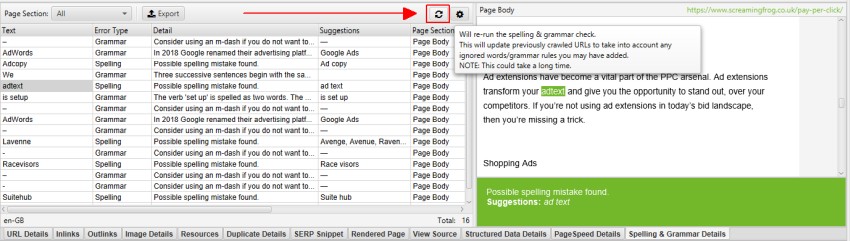
Grammar rules, ignore words, dictionary and content area settings used in the analysis can all be updated post crawl (or when paused) and the spelling and grammar checks can be re-run to refine the results, without the need for re-crawling.
Embeddings
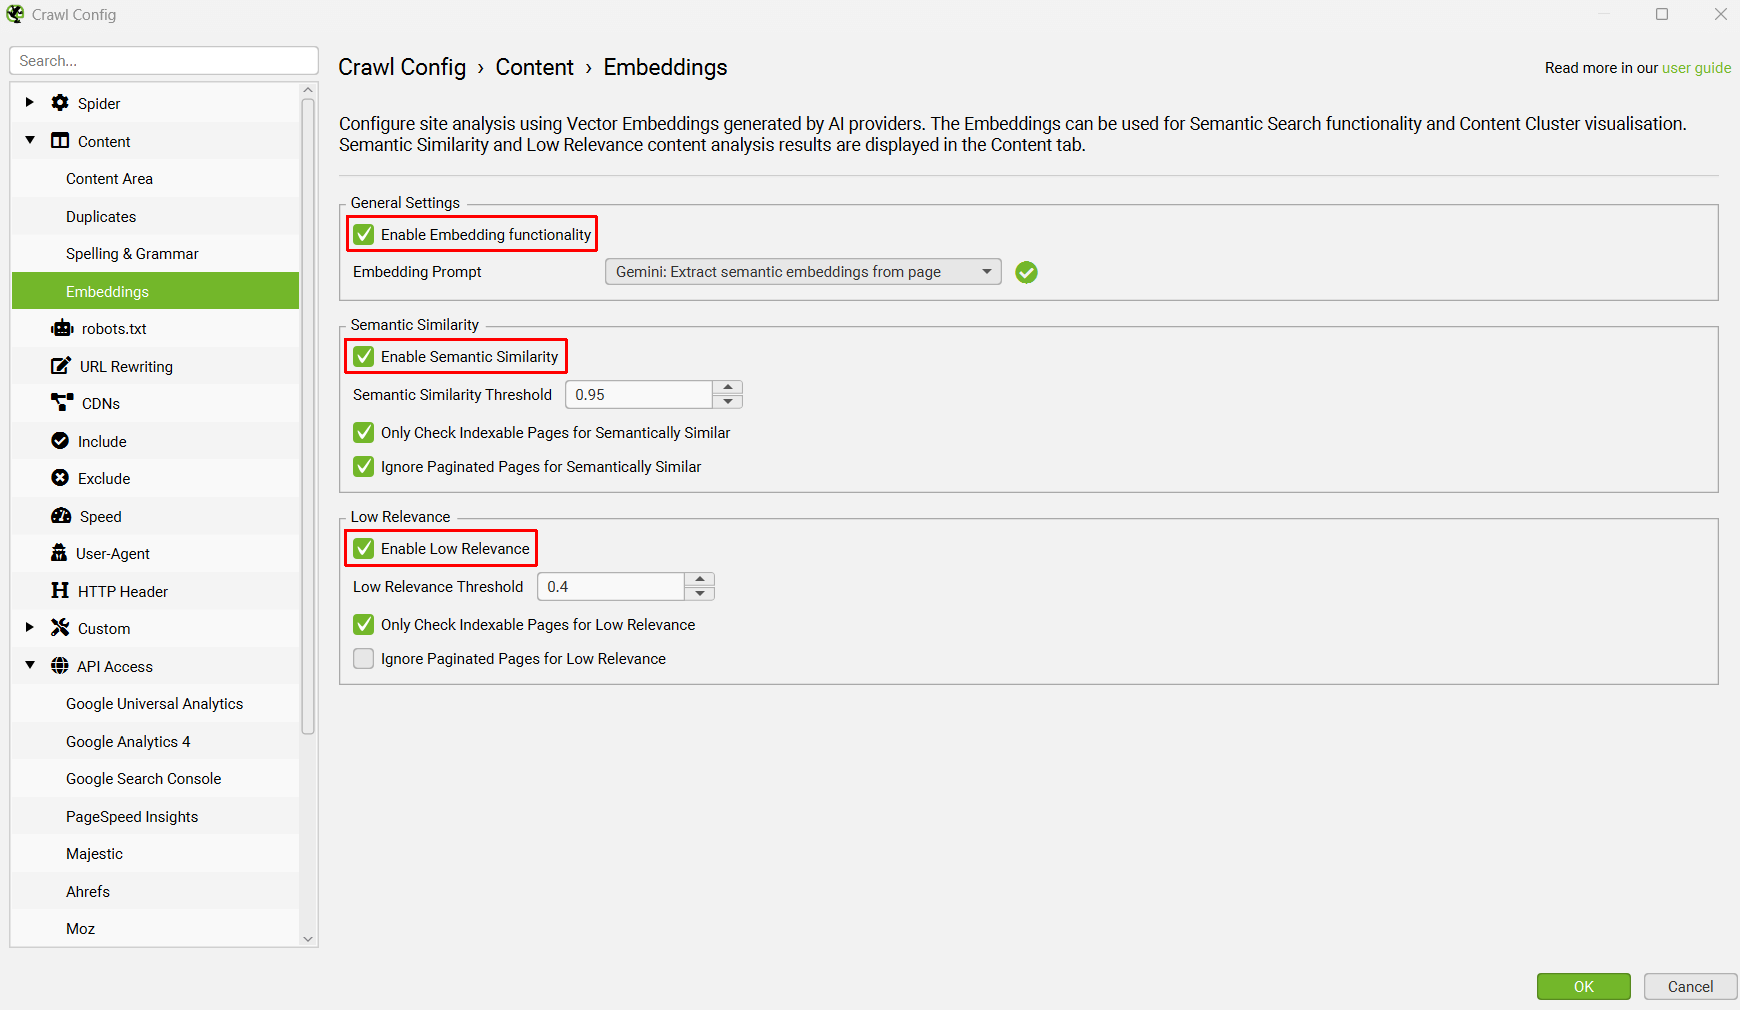
Configuration > Content > Embeddings
The SEO Spider is able to utilise vector embeddings generated by AI providers to identify semantically similar pages and low relevance content, as well as semantic search and the content cluster diagram visualisation.
To enable this functionality, first navigate to ‘Config > API Access > AI’ and select an AI provider to use to generate embeddings. Select from OpenAI, Gemini & Ollama. Ensure you have set up an account and have an API key as outlined in the guides above.
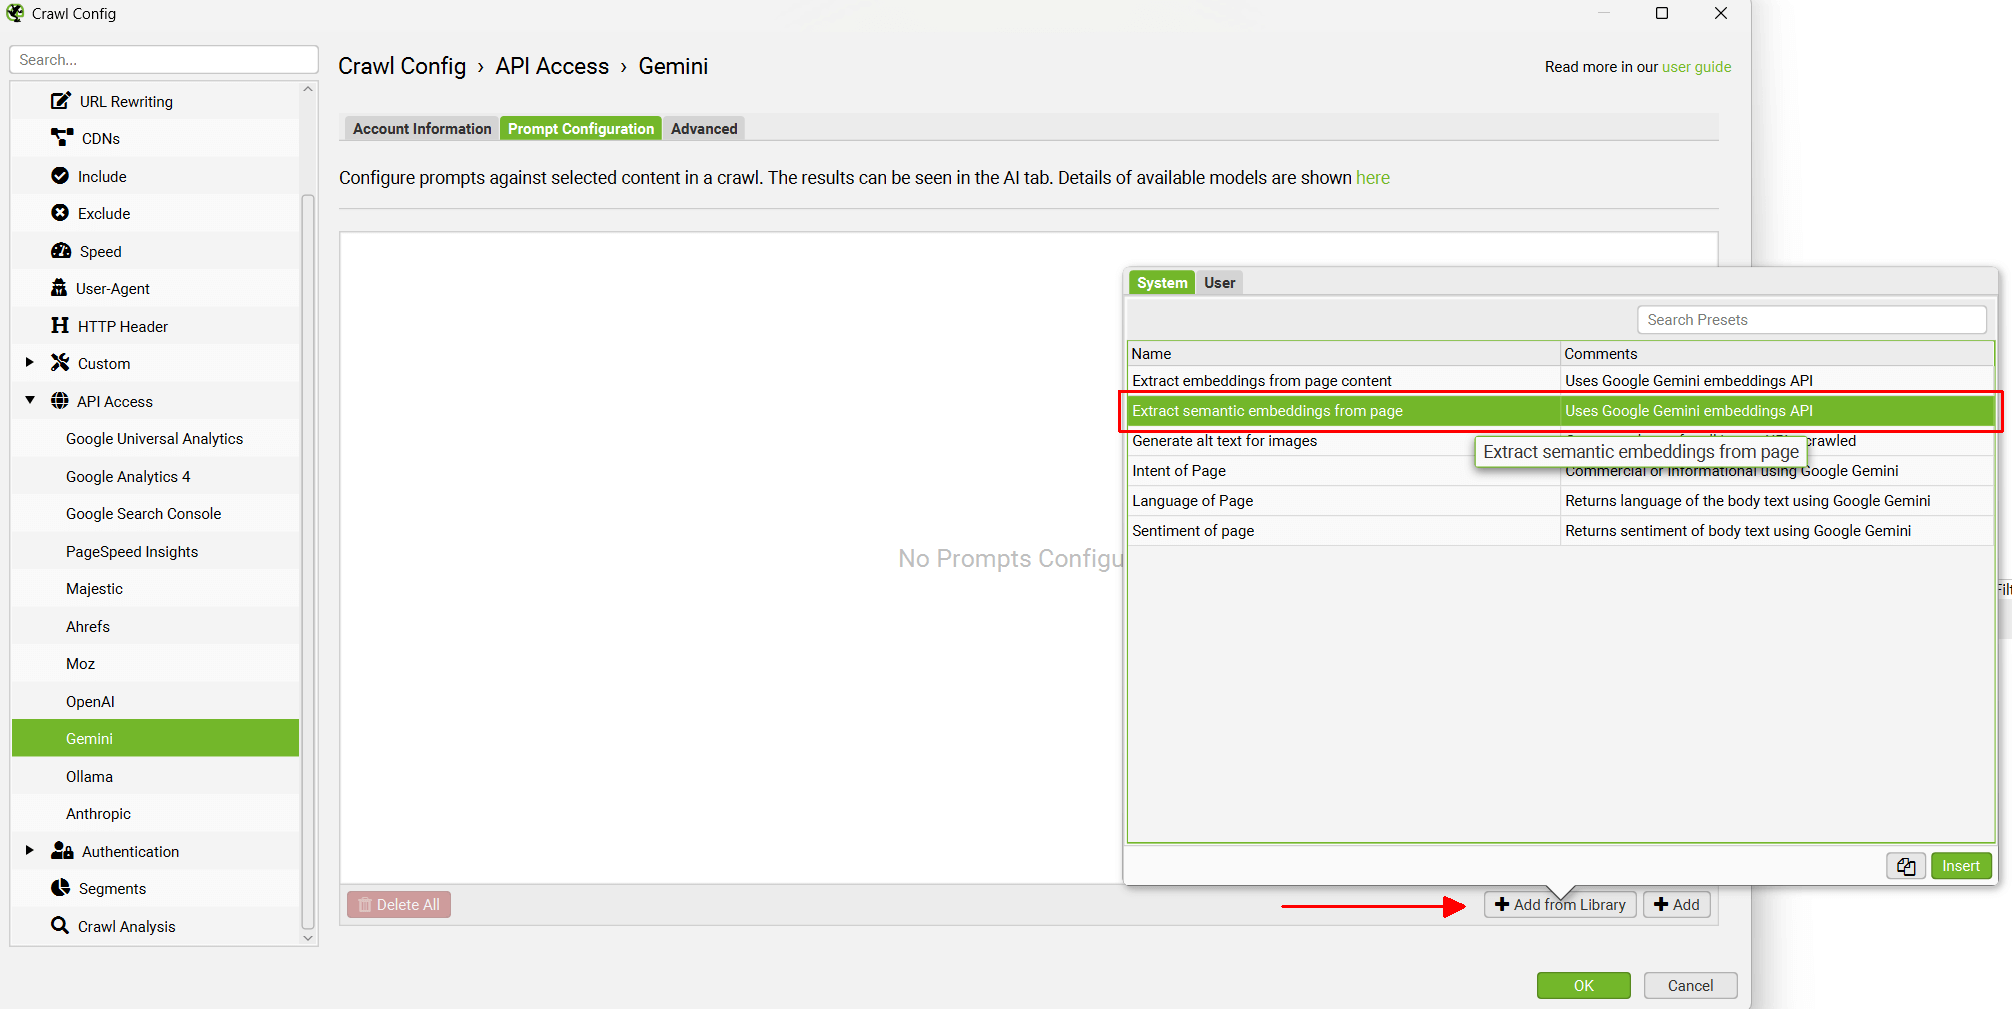
When you have selected your AI provider, navigate to the ‘Prompt Configuration’, select ‘Add from Library’ and choose the relevant preset for embeddings.
Using Gemini as an example, this would mean selecting ‘Extract Semantic Embeddings from Page’, which will be added as a prompt.
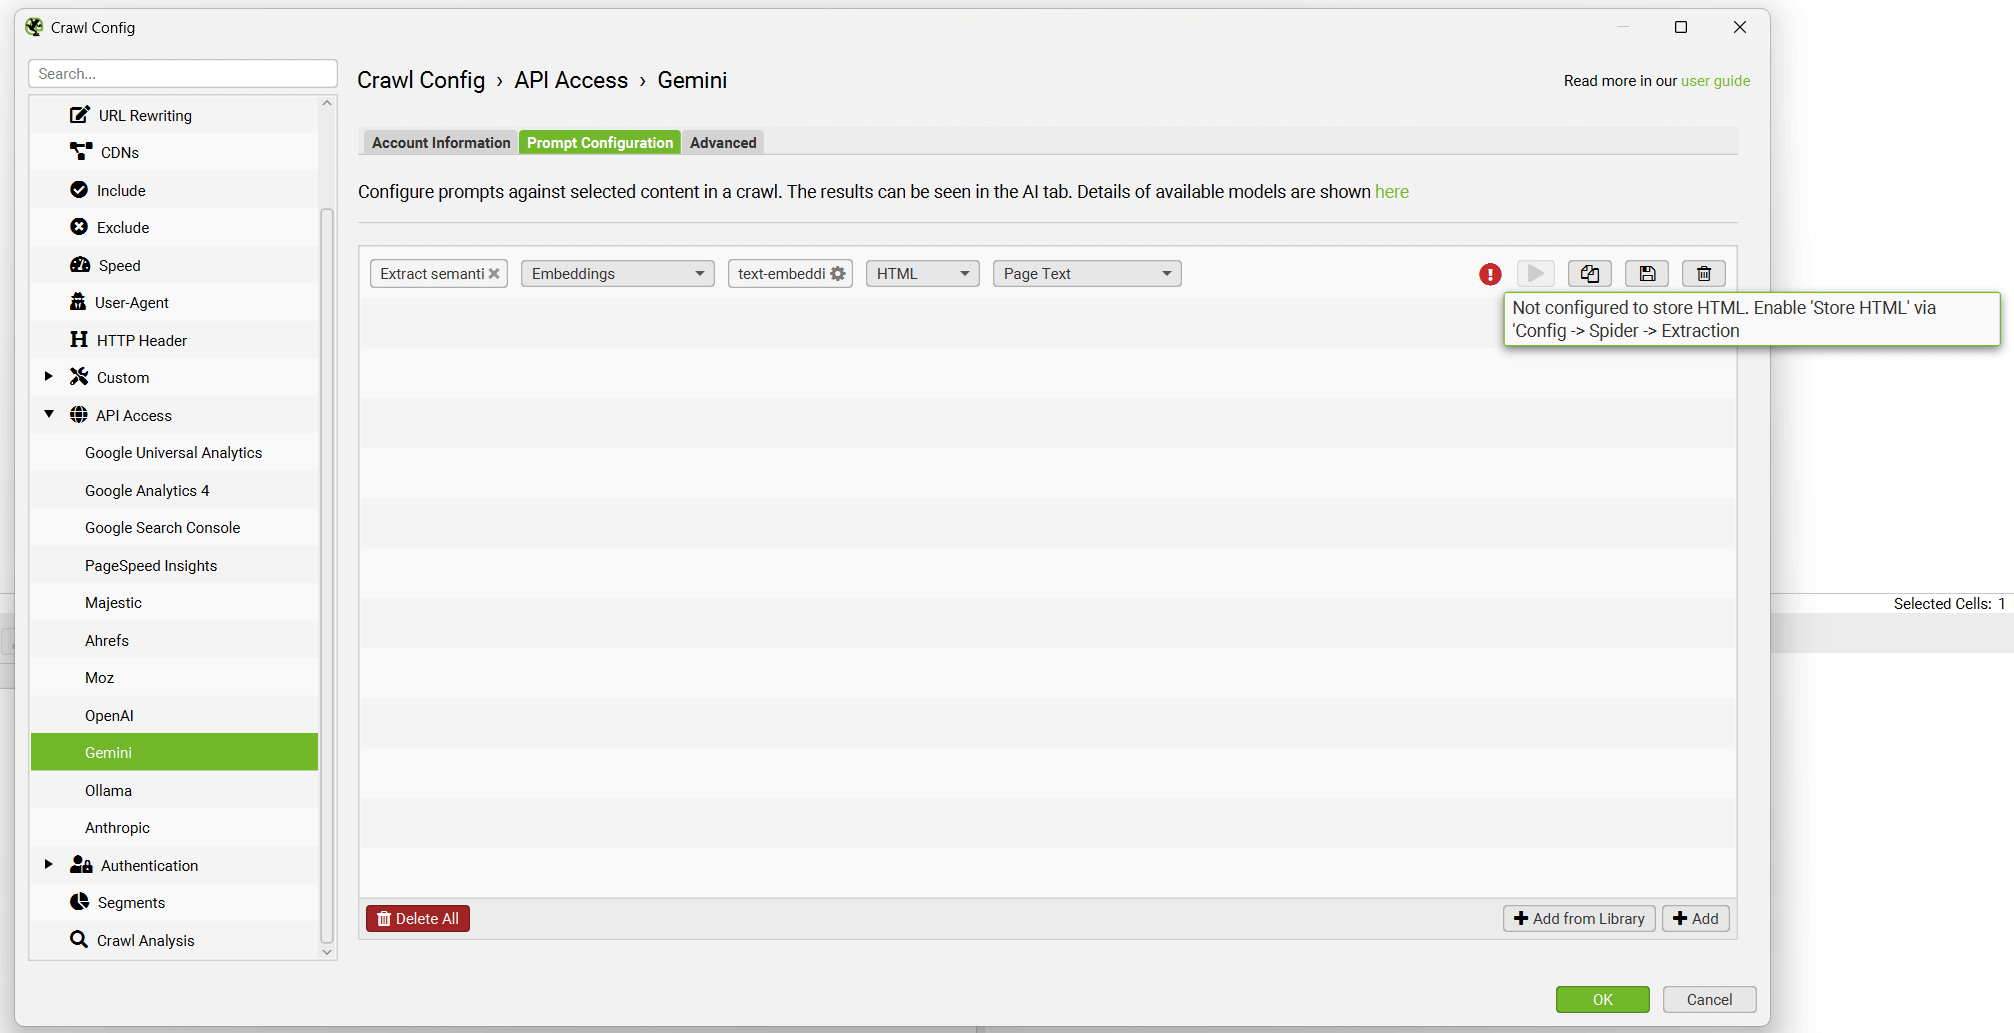
The prompt will be displayed, with an error message explaining that ‘Store HTML’ must also be configured.
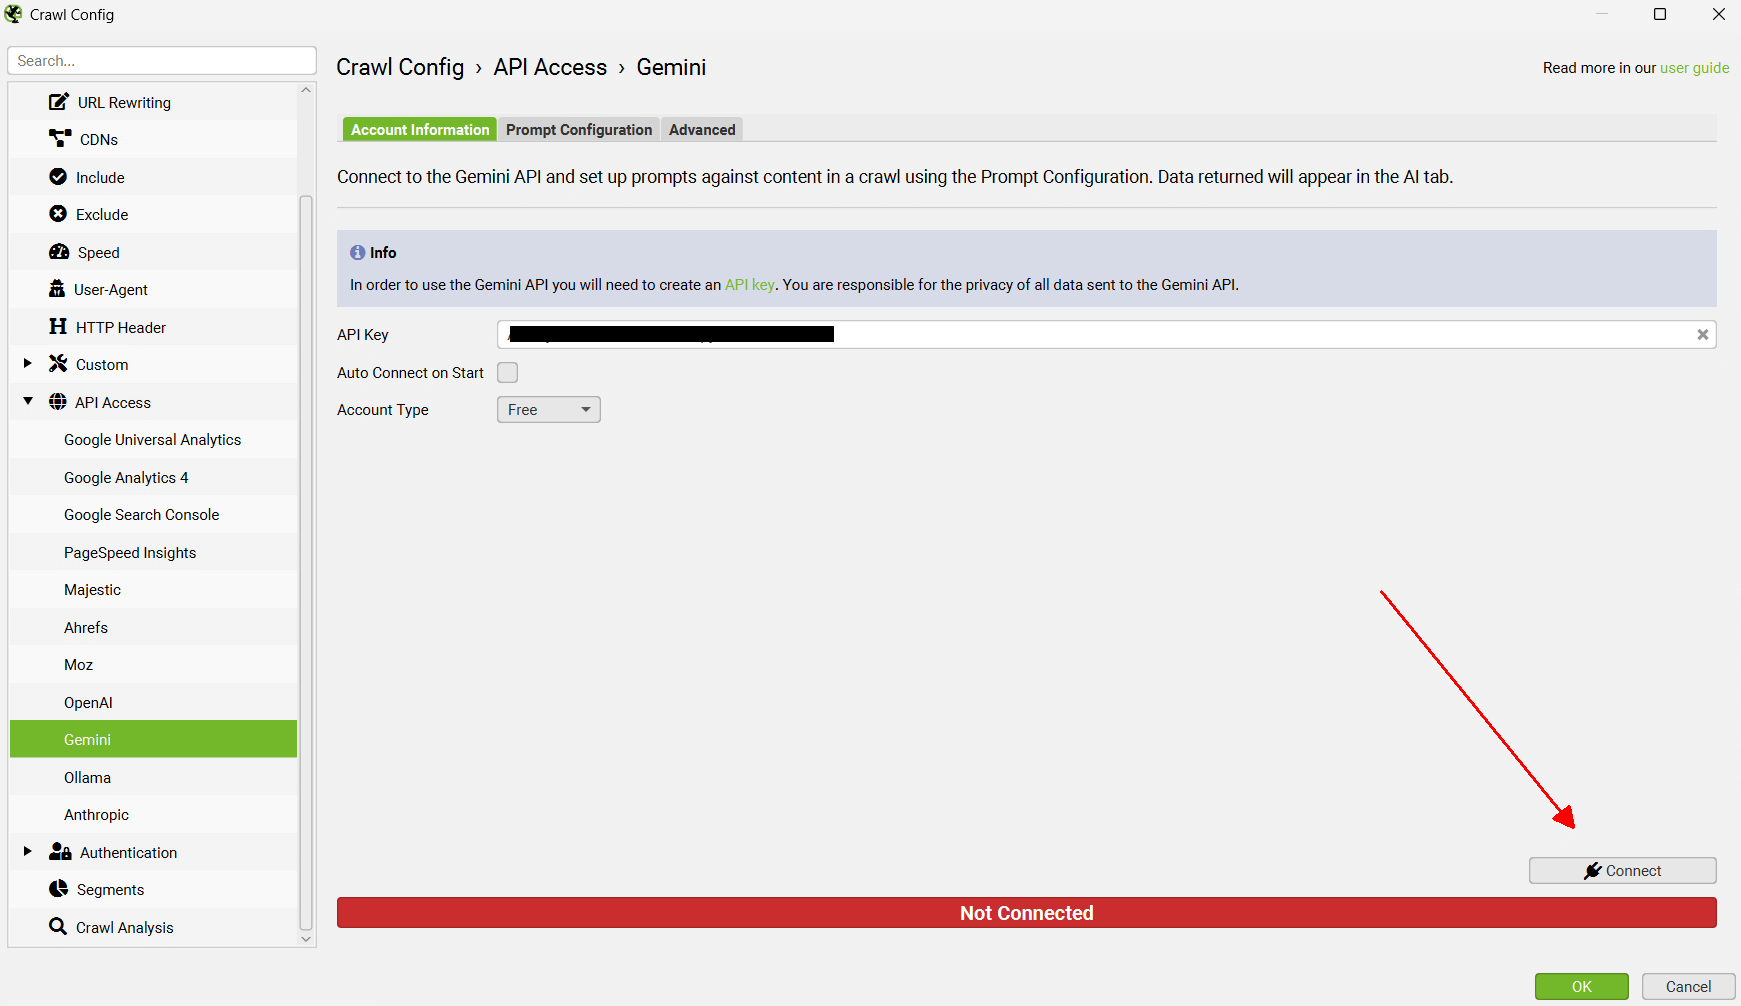
Before configuring the Store HTML option, remember to ‘Connect’ to the API under ‘Account Information’.
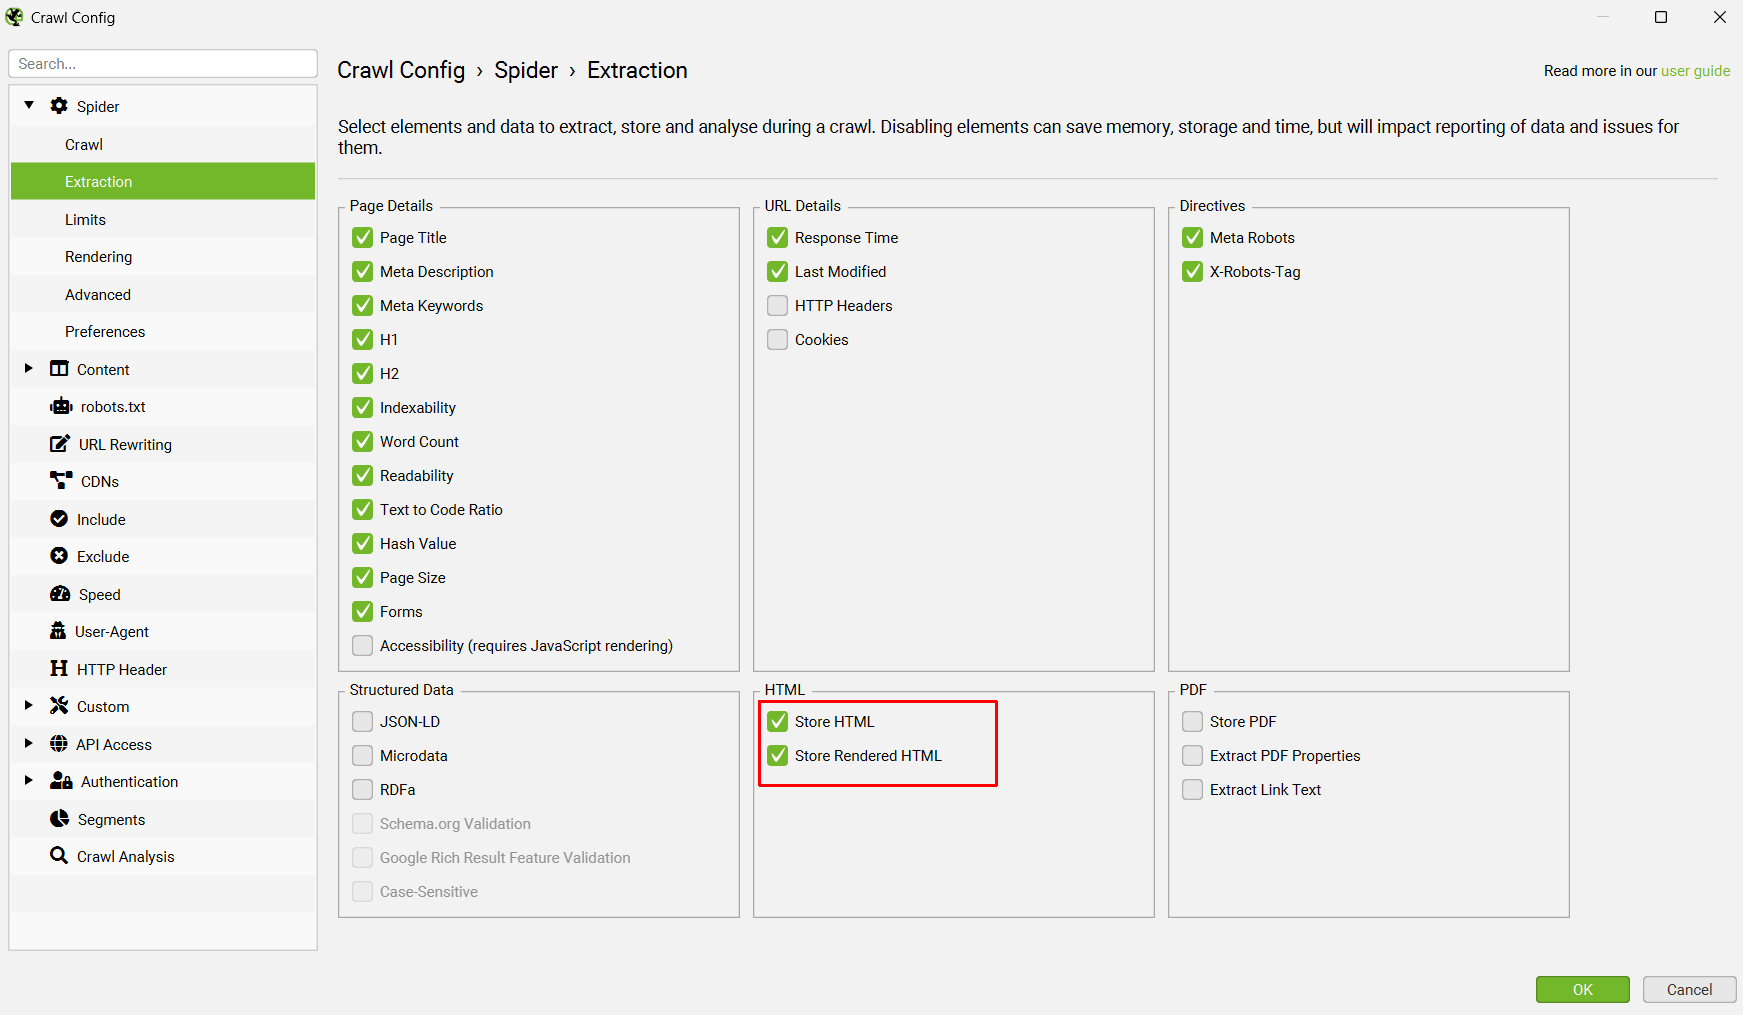
Now go to ‘Config > Spider > Extraction’ and enable ‘Store HTML’ and ‘Store Rendered HTML’, so page text is stored to be used for vector embeddings.
When this is set up, re-visit the Embeddings configuration via ‘Config > Content > Embeddings’.
Click ‘Enable Embedding functionality’ and the prompt set up should automatically be displayed in the embedding prompt dropdown. Enable ‘Semantic Similarity’ and ‘Low Relevance’ to populate the relevant columns and filters in the Content tab.
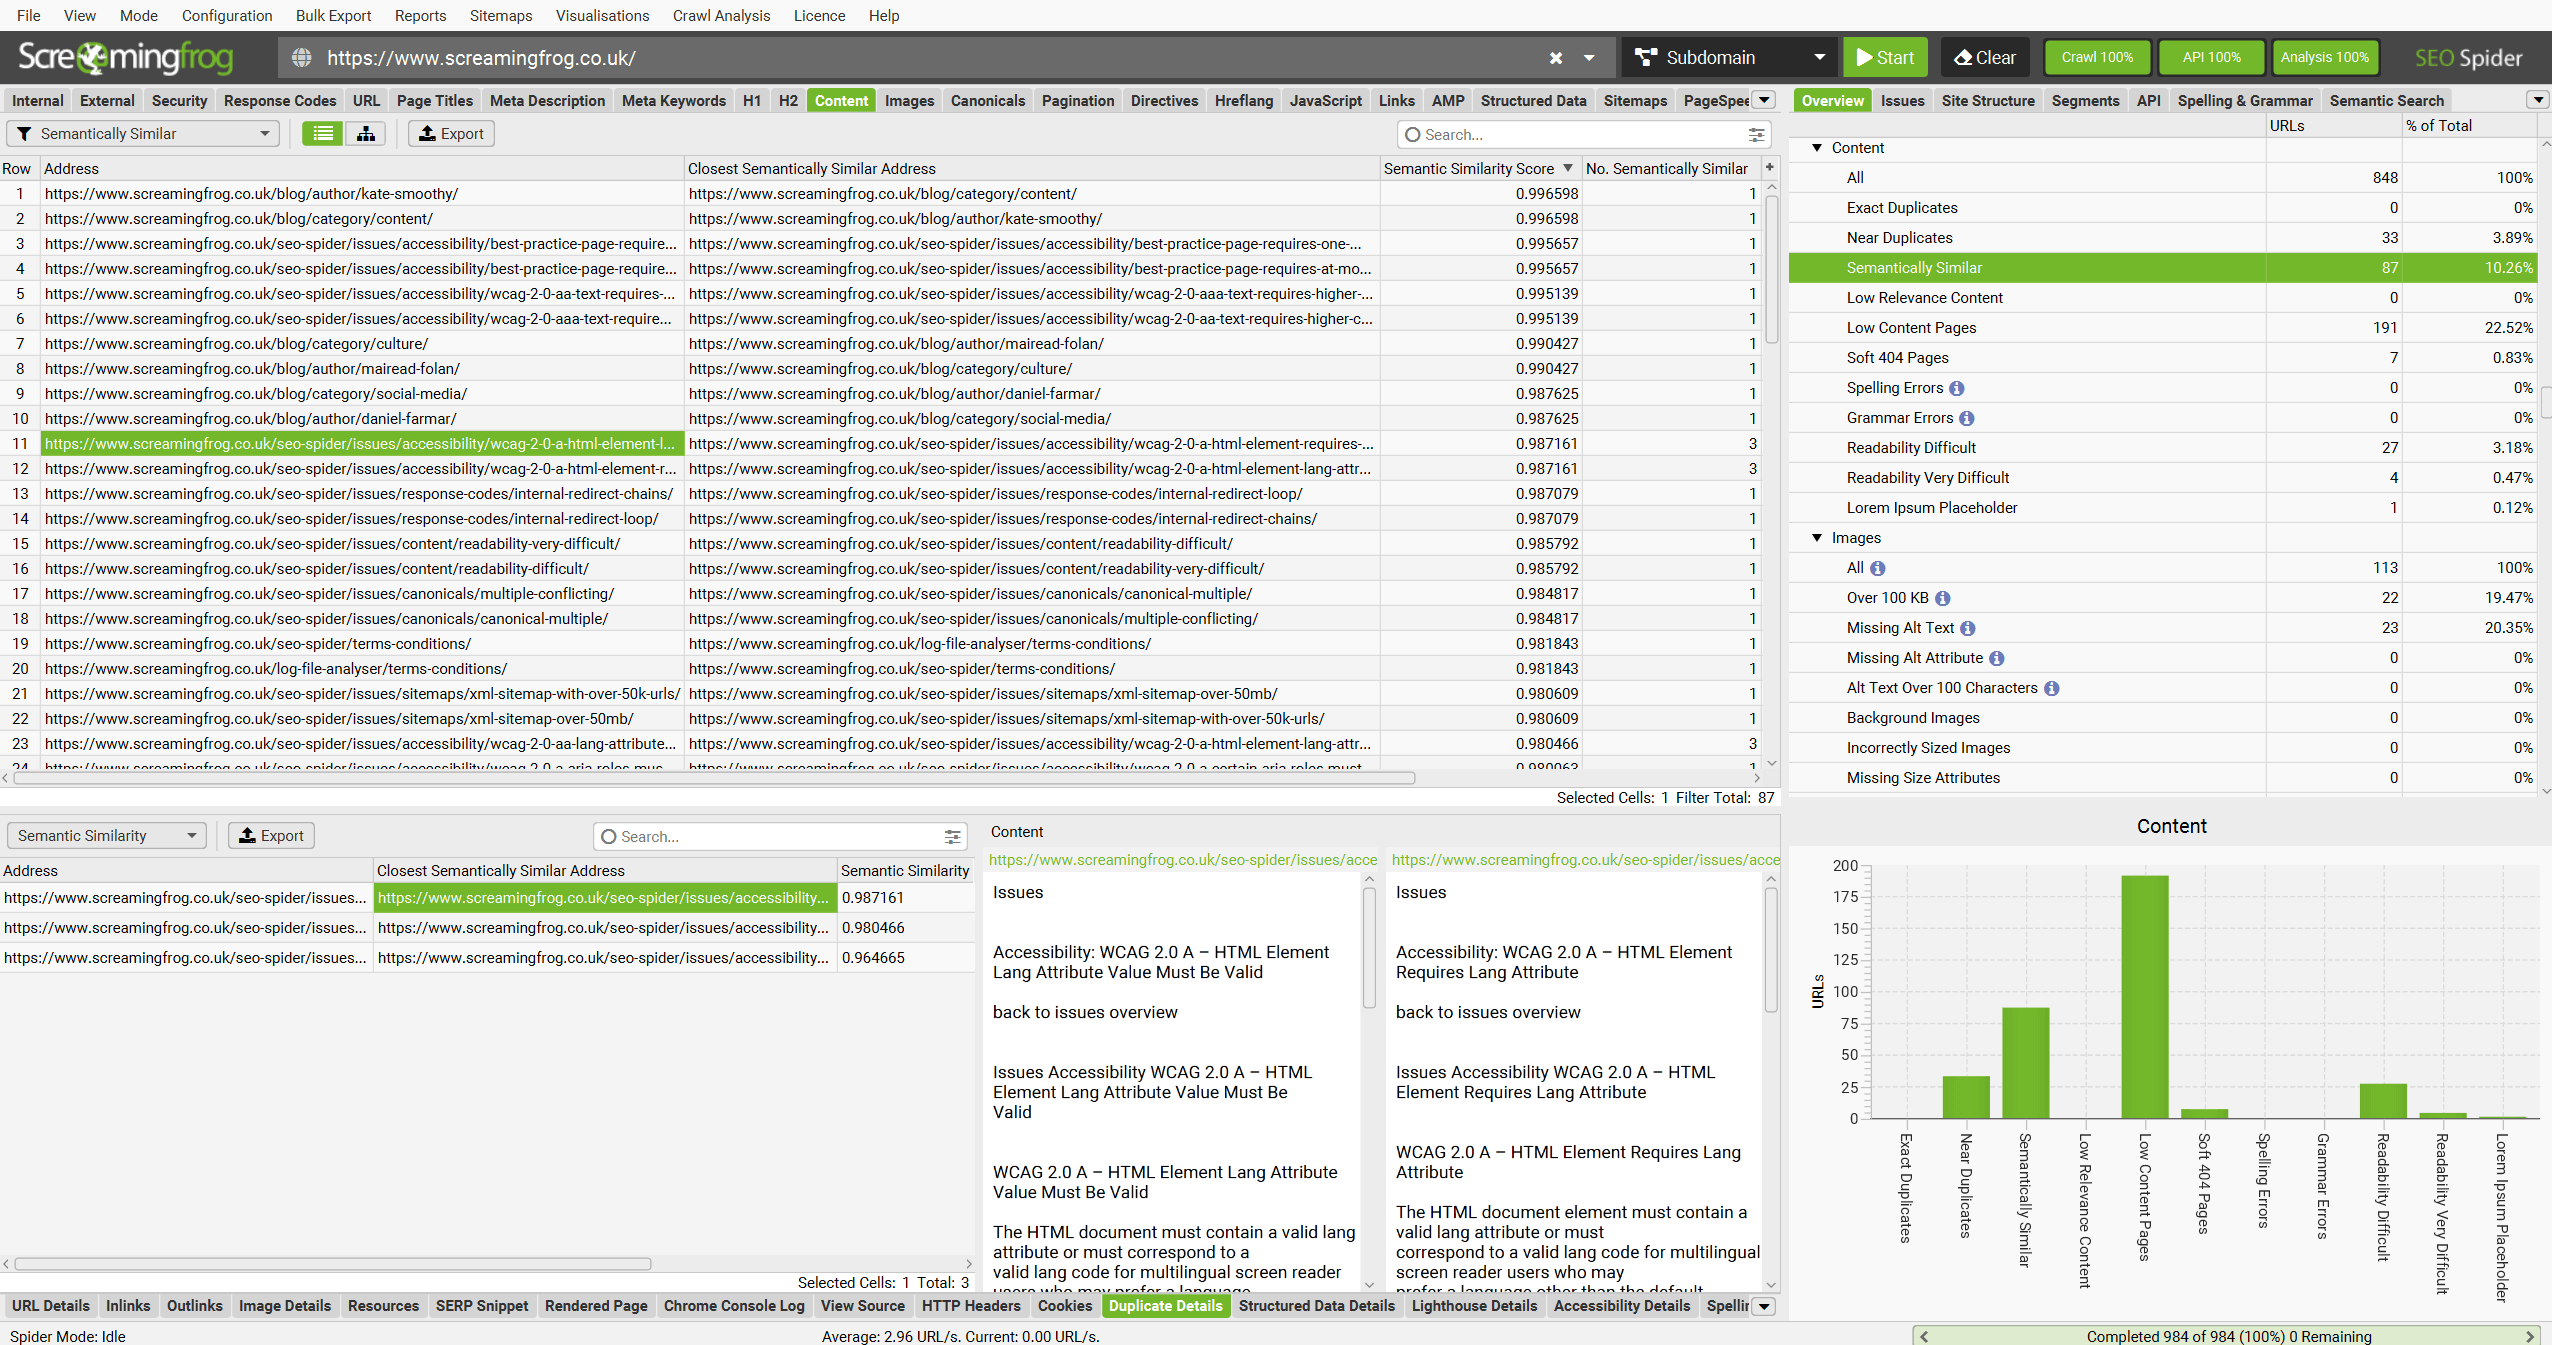
When the crawl has completed, run crawl analysis, and then the ‘Semantically Similar’ and ‘Low Relevance Content’ filters will be populated in the Content tab.
Please see our tutorial on How to Identify Semantically Similar Pages & Outliers.
Embeddings will also be utilised for the right hand ‘Semantic Search’ and the ‘Content Cluster Diagram’.
Robots.txt
Configuration > Robots.txt
By default the SEO Spider will obey robots.txt protocol and is set to ‘Respect robots.txt’. This means the SEO Spider will not be able to crawl a site if its disallowed via robots.txt.
This setting can be adjusted to ‘Ignore robots.txt’, or ‘Ignore robots.xt but report status’.
Ignore robots.txt
The ‘Ignore robots.txt’ option allows you to ignore this protocol, which is down to the responsibility of the user. This option actually means the SEO Spider will not even download the robots.txt file. So it also means all robots directives will be completely ignored.
Ignore robots.xt but report status
The ‘Ignore robots.txt, but report status’ configuration means the robots.txt of websites is downloaded and reported in the SEO Spider. However, the directives within it are ignored. This allows you to crawl the website, but still see which pages should be blocked from crawling.
Show Internal URLs Blocked By Robots.txt
By default internal URLs blocked by robots.txt will be shown in the ‘Internal’ tab with Status Code of ‘0’ and Status ‘Blocked by Robots.txt’. To hide these URLs in the interface deselect this option. This option is not available if ‘Ignore robots.txt’ is checked.
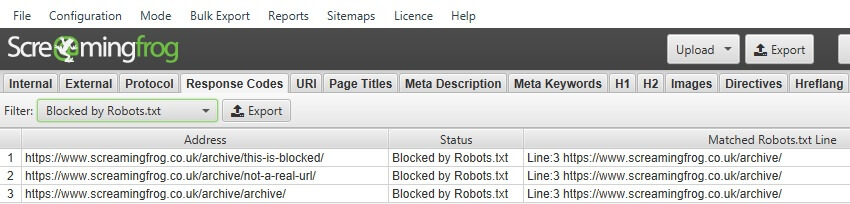
You can also view internal URLs blocked by robots.txt under the ‘Response Codes’ tab and ‘Blocked by Robots.txt’ filter. This will also show the robots.txt directive (‘matched robots.txt line’ column) of the disallow against each URL that is blocked.
Show External URLs Blocked By Robots.txt
By default external URLs blocked by robots.txt are hidden. To display these in the External tab with Status Code ‘0’ and Status ‘Blocked by Robots.txt’ check this option. This option is not available if ‘Ignore robots.txt’ is checked.
You can also view external URLs blocked by robots.txt under the ‘Response Codes’ tab and ‘Blocked by Robots.txt’ filter. This will also show robots.txt directive (‘matched robots.txt line column’) of the disallow against each URL that is blocked.
Custom Robots
You can download, edit and test a site’s robots.txt using the custom robots.txt feature which will override the live version on the site for the crawl. It will not update the live robots.txt on the site.
This feature allows you to add multiple robots.txt at subdomain level, test directives in the SEO Spider and view URLs which are blocked or allowed. The custom robots.txt uses the selected user-agent in the configuration.

During a crawl you can filter blocked URLs based upon the custom robots.txt (‘Response Codes > Blocked by robots.txt’) and see the matching robots.txt directive line.
Please read our featured user guide using the SEO Spider as a robots.txt tester.
Please note – As mentioned above, the changes you make to the robots.txt within the SEO Spider, do not impact your live robots.txt uploaded to your server. You can however copy and paste these into the live version manually to update your live directives.
URL rewriting
Configuration > URL Rewriting
The URL rewriting feature allows you to rewrite URLs on the fly. For the majority of cases, the ‘remove parameters’ and common options (under ‘options’) will suffice. However, we do also offer an advanced regex replace feature which provides further control.
URL rewriting is only applied to URLs discovered in the course of crawling a website, not URLs that are entered as the start of a crawl in ‘Spider’ mode, or as part of a set of URLs in ‘List’ mode.
Remove Parameters
This feature allows you to automatically remove parameters in URLs. This is extremely useful for websites with session IDs, Google Analytics tracking or lots of parameters which you wish to remove. For example –
If the website has session IDs which make the URLs appear something like this ‘example.com/?sid=random-string-of-characters’. To remove the session ID, you just need to add ‘sid’ (without the apostrophes) within the ‘parameters’ field in the ‘remove parameters’ tab.
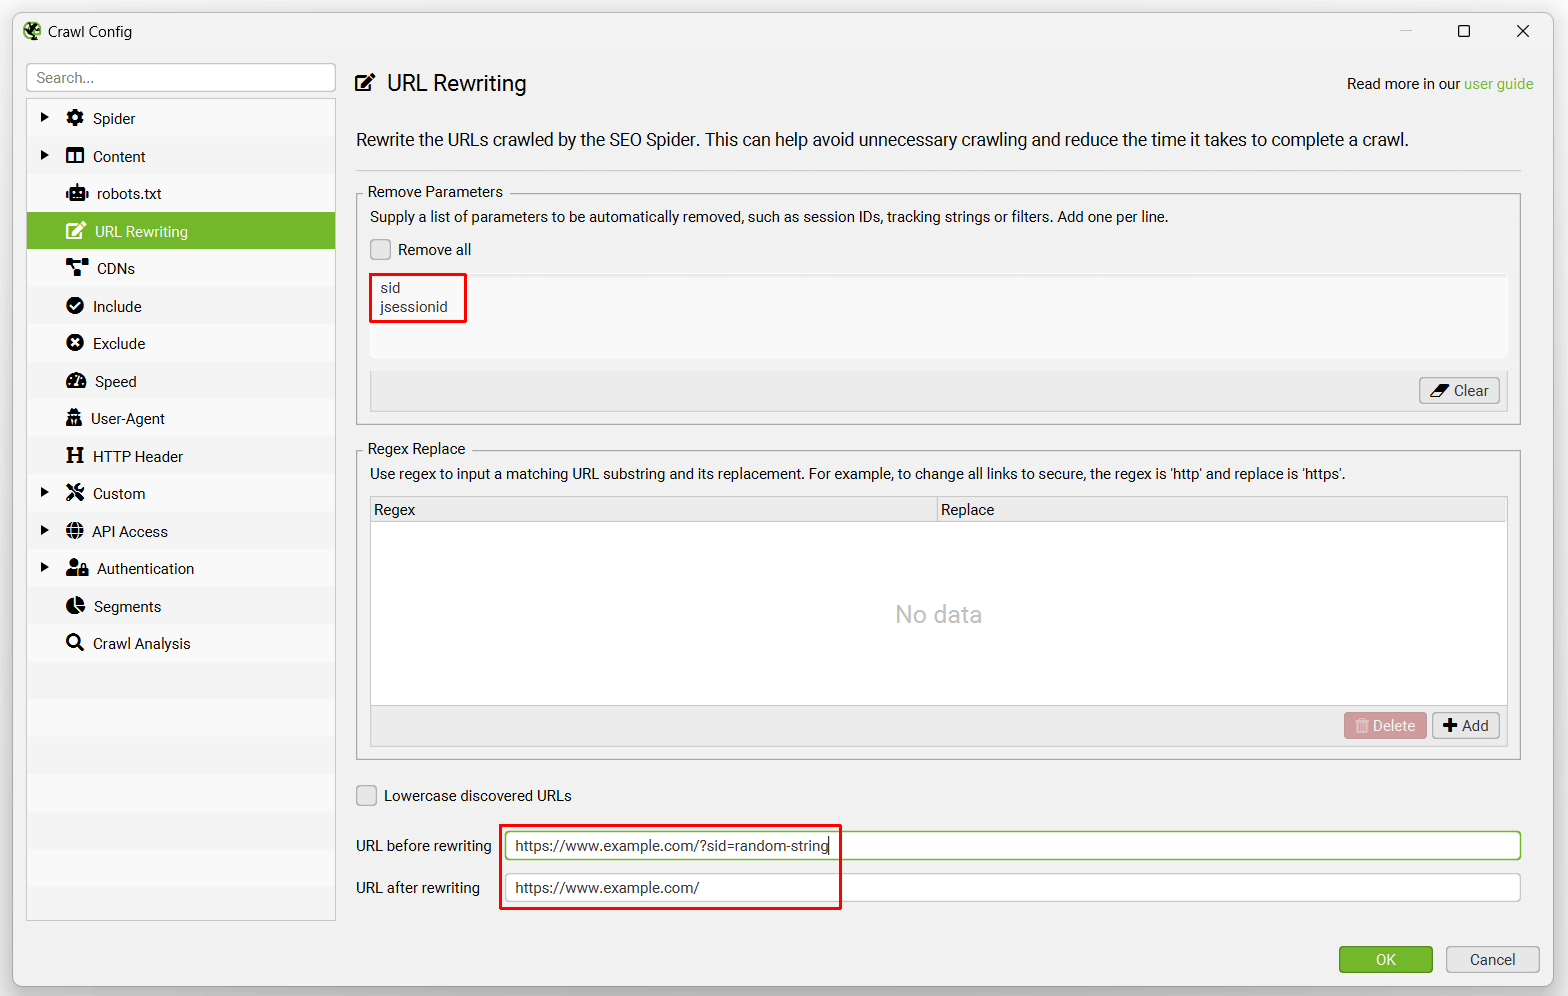
The SEO Spider will then automatically strip the session ID from the URL. You can test to see how a URL will be rewritten by our SEO Spider at the bottom of the config.
This feature can also be used for removing Google Analytics tracking parameters. For example, you can just include the following under ‘remove parameters’ –
utm_source
utm_medium
utm_campaign
This will strip the standard tracking parameters from URLs.
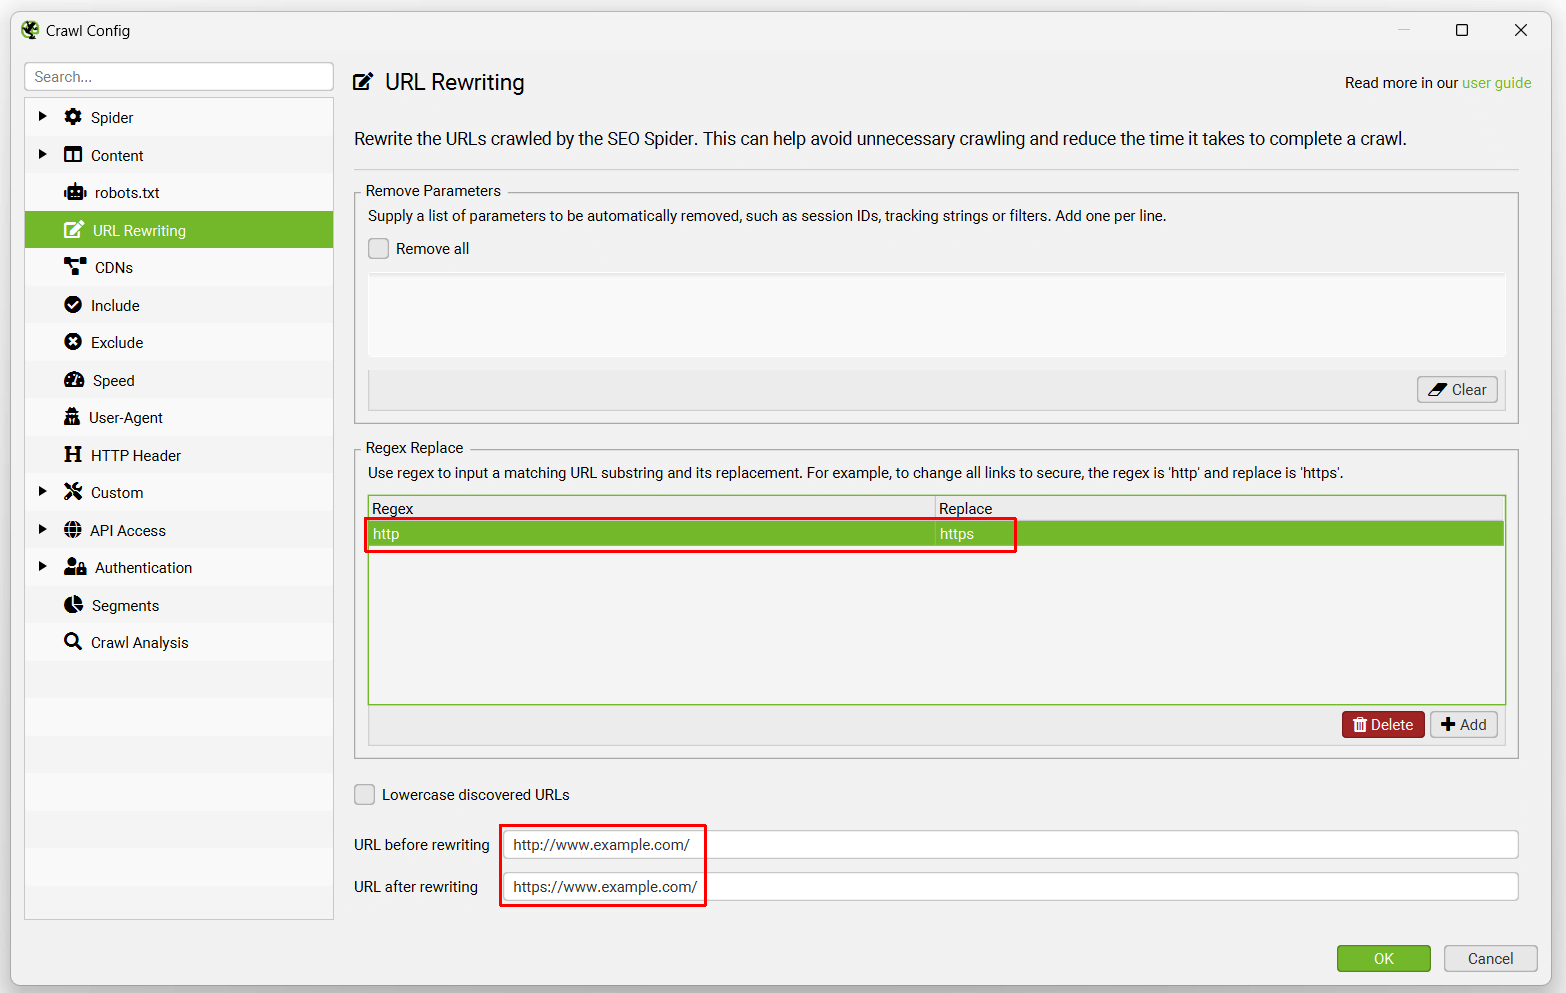
Regex Replace
This advanced feature runs against each URL found during a crawl or in list mode. It replaces each substring of a URL that matches the regex with the given replace string.
Examples are:
1) Changing all links from HTTP to HTTPS
Regex: http
Replace: https
2) Changing all links to example.com to be example.co.uk
Regex: .com
Replace: .co.uk
3) Making all links containing page=number to a fixed number, eg
www.example.com/page.php?page=1
www.example.com/page.php?page=2
www.example.com/page.php?page=3
www.example.com/page.php?page=4
To make all these go to www.example.com/page.php?page=1
Regex: page=\d+
Replace: page=1
4) Removing the www. domain from any URL by using an empty ‘Replace’. If you want to remove a query string parameter, please use the “Remove Parameters” feature – Regex is not the correct tool for this job!
Regex: www.
Replace:
5) Stripping all parameters
Regex: \?.*
Replace:
6) Changing links for only subdomains of example.com from HTTP to HTTPS
Regex: http://(.*example.com)
Replace: https://$1
7) Removing the anything after the hash value in JavaScript rendering mode
Regex: #.*
Replace:
8) Adding parameters to URLs
Regex: $
Replace: ?parameter=value
This will add ‘?parameter=value’ to the end of any URL encountered
In situations where the site already has parameters this requires more complicated expressions for the parameter to be added correctly:
Regex: (.*?\?.*)
Replace: $1¶meter=value
Regex: (^((?!\?).)*$)
Replace: $1?parameter=value
These must be entered in the order above or this will not work when adding the new parameter to existing query strings.
Options
We will include common options under this section. The ‘lowercase discovered URLs’ option does exactly that, it converts all URLs crawled into lowercase which can be useful for websites with case sensitivity issues in URLs.
CDNs
Configuration > CDNs
The CDNs feature allows you to enter a list of CDNs to be treated as ‘Internal’ during the crawl.
You’re able to supply a list of domains to be treated as internal. You can also supply a subfolder with the domain, for the subfolder (and contents within) to be treated as internal.
‘Internal’ links are then included in the ‘Internal’ tab, rather than ‘external’ and more details are extracted from them.
Include
Configuration > Include
This feature allows you to control which URL path the SEO Spider will crawl using partial regex matching. It narrows the default search by only crawling the URLs that match the regex which is particularly useful for larger sites, or sites with less intuitive URL structures. Matching is performed on the encoded version of the URL.
The page that you start the crawl from must have an outbound link which matches the regex for this feature to work, or it just won’t crawl onwards. If there is not a URL which matches the regex from the start page, the SEO Spider will not crawl anything!
- As an example, if you wanted to crawl pages from https://www.screamingfrog.co.uk which have ‘search’ in the URL string you would simply include the regex: search in the ‘include’ feature. This would find the /search-engine-marketing/ and /search-engine-optimisation/ pages as they both have ‘search’ in them.
Check out our video guide on the include feature.
Troubleshooting
- Matching is performed on the URL encoded address, you can see what this is in the URL Info tab in the lower window pane or respective column in the Internal tab.
- The regular expression must match the whole URL, not just part of it.
- If you experience just a single URL being crawled and then the crawl stopping, check your outbound links from that page. If you crawl http://www.example.com/ with an include of ‘/news/’ and only 1 URL is crawled, then it will be because http://www.example.com/ does not have any links to the news section of the site.
Exclude
Configuration > Exclude
The exclude configuration allows you to exclude URLs from a crawl by using partial regex matching. A URL that matches an exclude is not crawled at all (it’s not just ‘hidden’ in the interface). This will mean other URLs that do not match the exclude, but can only be reached from an excluded page will also not be found in the crawl.
The exclude list is applied to new URLs that are discovered during the crawl. This exclude list does not get applied to the initial URL(s) supplied in crawl or list mode.
Changing the exclude list during a crawl will affect newly discovered URLs and it will applied retrospectively to the list of pending URLs, but not update those already crawled.
Matching is performed on the URL encoded version of the URL. You can see the encoded version of a URL by selecting it in the main window then in the lower window pane in the details tab looking at the ‘URL Details’ tab, and the value second row labelled “URL Encoded Address”.
Here are some common examples –
- To exclude a specific URL or page the syntax is:
http://www.example.com/do-not-crawl-this-page.html - To exclude a sub directory or folder the syntax is:
http://www.example.com/do-not-crawl-this-folder/ - To exclude everything after brand where there can sometimes be other folders before:
http://www.example.com/.*/brand.* - If you wish to exclude URLs with a certain parameter such as ‘?price’ contained in a variety of different directories you can simply use (Note the ? is a special character in regex and must be escaped with a backslash):
\?price - To exclude anything with a question mark ‘?’(Note the ? is a special character in regex and must be escaped with a backslash):
\? - If you wanted to exclude all files ending jpg, the regex would be:
jpg$ - If you wanted to exclude all URLs with 1 or more digits in a folder such as ‘/1/’ or ‘/999/’:
/\d+/$ - If you wanted to exclude all URLs ending with a random 6 digit number after a hyphen such as ‘-402001’, the regex would be:
-[0-9]{6}$ - If you wanted to exclude any URL with ‘exclude’ within them, the regex would be:
exclude - Secure (https) pages would be:
https - Excluding all pages on http://www.domain.com would be:
http://www.domain.com/ - If you want to exclude a URL and it doesn’t seem to be working, its probably because it contains special regex characters such as ?. Rather trying to locate and escape these individually, you can escape the whole line starting with \Q and ending with \E as follow:
\Qhttp://www.example.com/test.php?product=special\E - Remember to use the encoded version of the URL. So if you wanted to exclude any URLs with a pipe |, it would be:
%7C - If you’re extracting cookies, which removes the auto exclude for Google Analytics tracking tags, you could stop them from firing by including:
google-analytics.com
Check out our video guide on the exclude feature.
Speed
Configuration > Speed
The speed configuration allows you to control the speed of the SEO Spider, either by number of concurrent threads, or by URLs requested per second.
When reducing speed, it’s always easier to control by the ‘Max URI/s’ option, which is the maximum number of URL requests per second. For example, the screenshot below would mean crawling at 1 URL per second –
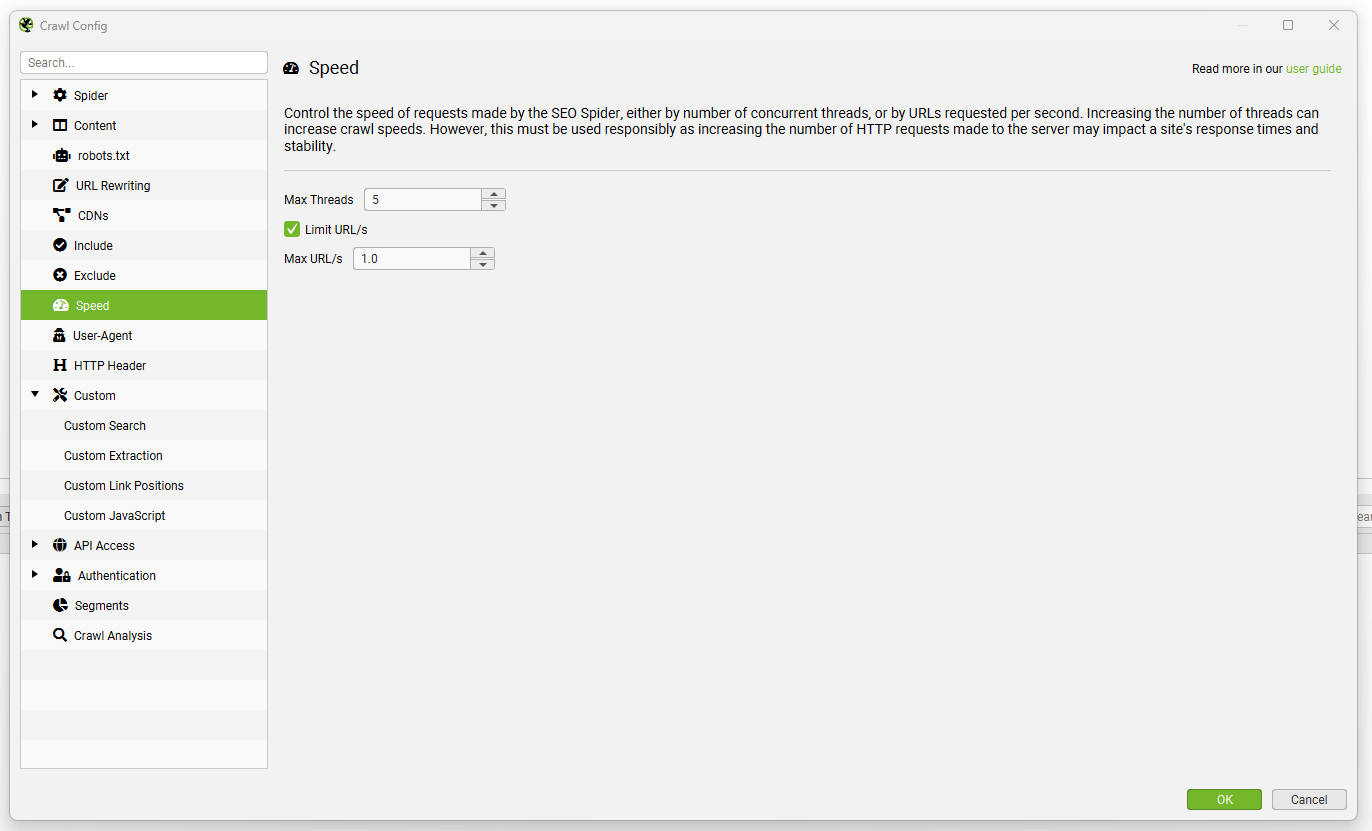
The ‘Max Threads’ option can simply be left alone when you throttle speed via URLs per second.
Increasing the number of threads allows you to significantly increase the speed of the SEO Spider. By default the SEO Spider crawls at 5 threads, to not overload servers.
Please use the threads configuration responsibly, as setting the number of threads high to increase the speed of the crawl will increase the number of HTTP requests made to the server and can impact a site’s response times. In very extreme cases, you could overload a server and crash it.
We recommend approving a crawl rate and time with the webmaster first, monitoring response times and adjusting the default speed if there are any issues.
User agent
Configuration > User-Agent
The user-agent configuration allows you to switch the user-agent of the HTTP requests made by the SEO Spider and which robots.txt directives are followed. By default the SEO Spider makes requests using its own ‘Screaming Frog SEO Spider user-agent string.
However, it has inbuilt preset user-agents for Googlebot, Bingbot, various browsers and more. This allows you to switch between them quickly when required. This feature also has a custom user-agent settings which allows you to specify your own user-agent:
- HTTP Request User-Agent: sets the user-agent field of the HTTP request header.
- Robots User-Agent: defines the user-agent used for following robots.txt directives.
Details on how the SEO Spider handles robots.txt can be found here.
HTTP header
Configuration > HTTP Header
The HTTP Header configuration allows you to supply completely custom header requests during a crawl.
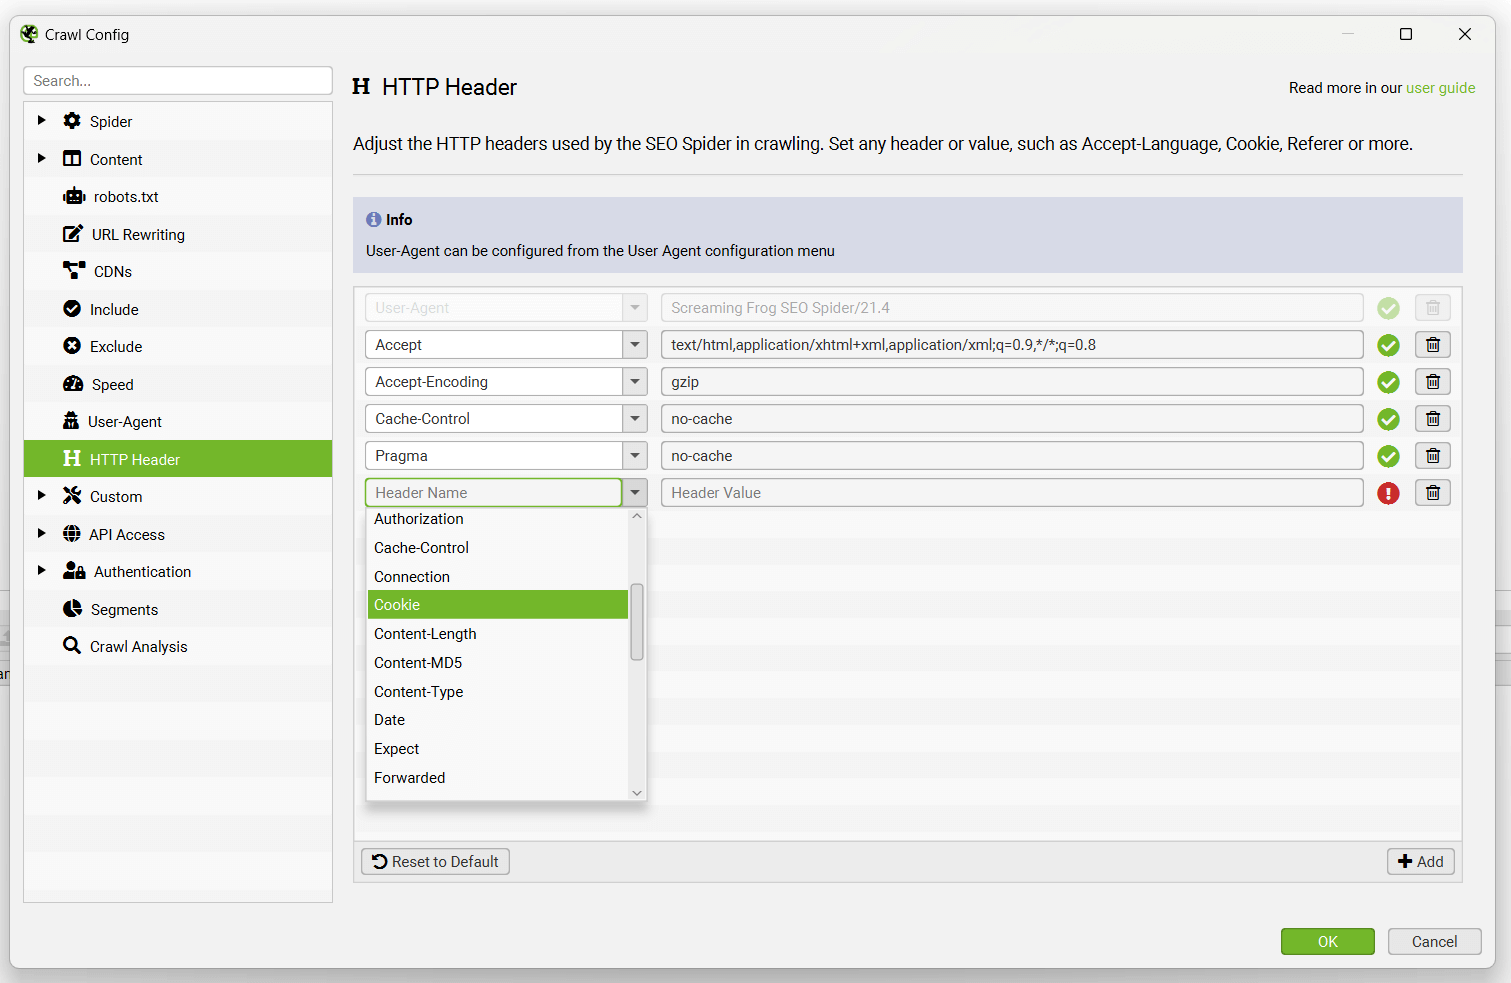
This means you’re able to set anything from accept-language, cookie, referer, or just supplying any unique header name. For example, there are scenarios where you may wish to supply an Accept-Language HTTP header in the SEO Spider’s request to crawl locale-adaptive content.
You can choose to supply any language and region pair that you require within the header value field.
User-agent is configured separately from other headers via ‘Configuration > User-Agent’.
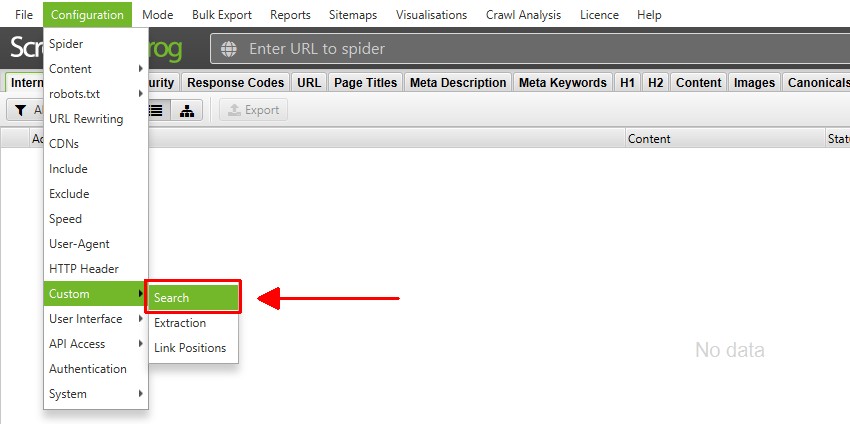
Custom search
Configuration > Custom > Search
The SEO Spider allows you to find anything you want in the source code of a website. The custom search feature will check the HTML (page text, or specific element you choose to search in) of every page you crawl.
By default custom search checks the raw HTML source code of a website, which might not be the text that is rendered in your browser. You can switch to JavaScript rendering mode to search the rendered HTML.
You’re able to configure up to 100 search filters in the custom search configuration, which allow you to input your text or regex and find pages that either ‘contain’ or ‘does not contain’ your chosen input.
This can be found under ‘Config > Custom > Search’.
Simply click ‘Add’ (in the bottom right) to include a filter in the configuration.
From left to right, you can name the search filter, select ‘contains’ or ‘does not contain’, choose ‘text’ or ‘regex’, input your search query – and choose where the search is performed (HTML, page text, an element, or XPath and more).
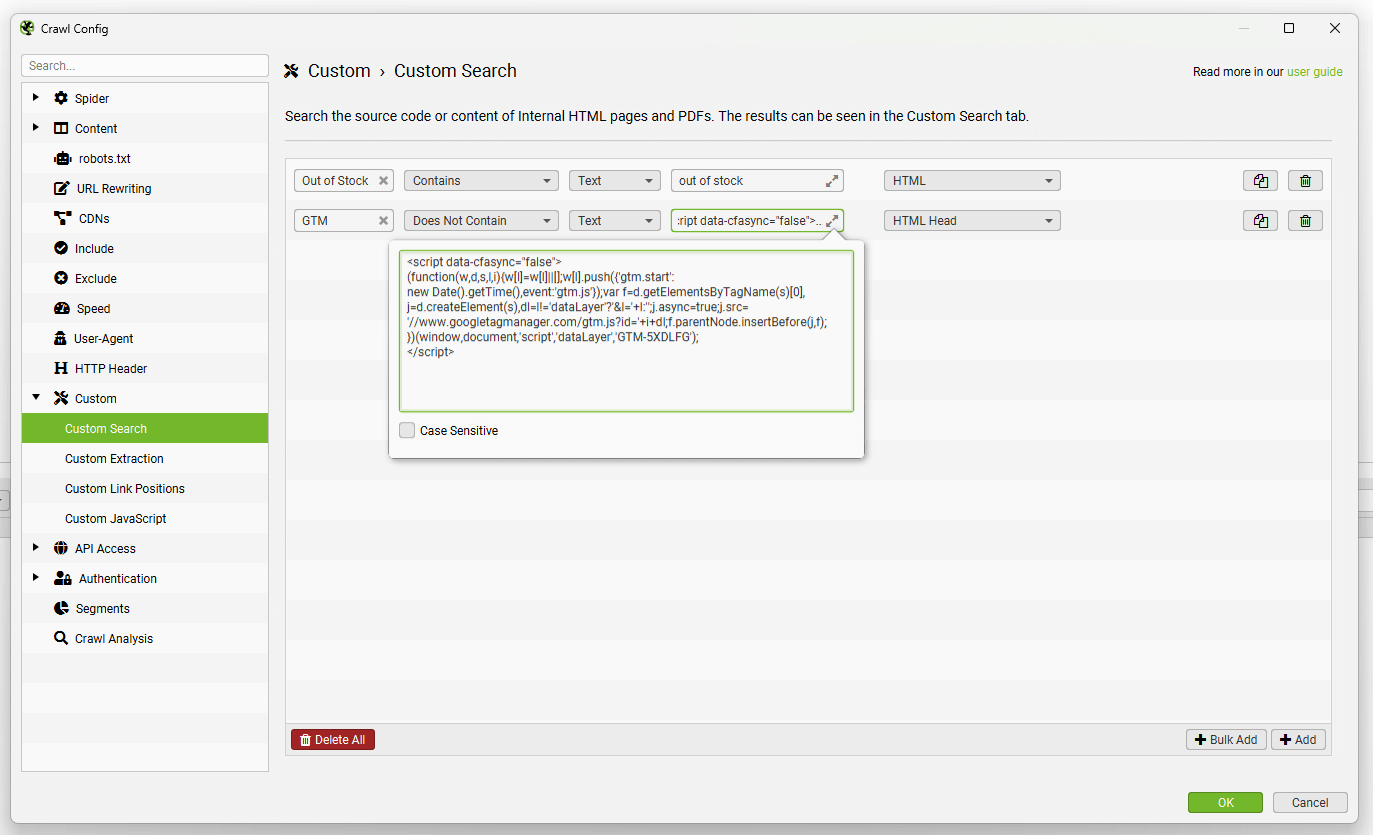
For example, you may wish to choose ‘contains’ for pages like ‘Out of stock’ as you wish to find any pages which have this on them. When searching for something like Google Analytics code, it would make more sense to choose the ‘does not contain’ filter to find pages that do not include the code (rather than just list all those that do!).
The pages that either ‘contain’ or ‘does not contain’ the entered data can be viewed within the ‘Custom Search’ tab.
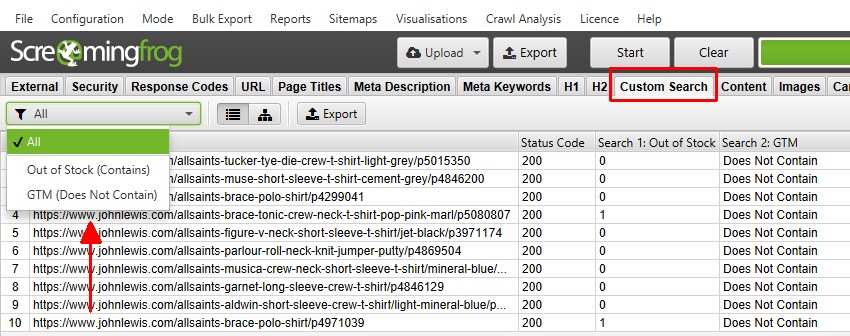
The ‘contains’ filter will show the number of occurrences of the search, while a ‘does not contain’ search will either return ‘Contains’ or ‘Does Not Contain’.
In this search, there are 2 pages with ‘Out of stock’ text, each containing the word just once – while the GTM code was not found on any of the 10 pages.
The SEO Spider uses the Java regex library, as described here. To ‘scrape’ or extract data, please use the custom extraction feature.
You are able to use regular expressions in custom search to find exact words. For example –
\bexample\b
Would match a particular word (‘example’ in this case), as \b matches word boundaries.
Please see our tutorial on ‘How to Use Custom Search‘ for more advanced scenarios, such as case sensitivity, finding exact & multiple words, combining searches, searching in specific elements and for multi-line snippets of code.
Custom extraction
Configuration > Custom > Extraction
Custom extraction allows you to collect any data from the HTML of a URL. Extraction is performed on the static HTML returned by internal HTML pages with a 2XX response code. You can switch to JavaScript rendering mode to extract data from the rendered HTML (for any data that’s client-side only).
The SEO Spider supports the following modes to perform data extraction:
- XPath: XPath selectors, including attributes.
- CSS Path: CSS Path and optional attribute.
- Regex: For more advanced uses, such as scraping HTML comments or inline JavaScript.
When using XPath or CSS Path to collect HTML, you can choose what to extract:
- Extract HTML Element: The selected element and its inner HTML content.
- Extract Inner HTML: The inner HTML content of the selected element. If the selected element contains other HTML elements, they will be included.
- Extract Text: The text content of the selected element and the text content of any sub elements.
- Function Value: The result of the supplied function, eg count(//h1) to find the number of h1 tags on a page.
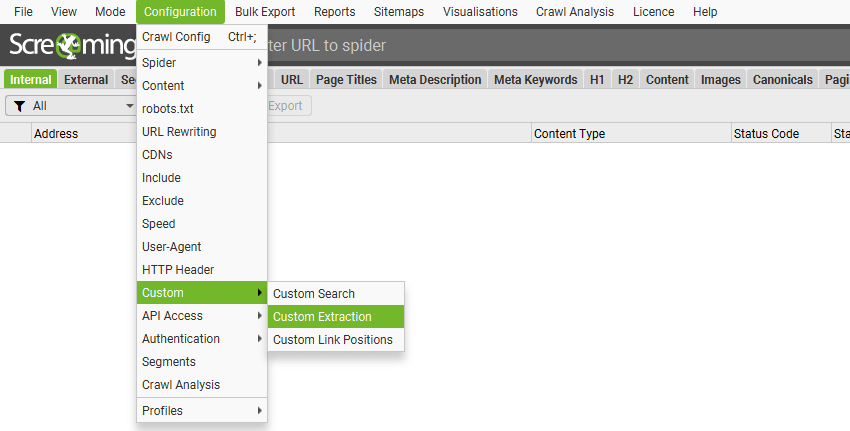
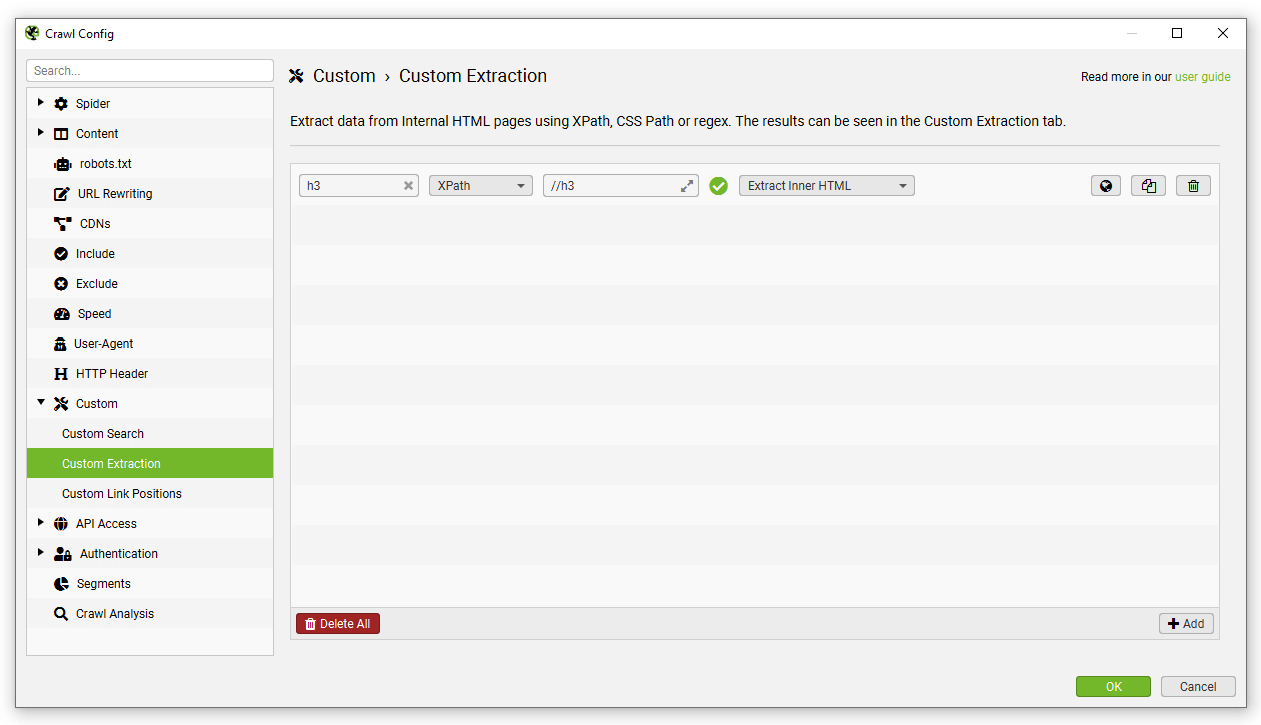
To set up custom extraction, click ‘Config > Custom > Custom Extraction’.
Just click ‘Add’ to start setting up an extractor.
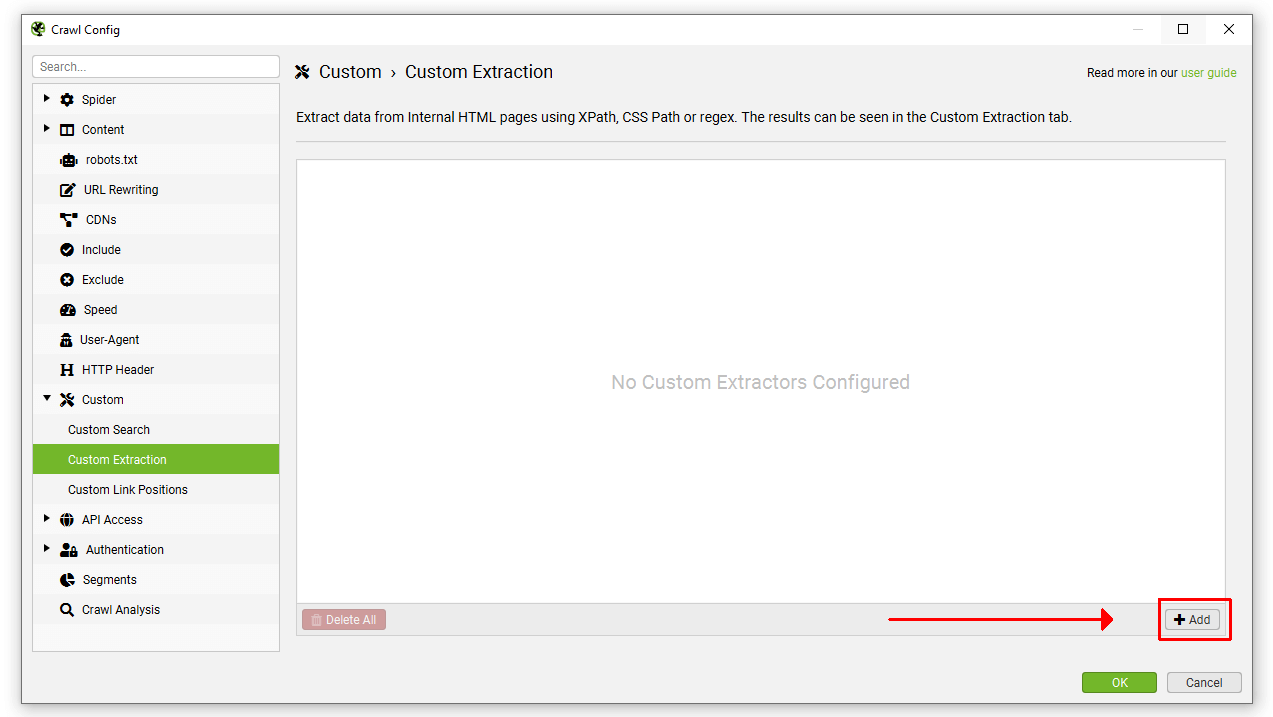
Then insert the relevant expression to scrape data. Up to 100 separate extractors can be configured to scrape data from a website with a limit of up to 1,000 extractions across all extractors.
If you’re unfamiliar with XPath, CSSPath and regex, you can use the visual custom extraction feature to select elements to scrape using an inbuilt browser. Click on the ‘browser’ icon next to the extractor.

Enter a URL you wish to extract data from in the URL bar and select the element you wish to scrape.
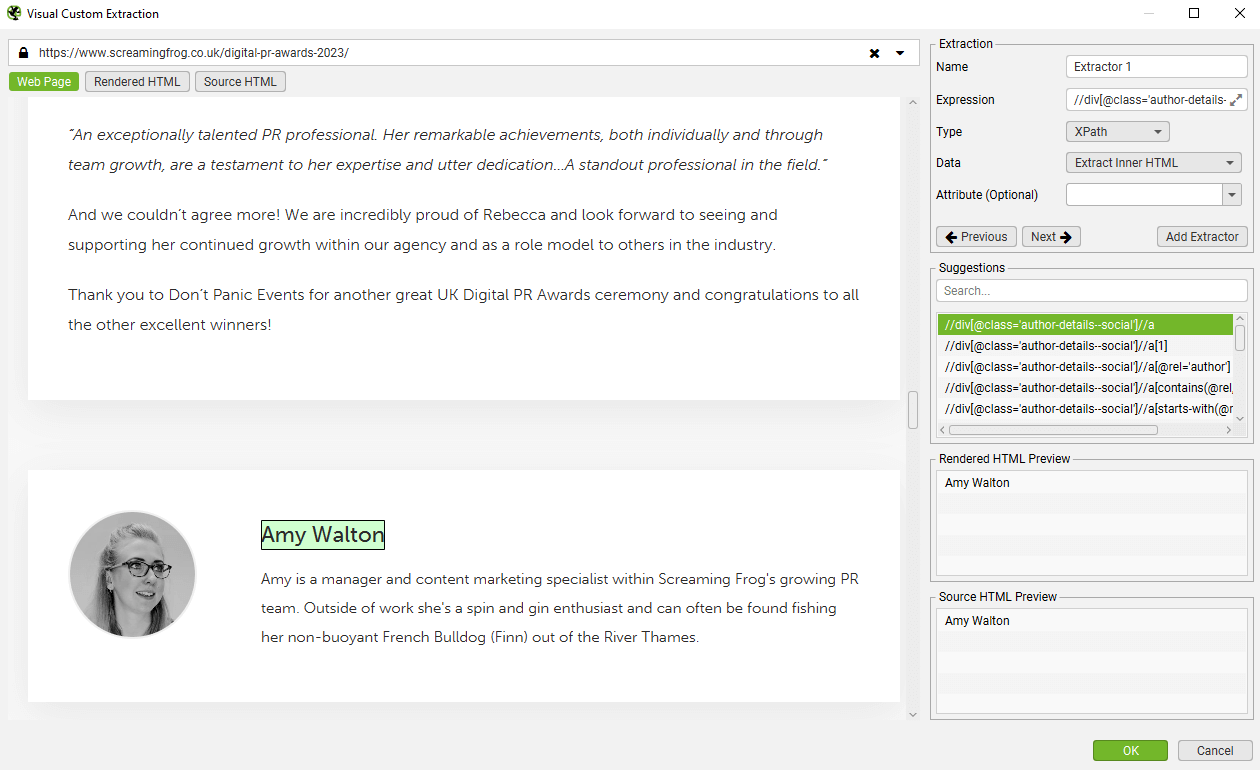
The SEO Spider will then highlight the area on the page, and create a variety of suggested expressions, and a preview of what will be extracted based upon the raw or rendered HTML. In this case, an author name from a blog post.
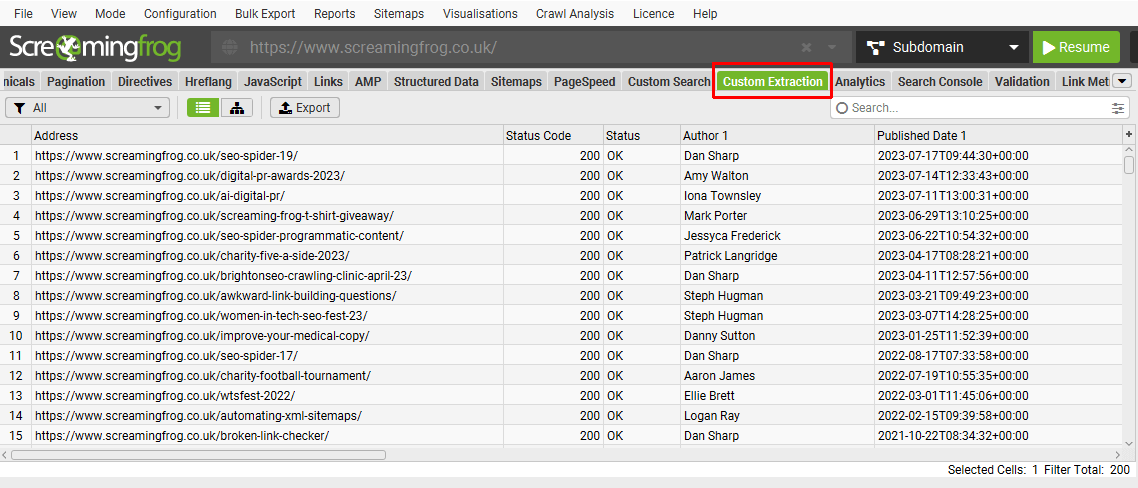
The data extracted can be viewed in the Custom Extraction tab Extracted data is also included as columns within the ‘Internal’ tab as well.
Please read our SEO Spider web scraping guide for a full tutorial on how to use custom extraction. For examples of custom extraction expressions, please see our XPath Examples and Regex Examples.
Regex Troubleshooting
- The SEO Spider does not pre process HTML before running regexes. Please bear in mind however that the HTML you see in a browser when viewing source maybe different to what the SEO Spider sees. This can be caused by the web site returning different content based on User-Agent or Cookies, or if the pages content is generated using JavaScript and you are not using JavaScript rendering.
- More details on the regex engine used by the SEO Spider can be found here.
- The regex engine is configured such that the dot character matches newlines.
- Regular Expressions, depending on how they are crafted, and the HTML they are run against, can be slow. This will have the affect of slowing the crawl down.
Custom link positions
Configuration > Custom > Link Positions
The SEO Spider classifies every links position on a page, such as whether it’s in the navigation, content of the page, sidebar or footer for example.
The classification is performed by using each links ‘link path’ (as an XPath) for known semantic substrings and can be seen in the ‘inlinks’ and ‘outlinks’ tabs.
This can help identify ‘inlinks’ to a page that are only from in body content for example, ignoring any links in the main navigation, or footer for better internal link analysis.
If your website uses semantic HTML5 elements (or well-named non-semantic elements, such as div id=”nav”), the SEO Spider will be able to automatically determine different parts of a web page and the links within them.
The default link positions set-up uses the following search terms to classify links.
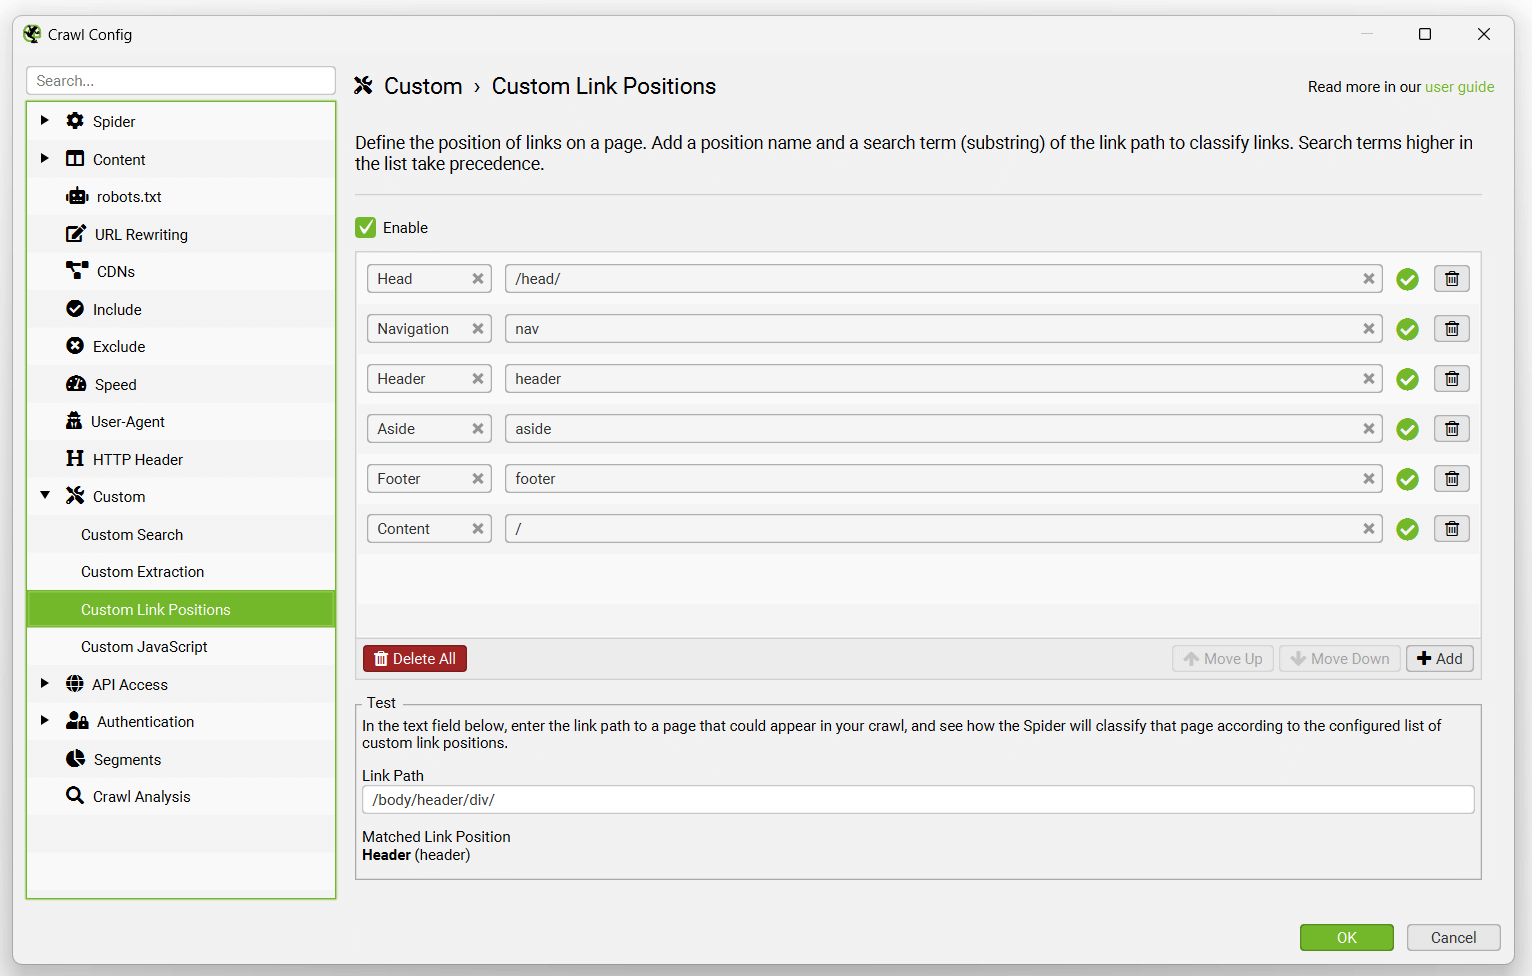
However, not every website is built in this way, so you’re able to configure the link position classification based upon each sites unique set-up. This allows you to use a substring of the link path of any links, to classify them.
For example, the Screaming Frog website has mobile menu links outside the nav element that are determined to be in ‘content’ links. This is incorrect, as they are just an additional site wide navigation on mobile. This is because they are not within a nav element, and are not well named such as having ‘nav’ in their class name. Doh!
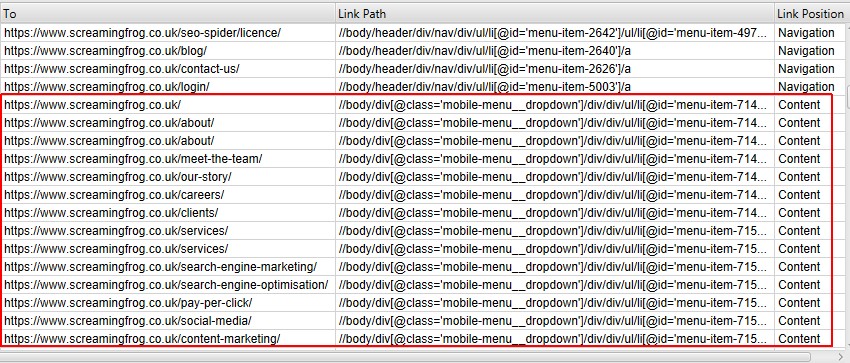
The ‘mobile-menu__dropdown’ class name (which is in the link path as shown above) can be used to define its correct link position using the Link Positions feature.
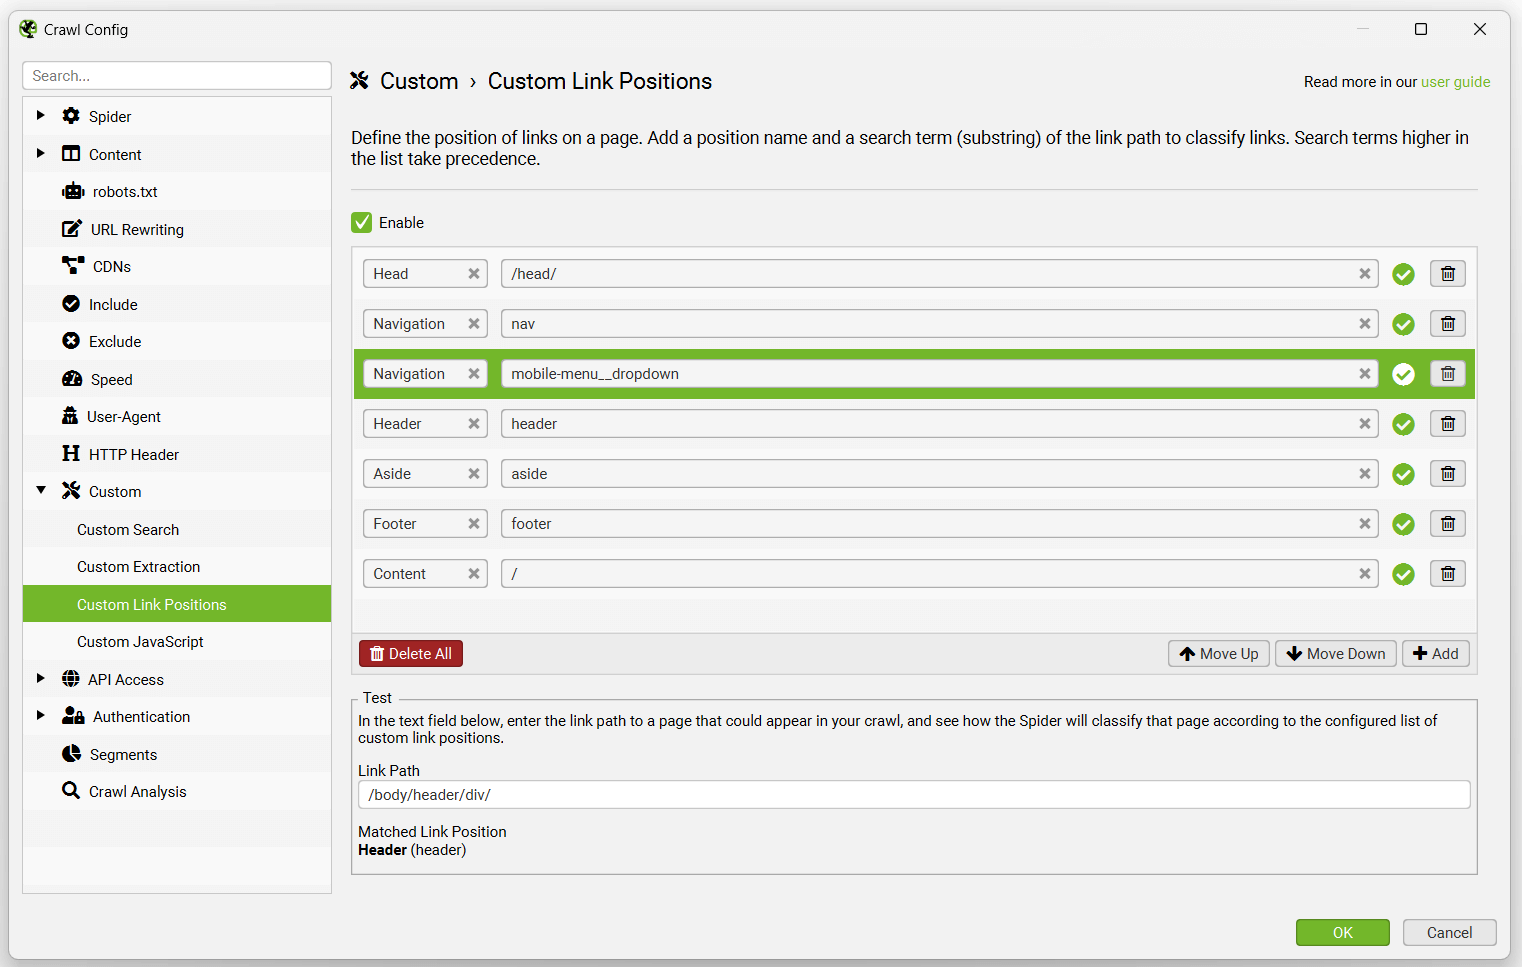
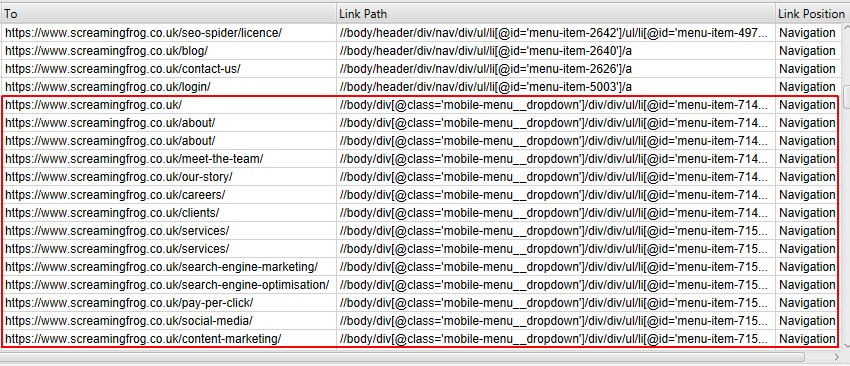
These links will then be correctly attributed as a sitewide navigation link.
The search terms or substrings used for link position classification are based upon order of precedence. As ‘Content’ is set as ‘/’ and will match any Link Path, it should always be at the bottom of the configuration.
So in the above example, the ‘mobile-menu__dropdown’ class name was added and moved above ‘Content’, using the ‘Move Up’ button to take precedence.
You’re able to disable ‘Link Positions’ classification, which means the XPath of each link is not stored and the link position is not determined. This can help save memory and speed up the crawl.
Custom JavaScript
Configuration > Custom > Custom JavaScript
Privacy Note
- ‘Custom JavaScript Snippets’ may involve sending data to third party services or APIs (i.e. those using ChatGPT). You are responsible for the privacy of all such data.
- Before sharing ‘Custom JavaScript Snippets’ ensure you remove API keys or other sensitive data.
Introduction
Custom JavaScript allows you to run JavaScript code on each internal 200 OK URL crawled (except for PDFs).
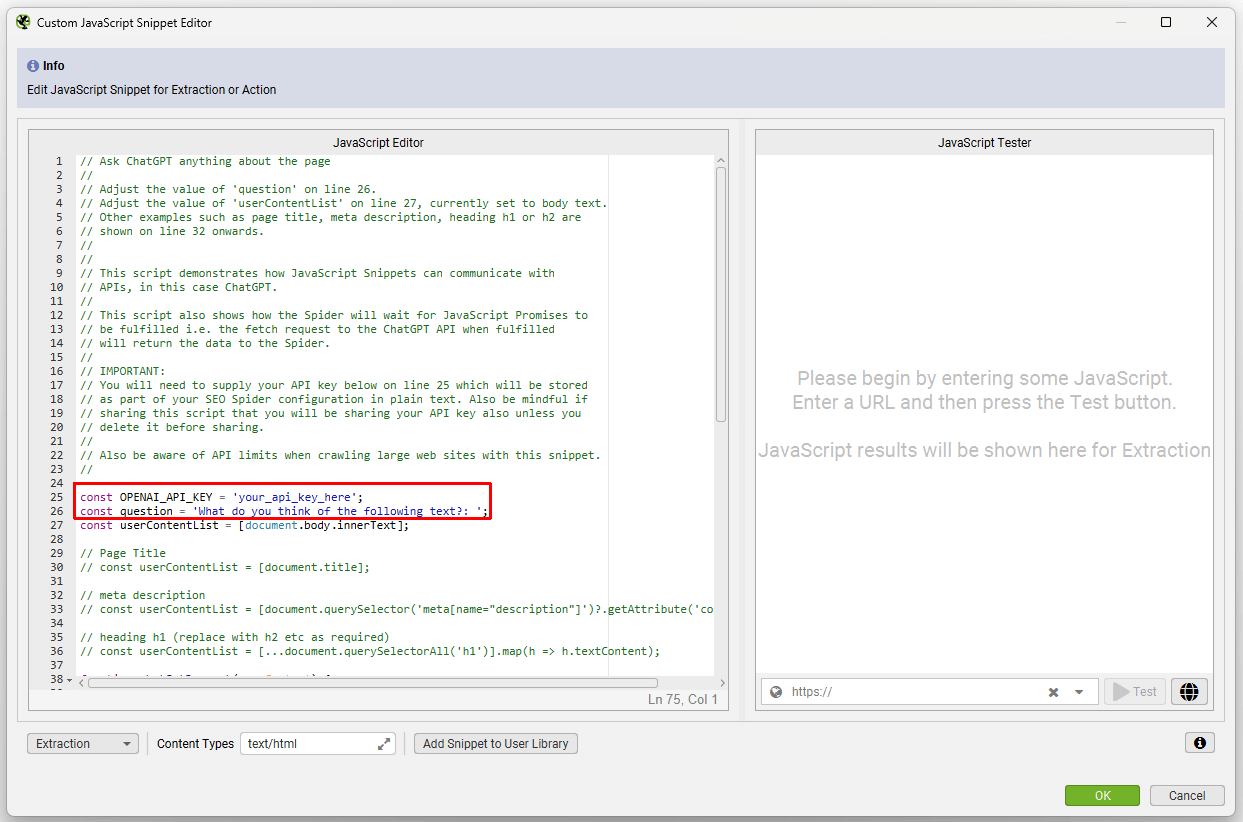
You can extract all sorts of useful information from a web page that may not be available in the SEO Spider, as well as communicate with APIs such as OpenAI’s ChatGPT, local LLMs, or other libraries. You have the ability to save URL content to disk and write to text files on disk.
To set up custom JavaScript snippet, click ‘Config > Custom > JavaScript’. Then ‘Add’ to start setting up a new snippet, or ‘Add from Library’ to choose an existing snippet.
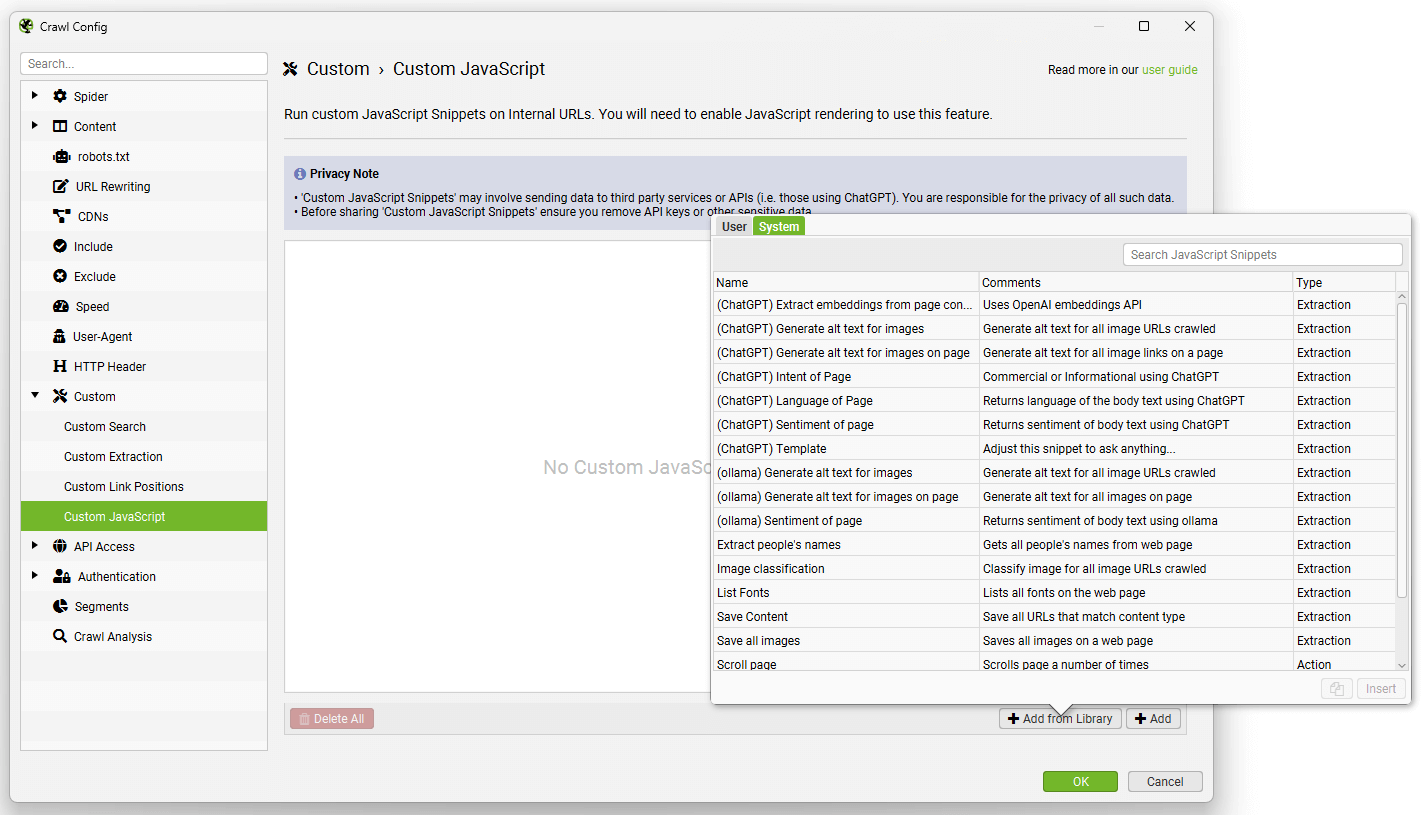
The library includes example snippets to perform various actions to act as inspiration of how the feature can be used, such as –
- Sentiment, intent or language analysis of page content.
- Generating image alt text for images.
- Triggering mouseover events.
- Scrolling a page (to crawl some infinite scroll set ups).
- Extracting embeddings from page content.
- Downloading and saving various content locally (like images).
And much more.
You can adjust our templated snippets by following the comments in them.
You can set a content type filter which will allow the Custom JavaScript Snippet to execute for certain content types only.
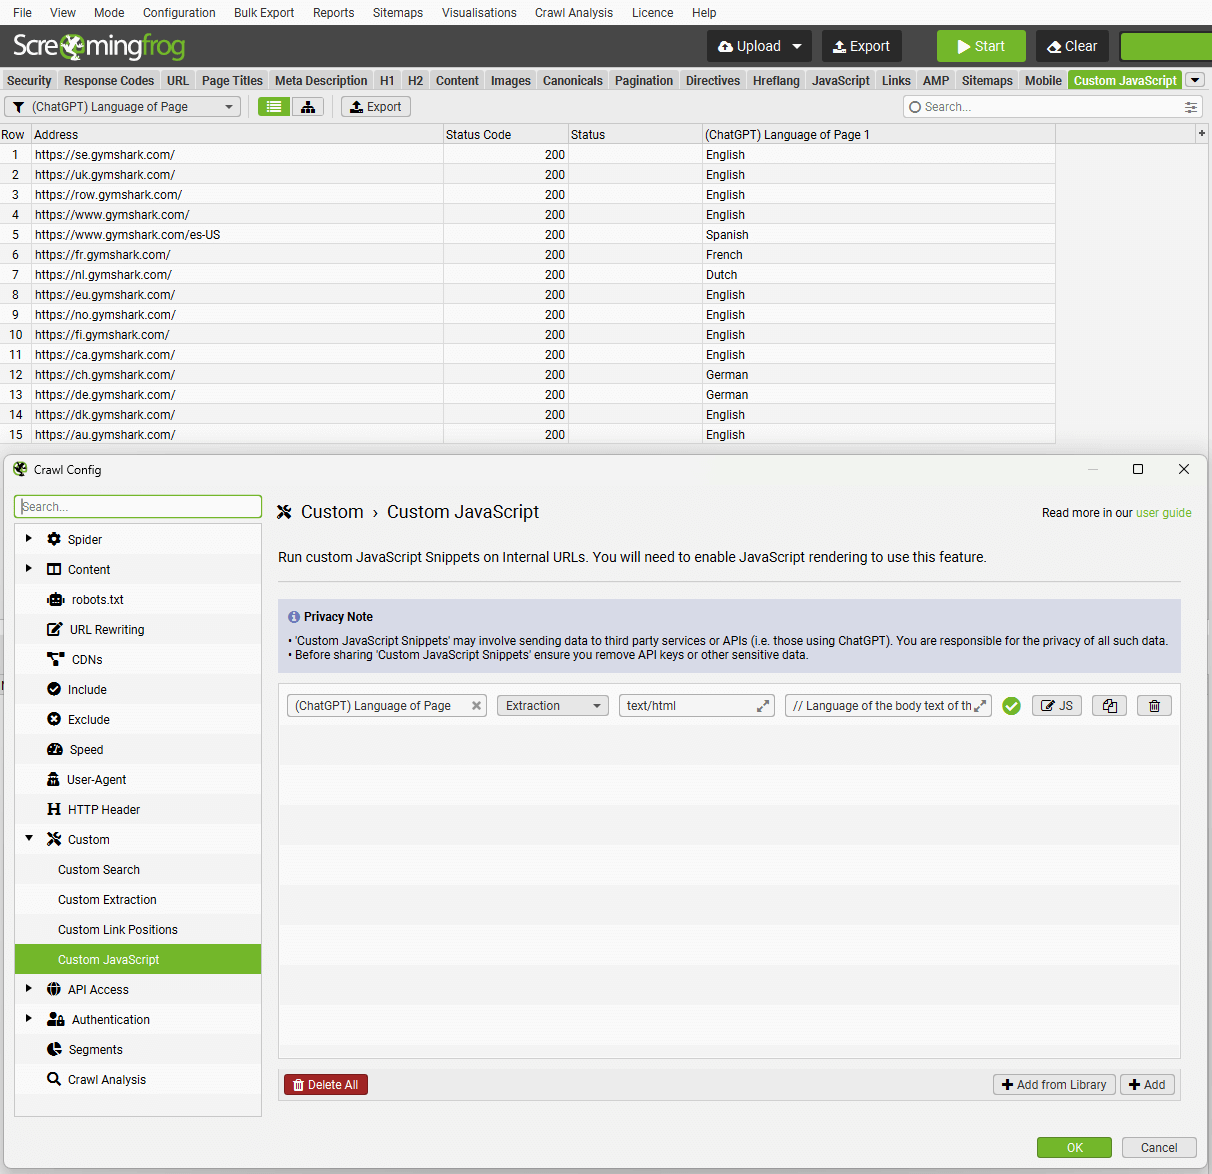
The results will be displayed in the Custom JavaScript tab.
There are 2 types of Snippet; Extraction and Action.
Extraction Snippets
- Extraction type Snippets return a value or list of values (numbers or strings), and display the values as columns in the Custom JavaScript tab. Each value in a list of values will be mapped across columns in the tab.
- When executing Extraction Snippets, the page will stop loading all resources and start executing the snippet. The SEO Spider will not complete the page crawl until the snippet has completed. Long running Snippets may timeout and the page will fail to be crawled.
- Extraction Snippets also have the ability to download URLs and write to a text file. For example we have a sample Snippet that can download all images from a web page and another sample Snippet that appends all adjectives on a web page to a CSV file.
Action Snippets
- Action type Snippets do not return any data but only perform actions. For example, we have a sample Snippet that scrolls down a web page allowing lazy loaded images to be crawled.
- When executing Action Snippets, the page will continue loading resources while the Action Snippet is executing. You must however give a timeout value in seconds for the Snippet. When the timer expires, the SEO Spider will complete the page crawl.
Important points to note
- You can run multiple Snippets at once. Please be aware that your crawl speed will be affected by the number and type of Snippets that you run.
- If you have multiple Snippets, all of the Action Snippets are performed before the Extraction Snippets.
- If you have multiple Action Snippets with different timeout values, the SEO Spider will use the maximum timeout value of all of the Action Snippets.
- Extraction Snippets stop all page loads so no more requests will happen. Action Snippets don’t have this limitation but you need to set a timeout value.
- Snippets have access to the Chrome Console Utilities API. This allows Snippets to use methods such as getEventListeners() which are not accessible via regular JavaScript on a web page. See the ‘Trigger mouseover events’ sample Snippet for an example of this.
Extraction Snippet API Usage
For Extraction Snippets, you interact with the SEO Spider using the seoSpider object which is an instance of the SEOSpider class documented below. In the most basic form you use it as follows:
// The SEO Spider will display '1' in a single column

return seoSpider.data(1);
// The SEO Spider will display each number in a separate column
return seoSpider.data([1, 2, 3]);// The SEO Spider will display 'item1' in a single column
return seoSpider.data("item1");// The SEO Spider will display each string in a separate column
return seoSpider.data(["item1", "item2"]);
You can also send back data to the SEO Spider from a Promise. The SEO Spider will wait for the Promise to be fulfilled. This allows you to do asynchronous work like fetch requests before returning data to the SEO Spider. For example:
let promise = new Promise(resolve => {

    setTimeout(() => resolve("done!"), 1000);

});


// sends "done!" to the SEO Spider after 1 second
return promise.then(msg => seoSpider.data(msg));
Please Note
Note that in all of the above Extraction Snippet examples, even for the Promise example, you MUST call the ‘return’ statement to end function execution. This is because all Snippet code is implicitly wrapped by the SEO Spider in an IIFE (Immediately Invoked Function Expression). This is to avoid JavaScript global namespace clashes when running snippets. If you don’t do this, then the SEO Spider will not receive any data.
The example below shows how your JavaScript Snippet code is implicitly wrapped in an IIFE. It also shows how the seoSpider instance is created for you just before your code is inserted.
(function () {

    // seoSpider object created for use by your snippet

    const seoSpider = new SEOSpider();


    // Your JavaScript Snippet code is inserted here i.e:

    return seoSpider.data("data");

})();
SEOSpider Methods
This class provides methods for sending back data to the SEO Spider. Do not call new on this class, an instance is supplied for you called seoSpider.
data(data)
Pass back the supplied data to the SEO Spider for display in the Custom JavaScript tab. The data parameter can be a string or an number, or a list of strings or numbers. If the data is a list, then each item in the list will be shown in a separate column on the Custom JavaScript tab.
Parameters:
Example:
// Get all H1 and H2 headings from page

let headings = Array.from(document.querySelectorAll("h1, h2"))

    .map(heading => heading.textContent.trim());


return seoSpider.data(headings);
error(msg)
Pass back any error messages to the SEO Spider. These messages will appear in a column of the Custom JavaScript tab.
Parameters:
Example:
return functionThatReturnsPromise()

    .then(success => seoSpider.data(success))

    .catch(error => seoSpider.error(error));

}
saveText(text, saveFilePath, shouldAppend)
Saves the supplied text to saveFilePath.
Parameters:
Example:
return seoSpider.saveText('some text', '/Users/john/file.txt', false);
saveUrls(urls, saveDirPath)
Downloads the supplied list of URLs and saves each of them to the saveDirPath.
Parameters:
Example:
return seoSpider.saveUrls(['https://foo.com/bar/image.jpeg'], '/Users/john/');
Note:
Each URL supplied in the ‘urls’ parameter will be saved in a directory structure that follows the URL path. For example, in the above example with a URL of:
'https://foo.com/bar/image.jpeg'
and a ‘saveDirPath’ of:
'/Users/john/'
Then the URL will be saved into the following folder structure:
'/Users/John/https/foo.com/bar/image.jpeg'
loadScript(src) → {Promise}
Loads external scripts for use by the Snippet. The script loads asynchronously. You write your code inside the ‘then’ clause as shown in the example below.
Parameters:
Example:
return seoSpider.loadScript("your_script_url")

    .then(() => {

        // The script has now loaded, you can start using it from here


        ...


        // Return data to the SEO Spider

        return seoSpider.data(your_data)

    })

    .catch(error => seoSpider.error(error));
Share Your Snippets
You can set up your own snippets, which will be saved in your user library, and then export/import the library as JSON to share with colleagues.
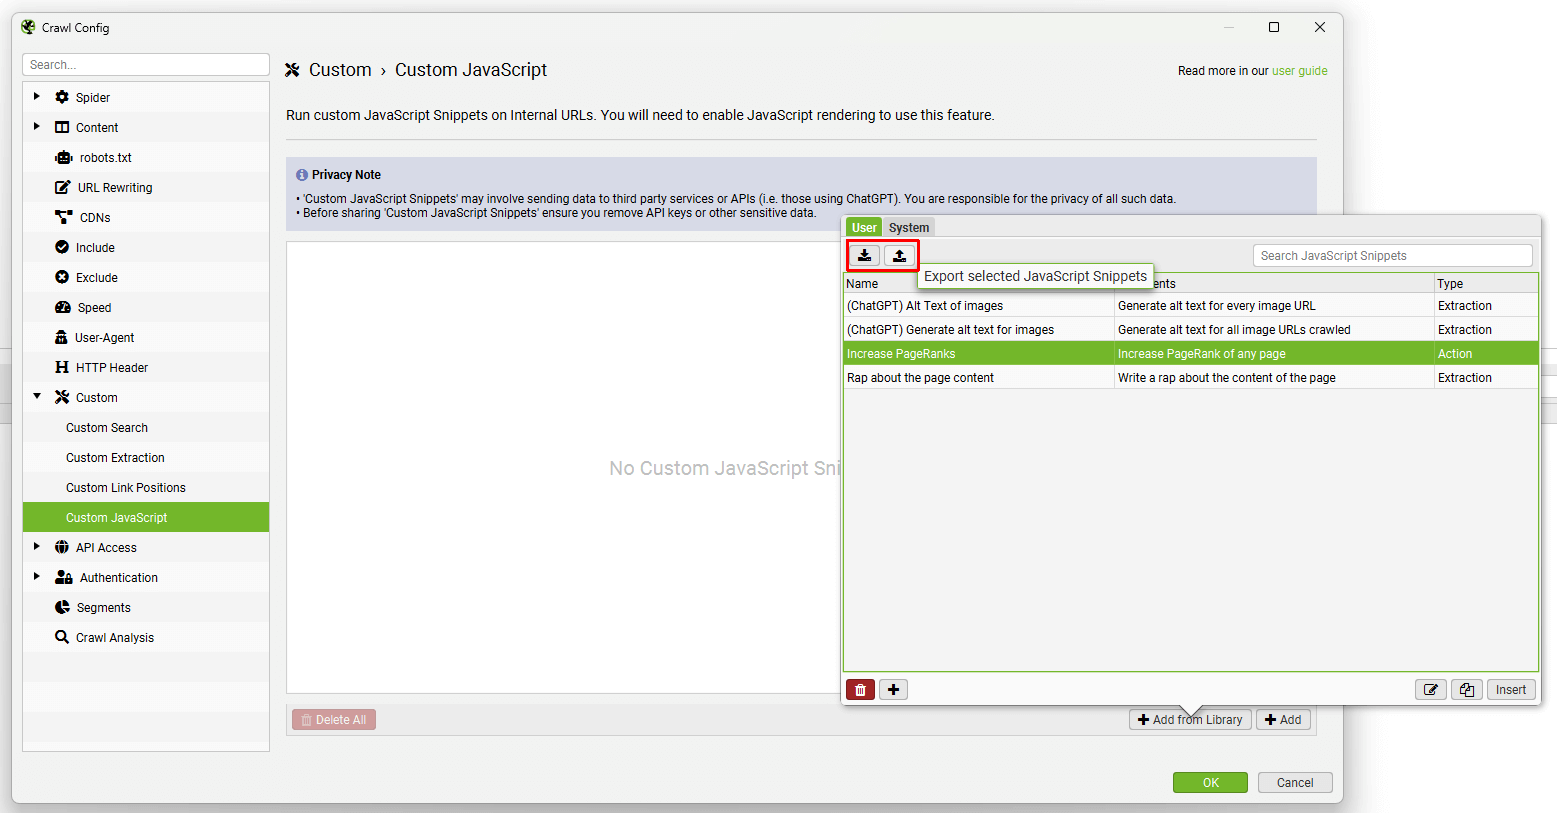
JavaScript snippets can also be saved in your configuration.
Please do not forget to remove any sensitive data, such as any API keys pre to sharing with others.
Debugging Snippets
When using Custom JavaScript, you may encounter issues with preset JavaScript snippets or your own custom JavaScript that require debugging.
Please read our How to Debug Custom JavaScript Snippets tutorial, which walks you through the debugging process and common errors.
Snippet Support
Due to the technical nature of this feature, unfortunately we are not able to provide support for writing and debugging your own custom JavaScript snippets.
Google Analytics integration
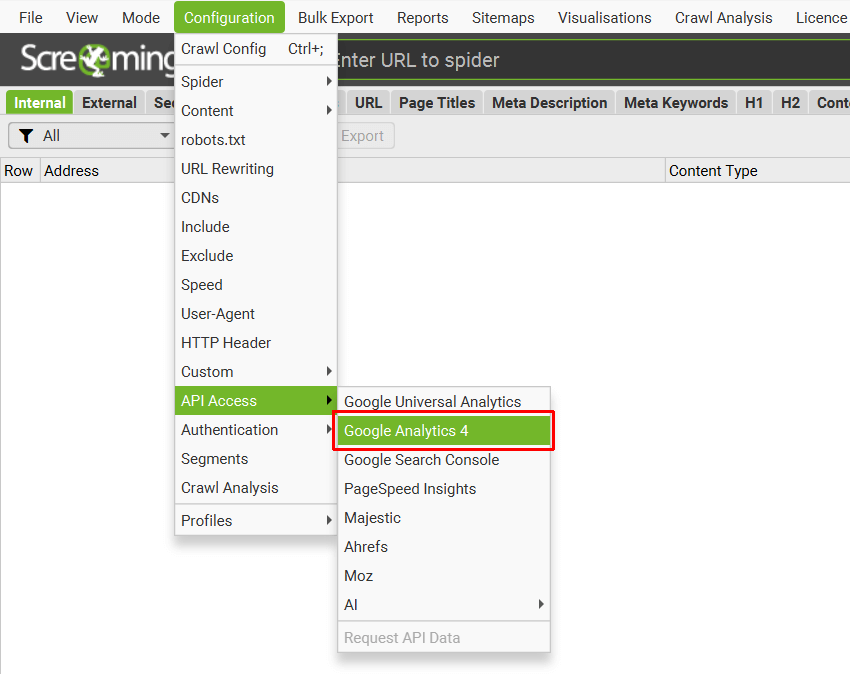
Configuration > API Access > Google Analytics 4
You can connect to the GA4 API and pull in data directly during a crawl. The SEO Spider can fetch user and session metrics, as well as key events and ecommerce (transactions and revenue) data for landing pages, so you can view your top performing pages when performing a technical or content audit.
To set this up, start the SEO Spider and go to ‘Configuration > API Access’ and choose ‘Google Analytics 4’.
Next, connect to a Google account (which has access to the Analytics account you wish to query) by granting the ‘Screaming Frog SEO Spider’ app permission to access your account to retrieve the data.
Google APIs use the OAuth 2.0 protocol for authentication and authorisation. The SEO Spider will remember any Google accounts you authorise within the list, so you can ‘connect’ quickly upon starting the application each time.
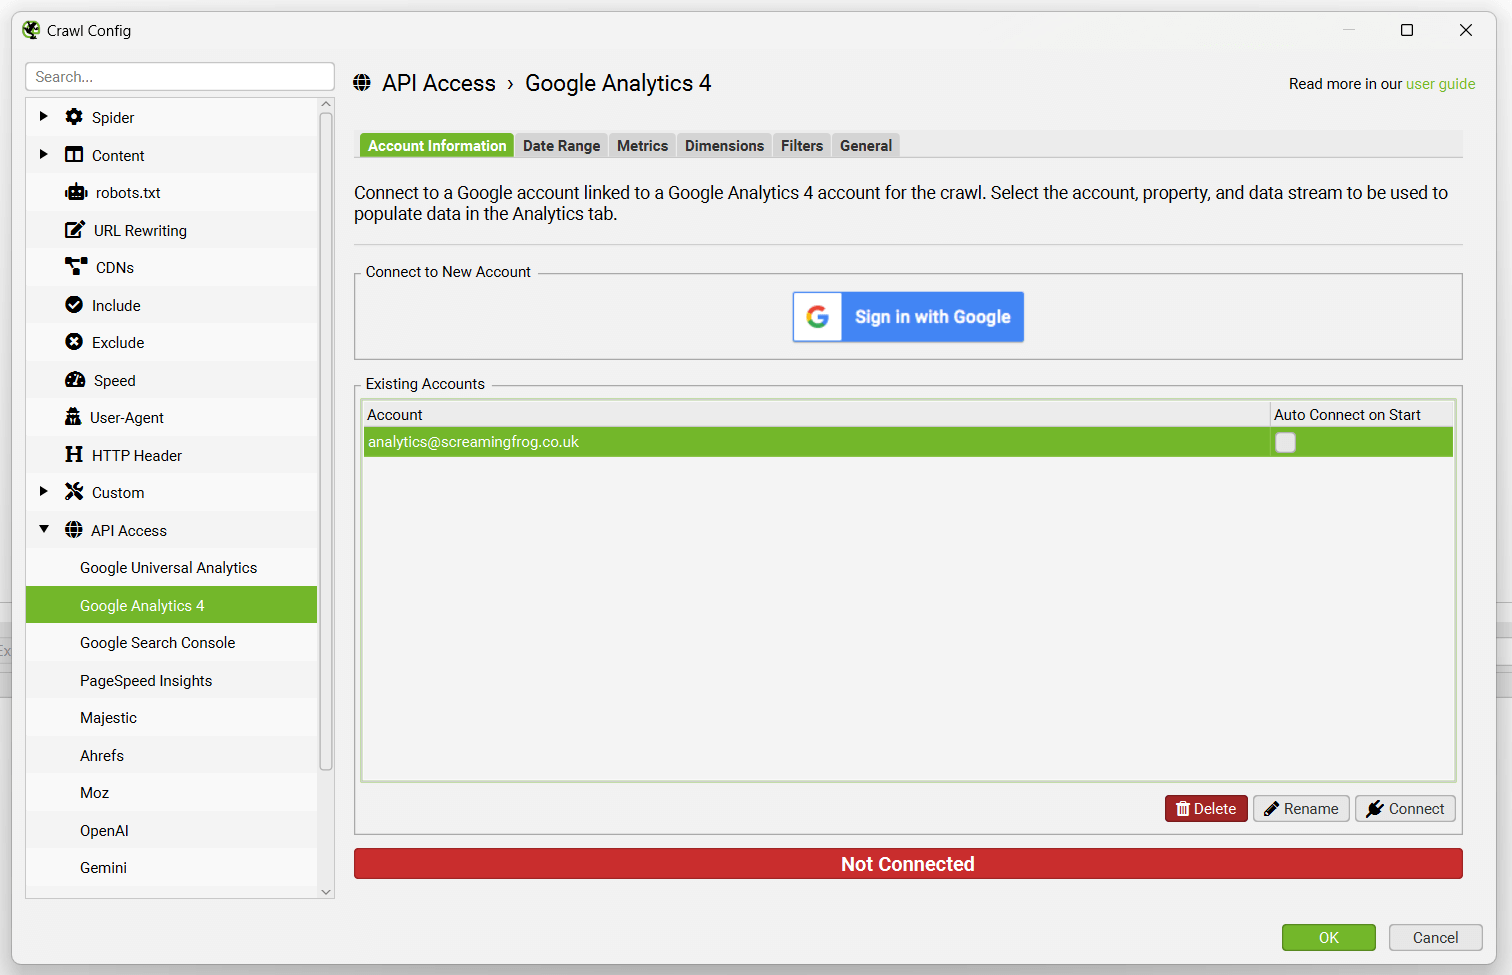
Once connected, you can select the analytics account, property and Data Stream.

Then simply select the metrics that you wish to fetch for GA4 –
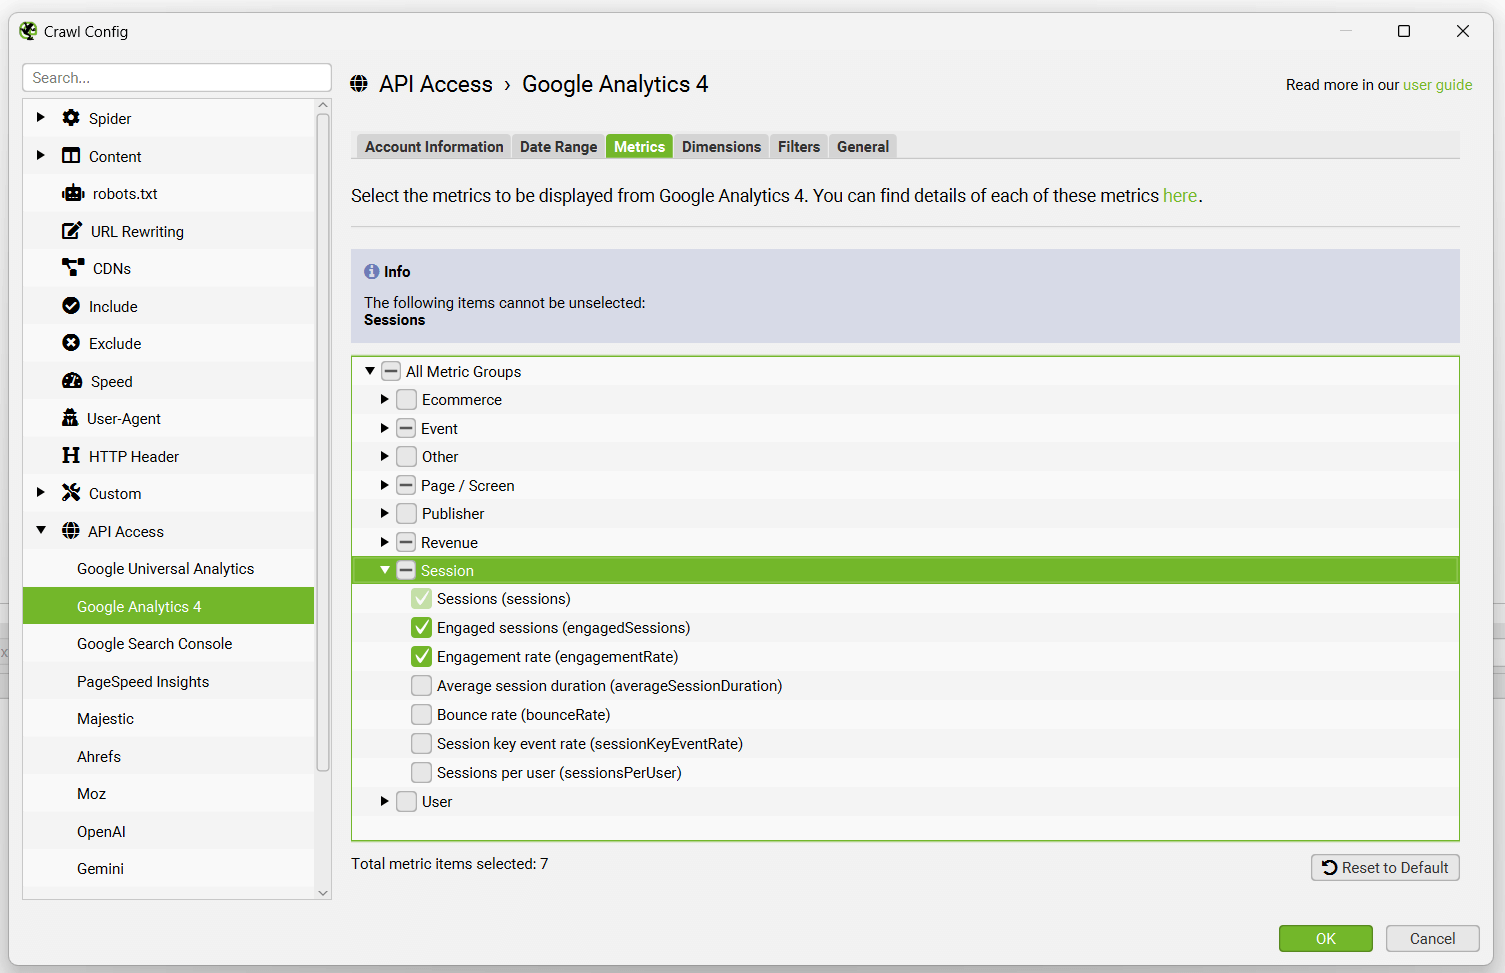
By default the SEO Spider collects the following 7 metrics in GA4 –
- Sessions
- Engaged Sessions
- Engagement Rate
- Views
- Conversions
- Event Count
- Total Revenue
For GA4 you can select up to 65 metrics available via their API.
You can read more about the metrics available and the definition of each metric from Google for GA4 in the GA4 Dimensions & Metrics Explorer.
You can also set the dimension of each individual metric against either full page URL (‘Page Path’ in UA), or landing page, which are quite different (and both useful depending on your scenario and objectives).

For GA4 there is also a ‘filters’ tab, which allows you to select additional dimensions. For example, you can choose first user or session channel grouping with dimension values, such as ‘organic search’ to refine to a specific channel.
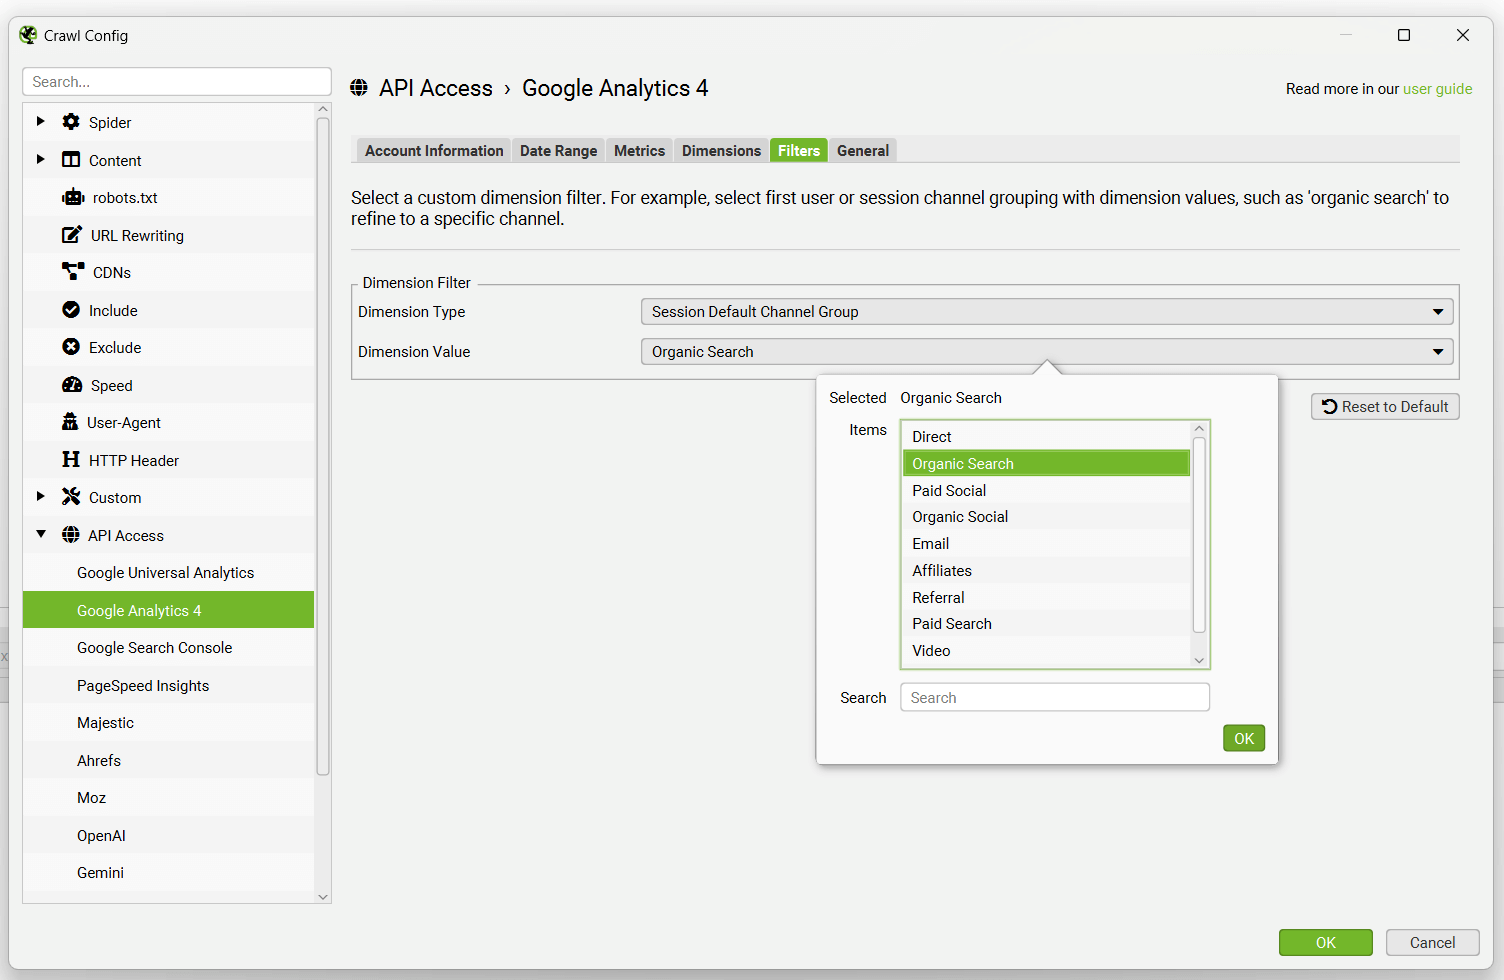
There are scenarios where URLs in Google Analytics might not match URLs in a crawl, so these are covered by auto matching trailing and non-trailing slash URLs and case sensitivity (upper and lowercase characters in URLs). Google doesn’t pass the protocol (HTTP or HTTPS) via their API, so these are also matched automatically.

When selecting either of the above options, please note that data from Google Analytics is sorted by sessions, so matching is performed against the URL with the highest number of sessions. Data is not aggregated for those URLs.
The following options are available –
- Match Trailing and Non-Trailing Slash URLs – Allows both http://example.com/contact and http://example.com/contact/ to match either http://example.com/contact or http://example.com/contact/ from GA, whichever has the highest number of sessions.
- Match Uppercase & Lowercase URLs – Allows http://example.com/contact.html, http://example.com/Contact.html and http://example.com/CONTACT.html to match the version of this URL from GA with the highest number of sessions.
- Limit Max Results – If you have hundreds of thousands of URLs in GA, you can choose to limit the number of URLs to query, which is by default ordered by sessions to return the top performing page data of the top 100,000 URLs.
- Crawl New URLs Discovered in Google Analytics – This means any new URLs discovered in Google Analytics (that are not found via hyperlinks) will be crawled. If this option isn’t enabled, then new URLs discovered via Google Analytics will only be available to view in the ‘Orphan Pages’ report. They won’t be added to the crawl queue, viewable within the user interface and appear under the respective tabs and filters. Please see our guide on finding orphan pages.
Google Analytics data will be fetched and display in respective columns within the ‘Internal’ and ‘Analytics’ tabs.
There’s an ‘API’ progress bar in the top right and when this has reached 100%, analytics data will start appearing against URLs in real-time. The more URLs and metrics queried the longer this process can take, but generally it’s extremely quick.
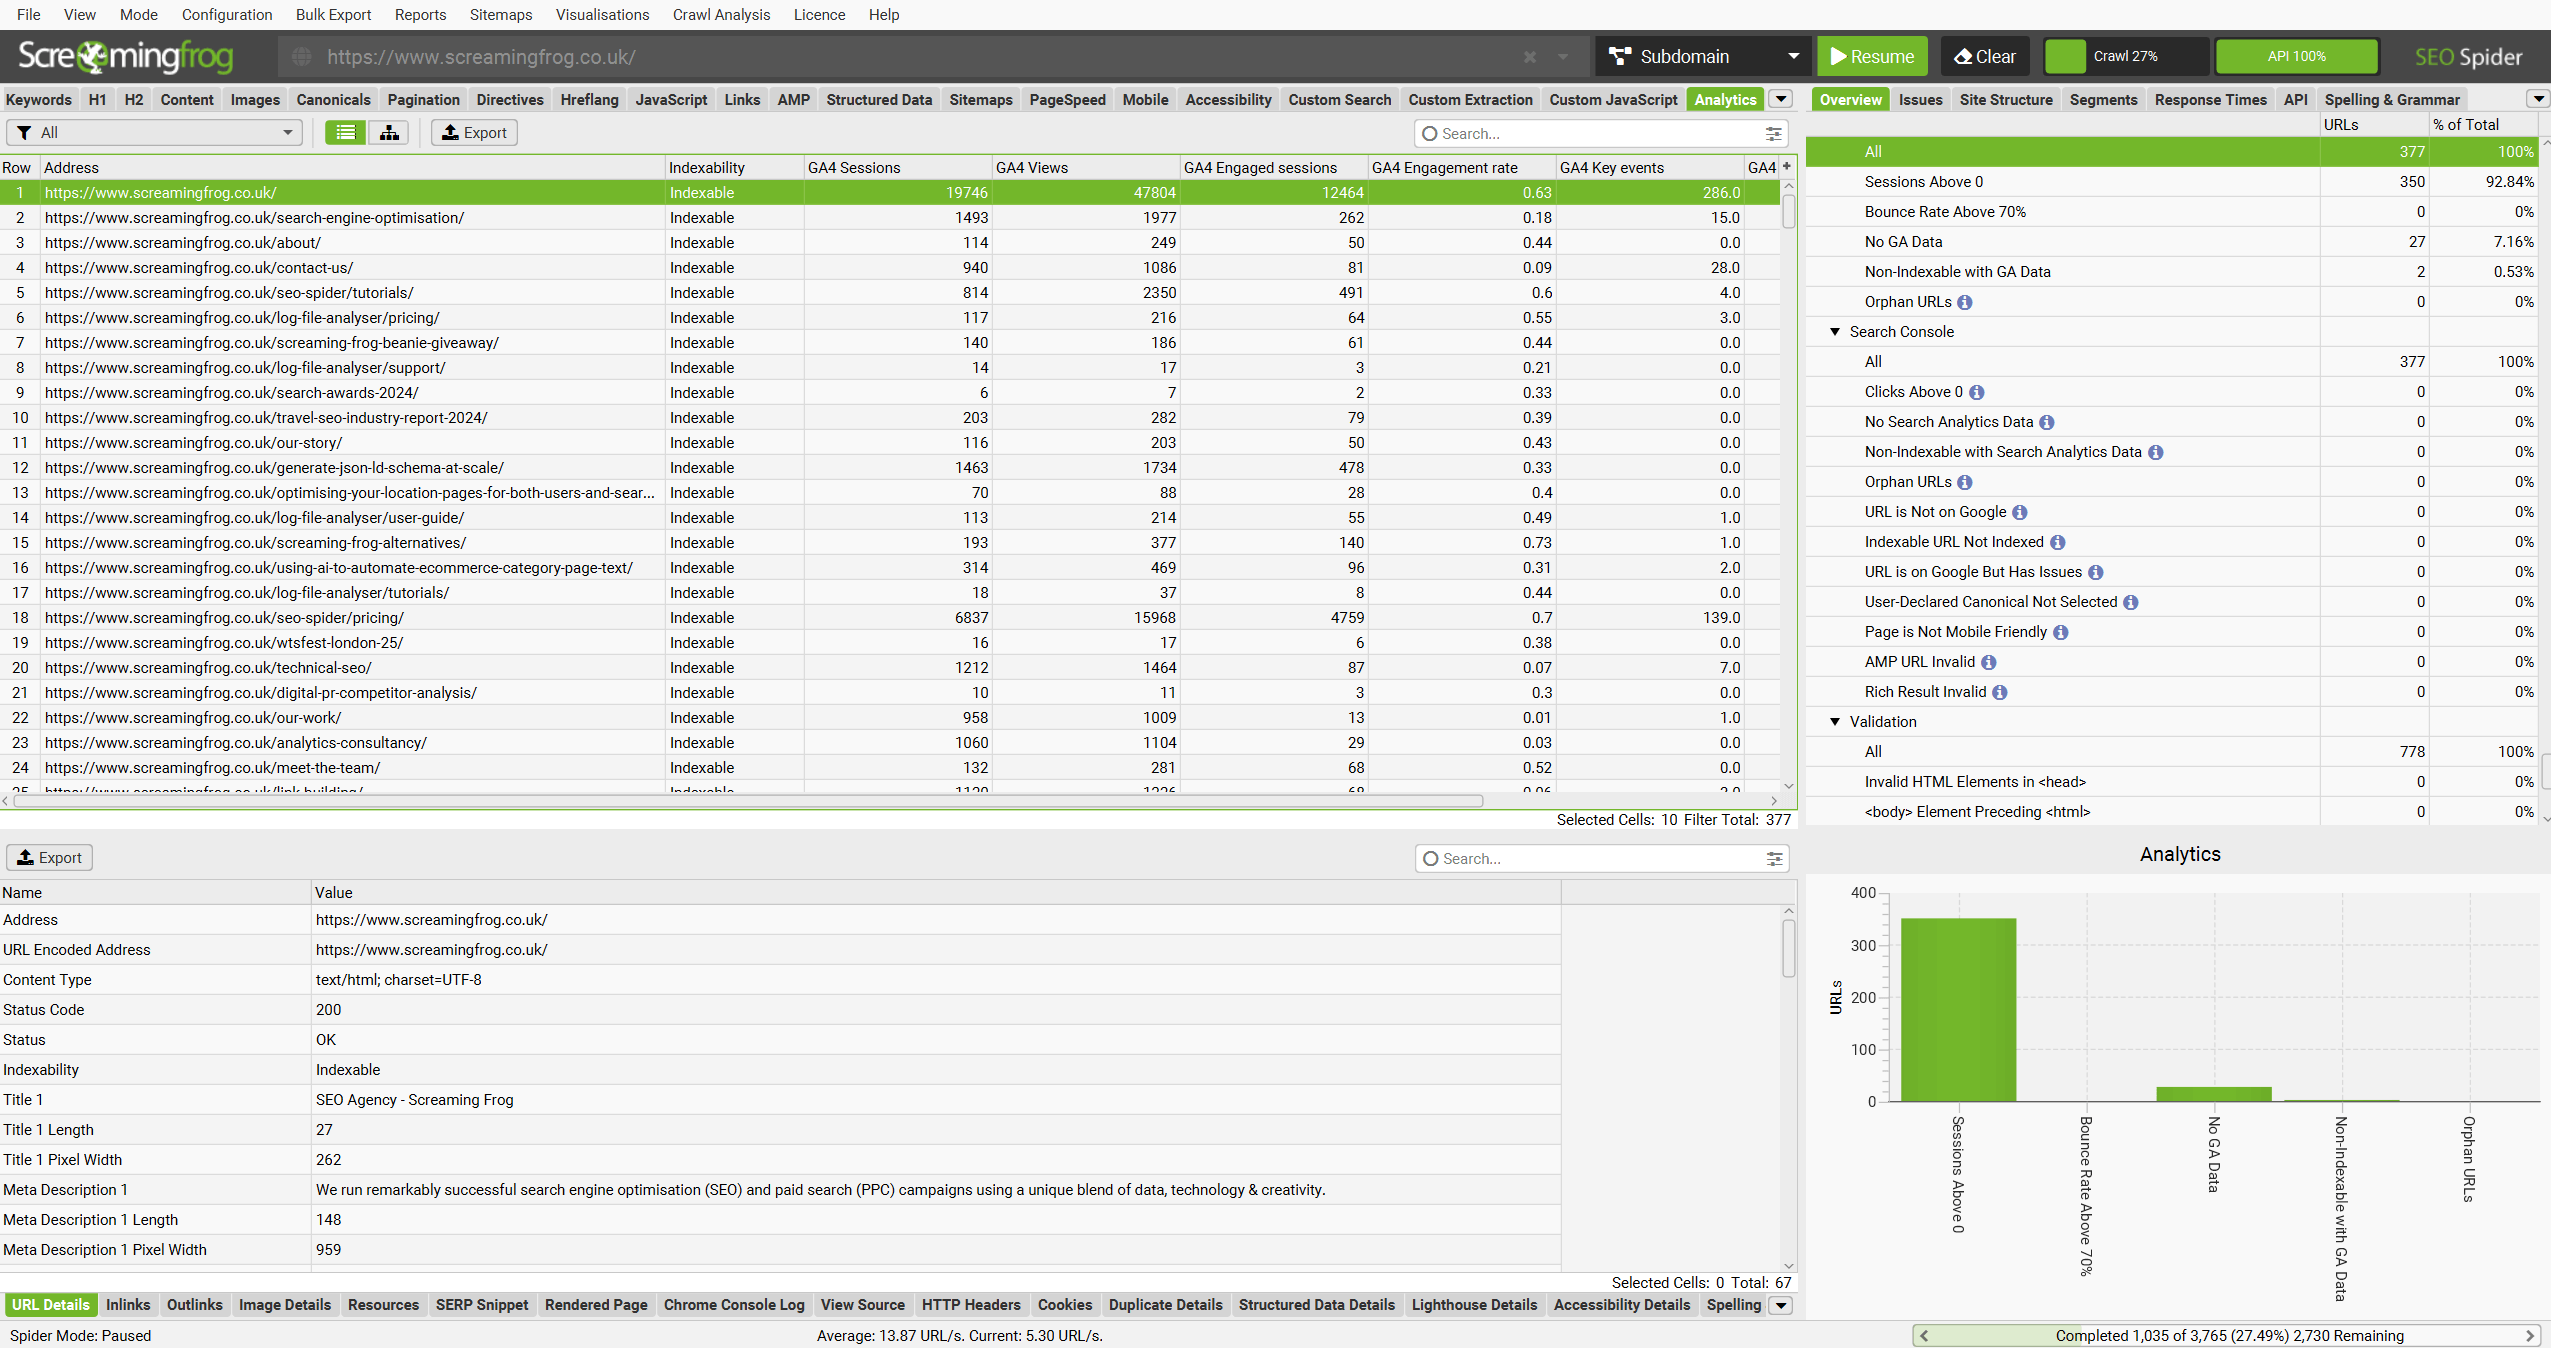
There are 5 filters currently under the ‘Analytics’ tab, which allow you to filter the Google Analytics data –
- Sessions Above 0 – This simply means the URL in question has 1 or more sessions.
- Bounce Rate Above 70% – This means the URL has a bounce rate over 70%, which you may wish to investigate. In some scenarios this is normal though!
- No GA Data – This means that for the metrics and dimensions queried, the Google API didn’t return any data for the URLs in the crawl. So the URLs either didn’t receive any visits sessions, or perhaps the URLs in the crawl are just different to those in GA for some reason.
- Non-Indexable with GA Data – This means the URL is non-indexable, but still has data from GA.
- Orphan URLs – This means the URL was only discovered via GA, and was not found via an internal link during the crawl.
Please read the following FAQs for various issues with accessing Google Analytics data in the SEO Spider –
- Why do I receive an error when granting access to my Google account?
- Why does my connection to Google Analytics fail?
- Why doesn’t GA data populate against my URLs?
- Why doesn’t the GA API data in the SEO Spider match what’s reported in the GA interface?
- Why can’t I see GA4 properties when I connect my Google Analytics account?
Please note, Google APIs use the OAuth 2.0 protocol for authentication and authorisation, and the data provided via Google Analytics and other APIs is only accessible locally on your machine. We cannot view and do not store that data ourselves. Please see more in our FAQ.
Using the Google Analytics 4 API is subject to their standard property quotas for core tokens.
Google Search Console integration
Configuration > API Access > Google Search Console
You can connect to the Google Search Analytics and URL Inspection APIs and pull in data directly during a crawl.
By default the SEO Spider will fetch impressions, clicks, CTR and position metrics from the Search Analytics API, so you can view your top performing pages when performing a technical or content audit.
Optionally, you can also choose to ‘Enable URL Inspection’ alongside Search Analytics data, which provides Google index status data for up to 2,000 URLs per property a day. This includes whether the ‘URL is on Google’, or ‘URL is not on Google’ and coverage.
To set this up, go to ‘Configuration > API Access > Google Search Console’.
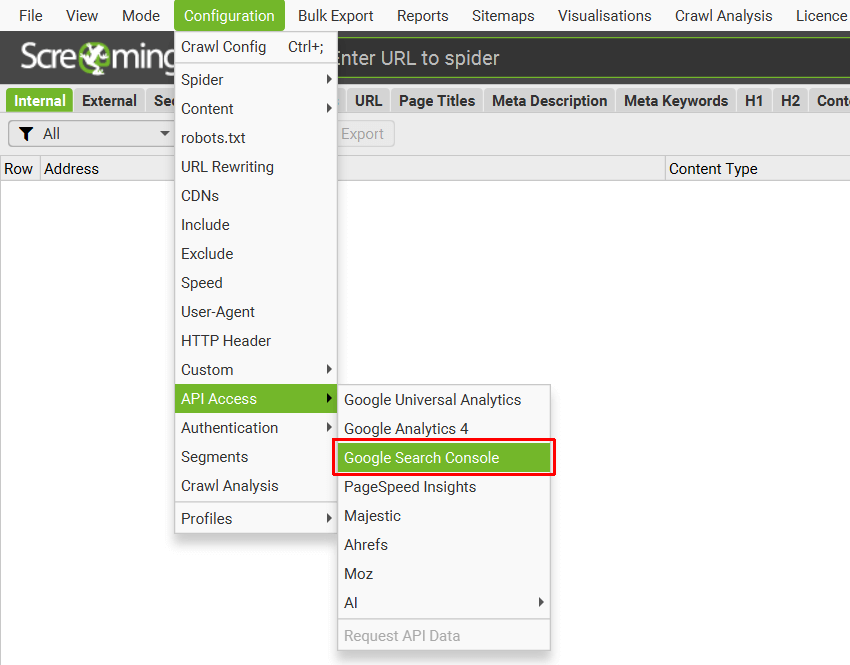
Connect to a Google account (which has access to the Search Console account you wish to query) by granting the ‘Screaming Frog SEO Spider’ app permission to access your account to retrieve the data. Google APIs use the OAuth 2.0 protocol for authentication and authorisation. The SEO Spider will remember any Google accounts you authorise within the list, so you can ‘connect’ quickly upon starting the application each time.
Once you have connected, you can choose the relevant website property.

By default the SEO Spider collects the following metrics for the last 30 days –
- Clicks
- Impressions
- CTR
- Position
Read more about the definition of each metric from Google.
If you click the ‘Search Analytics’ tab in the configuration, you can adjust the date range, dimensions and various other settings.
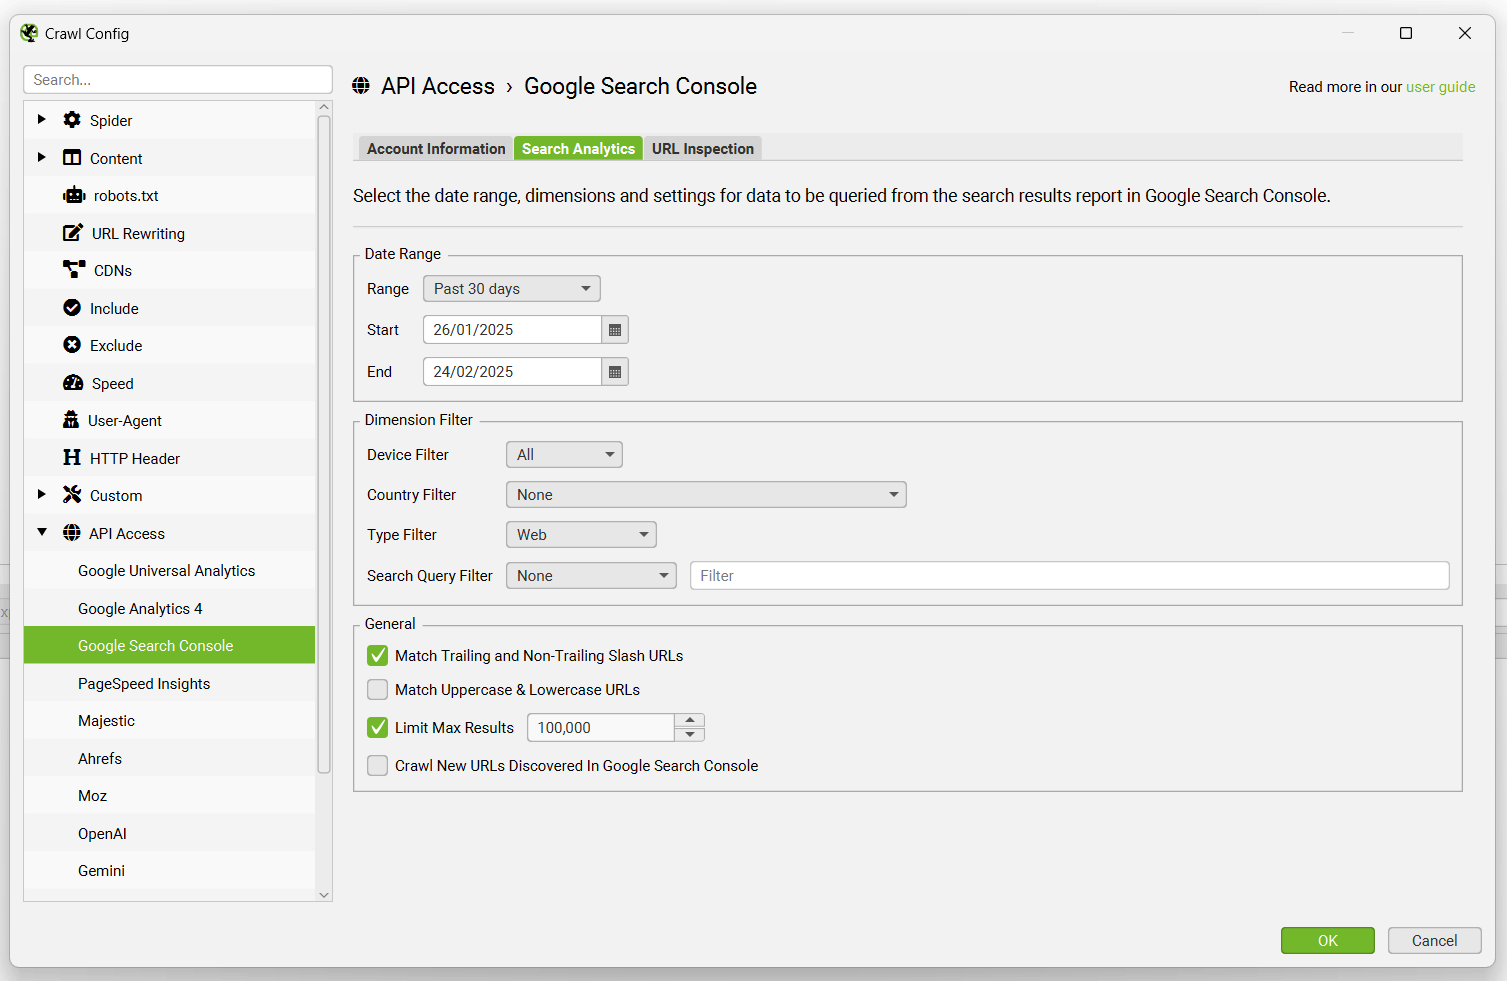
If you wish to crawl new URLs discovered from Google Search Console to find any potential orphan pages, remember to enable the configuration shown below.
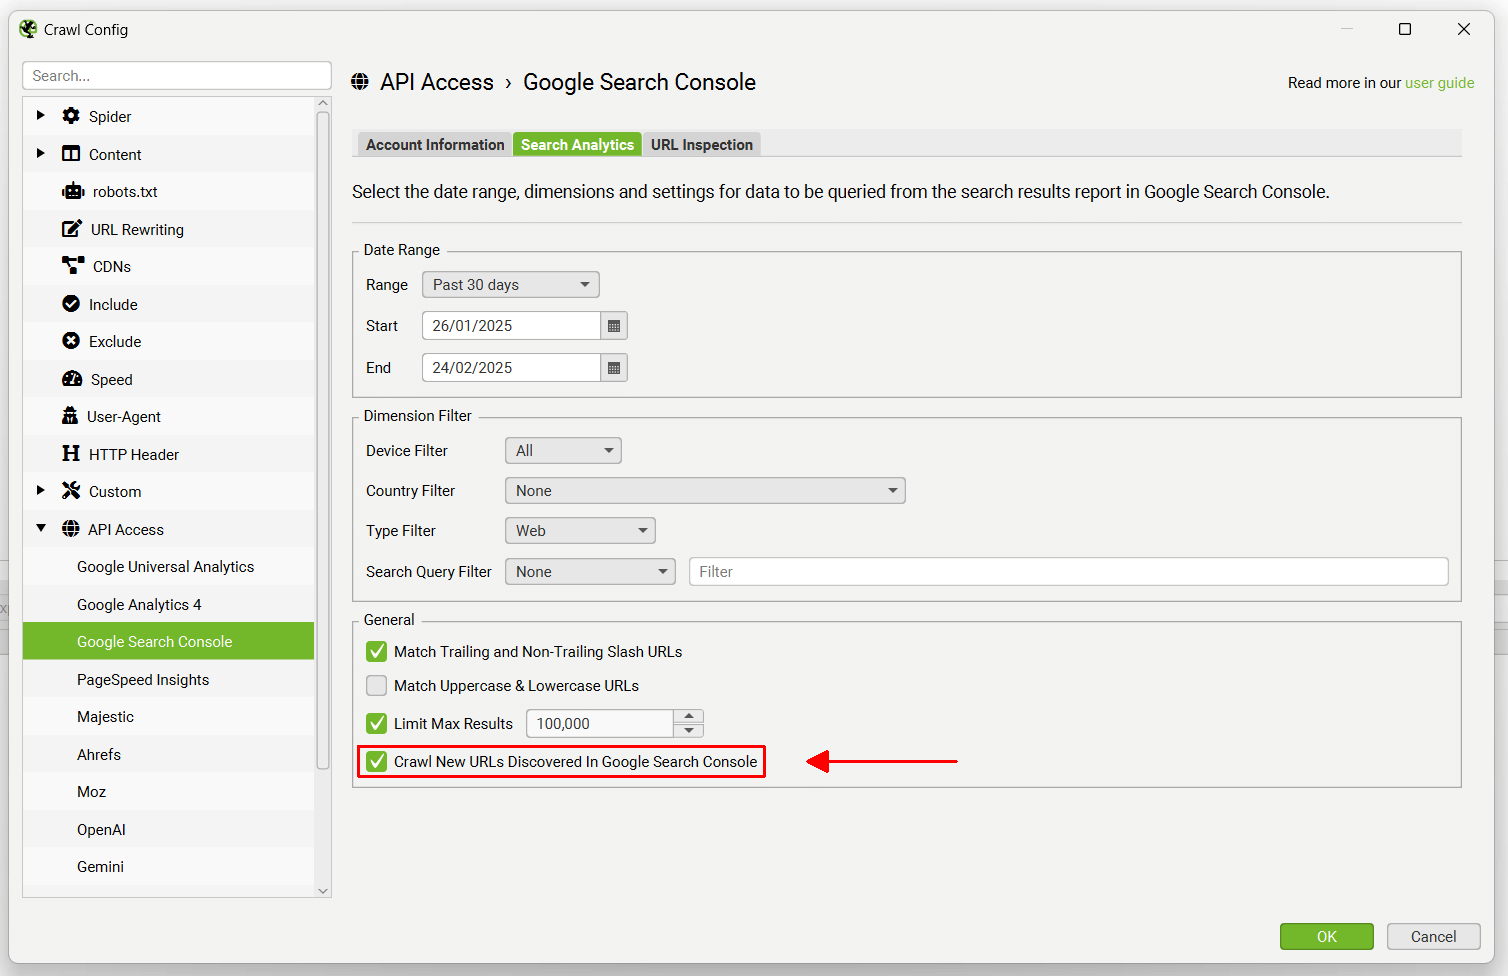
Optionally, you can navigate to the ‘URL Inspection’ tab and ‘Enable URL Inspection’ to collect data about the indexed status of up to 2,000 URLs in the crawl.
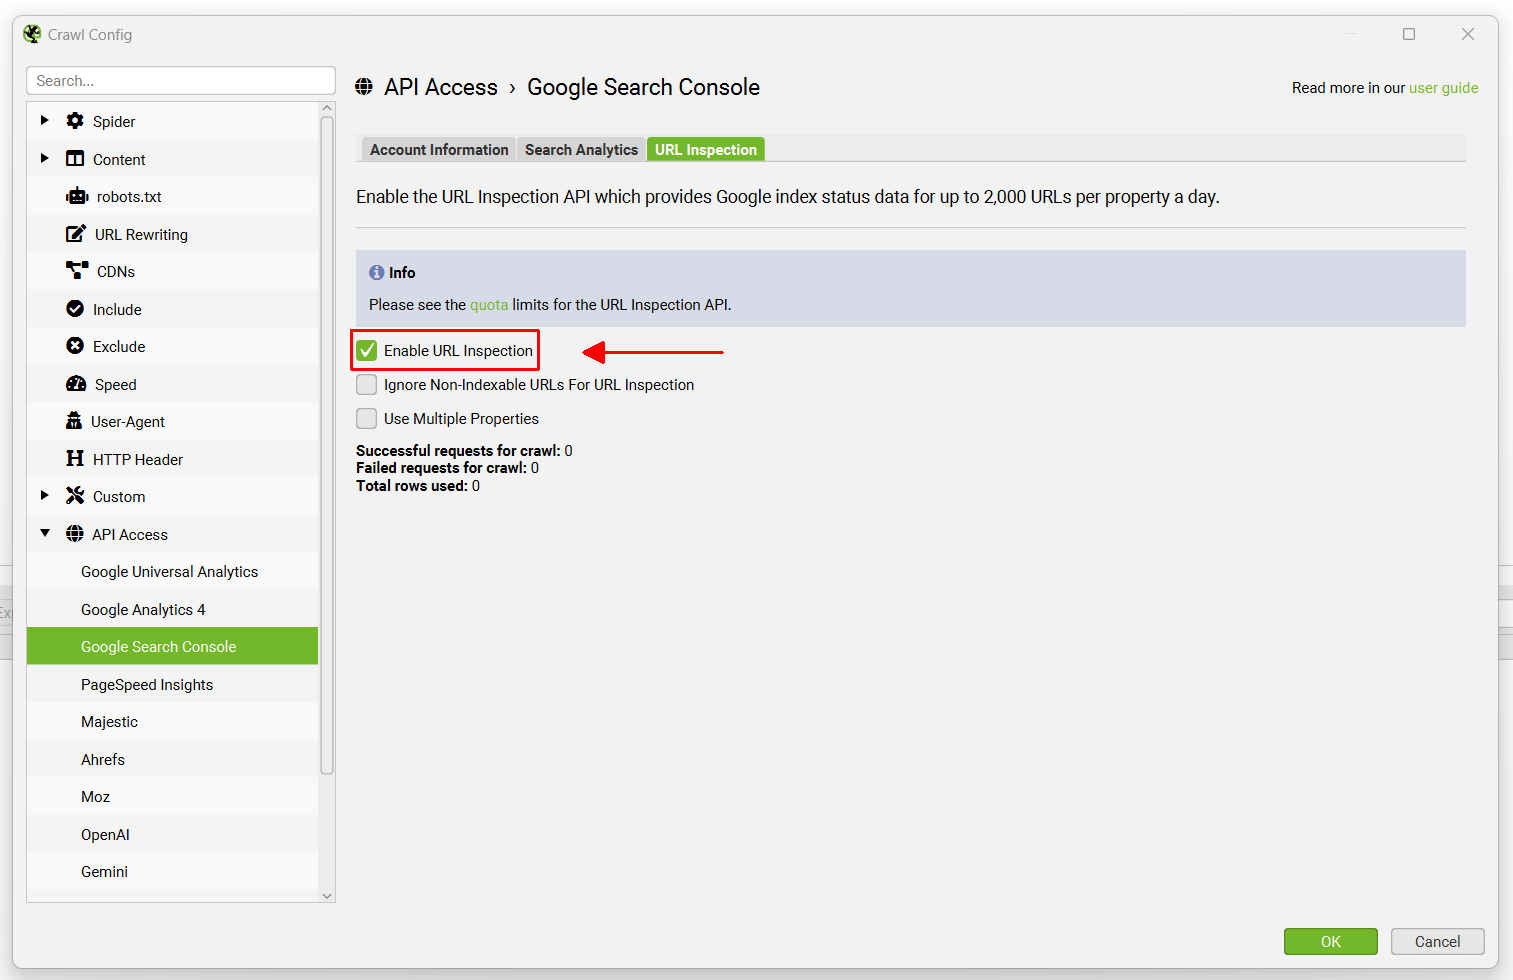
The SEO Spider crawls breadth-first by default, meaning via crawl depth from the start page of the crawl. The first 2k HTML URLs discovered will be queried, so focus the crawl on specific sections, use the configration for include and exclude, or list mode to get the data on key URLs and templates you need.
The following configuration options are available –
- Ignore Non-Indexable URLs for URL Inspection – This means any URLs in the crawl that are classed as ‘Non-Indexable’, won’t be queried via the API. Only Indexable URLs will be queried, which can help save on your inspection quota if you’re confident on your sites set-up.
- Use Multiple Properties – If multiple properties are verified for the same domain the SEO Spider will automatically detect all relevant properties in the account, and use the most specific property to request data for the URL. This means it’s now possible to get far more than 2k URLs with URL Inspection API data in a single crawl, if there are multiple properties set up – without having to perform multiple crawls.
The URL Inspection API includes the following data.
- Summary – A top level verdict on whether the URL is indexed and eligible to display in the Google search results. ‘URL is on Google’ means the URL has been indexed, can appear in Google Search results, and no problems were found with any enhancements found in the page (rich results, mobile, AMP). ‘URL is on Google, but has Issues’ means it has been indexed and can appear in Google Search results, but there are some problems with mobile usability, AMP or Rich results that might mean it doesn’t appear in an optimal way. ‘URL is not on Google’ means it is not indexed by Google and won’t appear in the search results. This filter can include non-indexable URLs (such as those that are ‘noindex’) as well as Indexable URLs that are able to be indexed.
- Coverage – A short, descriptive reason for the status of the URL, explaining why the URL is or isn’t on Google.
- Last Crawl – The last time this page was crawled by Google, in your local time. All information shown in this tool is derived from this last crawled version.
- Crawled As – The user agent type used for the crawl (desktop or mobile).
- Crawl Allowed – Indicates whether your site allowed Google to crawl (visit) the page or blocked it with a robots.txt rule.
- Page Fetch – Whether or not Google could actually get the page from your server. If crawling is not allowed, this field will show a failure.
- Indexing Allowed – Whether or not your page explicitly disallowed indexing. If indexing is disallowed, the reason is explained, and the page won’t appear in Google Search results.
- User-Declared Canonical – If your page explicitly declares a canonical URL, it will be shown here.
- Google-Selected Canonical – The page that Google selected as the canonical (authoritative) URL, when it found similar or duplicate pages on your site.
- Mobile Usability – Whether the page is mobile friendly or not.
- Mobile Usability Issues – If the ‘page is not mobile friendly’, this column will display a list of mobile usability errors.
- AMP Results – A verdict on whether the AMP URL is valid, invalid or has warnings. ‘Valid’ means the AMP URL is valid and indexed. ‘Invalid’ means the AMP URL has an error that will prevent it from being indexed. ‘Valid with warnings’ means the AMP URL can be indexed, but there are some issues that might prevent it from getting full features, or it uses tags or attributes that are deprecated, and might become invalid in the future.
- AMP Issues – If the URL has AMP issues, this column will display a list of AMP errors.
- Rich Results – A verdict on whether Rich results found on the page are valid, invalid or has warnings. ‘Valid’ means rich results have been found and are eligible for search. ‘Invalid’ means one or more rich results on the page has an error that will prevent it from being eligible for search. ‘Valid with warnings’ means the rich results on the page are eligible for search, but there are some issues that might prevent it from getting full features.
- Rich Results Types – A comma separated list of all rich result enhancements discovered on the page.
- Rich Results Types Errors – A comma separated list of all rich result enhancements discovered with an error on the page. To export specific errors discovered, use the ‘Bulk Export > URL Inspection > Rich Results’ export.
- Rich Results Warnings – A comma separated list of all rich result enhancements discovered with a warning on the page. To export specific warnings discovered, use the ‘Bulk Export > URL Inspection > Rich Results’ export.
You can read more about the the indexed URL results from Google.
There are 11 filters under the ‘Search Console’ tab, which allow you to filter Google Search Console data from both APIs.
- Clicks Above 0 – This simply means the URL in question has 1 or more clicks.
- No Search Analytics Data – This means that the Search Analytics API didn’t return any data for the URLs in the crawl. So the URLs either didn’t receive any impressions, or perhaps the URLs in the crawl are just different to those in GSC for some reason.
- Non-Indexable with Search Analytics Data – URLs that are classed as non-indexable, but have Google Search Analytics data.
- Orphan URLs – URLs that have been discovered via Google Search Analytics, rather than internal links during a crawl. This filter requires ‘Crawl New URLs Discovered In Google Search Console’ to be enabled under the ‘General’ tab of the Google Search Console configuration window (Configuration > API Access > Google Search Console) and post ‘crawl analysis‘ to be populated. Please see our guide on how to find orphan pages.
- URL Is Not on Google – The URL is not indexed by Google and won’t appear in the search results. This filter can include non-indexable URLs (such as those that are ‘noindex’) as well as Indexable URLs that are able to be indexed. It’s a catch all filter for anything not on Google according to the API.
- Indexable URL Not Indexed – Indexable URLs found in the crawl that are not indexed by Google and won’t appear in the search results. This can include URLs that are unknown to Google, or those that have been discovered but not indexed, and more.
- URL is on Google, But Has Issues – The URL has been indexed and can appear in Google Search results, but there are some problems with mobile usability, AMP or Rich results that might mean it doesn’t appear in an optimal way.
- User-Declared Canonical Not Selected – Google has chosen to index a different URL to the one declared by the user in the HTML. Canonicals are hints, and sometimes Google does a great job of this, other times it’s less than ideal.
- Page Is Not Mobile Friendly – The page has issues on mobile devices.
- AMP URL Is Invalid – The AMP has an error that will prevent it from being indexed.
- Rich Result Invalid – The URL has an error with one or more rich result enhancements that will prevent the rich result from showing in the Google search results. To export specific errors discovered, use the ‘Bulk Export > URL Inspection > Rich Results’ export.
Please see our tutorial on ‘How To Automate The URL Inspection API‘.
PageSpeed Insights integration
Configuration > API Access > PageSpeed Insights
You can connect to the Google PageSpeed Insights API and pull in page speed and mobile usability data directly during a crawl.
PageSpeed Insights uses Lighthouse, so the SEO Spider is able to display Lighthouse speed metrics, analyse speed opportunities and diagnostics at scale and gather real-world data from the Chrome User Experience Report (CrUX) which contains Core Web Vitals from real-user monitoring (RUM). Lighthouse is also able to report on mobile usability issues.
There are two options to run PageSpeed Insights, ‘remote’ and ‘local’.

- Remote means Lighthouse is run on URLs on a remote server, and data is returned to the SEO Spider via the API. The benefits are it won’t consume your machines resource to run Lighthouse. It can also fetch CrUX page speed data.
- Local means Lighthouse runs directly on the users machine. The benefits are that this can be used for sites that require authentication to access them, and it’s not limited to 25k queries a day like the API. CrUX data is not available by running Lighthouse locally however.
Start the SEO Spider and go to ‘Configuration > API Access > PageSpeed Insights’, choose the ‘source, enter a free PageSpeed Insights API key if necessary, choose your metrics, connect and crawl.
Setting Up A PageSpeed Insights API Key
To set-up a free PageSpeed Insights API key, login to your Google account and then visit the PageSpeed Insights getting started page.
Once you’re on the page, scroll down a paragraph and click on the ‘Get a Key’ button.
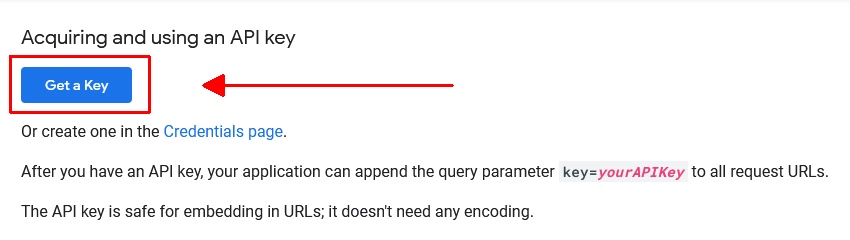
Then follow the process of creating a key – by submitting a project name, agreeing to the terms and conditions and clicking ‘next’.
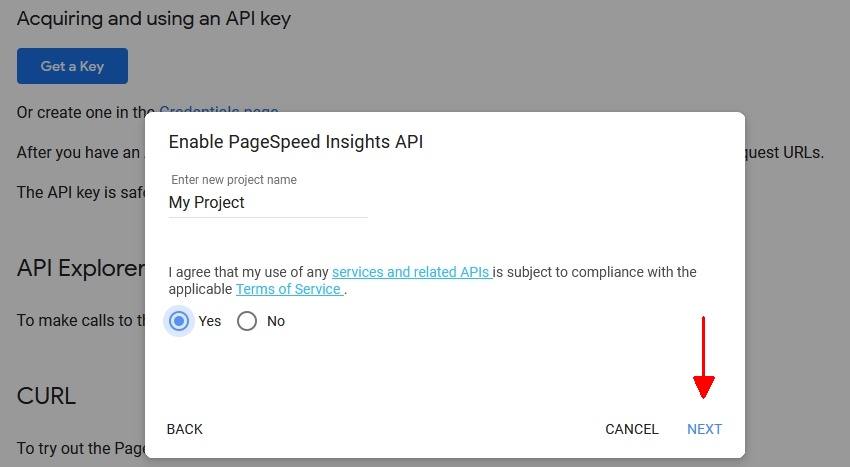
It will then enable the key for PSI and provide an API key which can be copied.
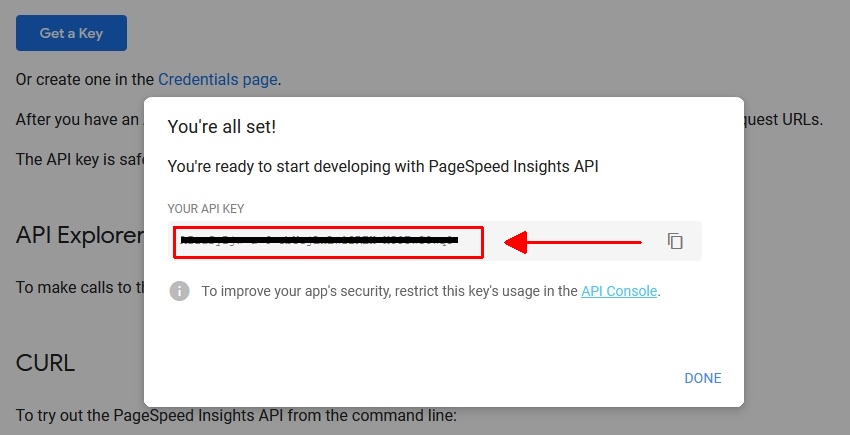
Copy the key, and click ‘Done’.
Then simply paste this in the SEO Spider ‘Secret Key:’ field under ‘Configuration > API Access > PageSpeed Insights’ and press ‘connect’. This key is used when making calls to the API at https://www.googleapis.com/pagespeedonline/v5/runPagespeed.
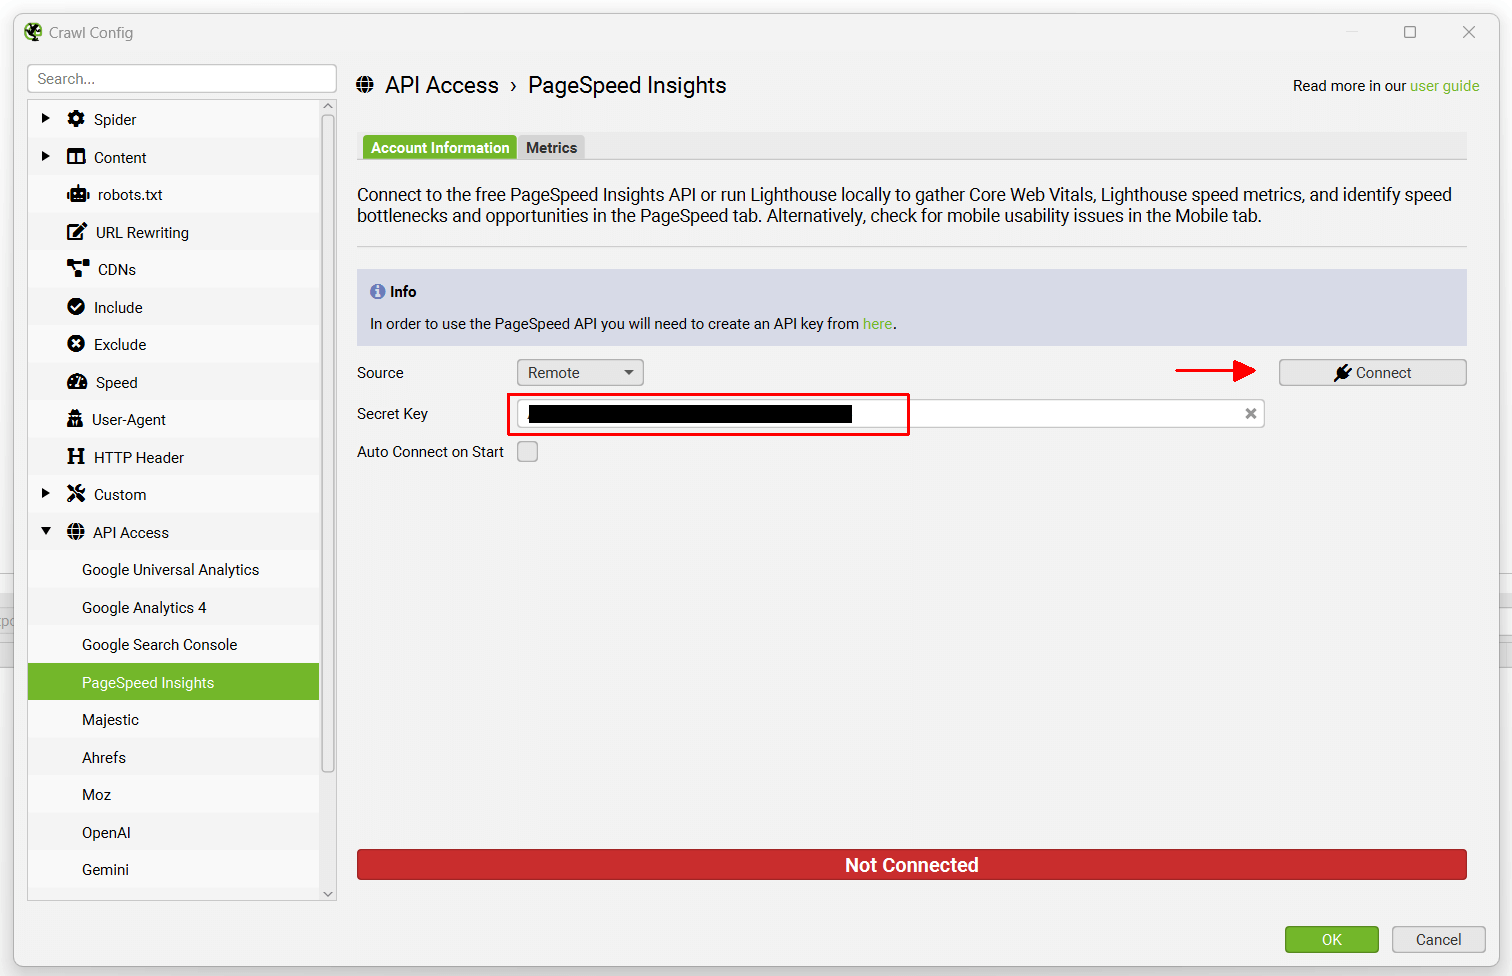
That’s it, you’re now connected! The SEO Spider will remember your secret key, so you can ‘connect’ quickly upon starting the application each time.
If you find that your API key is saying it’s ‘failed to connect’, it can take a couple of minutes to activate. You can also check that the PSI API has been enabled in the API library as per our FAQ. If it isn’t enabled, enable it – and it should then allow you to connect.
Once you have connected, you can choose metrics and device to query under the ‘metrics’ tab.
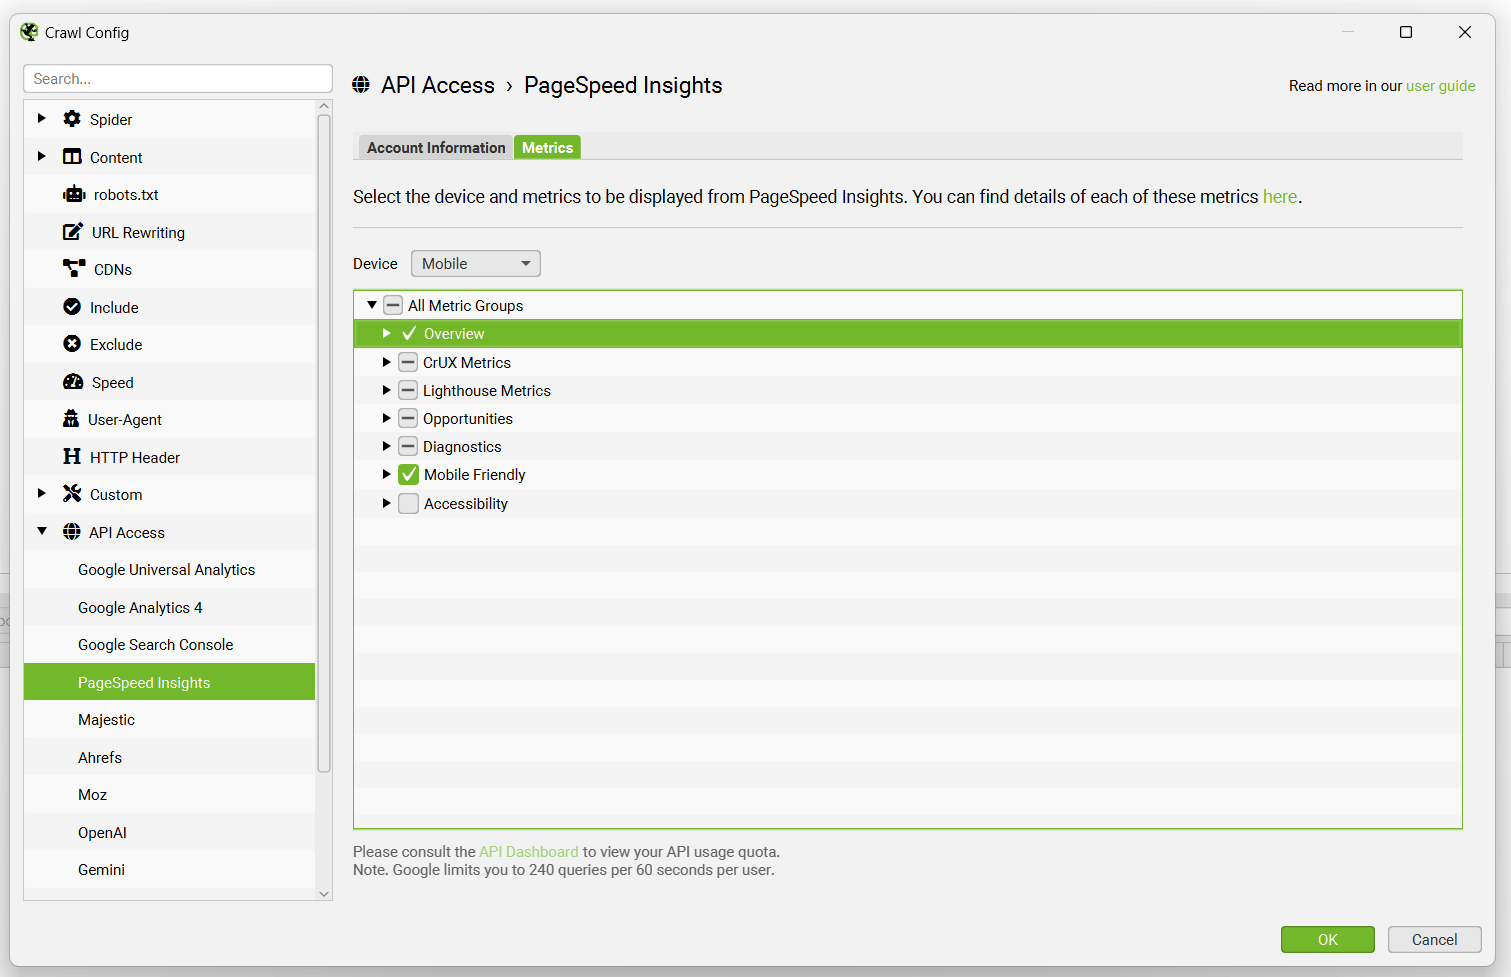
The following speed metrics, opportunities and diagnostics data can be configured to be collected via the PageSpeed Insights API integration.
Overview Metrics
- Total Size Savings
- Total Time Savings
- Total Requests
- Total Page Size
- HTML Size
- HTML Count
- Image Size
- Image Count
- CSS Size
- CSS Count
- JavaScript Size
- JavaScript Count
- Font Size
- Font Count
- Media Size
- Media Count
- Other Size
- Other Count
- Third Party Size
- Third Party Count
CrUX Metrics (‘Field Data’ in PageSpeed Insights)
- Core Web Vitals Assessment
- CrUX First Contentful Paint Time (sec)
- CrUX First Contentful Paint Category
- CrUX First Input Delay Time (sec)
- CrUX First Input Delay Category
- CrUX Largest Contentful Paint Time (sec)
- CrUX Largest Contentful Paint Category
- CrUX Cumulative Layout Shift
- CrUX Cumulative Layout Shift Category
- CrUX Interaction to Next Paint (ms)
- CrUX Interaction to Next Paint Category
- CrUX Time to First Byte (ms)
- CrUX Time to First Byte Category
- CrUX Origin Core Web Vitals Assessment
- CrUX Origin First Contentful Paint Time (sec)
- CrUX Origin First Contentful Paint Category
- CrUX Origin First Input Delay Time (sec)
- CrUX Origin First Input Delay Category
- CrUX Origin Largest Contentful Paint Time (sec)
- CrUX Origin Largest Contentful Paint Category
- CrUX Origin Cumulative Layout Shift
- CrUX Origin Cumulative Layout Shift Category
- CrUX Origin Interaction to Next Paint (ms)
- CrUX Origin Interaction to Next Paint Category
- CrUX Origin Time to First Byte (ms)
- CrUX Origin Time to First Byte Category
Lighthouse Metrics (‘Lab Data’ in PageSpeed Insights)
- Performance Score
- Time to First Byte (ms)
- First Contentful Paint Time (sec)
- First Contentful Paint Score
- Speed Index Time (sec)
- Speed Index Score
- Largest Contentful Paint Time (sec)
- Largest Contentful Paint Score
- Time to Interactive (sec)
- Time to Interactive Score
- First Meaningful Paint Time (sec)
- First Meaningful Paint Score
- Max Potential First Input Delay (ms)
- Max Potential First Input Delay Score
- Total Blocking Time (ms)
- Total Blocking Time Score
- Cumulative Layout Shift
- Cumulative Layout Shift Score
Opportunities
- Eliminate Render-Blocking Resources Savings (ms)
- Defer Offscreen Images Savings (ms)
- Defer Offscreen Images Savings
- Efficiently Encode Images Savings (ms)
- Efficiently Encode Images Savings
- Properly Size Images Savings (ms)
- Properly Size Images Savings
- Minify CSS Savings (ms)
- Minify CSS Savings
- Minify JavaScript Savings (ms)
- Minify JavaScript Savings
- Reduce Unused CSS Savings (ms)
- Reduce Unused CSS Savings
- Reduce Unused JavaScript Savings (ms)
- Reduce Unused JavaScript Savings
- Serve Images in Next-Gen Formats Savings (ms)
- Serve Images in Next-Gen Formats Savings
- Enable Text Compression Savings (ms)
- Enable Text Compression Savings
- Preconnect to Required Origin Savings
- Server Response Times (TTFB) (ms)
- Server Response Times (TTFB) Category (ms)
- Multiple Redirects Savings (ms)
- Preload Key Requests Savings (ms)
- Use Video Format for Animated Images Savings (ms)
- Use Video Format for Animated Images Savings
- Total Image Optimization Savings (ms)
- Avoid Serving Legacy JavaScript to Modern Browser Savings
Diagnostics
- DOM Element Count
- JavaScript Execution Time (sec)
- JavaScript Execution Time Category
- Efficient Cache Policy Savings
- Minimize Main-Thread Work (sec)
- Minimize Main-Thread Work Category
- Text Remains Visible During Webfont Load
- Image Elements Do Not Have Explicit Width & Height
- Avoid Large Layout Shifts
Mobile Friendly
- Viewport Not Set
- Target Size
- Content Width
- Font Display Size
To view data and issues discovered, view the PageSpeed tab and Mobile tab in the SEO Spider.
For more details on each issue, warning or opportunity discovered, refer to our SEO Issues library.
Please read the Lighthouse performance audits guide for more definitions and explanations of each of the opportunities and diagnostics described above.
The speed opportunities, source pages and resource URLs that have potential savings can be exported in bulk via the ‘Reports > PageSpeed’ menu.
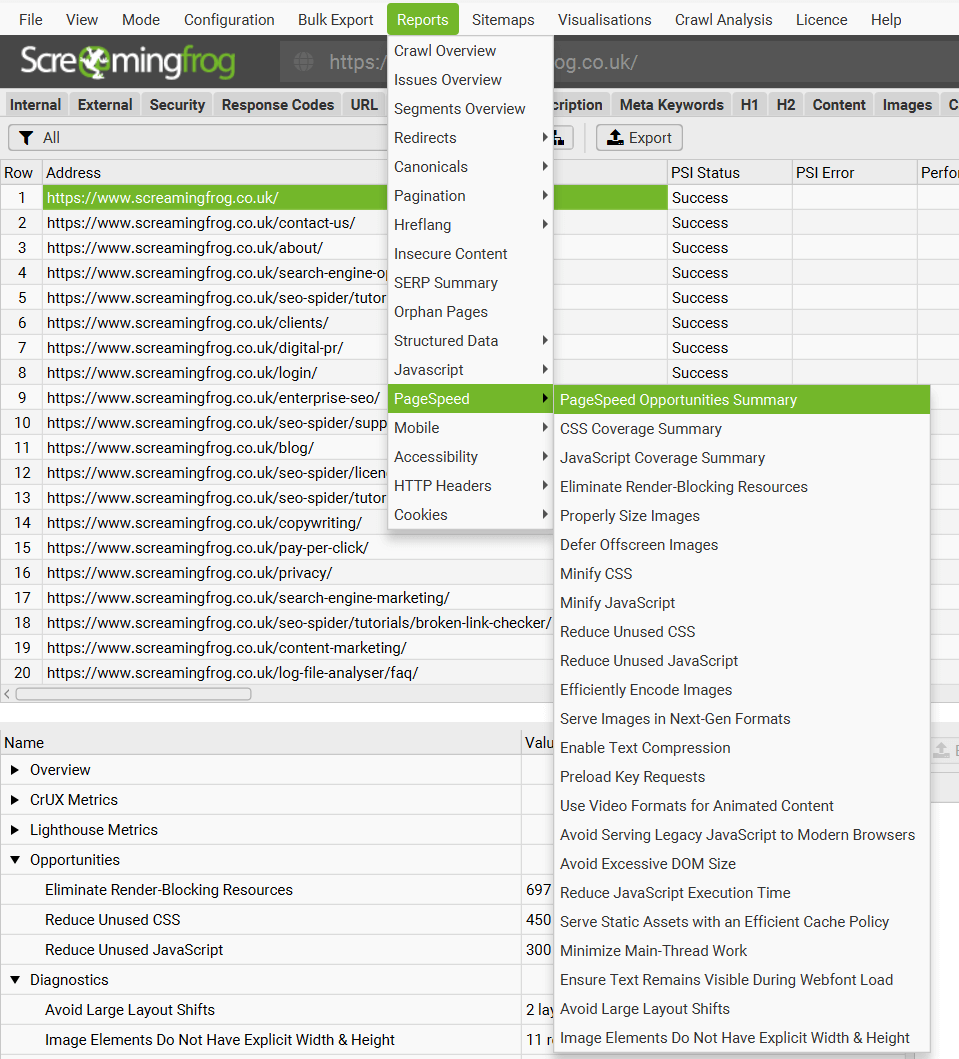
PageSpeed Insights API Limits
The API is limited to 25,000 queries a day at 60 queries per 100 seconds per user. The SEO Spider automatically controls the rate of requests to remain within these limits. With these limits in places the best case is the SEO Spider can request 36 URLs a minute. So for a crawl of 10,000 URLs this would take just over 4.5 hours.
Please consult the ‘quotas’ section of the API dashboard to view your API usage quota.
PageSpeed Insights API Errors
The PSI Status column shows whether an API request for a URL has been a success, or there has been an error. An ‘error’ usually reflects the web interface, where you would see the same error and message.
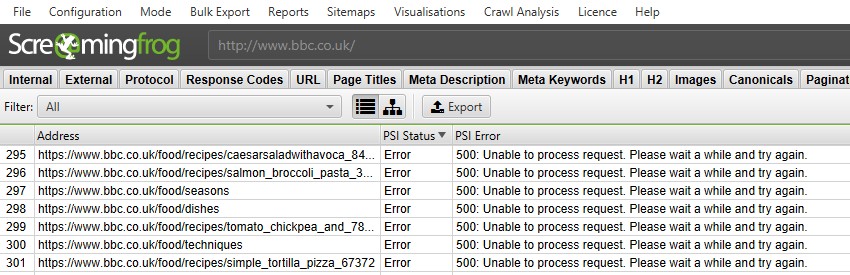
There two most common error messages are –
- “500: Unable to process request. Please wait a while and try again” – This error is generally replicable in the web interface and our testing suggests that from time to time the PSI API is unable to process requests, possibly due to overall load capacity. If this occurs, we recommend pausing the crawl for 10mins until it’s available again and working in the web interface, and then right click and ‘re-spider’ URLs. This will re-request the PSI data for those URLs selected and continue crawling and requesting API data for other URLs.
- “500: Lighthouse returned error: ERRORED_DOCUMENT_REQUEST. Lighthouse was unable to reliably load the page you requested.” – This error is again typically replicable in the web interface and is not an issue with the SEO Spider, or the API, it is directly related to the Lighthouse audit conducted by PSI. Unfortunately ‘re-spidering’ these URLs to re-request API data generally does not help. You can provide Google with feedback about any errors you experience directly on their mailing list or ask questions via Stack Overflow.
Please read our FAQ on PageSpeed Insights API Errors for more information.
Majestic
Configuration > API Access > Majestic
In order to use Majestic, you will need a subscription which allows you to pull data from their API. You then just need to navigate to ‘Configuration > API Access > Majestic’ and then click on the ‘generate an Open Apps access token’ link.

You will then be taken to Majestic, where you need to ‘grant’ access to the Screaming Frog SEO Spider.
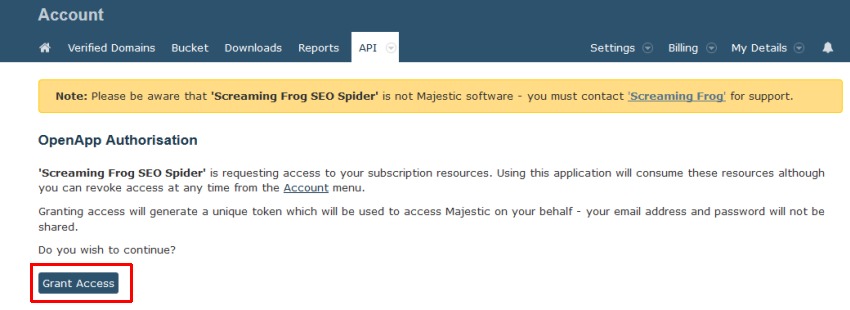
You will then be given a unique access token from Majestic.
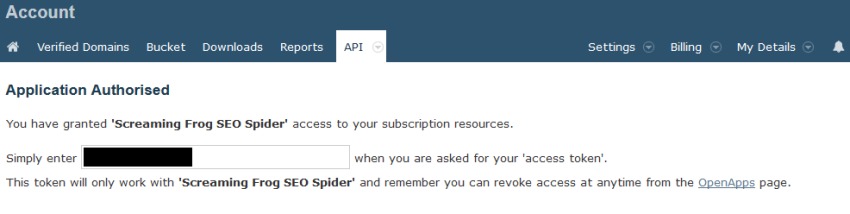
Copy and input this token into the API key box in the Majestic window, and click ‘connect’ –
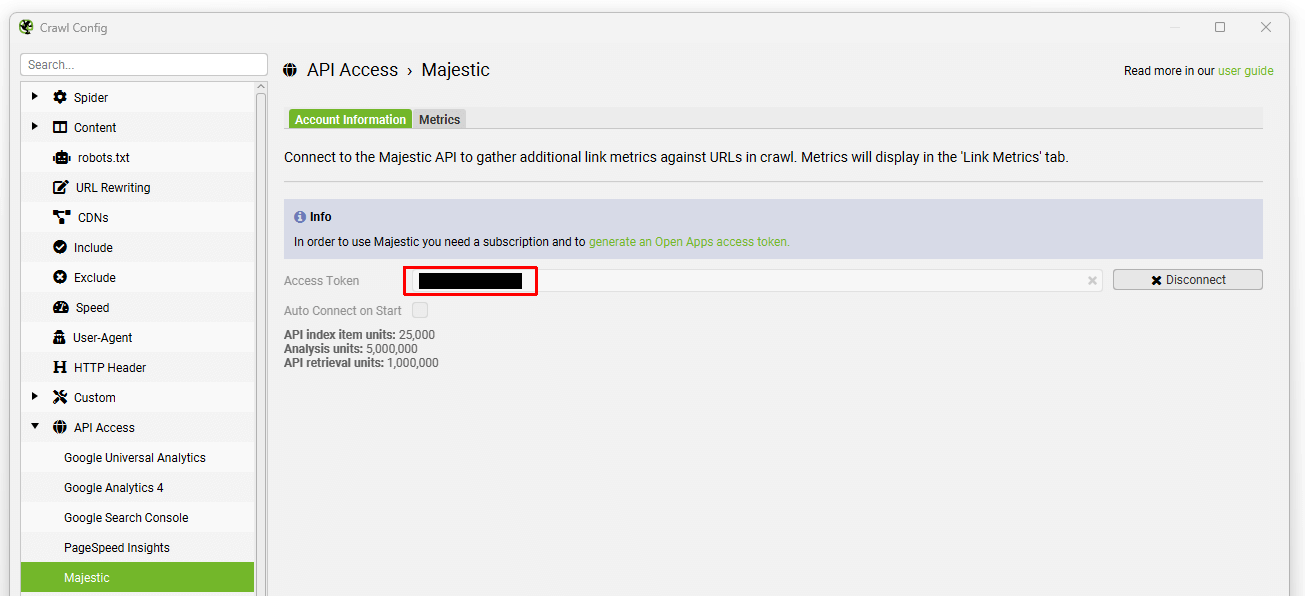
You can then select the data source (fresh or historic) and metrics, at either URL, subdomain or domain level.
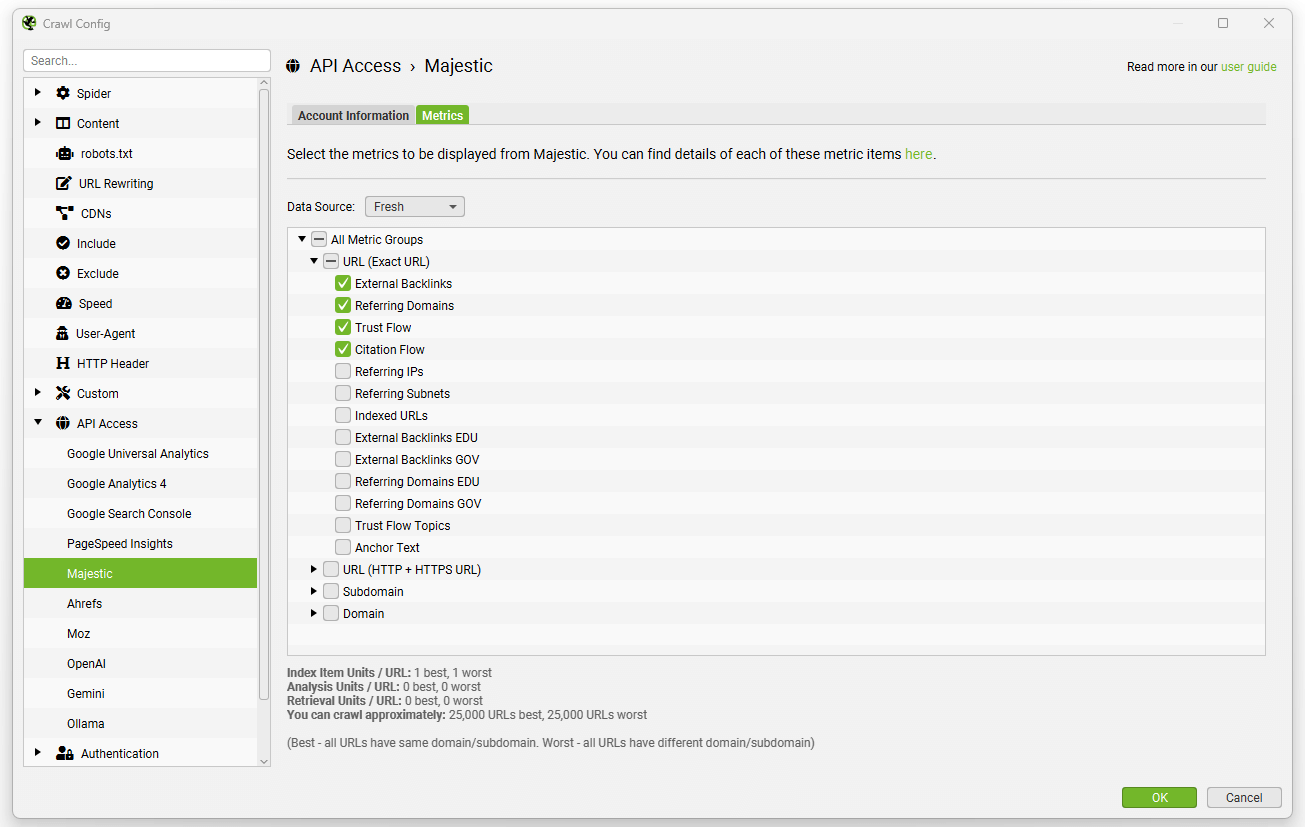
Then simply click ‘start’ to perform your crawl, and the data will be automatically pulled via their API, and can be viewed under the ‘link metrics’ and ‘internal’ tabs.
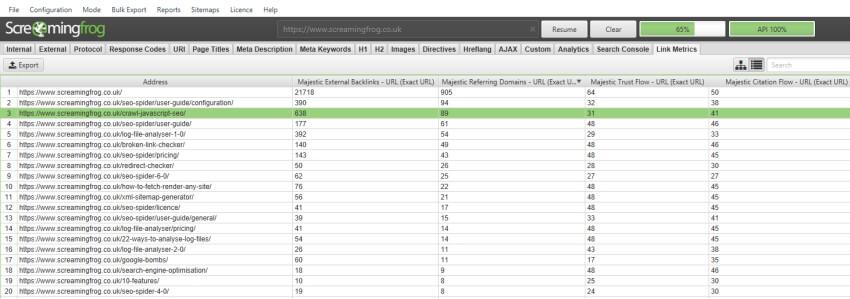
Ahrefs
Configuration > API Access > Ahrefs
In order to use the Ahrefs integration, you will need a paid subscription. The SEO Spider uses version 2 of their API, which does not require an enterprise plan and API units specifically. It’s integrated as an app, and utilises integration rows. Each subscription level has a row limit.
To use Ahrefs with the SEO Spider, you must create an API access token via the link in the app. You cannot create an API key in Ahrefs, then just input it into the tool.
To set up, navigate to ‘Configuration > API Access > Ahrefs’ and then click on the ‘generate an API access token’ link.
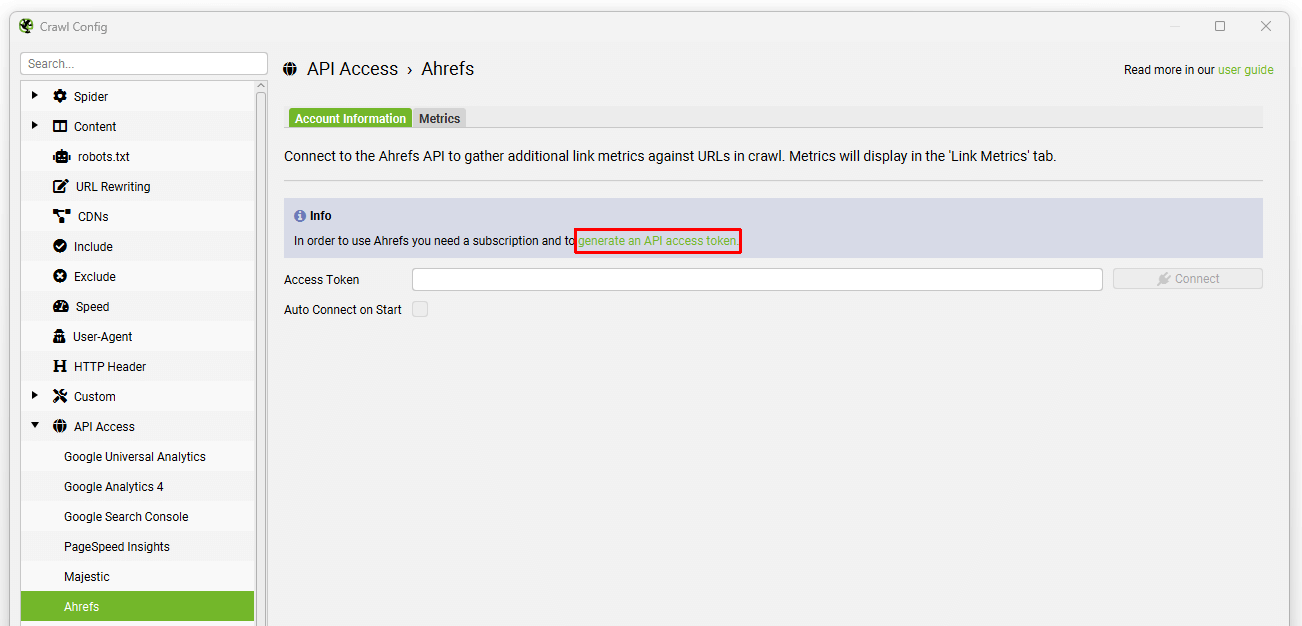
You will then be taken to Ahrefs, where you need to select your workspace.
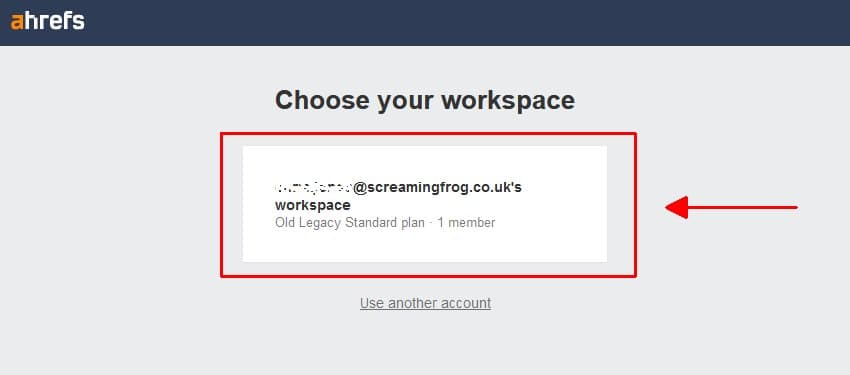
Then ‘allow’ access to the Screaming Frog SEO Spider.
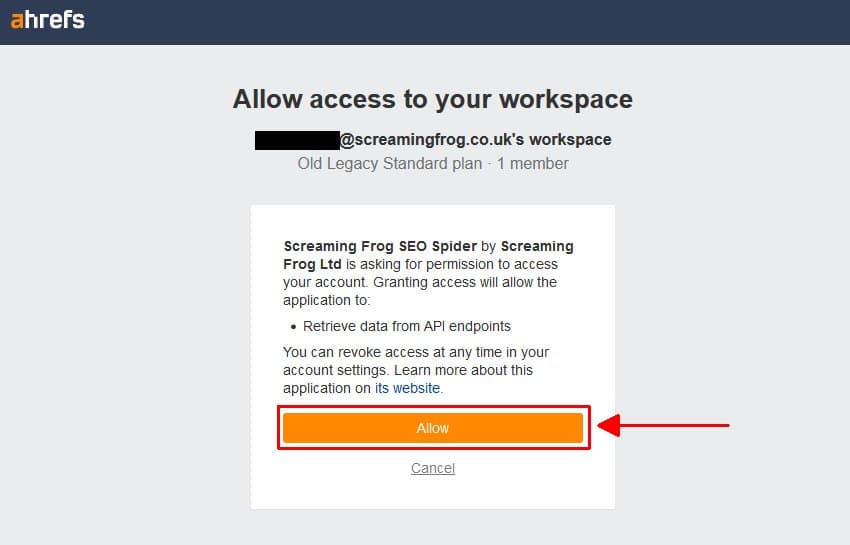
You will then be given a unique access token from Ahrefs (but hosted on the Screaming Frog domain).
Then copy and input this token into the API key box in the Ahrefs window, and click ‘connect’ –
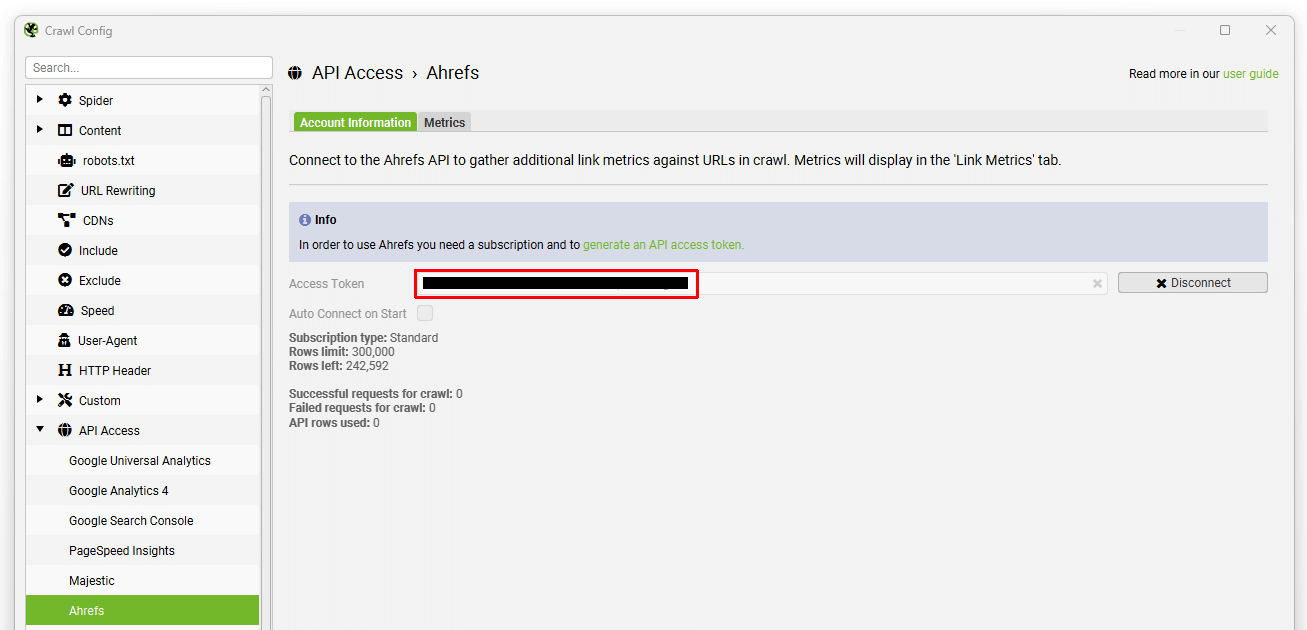
You can then select the metrics you wish to pull at either URL, subdomain or domain level.
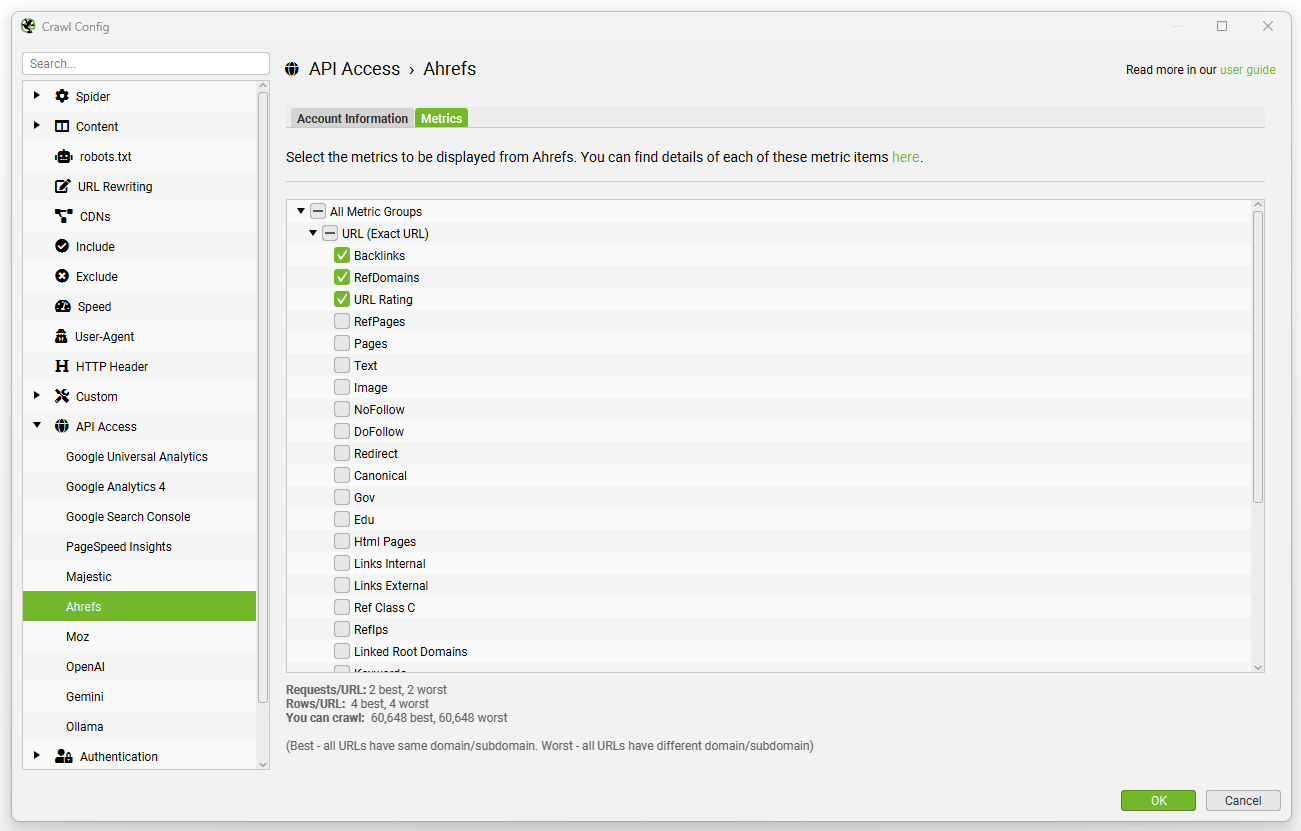
Then simply click ‘start’ to perform your crawl, and the data will be automatically pulled via their API, and can be viewed under the ‘link metrics’ and ‘internal’ tabs.
Moz
Configuration > API Access > Moz
You will require a Moz account to pull data from the Mozscape API. Moz offer a free limited API and a separate paid API, which allows users to pull more metrics, at a faster rate. Please note, this is a separate subscription to a standard Moz PRO account.
To access the API, with either a free account, or paid subscription, you just need to login to your Moz account and view your API ID and secret key.
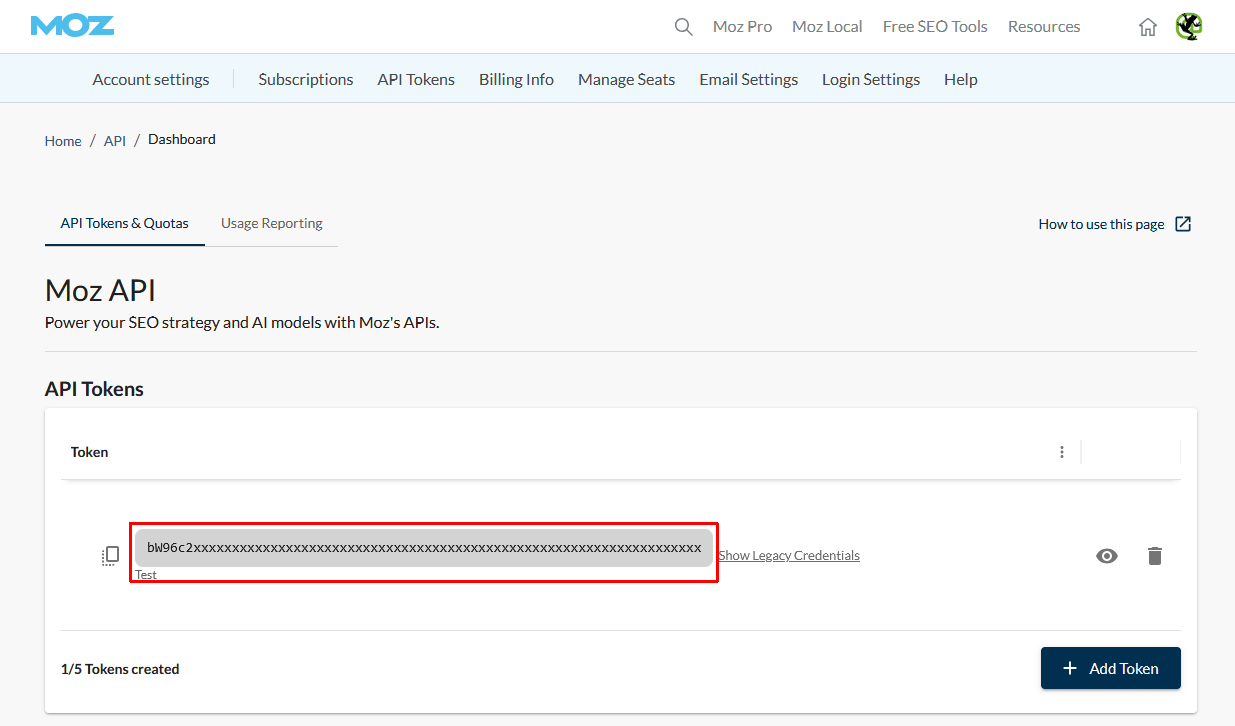
The API uses v.3 of their API, so you just need to insert a singular access token into the SEO Spider.
Copy and paste the Moz API token into the ‘Access Token’ field in the Moz Account Information diablog via ‘Config > API Access > Moz’, select your account type (‘free’ or ‘paid’), and click ‘connect’ –
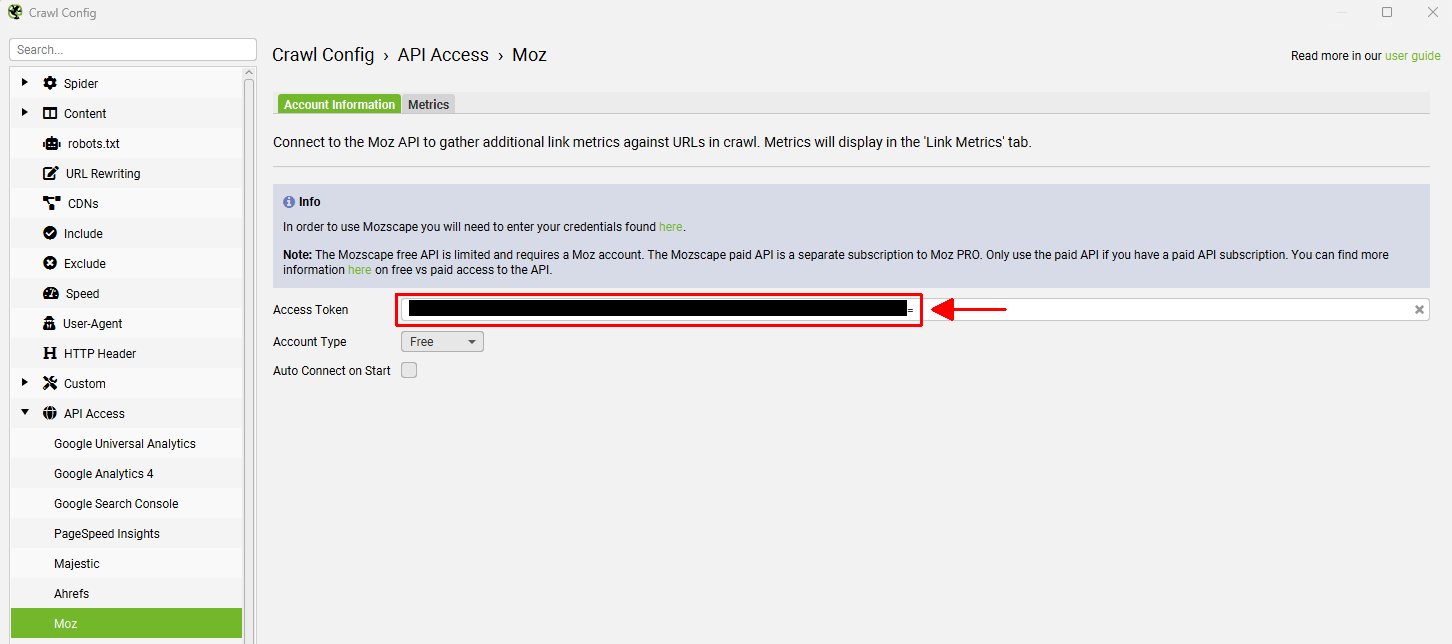
You can then select the metrics available to you, based upon your free or paid plan. Simply choose the metrics you wish to pull at either URL, subdomain or domain level.
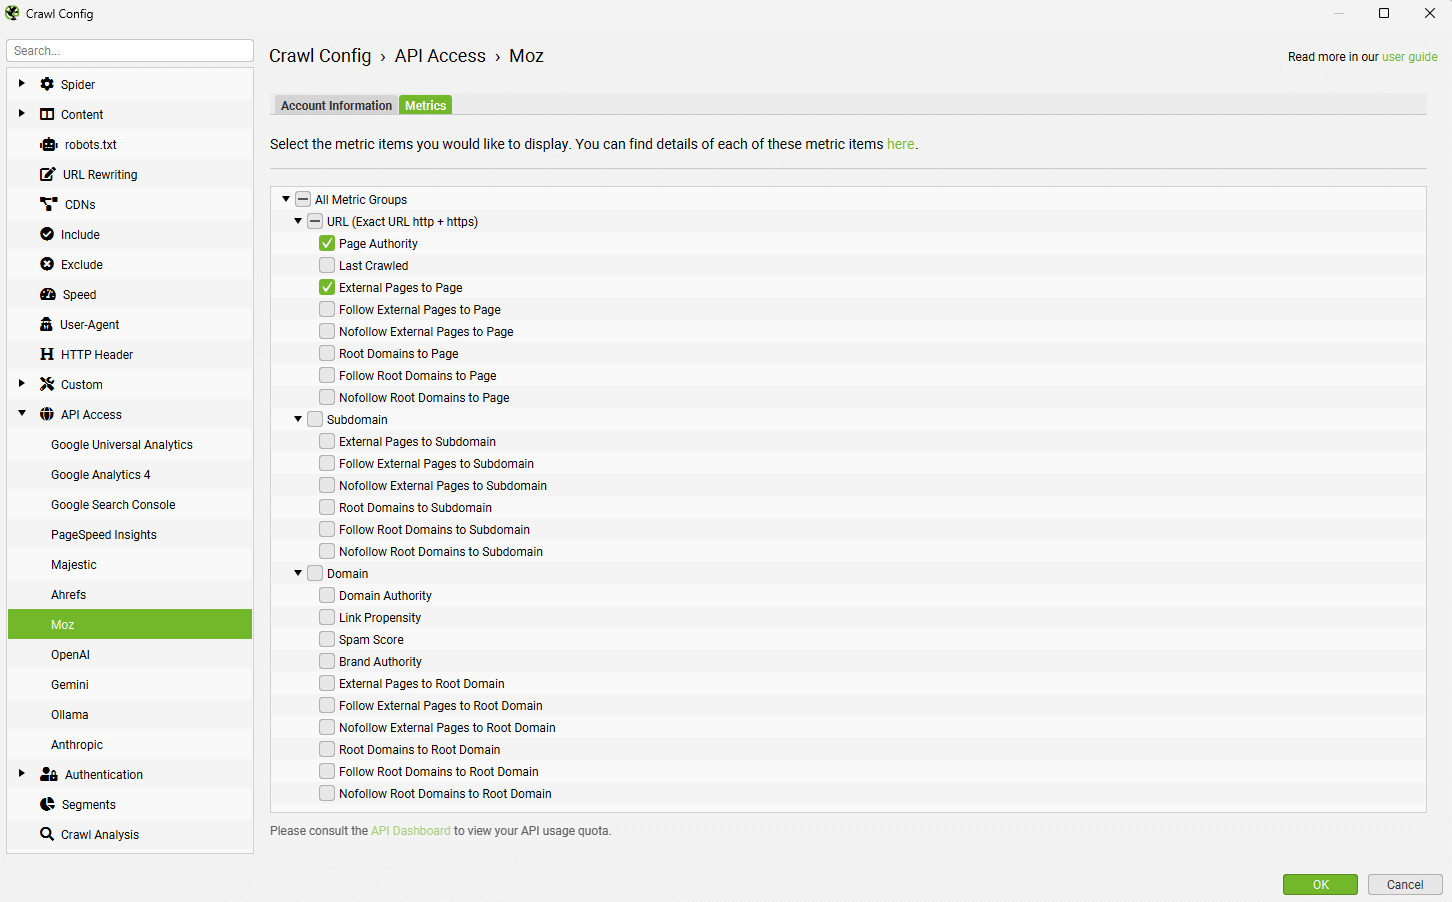
Then simply click ‘start’ to perform your crawl, and the data will be automatically pulled via their API, and can be viewed under the ‘link metrics’ and ‘internal’ tabs.
OpenAI
Configuration > API Access > AI > OpenAI
To connect to OpenAI you will need a funded OpenAI account and an OpenAI API key. This is different to a ChatGPT subscription.
You can sign up to an OpenAI account, select your use as ‘API’, and then head over to the billing section to fund the account.
If you don’t fund the account, it will not work. You’re able to select to add a fixed amount of credit to the account, as well as adjust spending limits. Please carefully review their API pricing and token costs.
When you have an API key, copy and paste it into the ‘API Key’ field in the OpenAI Account Information tab.
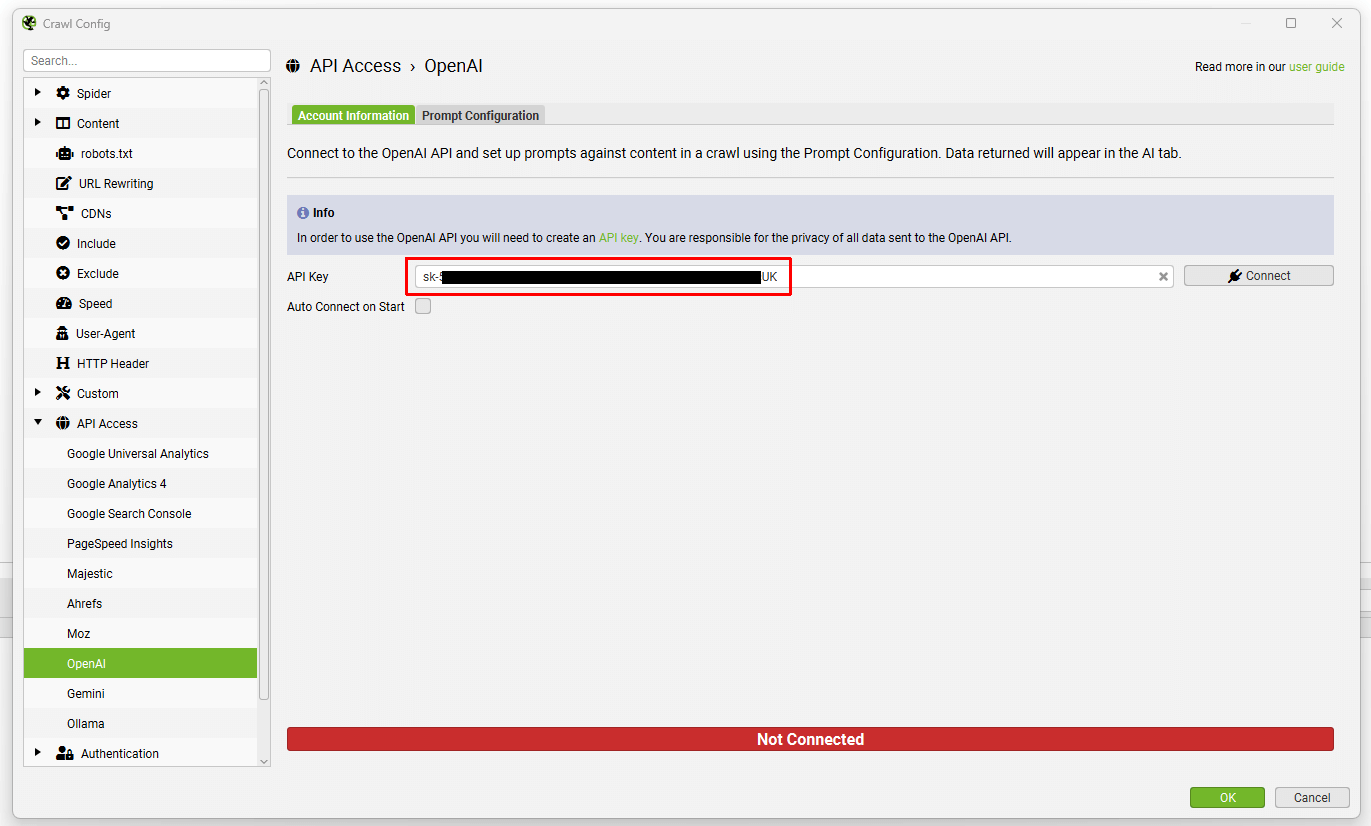
Click ‘Connect’ when you wish to use the set up for a crawl.
Navigate to the ‘Prompt Configuration’ tab, to set up up to 100 prompts against crawl data.
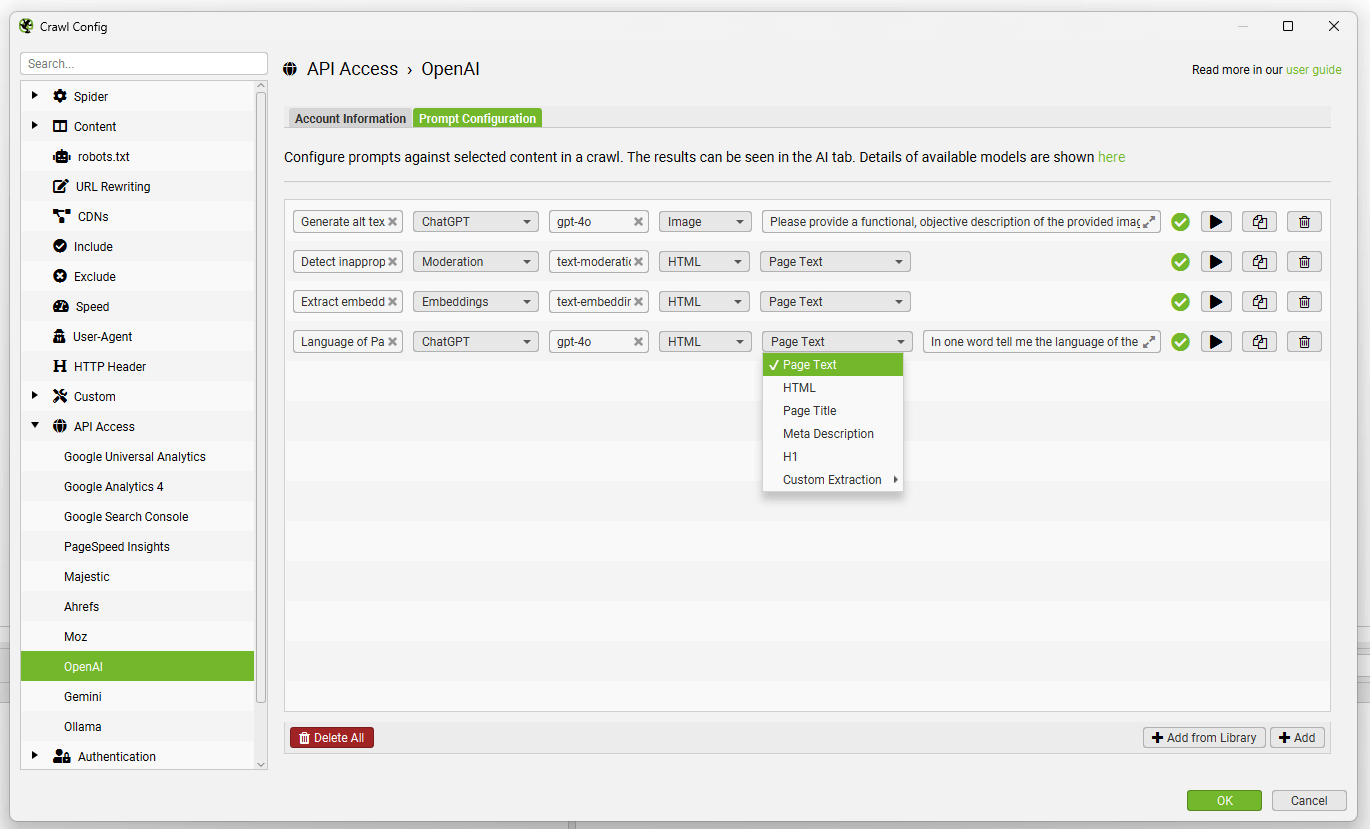
Select the category of model (ChatGPT, Moderation or Embeddings), the OpenAI model used (for example, ‘gpt-4o’), content type and data to be used for the prompt, such as body text, HTML, or a custom extraction, as well as write your custom prompt.
Please note: To use ‘Page Text’ or ‘HTML’ for the prompt, you will need to enable ‘Store HTML‘ via ‘Config > Spider > Extraction’.
To test a prompt, use the ‘play’ icon to the right of the prompt field.
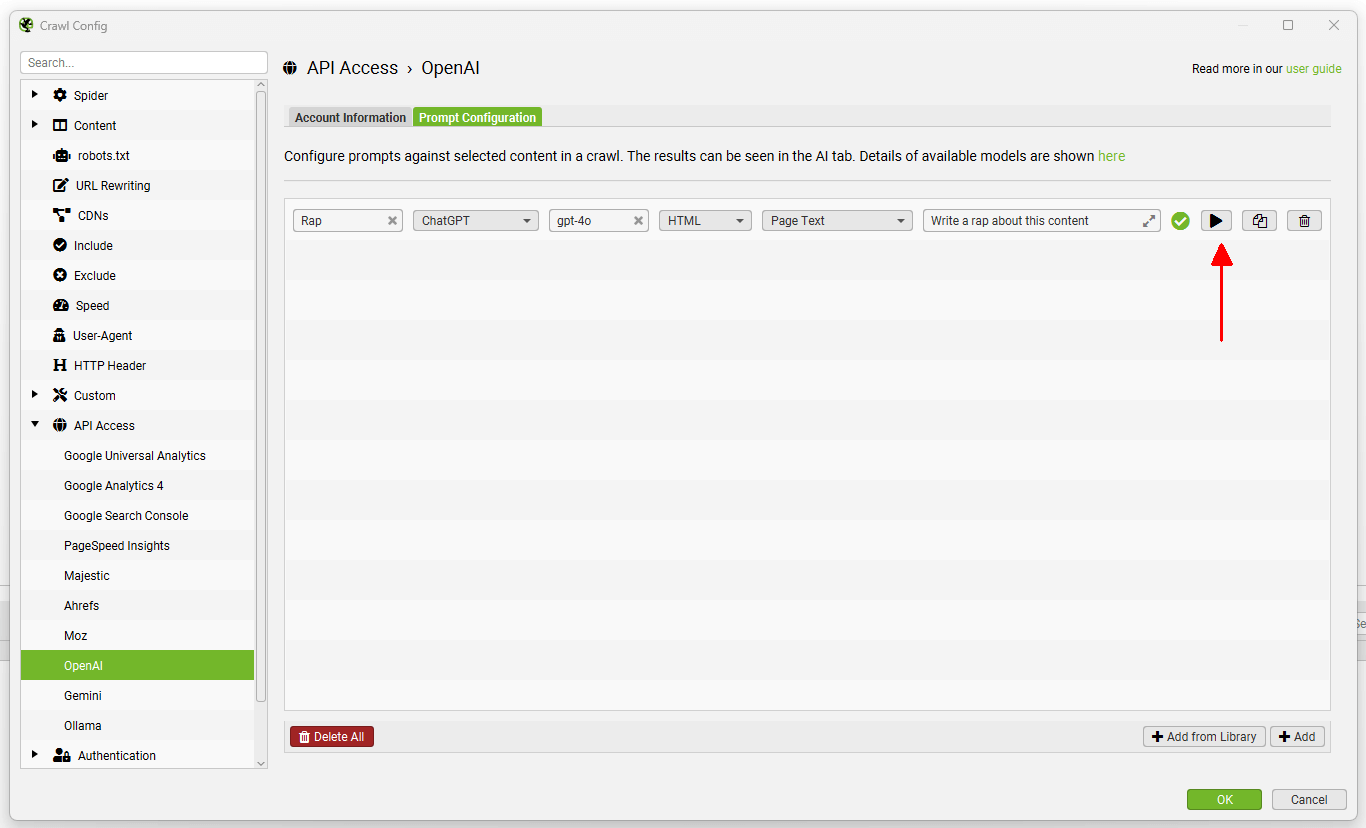
In the OpenAI prompt tester, input the URL to test and click the ‘Test’ button to display both the extraction, and response.
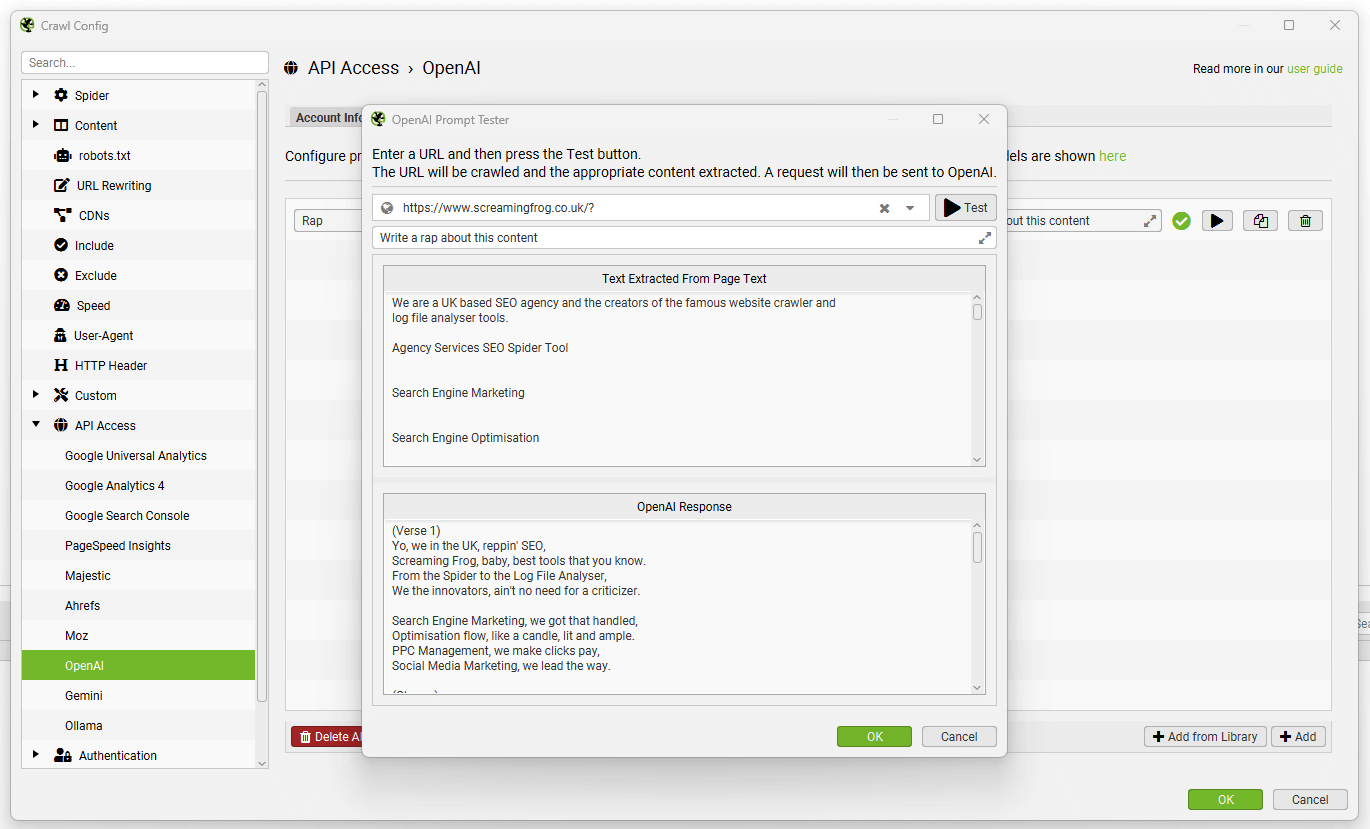
Data from the prompt will appear in the AI tab (and Internal tab, against your usual crawl data).
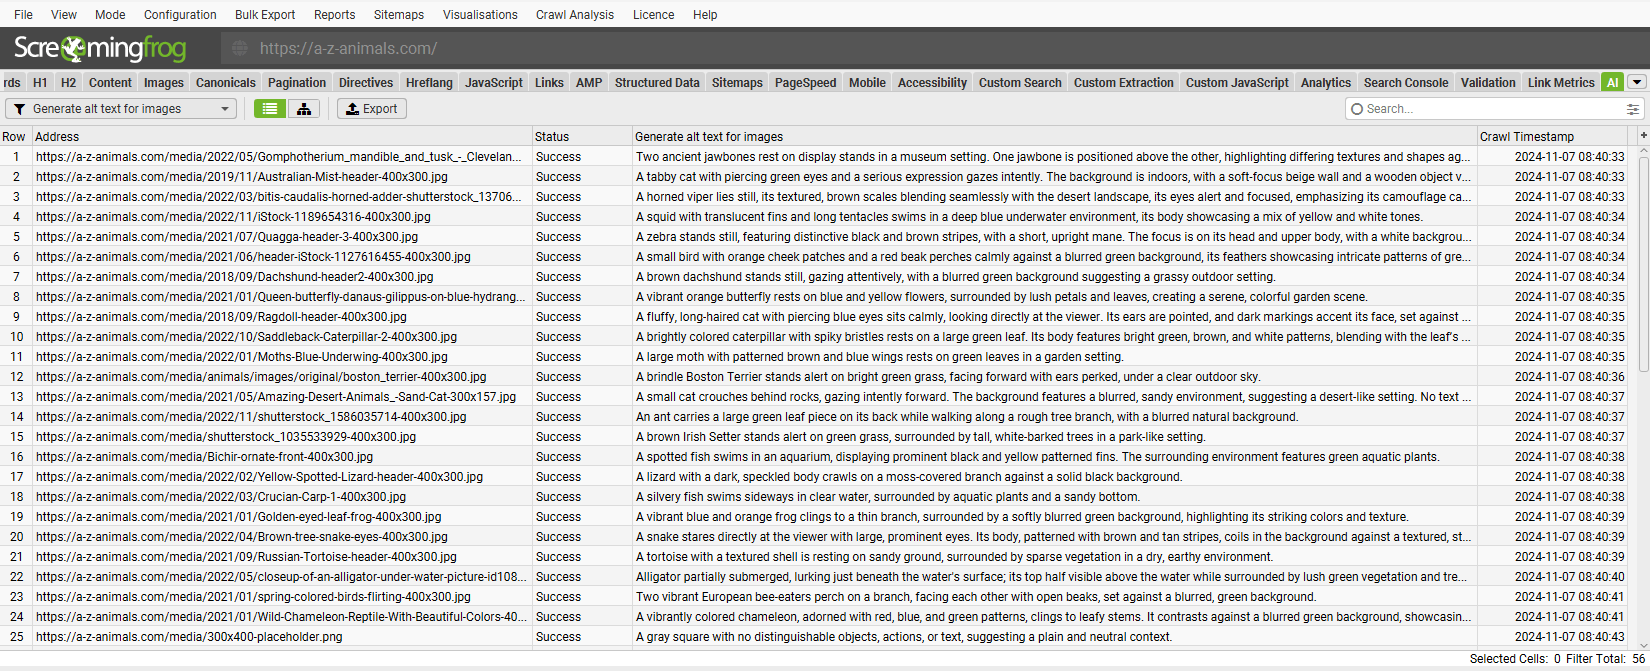
The ‘Add from Library’ function includes half a dozen prompts for inspiration.
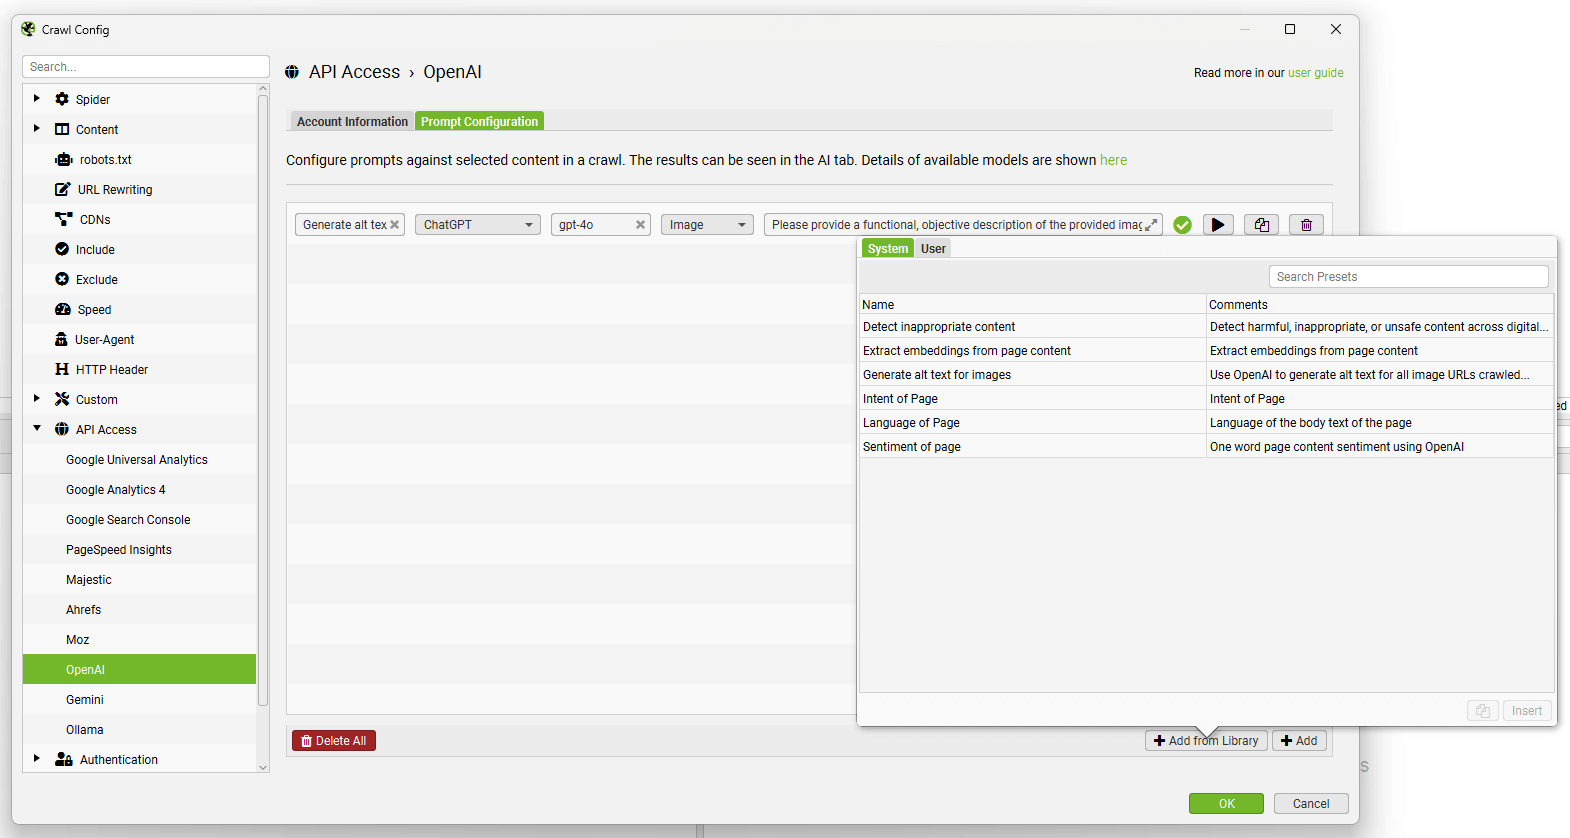
You’re able to add and customise your own using the ‘Add from Library’ button, clicking ‘User’ and the ‘+’ button.
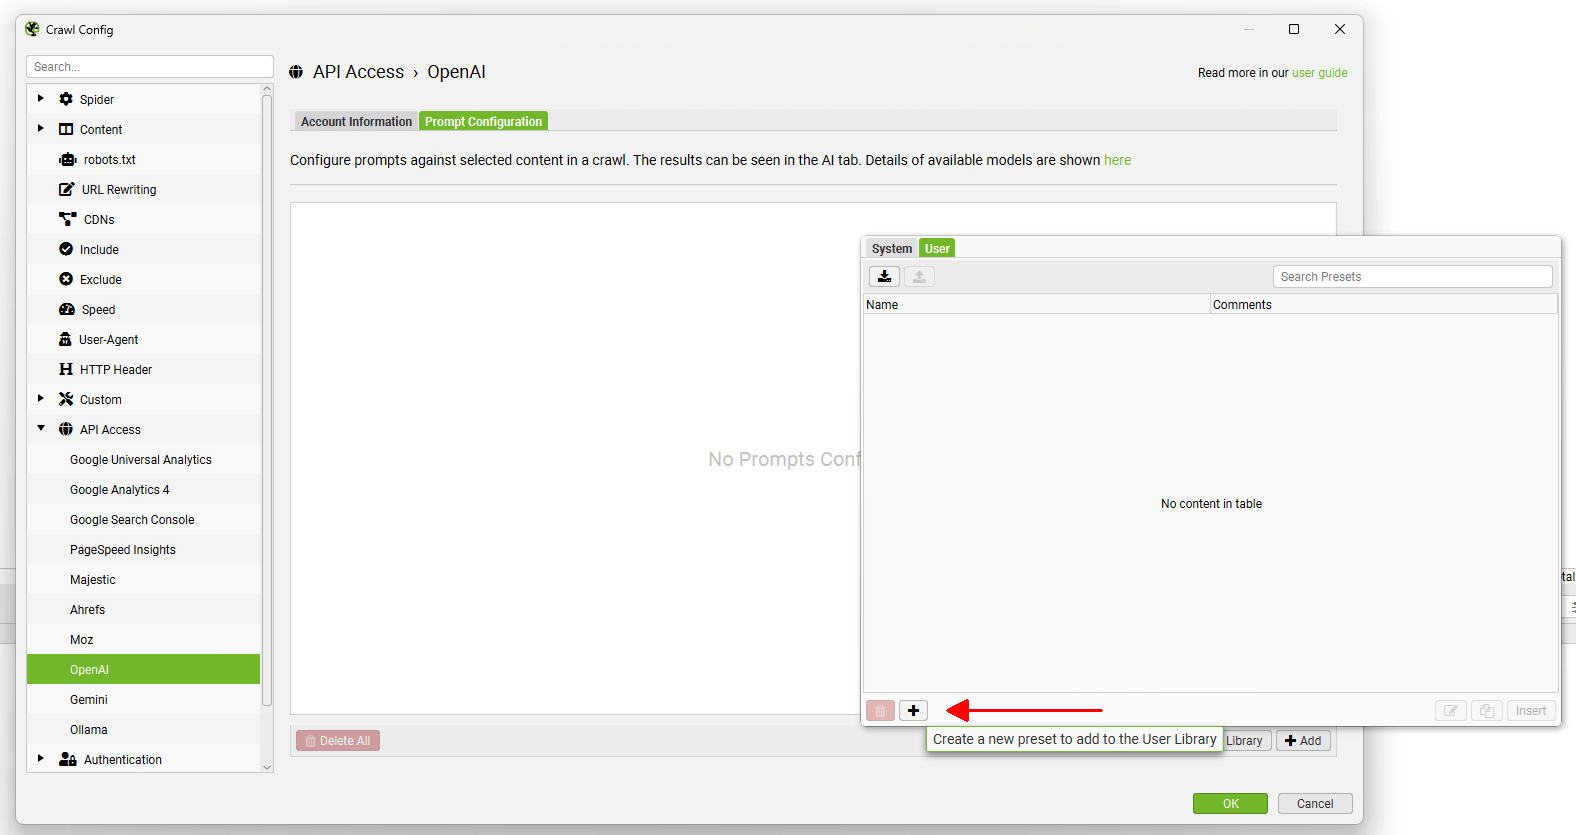
Custom prompts can be shared using the export and import buttons at the top.
Read our full tutorial on How To Crawl With AI Prompts.
Gemini
Configuration > API Access > AI > Gemini
To connect to the Gemini API, you need an API key. You can create a key in Google AI Studio.
Click ‘Create API Key’, select a project and set up an API key. Gemini is only available in select regions, and there are free and paid account types with different rate limits.
When you have an API key, copy and paste it into the ‘API Key’ field in the Gemini Account Information tab.
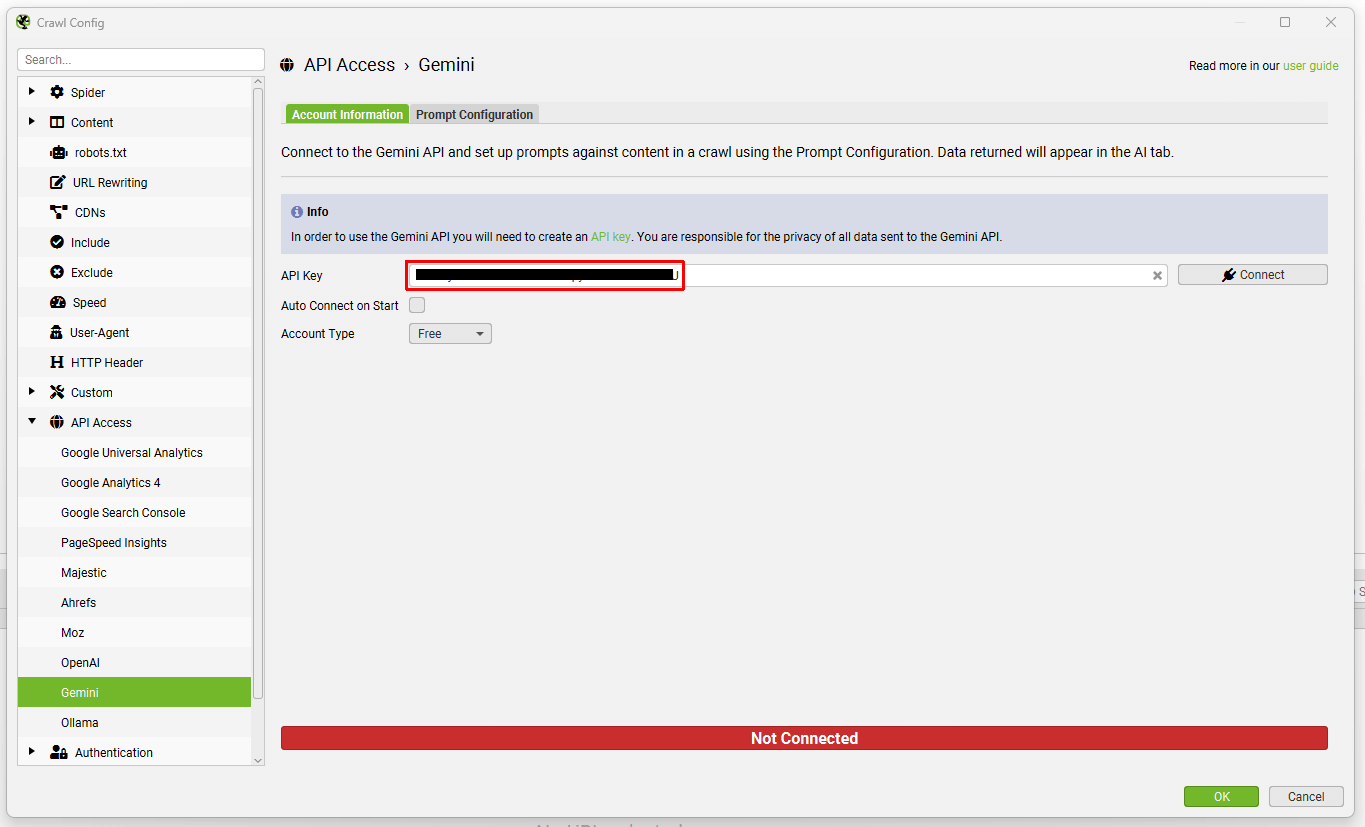
Choose the ‘Account Type’, either free or paid which will adjust the rate limits, and click ‘Connect’ when you wish to use the set up for a crawl.
Navigate to the ‘Prompt Configuration’ tab, to set up up to 100 prompts against crawl data.
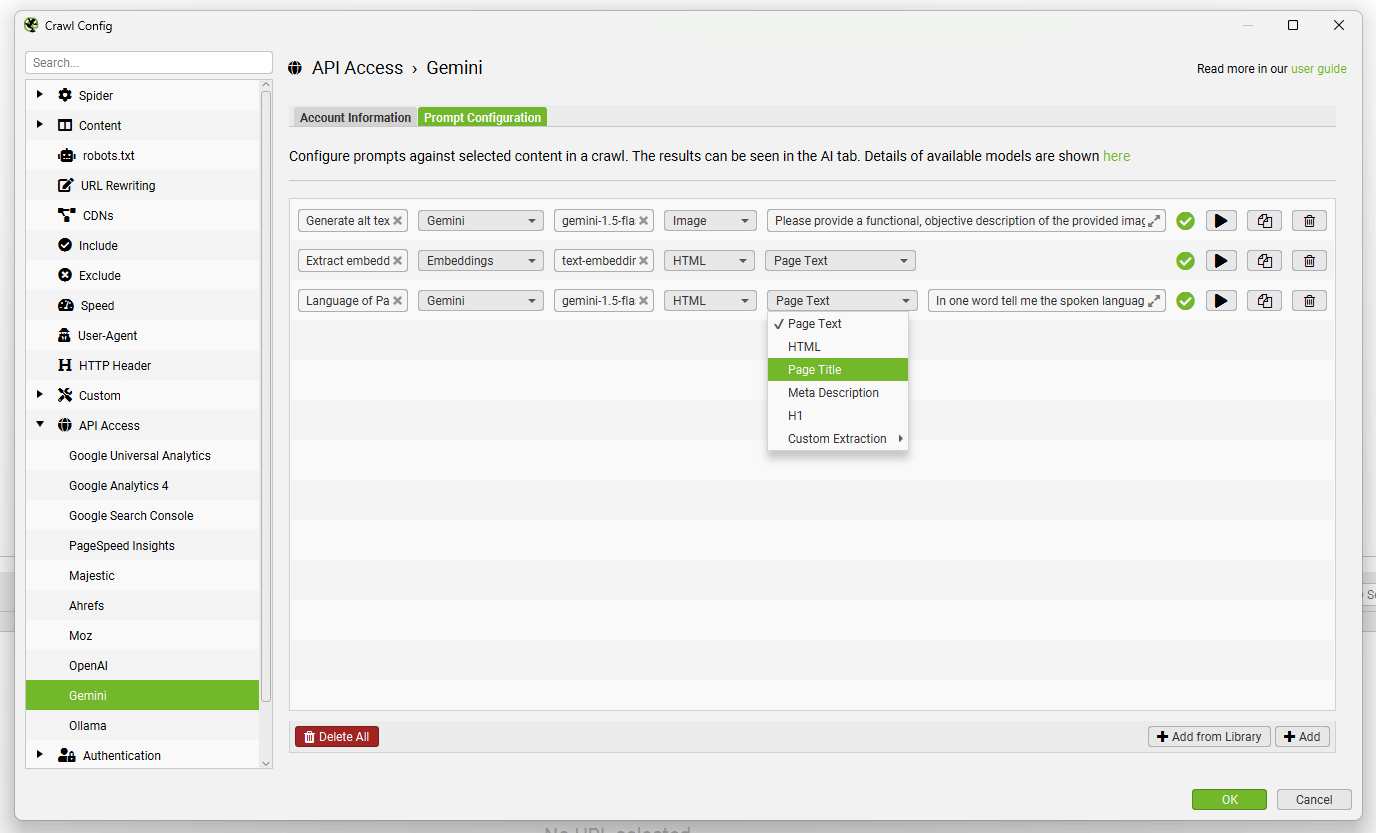
Select the category of model (Gemini or Embeddings), the Gemini model used (for example, ‘gemini-1.5-flash’), content type and data to be used for the prompt, such as body text, HTML, or a custom extraction, as well as write your custom prompt.
Please note: To use ‘Page Text’ or ‘HTML’ for the prompt, you will need to enable ‘Store HTML‘ via ‘Config > Spider > Extraction’.
To test a prompt, use the ‘play’ icon to the right of the prompt field.
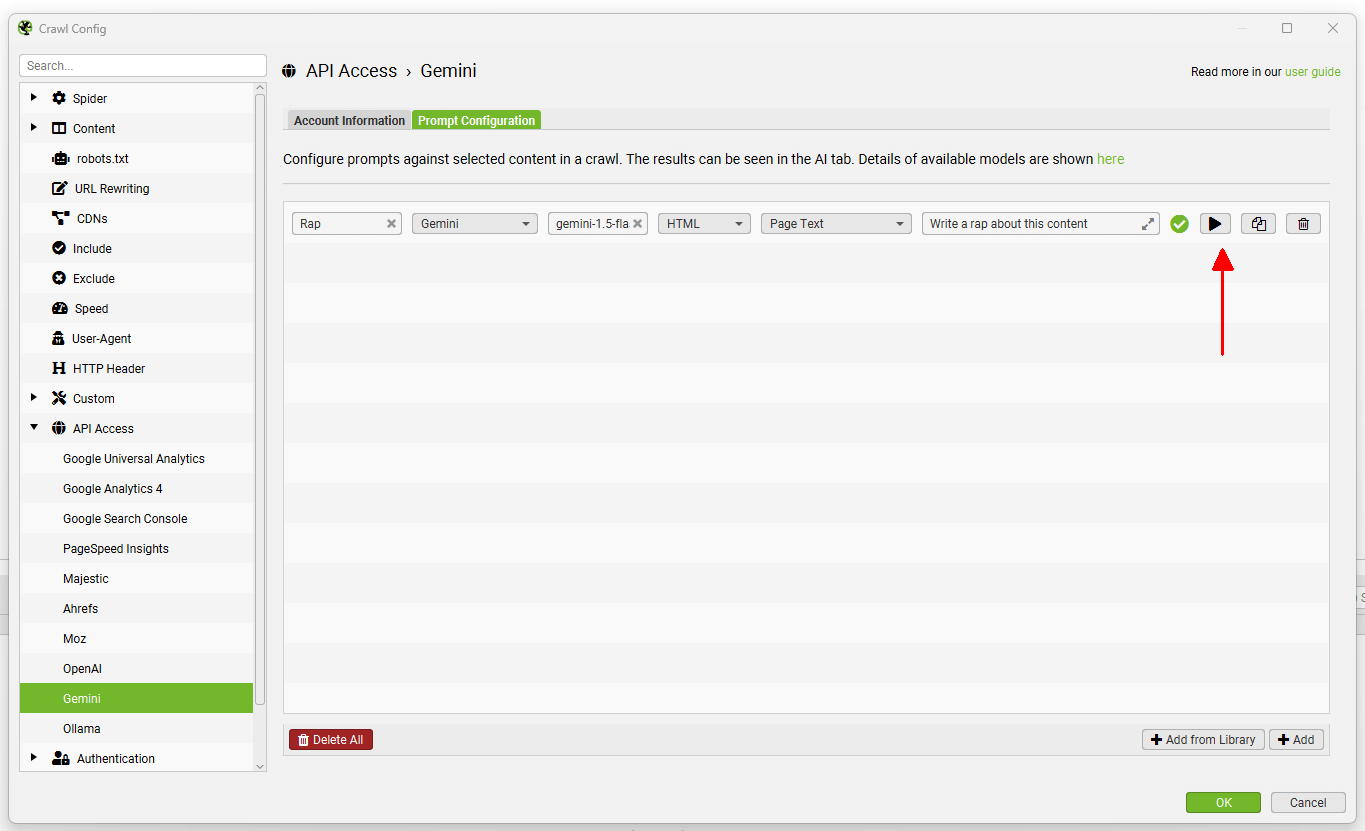
In the Gemini prompt tester, input the URL to test and click the ‘Test’ button to display both the extraction, and response.
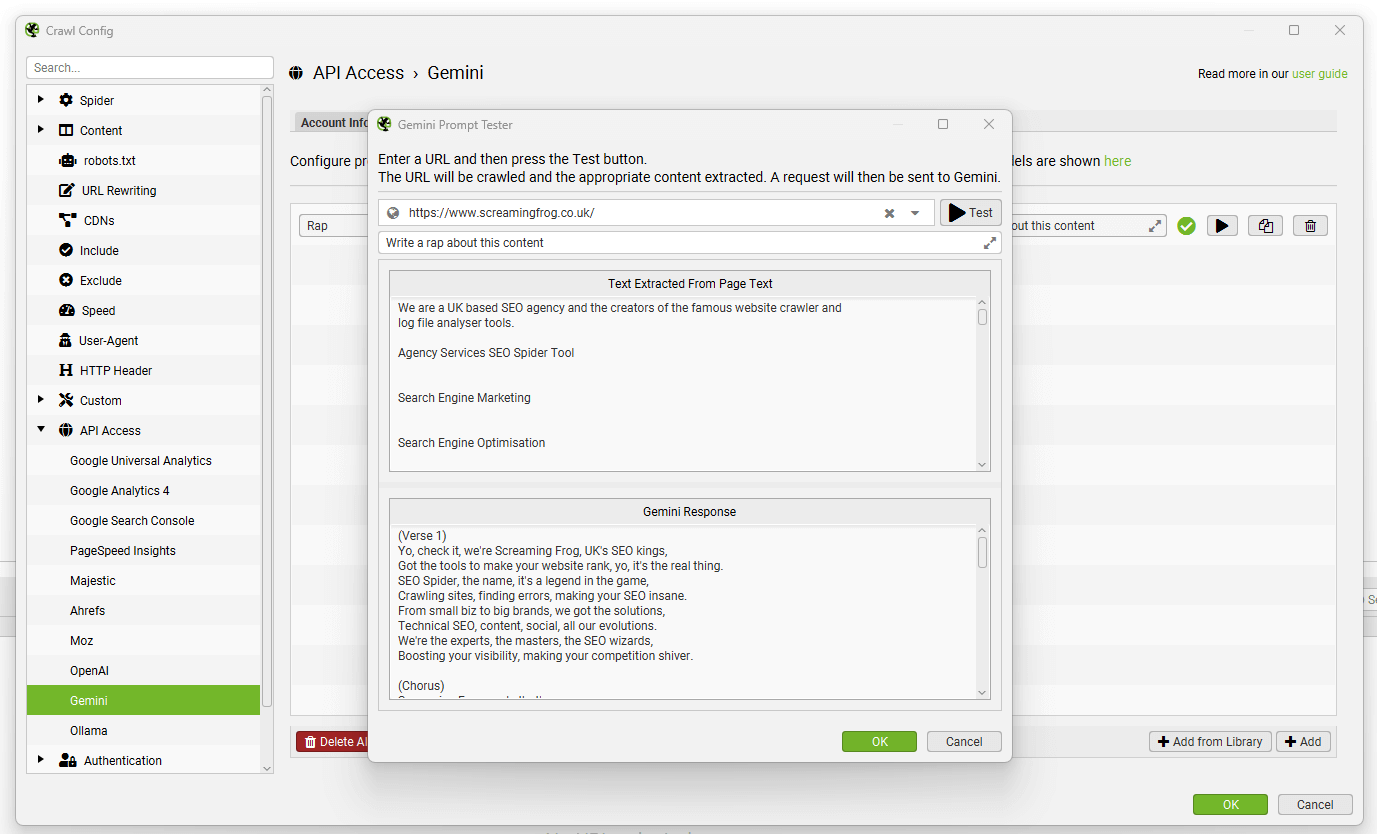
Data from the prompt will appear in the AI tab (and Internal tab, against your usual crawl data).
The ‘Add from Library’ function includes half a dozen prompts for inspiration.
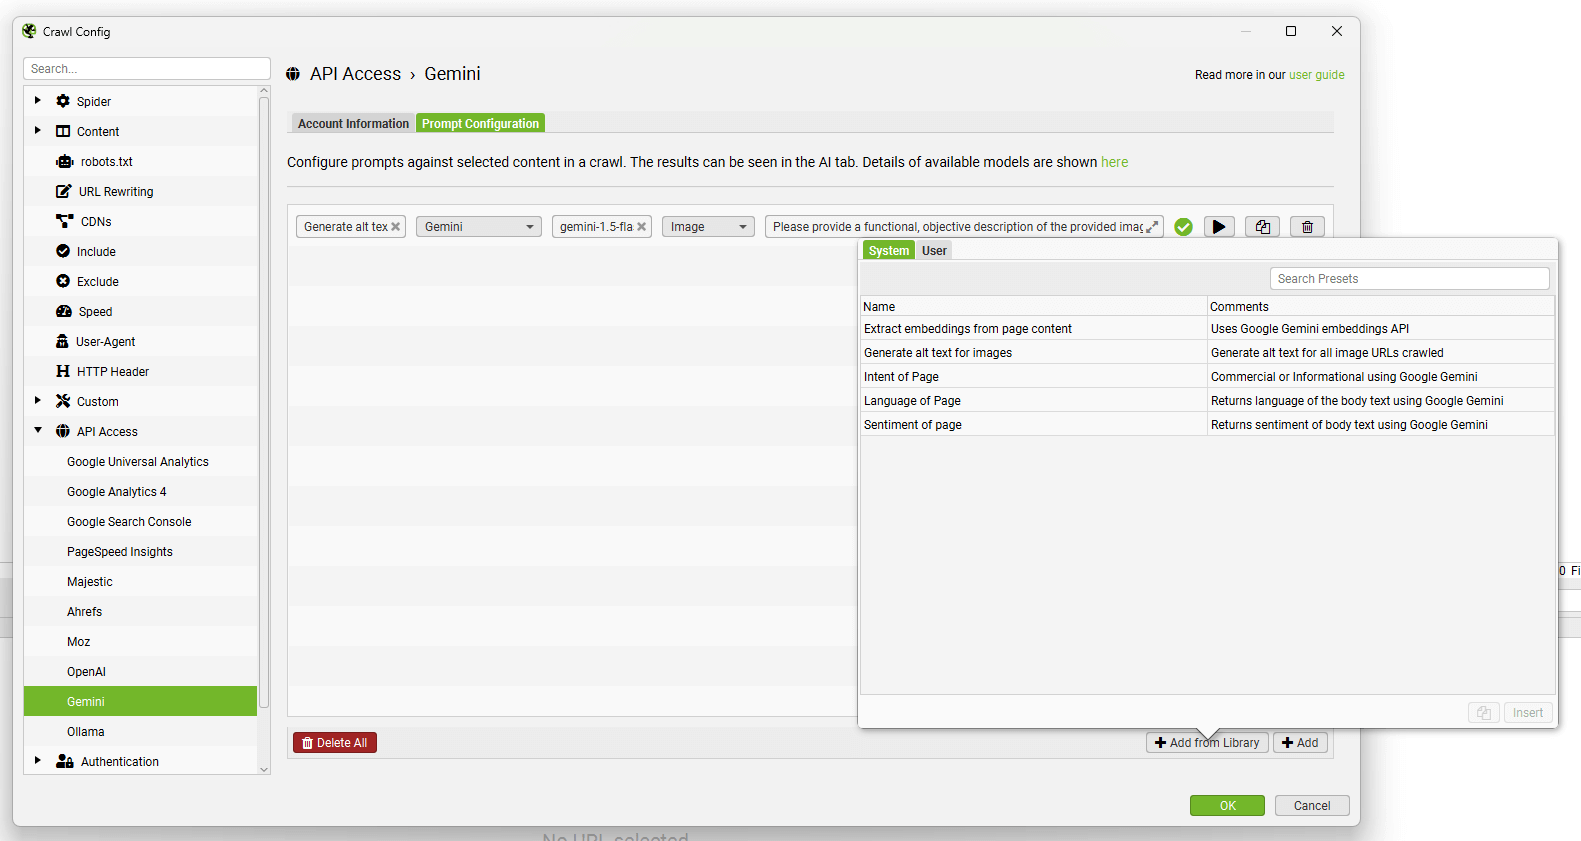
You’re able to add and customise your own using the ‘Add from Library’ button, clicking ‘User’ and the ‘+’ button.
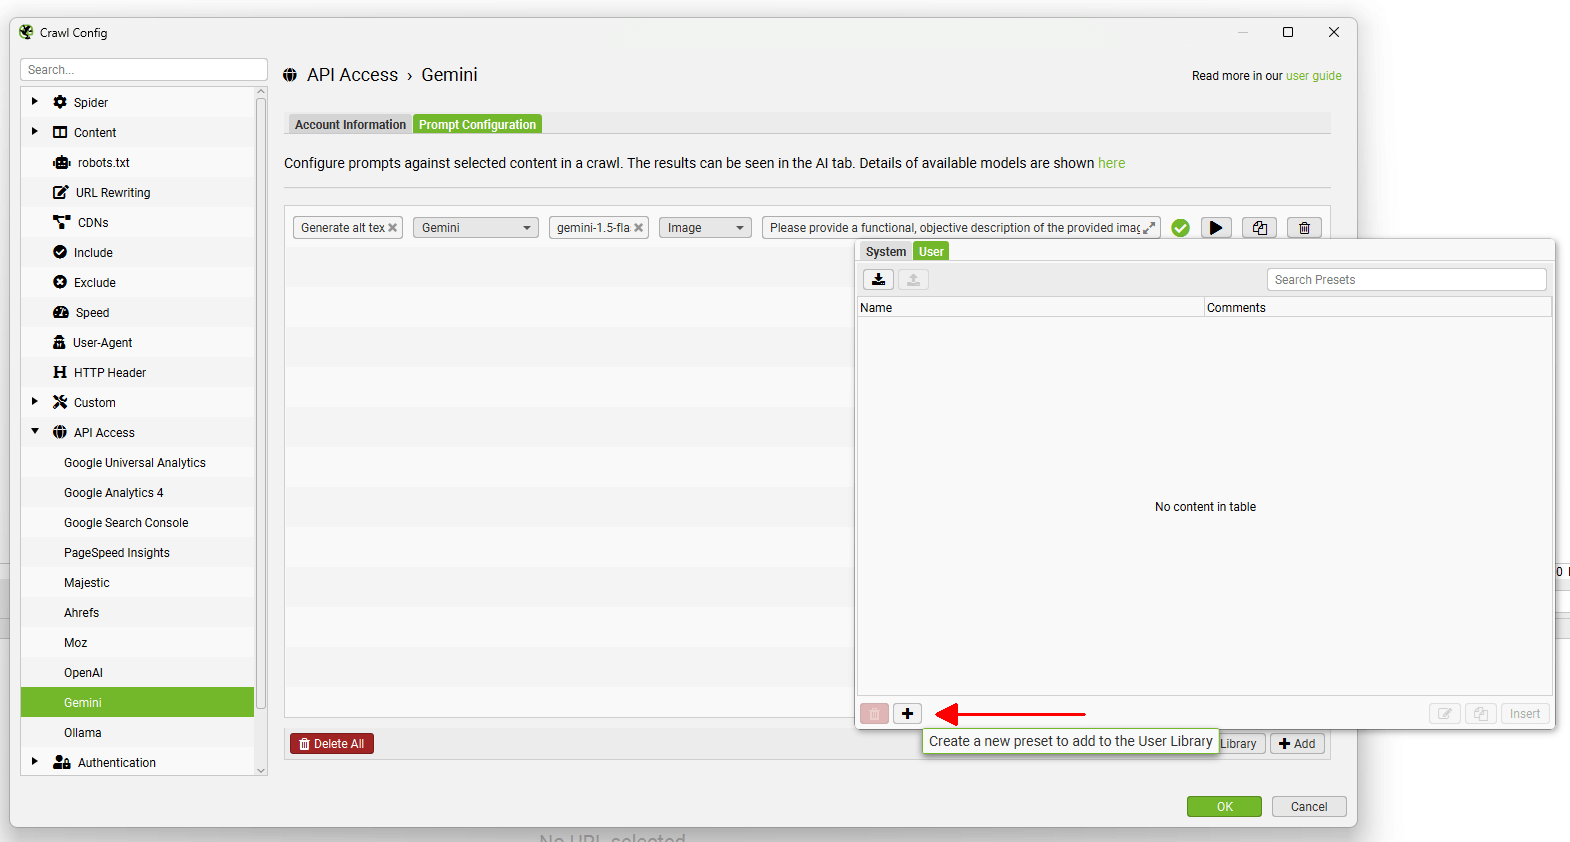
Custom prompts can be shared using the export and import buttons at the top.
Read our full tutorial on How To Crawl With AI Prompts.
Ollama
Configuration > API Access > AI > Ollama
To connect to the Ollama you will need to download and install the LLM on your machine locally.
Once the set up is installed, you’ll need to download the model you wish using a command prompt or terminal, such as ollama run llama3.1.
This requires a powerful modern machine.
Once installed, click ‘Connect’ on the Ollama Account Information tab. The Server URL field can be left as it is (http://localhost:11434).
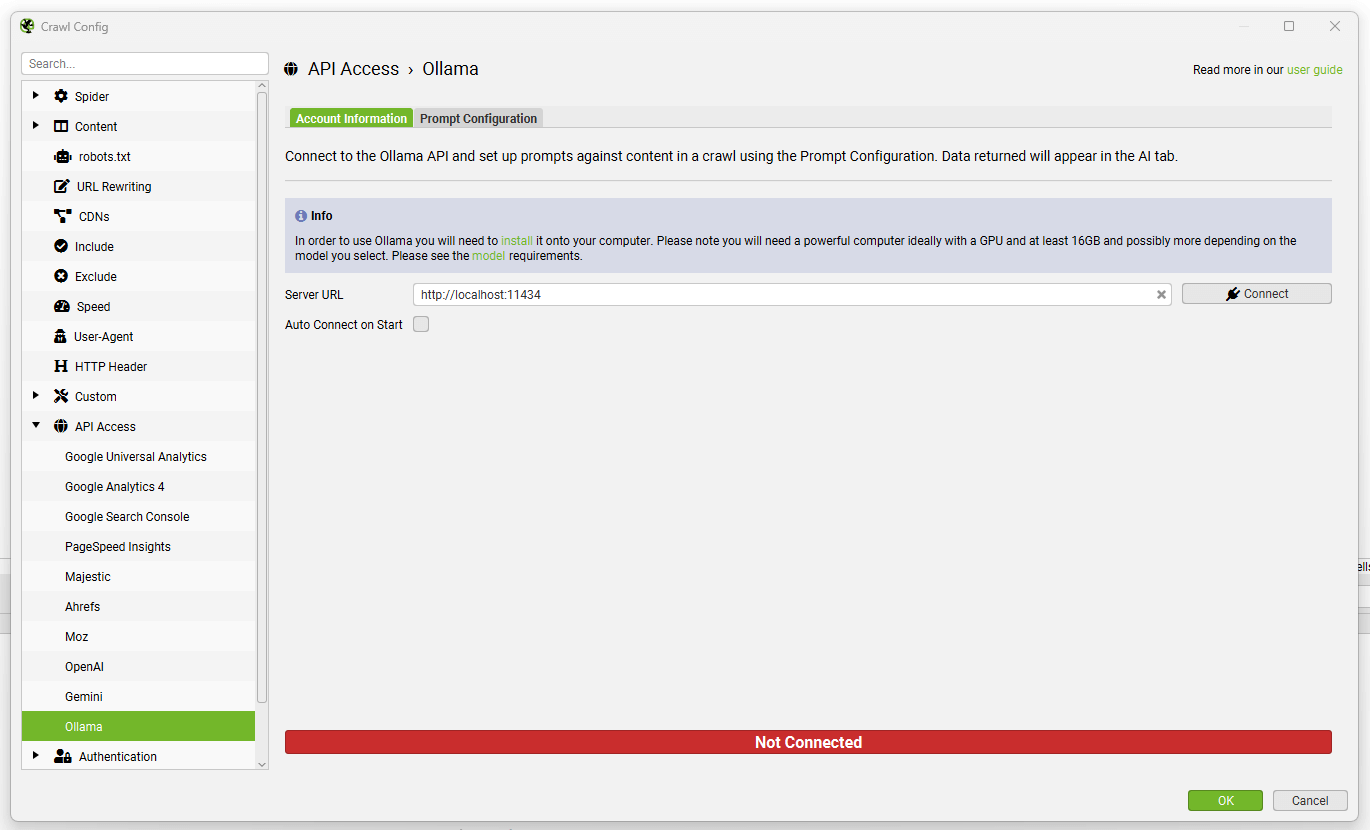
Navigate to the ‘Prompt Configuration’ tab, to set up up to 100 prompts against crawl data.
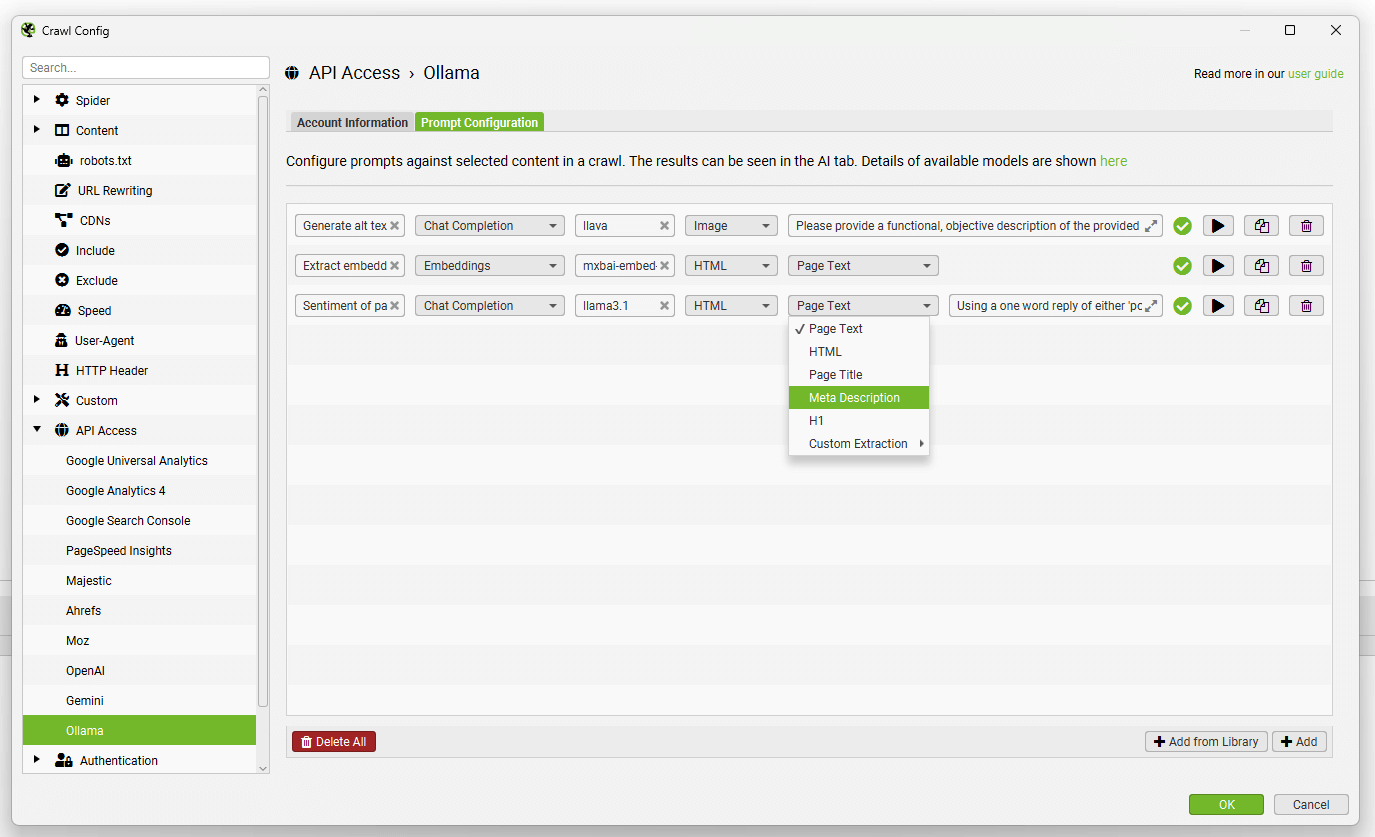
Select the category of model (Chat Completion or Embeddings), the Ollama model used (for example, ‘llama3.1’), content type and data to be used for the prompt, such as body text, HTML, or a custom extraction, as well as write your custom prompt.
Please note: To use ‘Page Text’ or ‘HTML’ for the prompt, you will need to enable ‘Store HTML‘ via ‘Config > Spider > Extraction’.
To test a prompt, use the ‘play’ icon to the right of the prompt field.
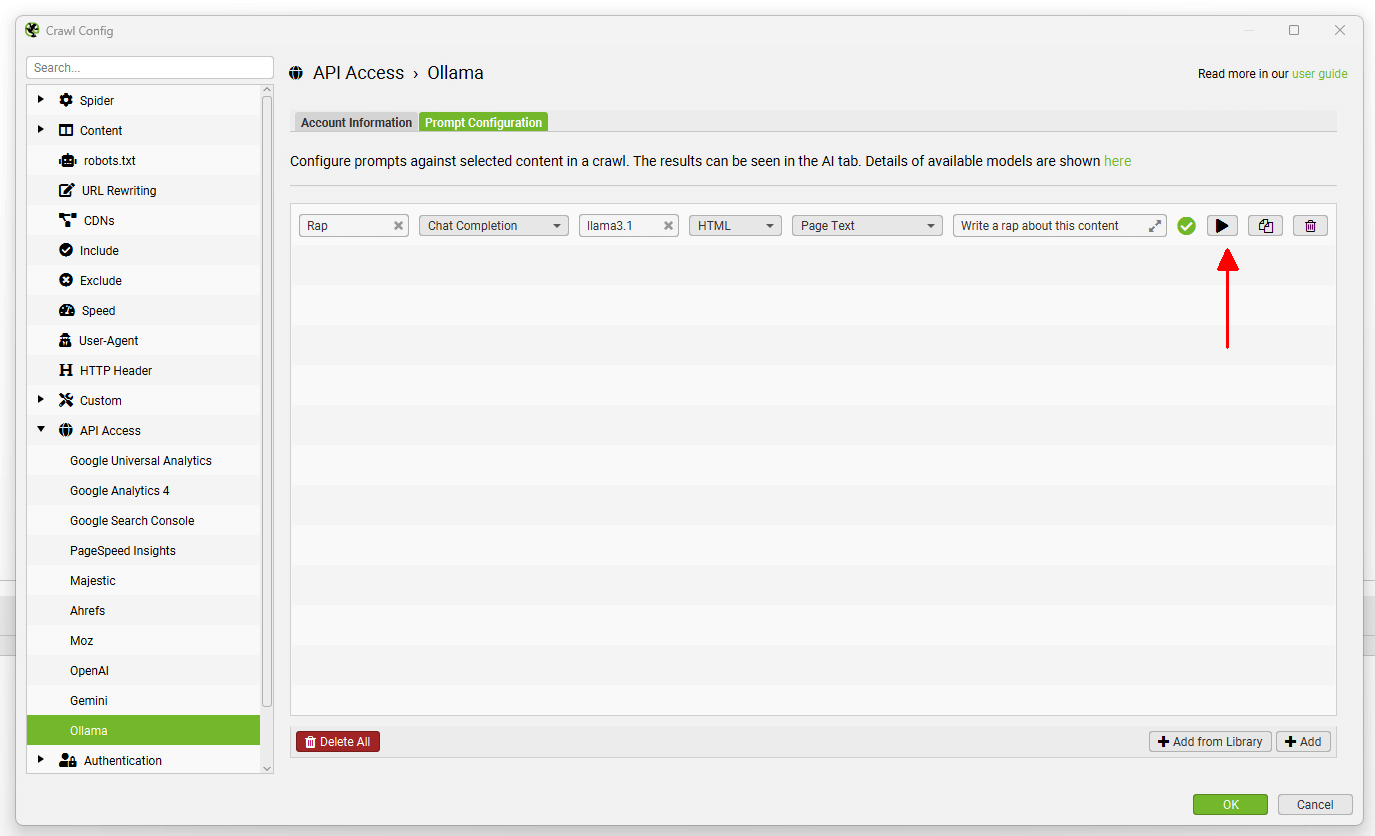
In the Ollama prompt tester, input the URL to test and click the ‘Test’ button to display both the extraction, and response.
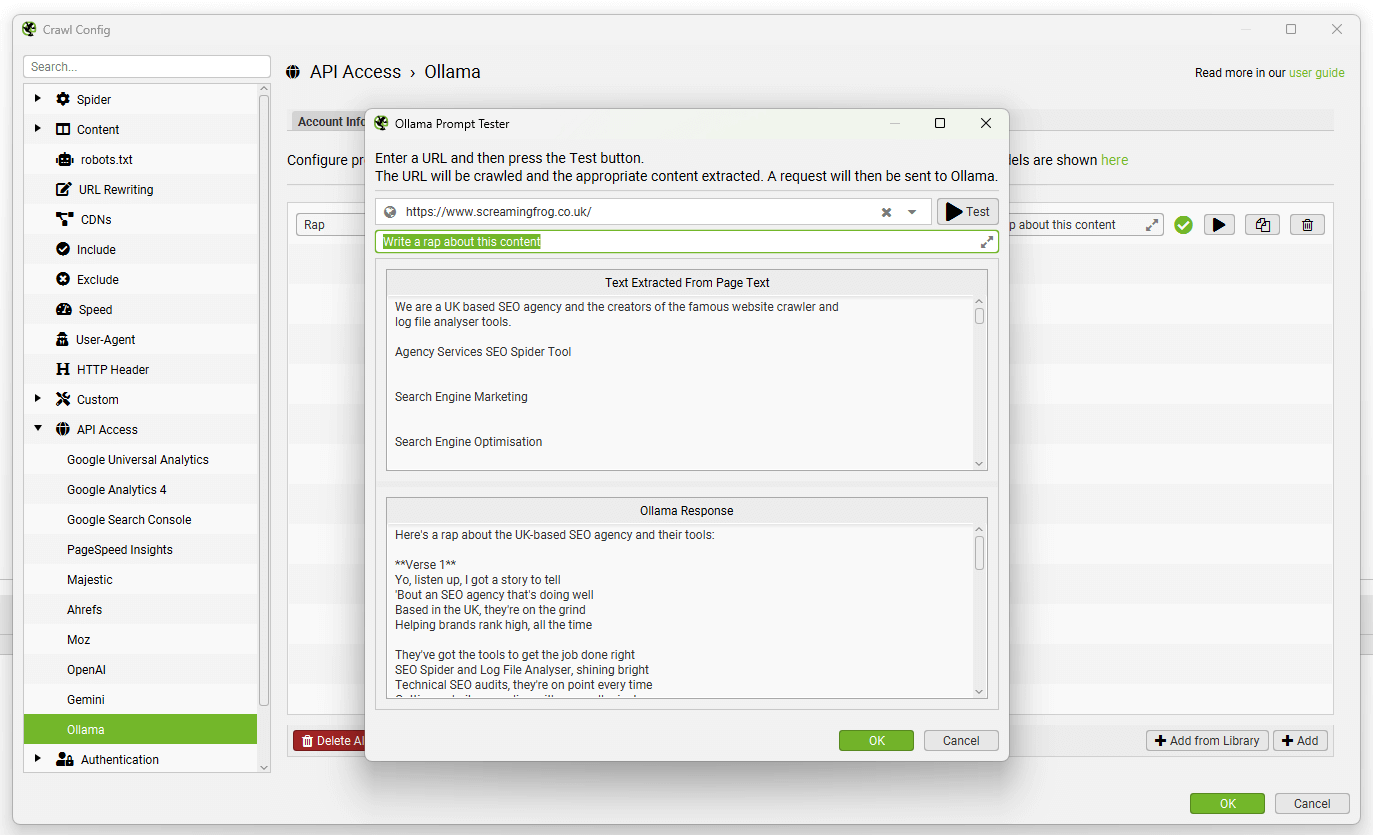
Data from the prompt will appear in the AI tab (and Internal tab, against your usual crawl data).
The ‘Add from Library’ function includes half a dozen prompts for inspiration.
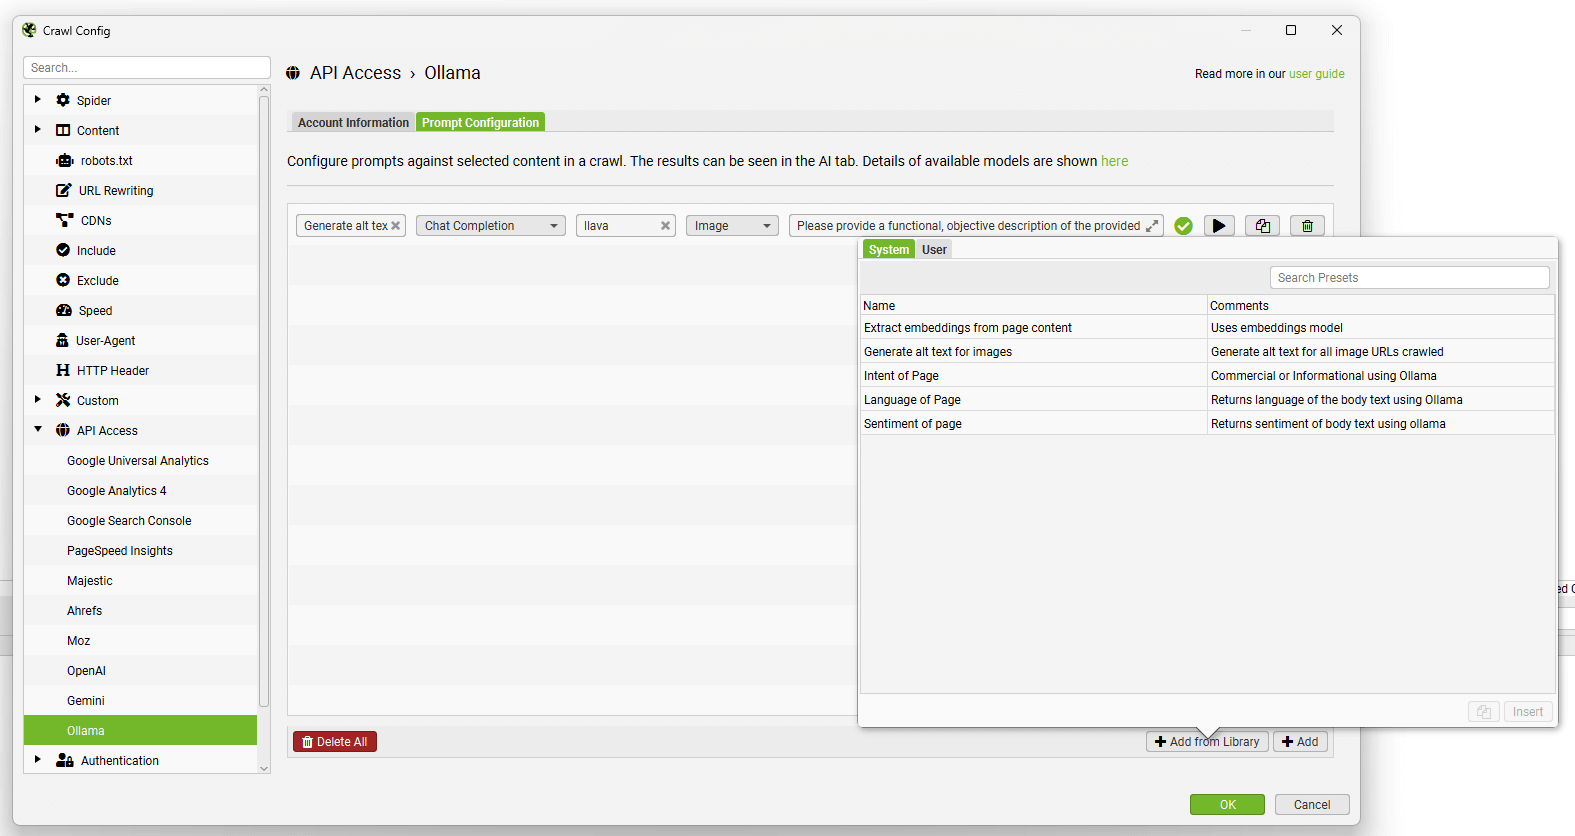
You’re able to add and customise your own using the ‘Add from Library’ button, clicking ‘User’ and the ‘+’ button.
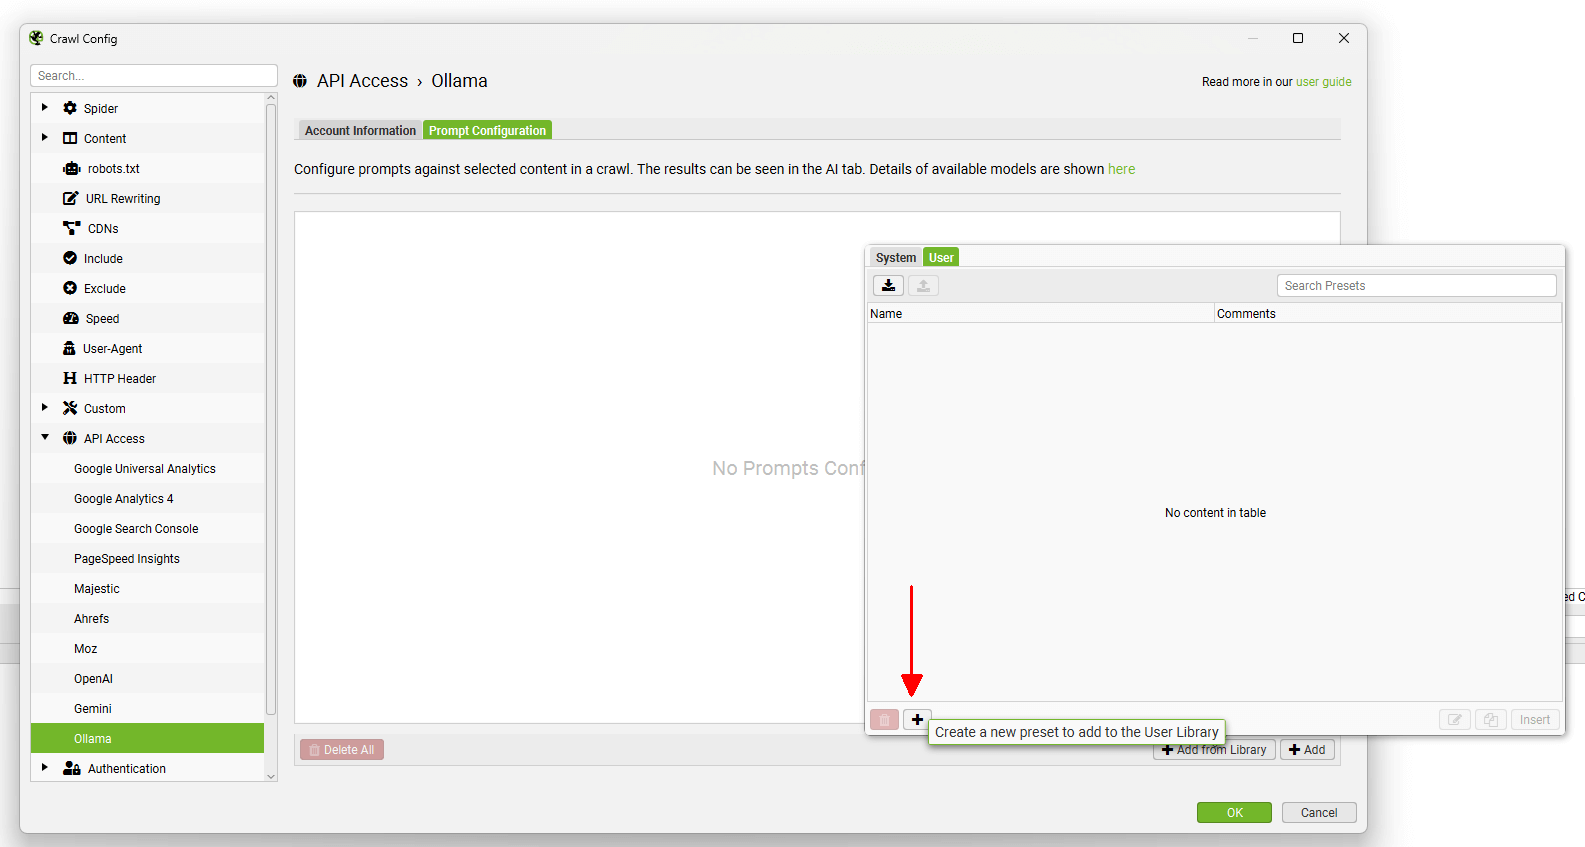
Custom prompts can be shared using the export and import buttons at the top.
Read our full tutorial on How To Crawl With AI Prompts.
Anthropic
Configuration > API Access > AI > Anthropic
To connect to the Anthropic API, you need an API key. You can create a paid account via their Build With Claude API page and ‘Start Building’ button.
After creating an account, generate an API key via the account settings page.
When you have an API key, copy and paste it into the ‘API Key’ field in the Anthropic Account Information tab.

Click ‘Connect’ when you wish to use the set up for a crawl.
Navigate to the ‘Prompt Configuration’ tab, to set up up to 100 prompts against crawl data.
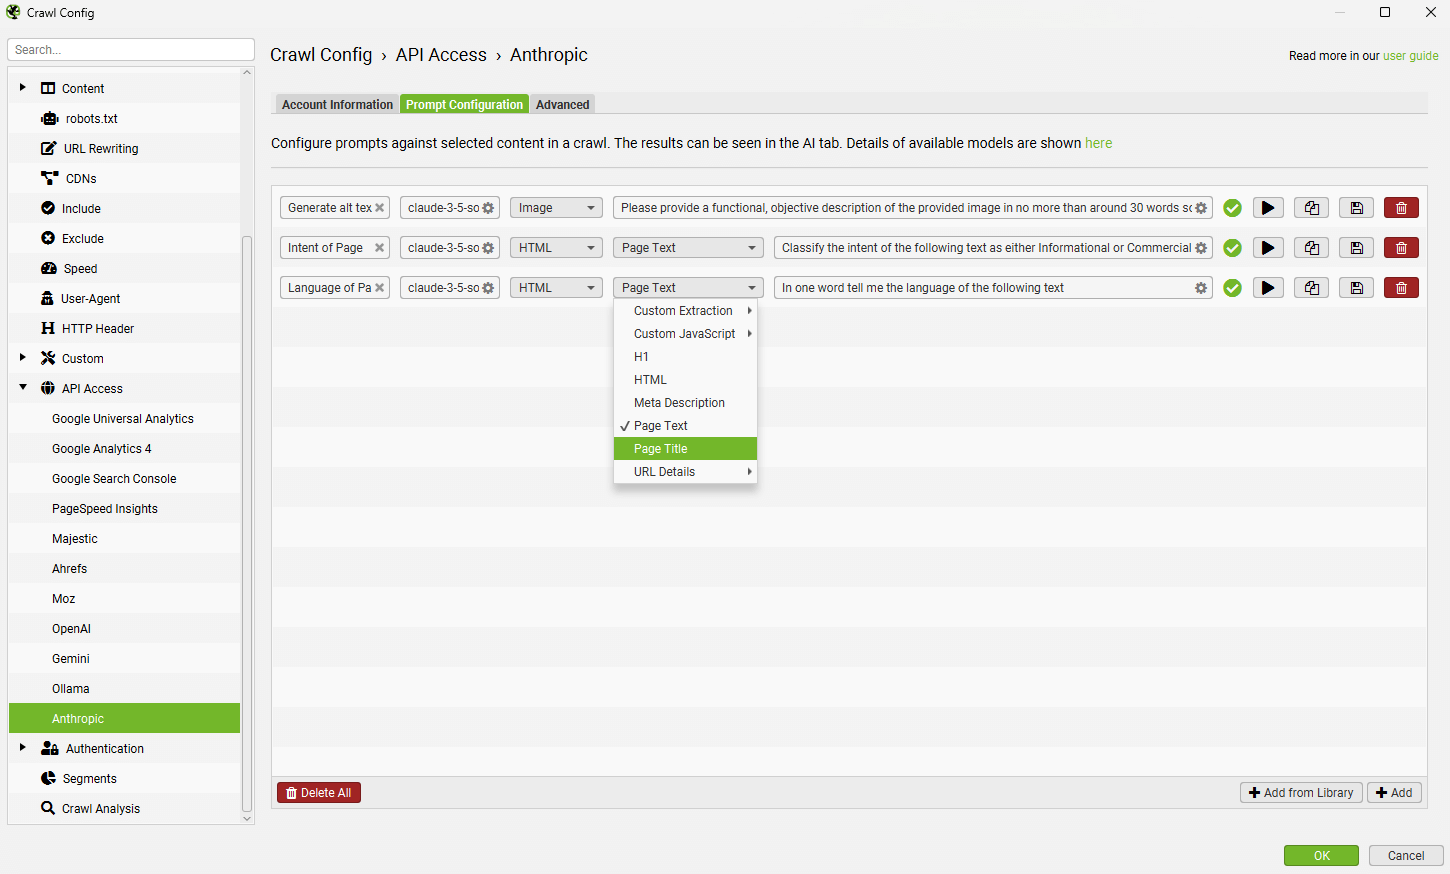
Select the model used (for example, ‘claude-3-5-sonnet-latest’), content type and data to be used for the prompt, such as body text, HTML, or a custom extraction, as well as write your custom prompt.
Please note: To use ‘Page Text’ or ‘HTML’ for the prompt, you will need to enable ‘Store HTML‘ via ‘Config > Spider > Extraction’.
To test a prompt, use the ‘play’ icon to the right of the prompt field.
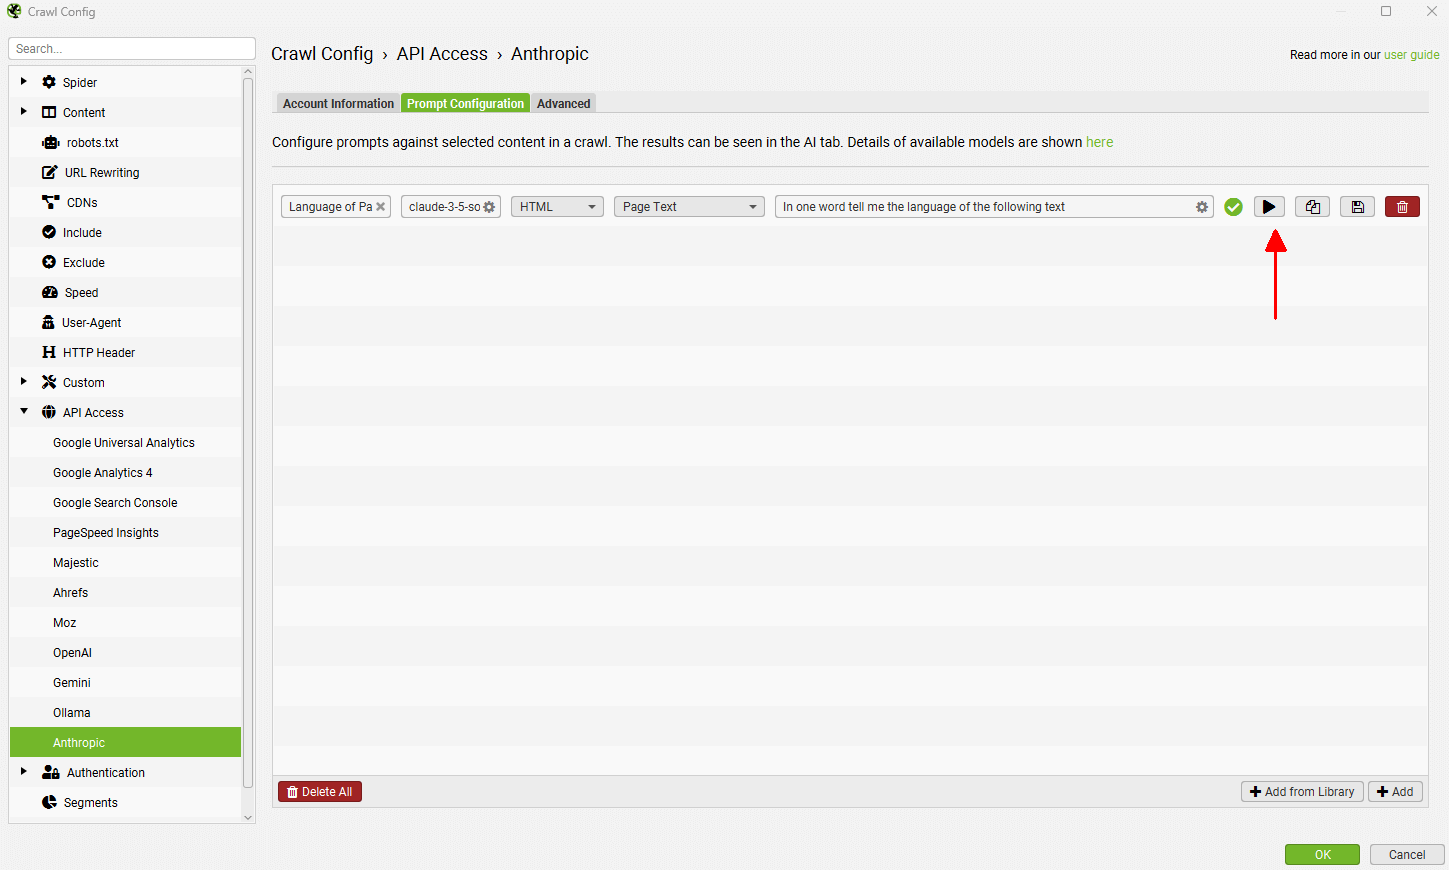
In the Anthropic prompt tester, input the URL to test and click the ‘Test’ button to display both the extraction, and response.
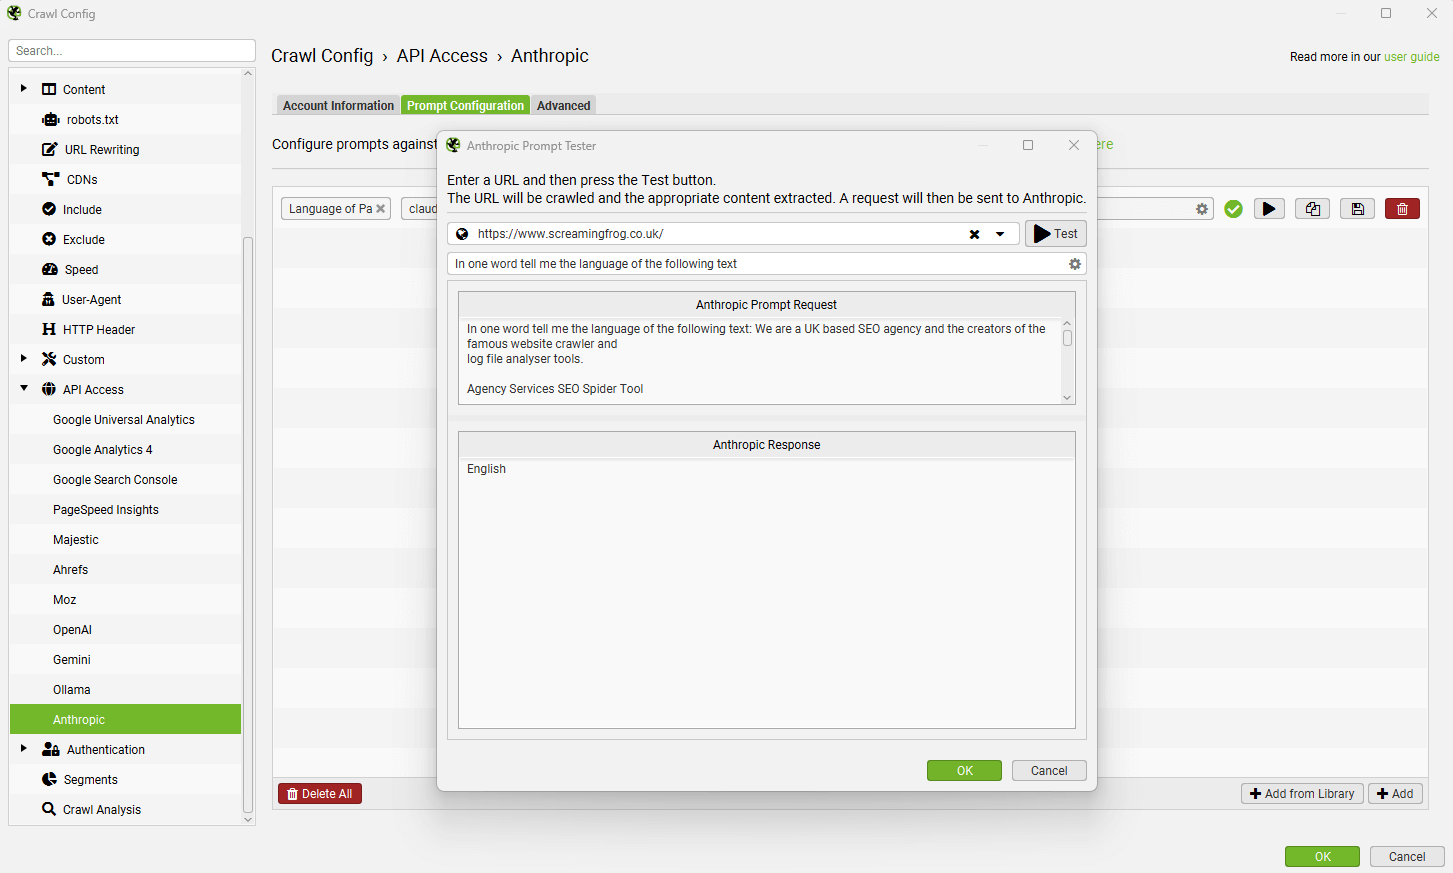
Data from the prompt will appear in the AI tab (and Internal tab, against your usual crawl data).
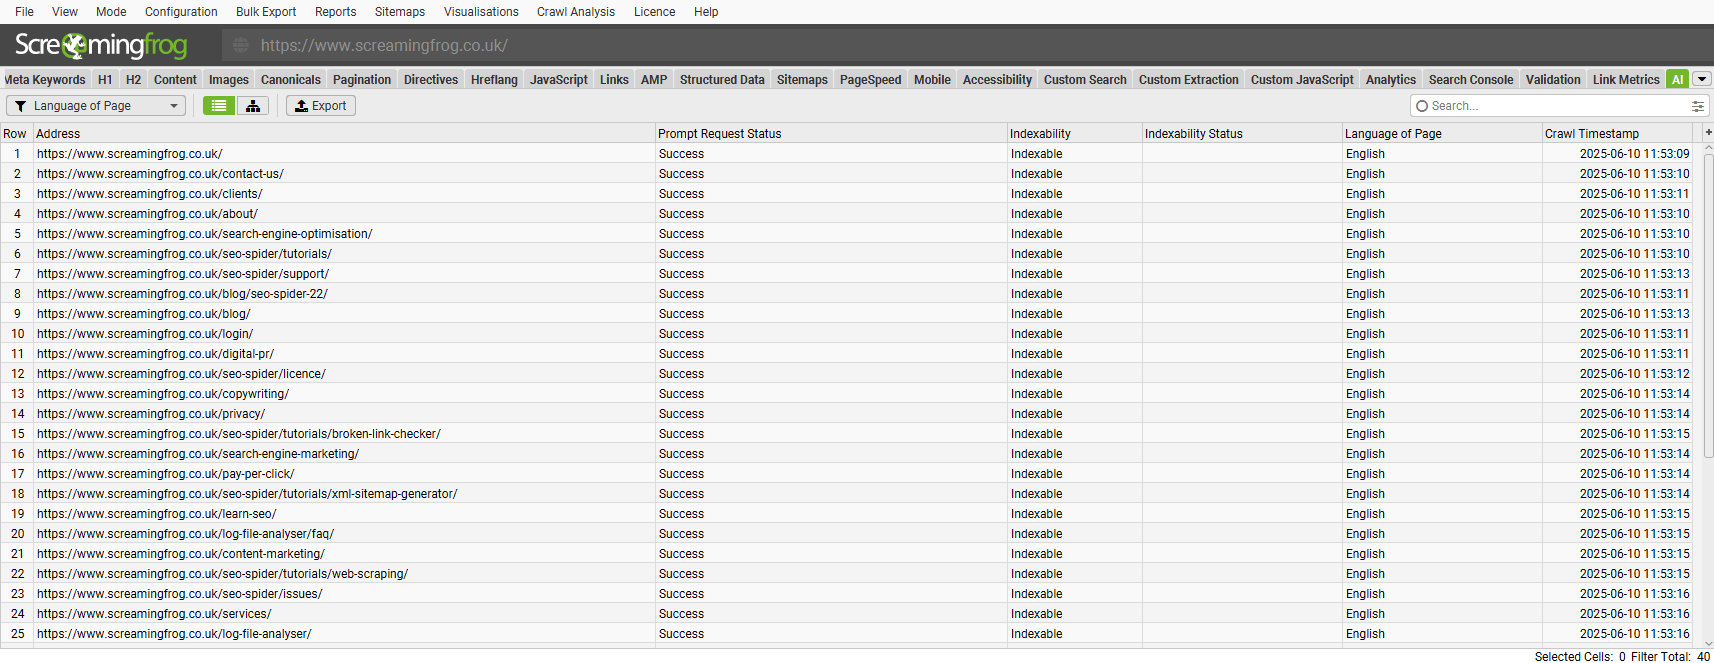
The ‘Add from Library’ function includes a few prompts for inspiration.
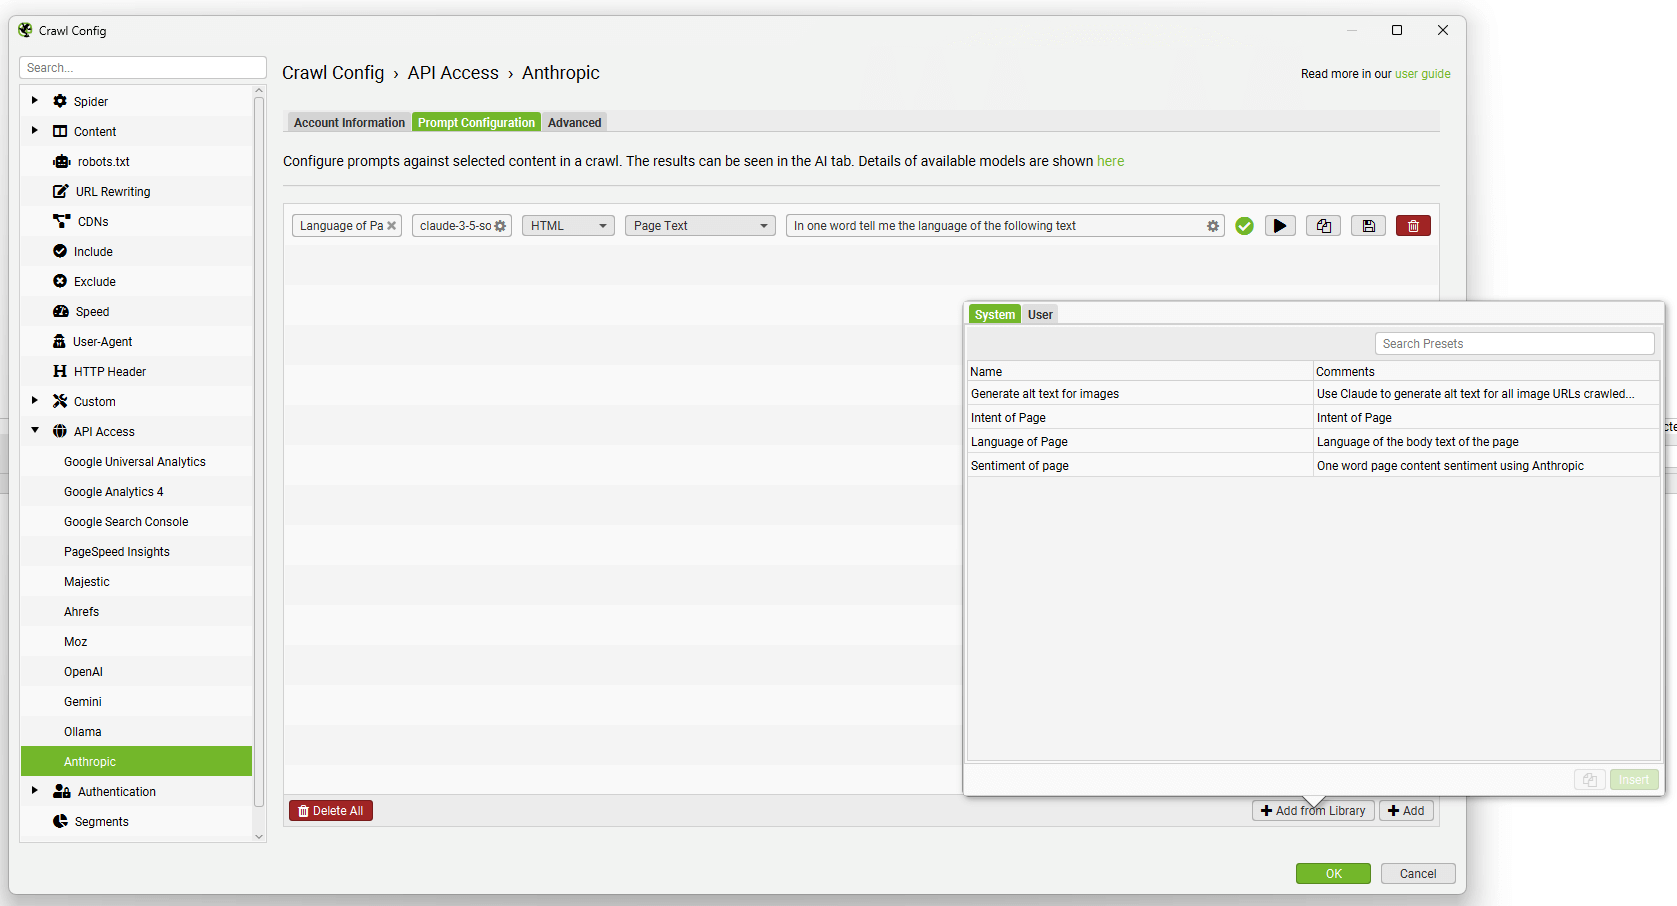
You’re able to add and customise your own using the ‘Add from Library’ button, clicking ‘User’ and the ‘+’ button.
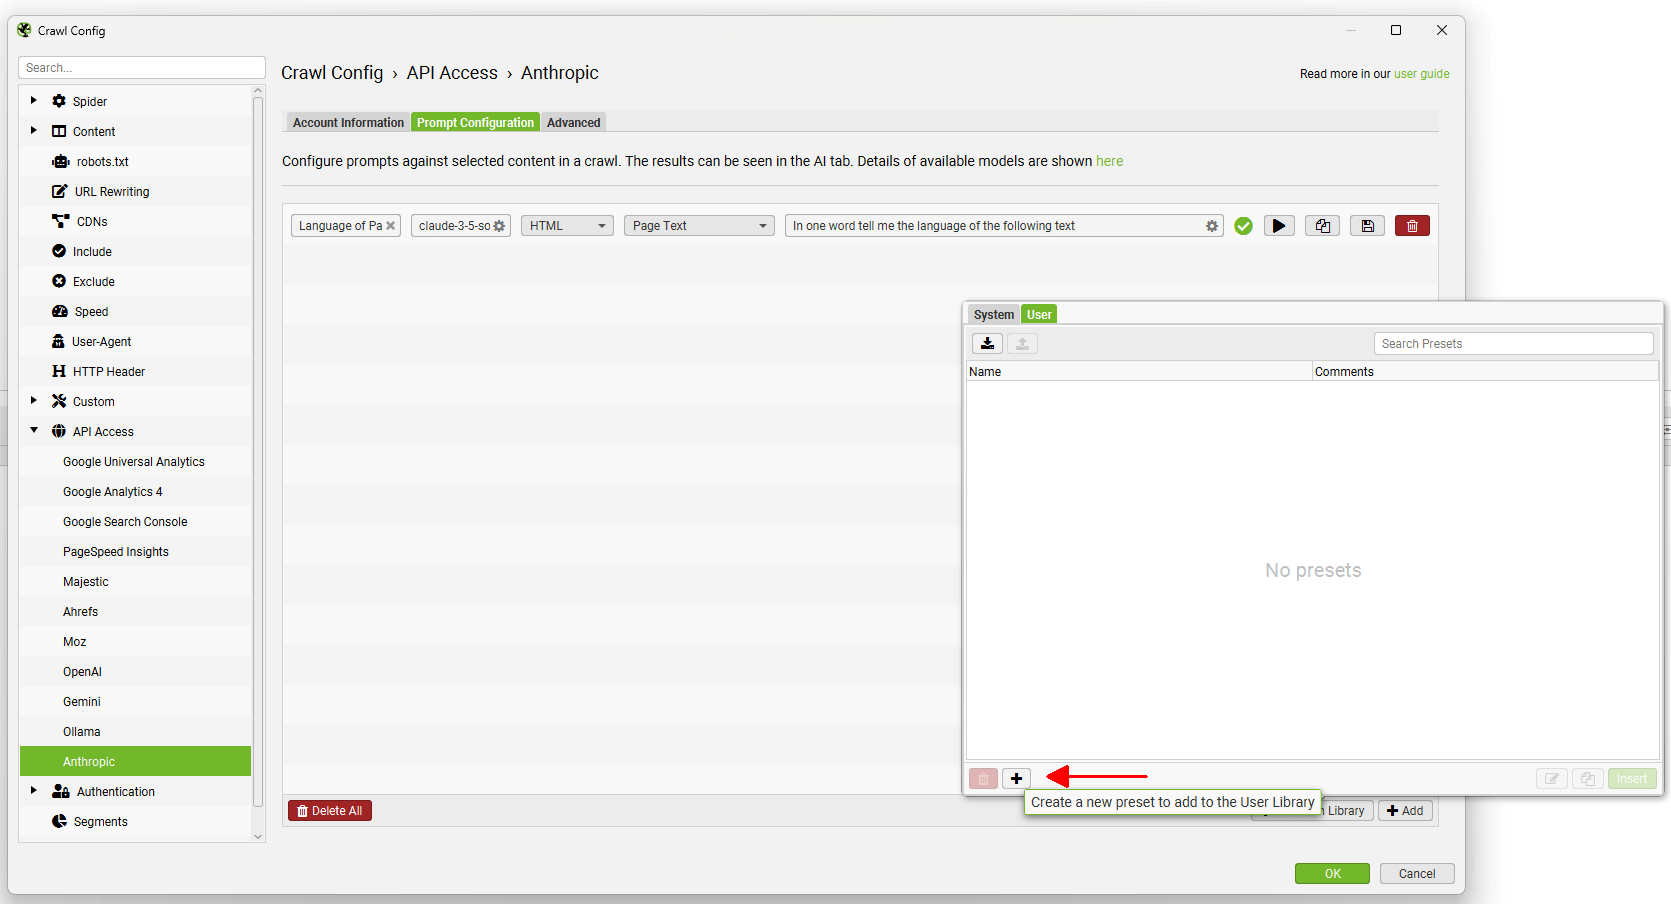
Custom prompts can be shared using the export and import buttons at the top.
Read our full tutorial on How To Crawl With AI Prompts.
Authentication
Configuration > Authentication
The SEO Spider supports two forms of authentication, standards based which includes basic and digest authentication, and web forms based authentication.
Check out our video guide on how to crawl behind a login, or carry on reading below.
Basic & Digest Authentication
There is no set-up required for basic and digest authentication, it is detected automatically during a crawl of a page which requires a login. If you visit the website and your browser gives you a pop-up requesting a username and password, that will be basic or digest authentication. If the login screen is contained in the page itself, this will be a web form authentication, which is discussed in the next section.
Often sites in development will also be blocked via robots.txt as well, so make sure this is not the case or use the ‘ignore robot.txt configuration‘. Then simply insert the staging site URL, crawl and a pop-up box will appear, just like it does in a web browser, asking for a username and password.
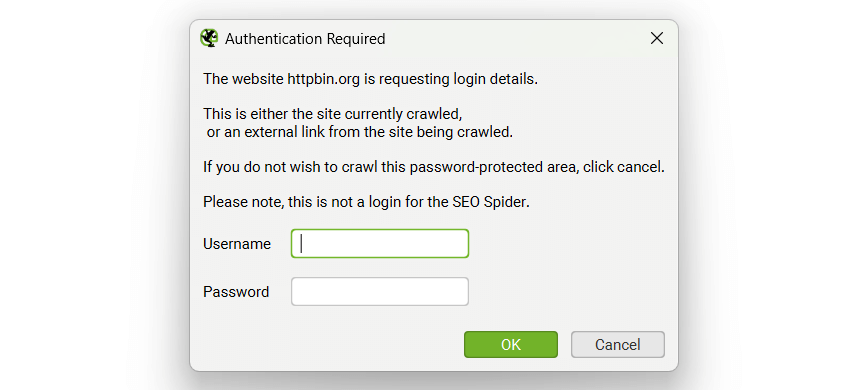
Enter your credentials and the crawl will continue as normal.
Alternatively, you can pre-enter login credentials via ‘Config > Authentication’ and clicking ‘Add’ on the Standards Based tab.
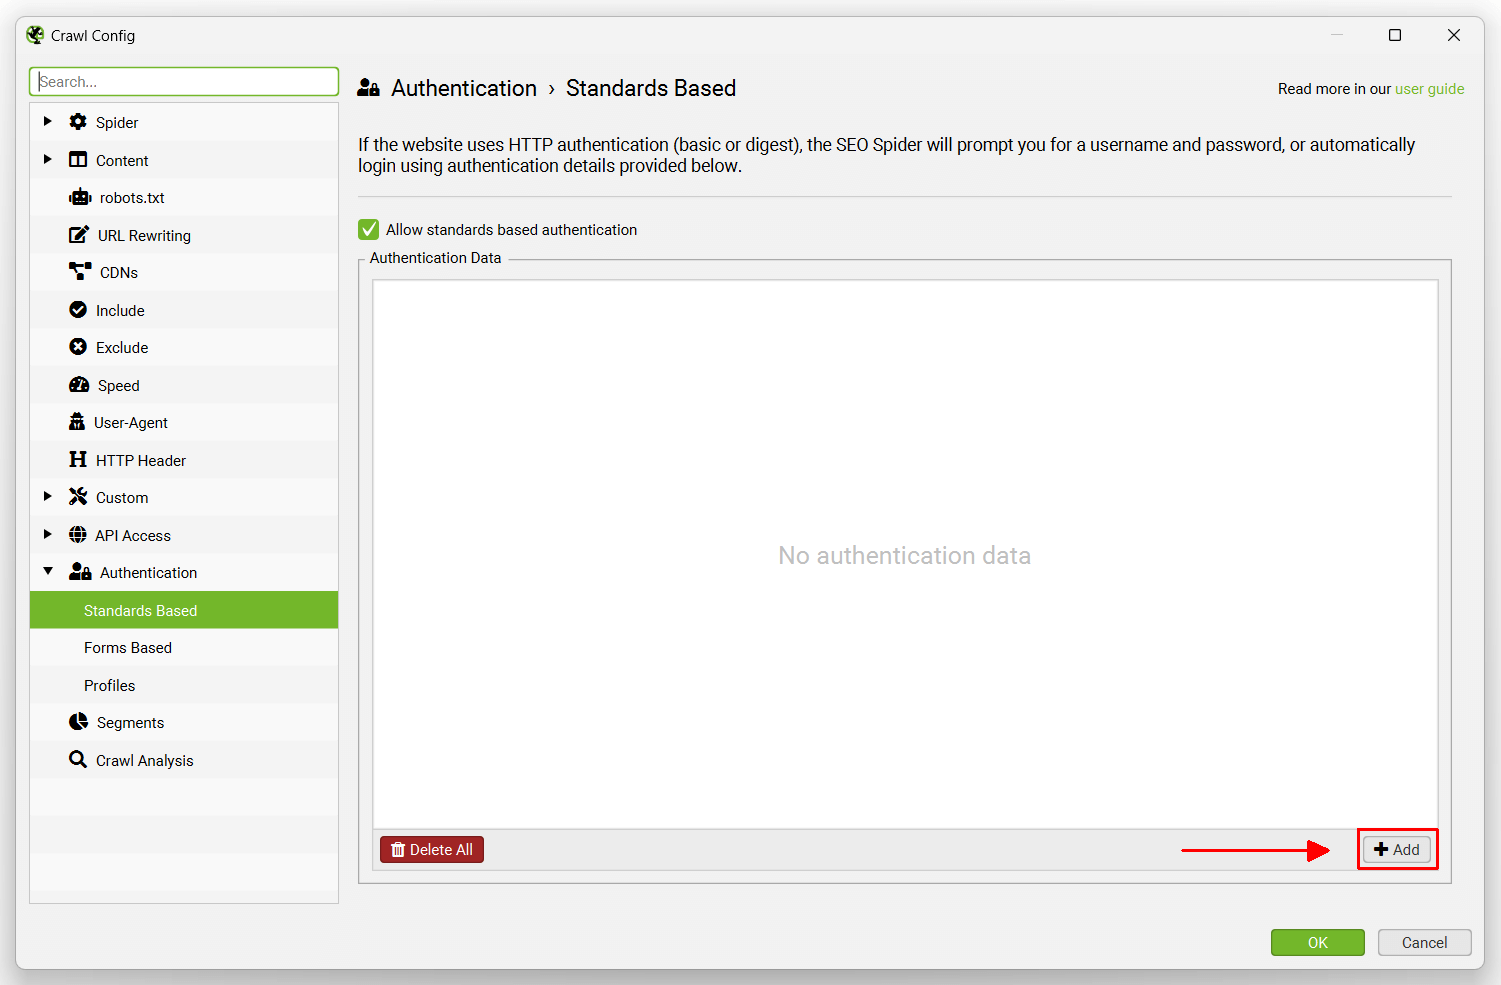
Then input the URL, username and password.
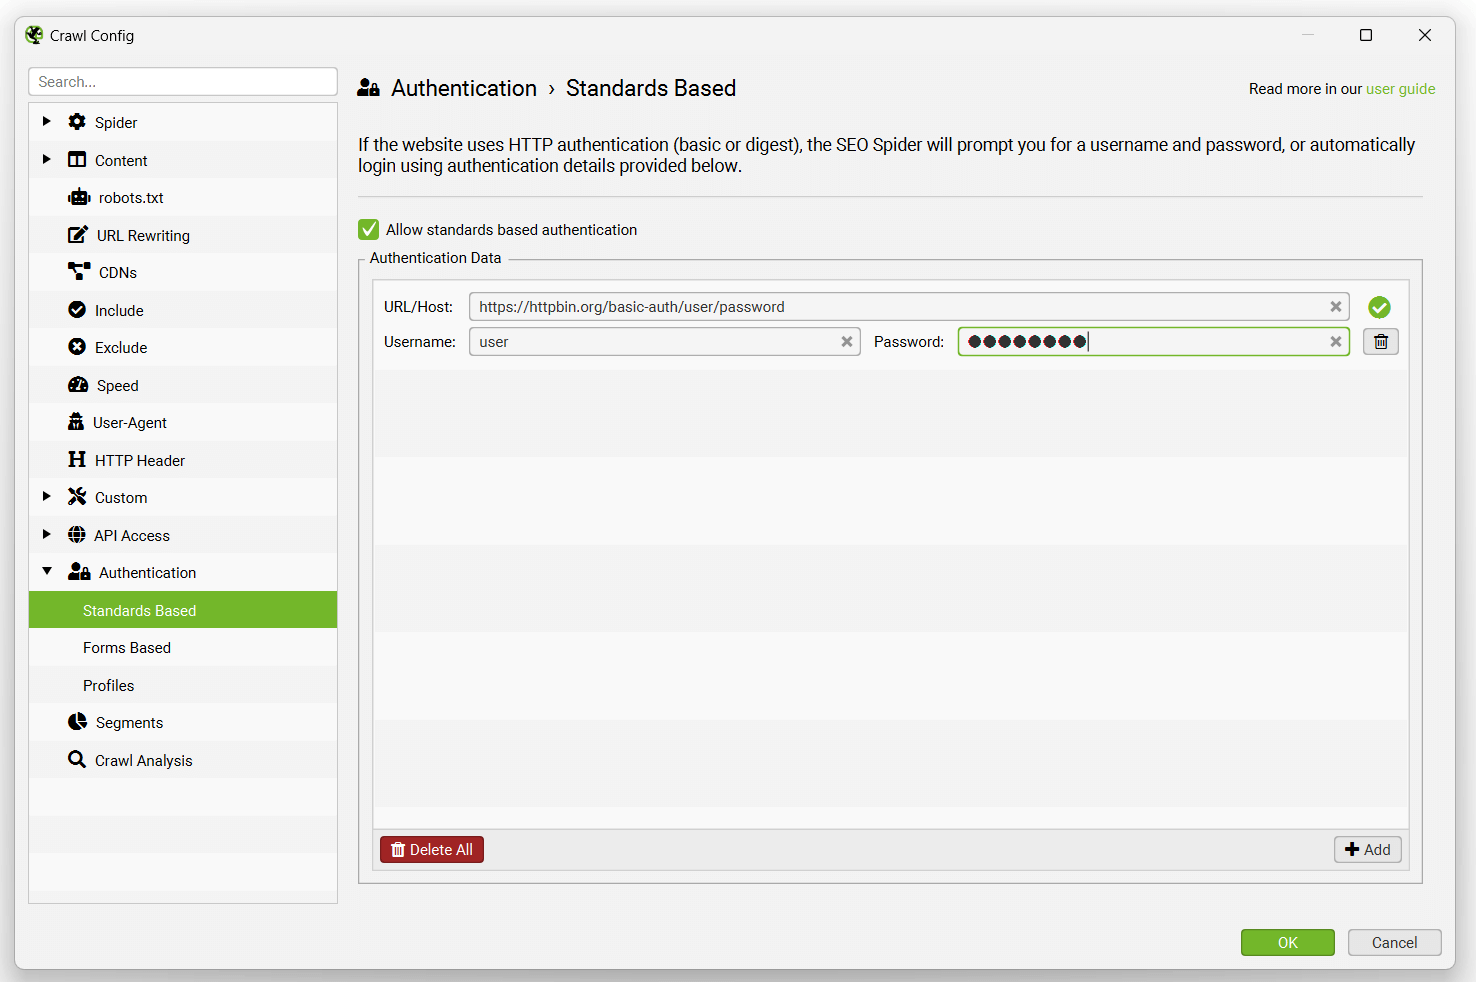
When entered in the authentication config, they will be remembered until they are deleted.
This feature does not require a licence key. Try to following pages to see how authentication works in your browser, or in the SEO Spider.
- Basic Authentication Username:user Password: password
- Digest Authentication Username:user Password: password
Web Form Authentication
There are other web forms and areas which require you to login with cookies for authentication to be able to view or crawl it. The SEO Spider allows users to log in to these web forms within the SEO Spider’s built in Chromium browser, and then crawl it. This feature requires a licence to use it.
To log in, navigate to ‘Configuration > Authentication’ then switch to the ‘Forms Based’ tab, click the ‘Add’ button, enter the URL for the site you want to crawl, and a browser will pop up allowing you to log in.
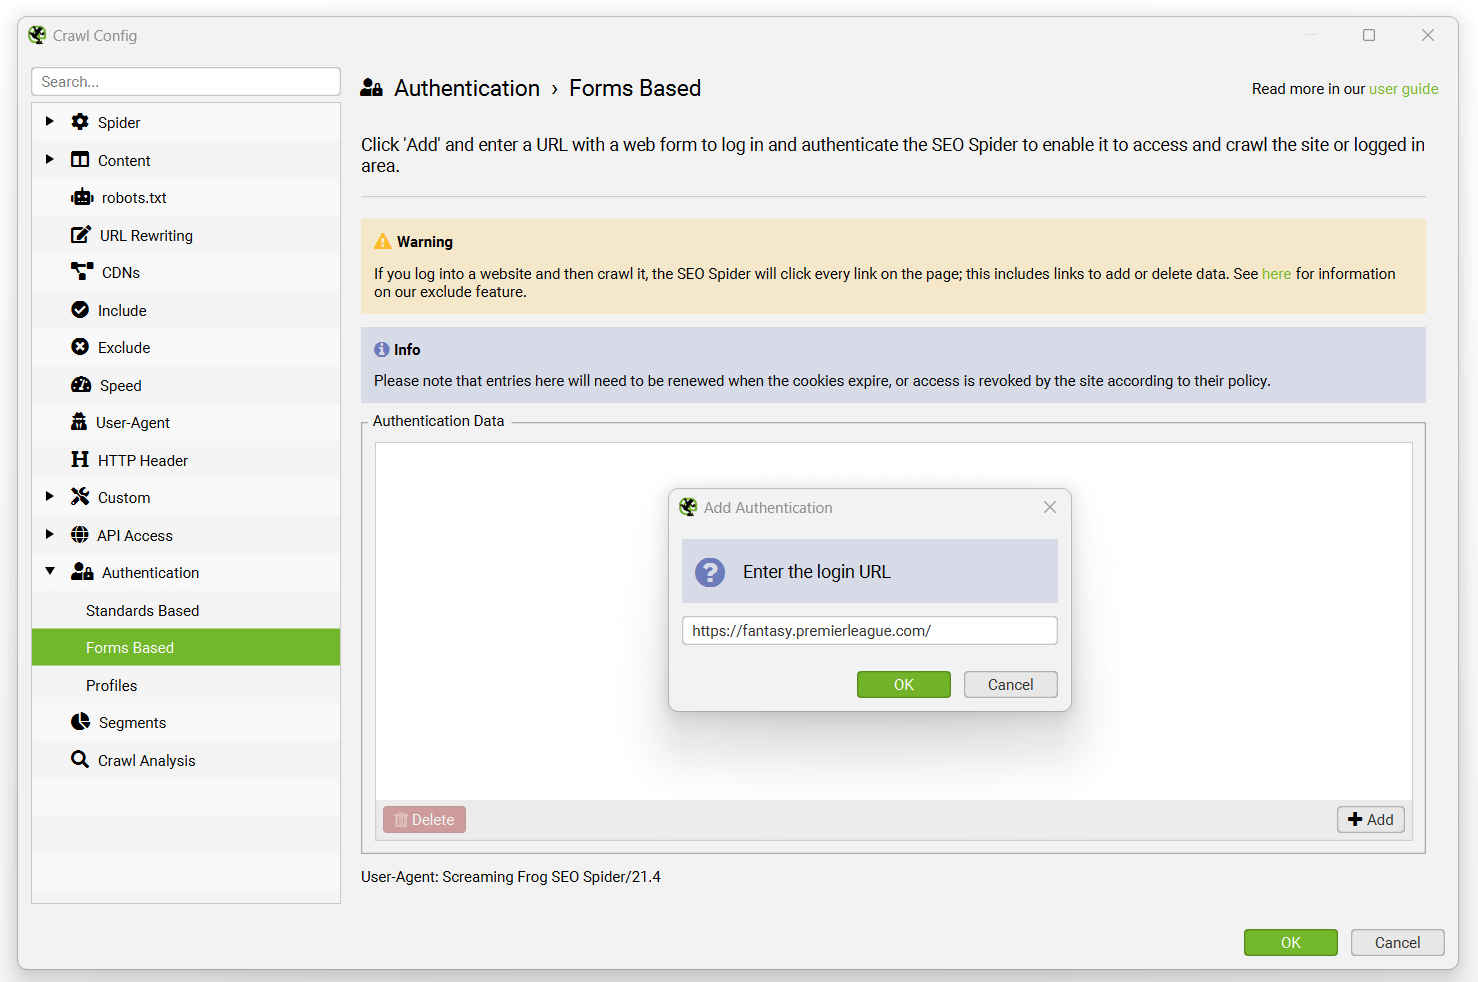
Please read our guide on crawling web form password protected sites in our user guide, before using this feature. Some website’s may also require JavaScript rendering to be enabled when logged in to be able to crawl it.
Please note – This is a very powerful feature, and should therefore be used responsibly. The SEO Spider clicks every link on a page; when you’re logged in that may include links to log you out, create posts, install plugins, or even delete data.
Authentication Profiles
The authentication profiles tab allows you to export an authentication configuration to be used with scheduling, or command line.
This means it’s possible for the SEO Spider to login to standards and web forms based authentication for automated crawls.
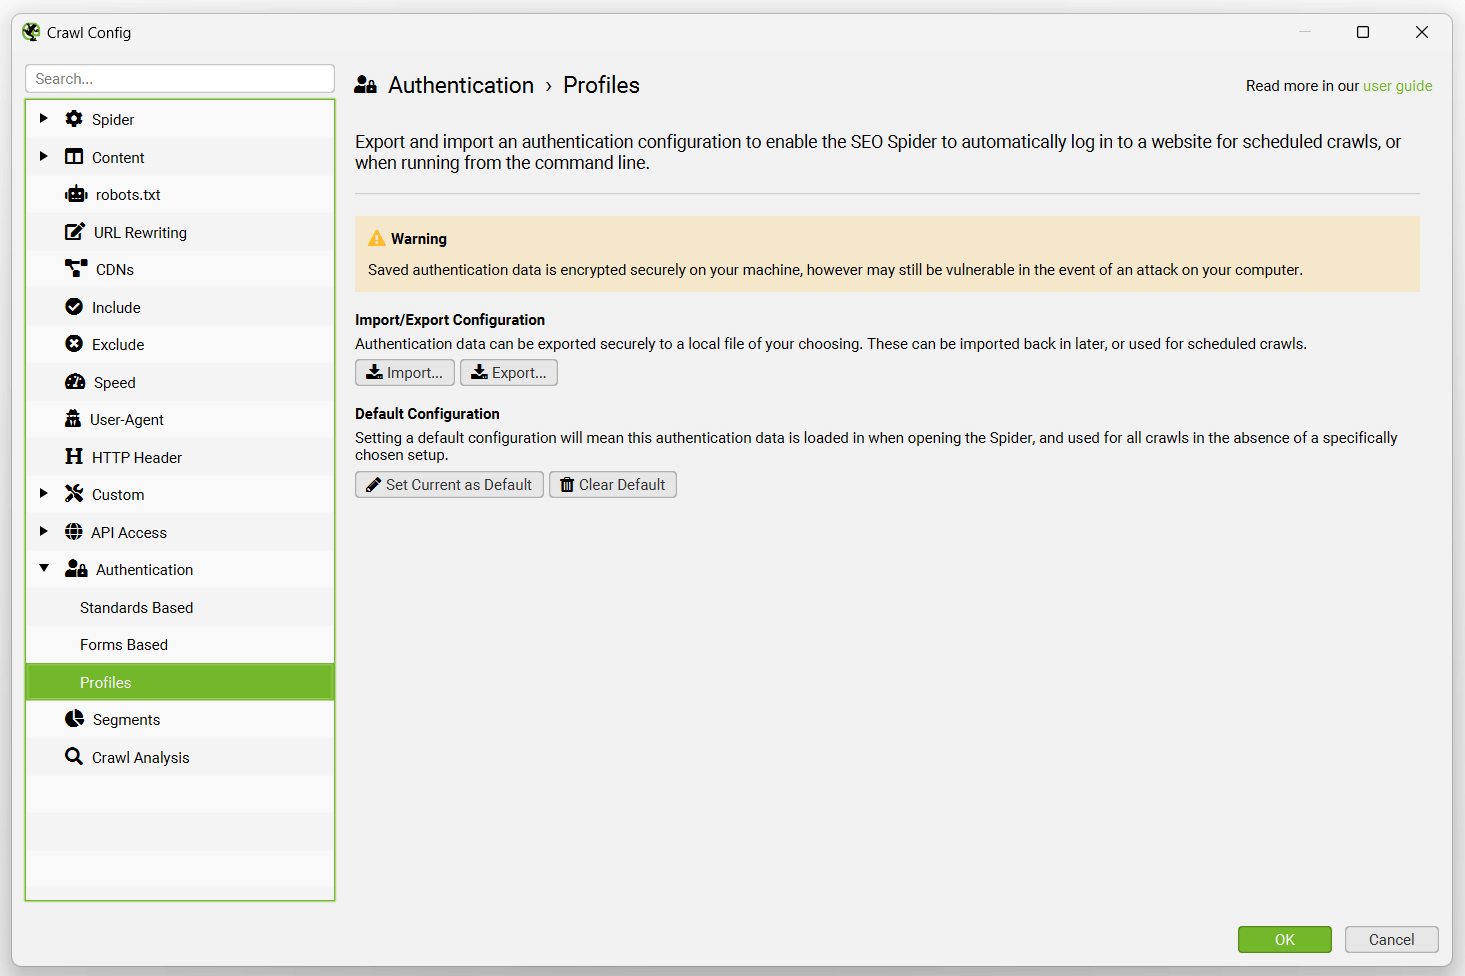
When you have authenticated via standards based or web forms authentication in the user interface, you can visit the ‘Profiles’ tab, and export an .seospiderauthconfig file.
This can be supplied in scheduling via the ‘start options’ tab, or using the ‘auth-config’ argument for the command line as outlined in the CLI options.
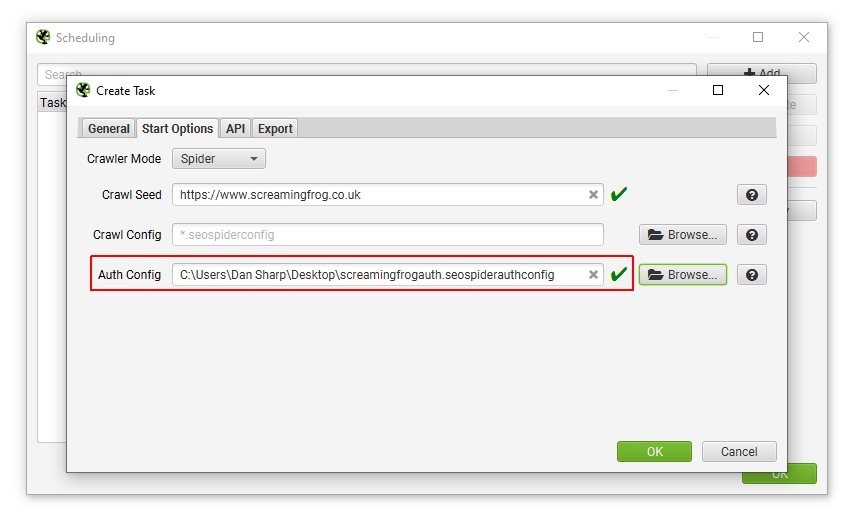
Please note – We can’t guarantee that automated web forms authentication will always work, as some websites will expire login tokens or have 2FA etc. Exporting or saving a default authentication profile will store an encrypted version of your authentication credentials on disk using AES-256 Galois/Counter Mode.
Troubleshooting
- Forms based authentication uses the configured User Agent. If you are unable to login, perhaps try this as Chrome or another browser.
Segments
Configuration > Segments
You can segment a crawl to better identify and monitor issues and opportunities from different templates, page types, or areas of priority.
Watch our video, or read our guide below on how to set up segments.
The segments right-hand tab and configuration is only available if you’re using database storage mode.
If you’re not already using database storage mode, we highly recommend it. This can be adjusted via ‘File > Settings > Storage Mode’ and has a number of benefits.
The segmentation config can be accessed via the config menu or right-hand ‘Segments’ tab, and it allows you to segment based upon any data found in the crawl, including data from APIs such as GA or GSC, or post-crawl analysis.
You can set up a segment at the start, during, or at the end of a crawl. Once set-up, segments can be saved with the configuration.
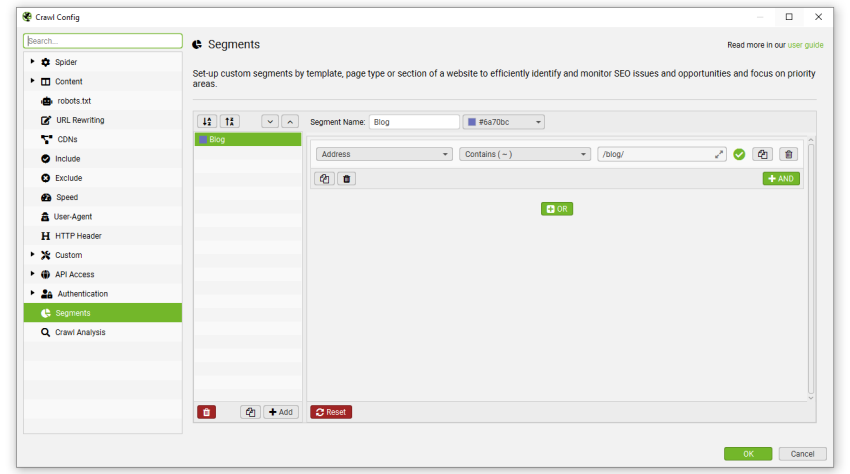
A segments column will appear in each tab with coloured labels against each URL with their segment.
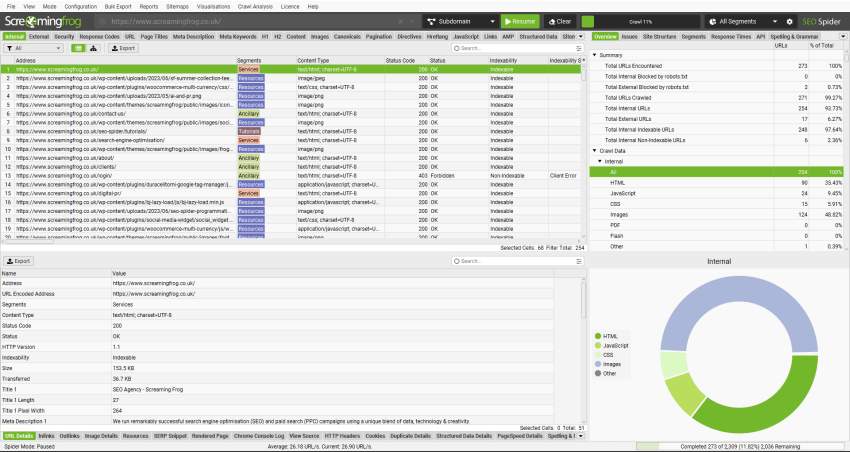
When segments are set up, the right hand ‘Issues’ tab includes a segments bar, so you can quickly see where on the site the issues are at a glance.

You can then use the right-hand segments filter, to drill down to individual segments.
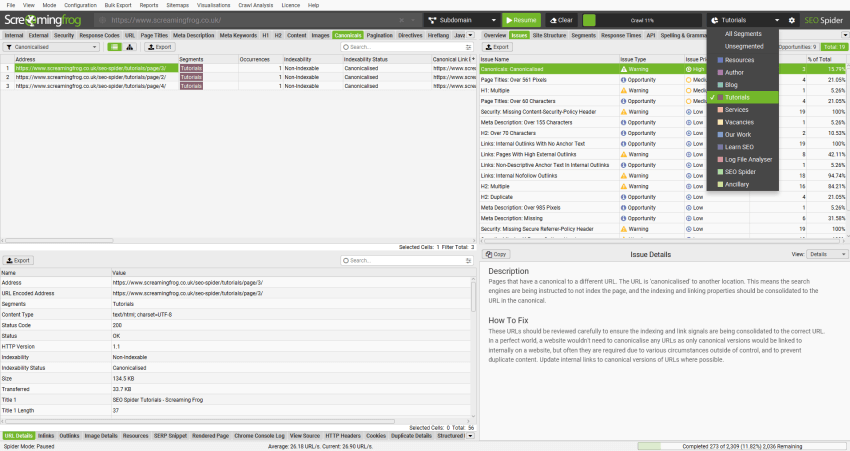
The right-hand ‘Segments’ tab is an aggregated view, to quickly see where issues are by segment.
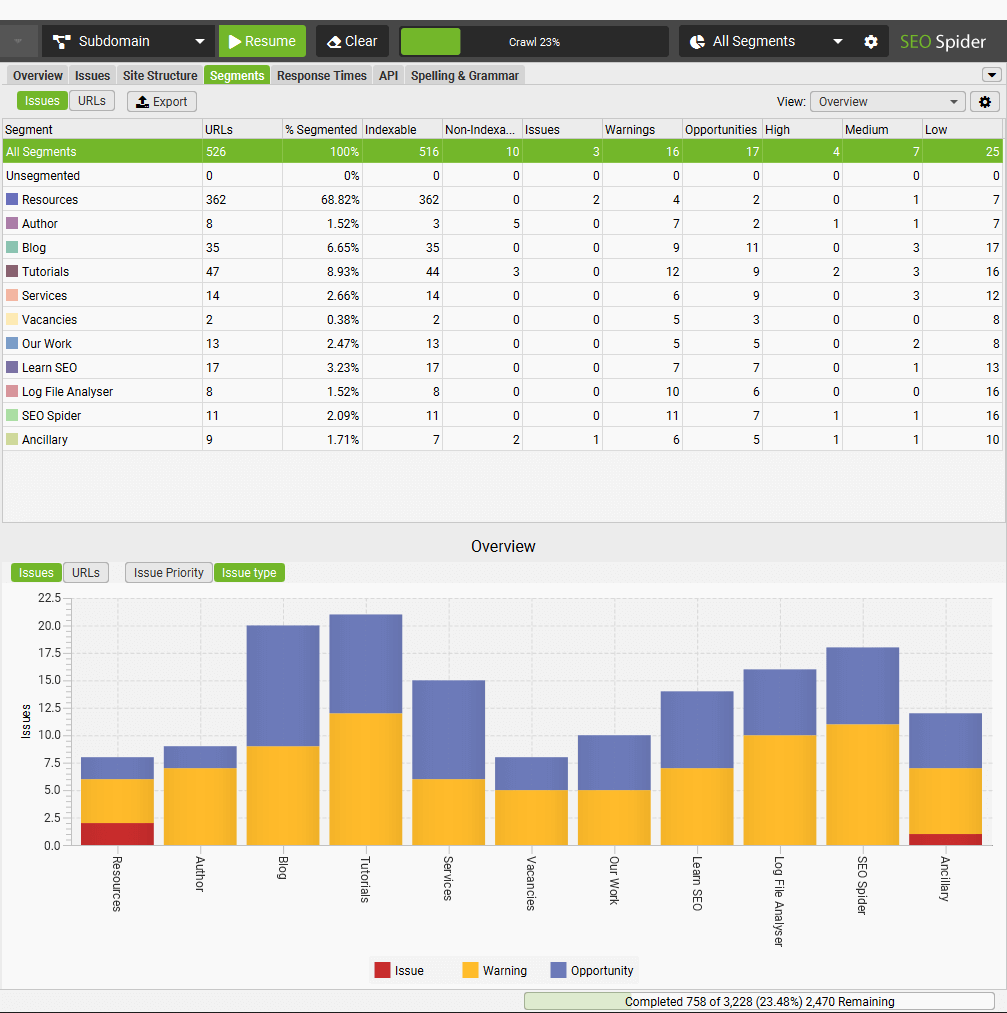
You can use the Segments tab ‘view’ filter to better analyse items like crawl depth by segment, or which segments have different types of issues.
Please note – You are able to segment using existing segments. For example, you may wish to include URLs in a segment, if it’s not already in an existing segment. This works by order of precedence. Dependencies must be above those in order to work appropriately.
Segments are fully integrated into various other features in the SEO Spider as well.
- You can select to colour crawl visualisations by segments.
- You can choose to create XML Sitemaps by segment, and the SEO Spider will automatically create a Sitemap Index file referencing each segmented sitemap.
- Within the Export for Looker Studio for automated crawl reports, a separate sheet will also be automatically created for each segment when a saved configuration is supplied with segments set-up. This means you can monitor issues by segment in a Looker Studio Crawl Report as well.
Crawl analysis
Configuration > Crawl Analysis
The SEO Spider usually analyses and reports data at run-time, where metrics, tabs and filters are populated during a crawl. However, ‘Link Score’ and a relatively small number of filters require calculation at the end of a crawl (or when a crawl has been stopped).
The full list of items that require ‘crawl analysis’ can be viewed below, and seen under ‘Config > Crawl Analysis’.
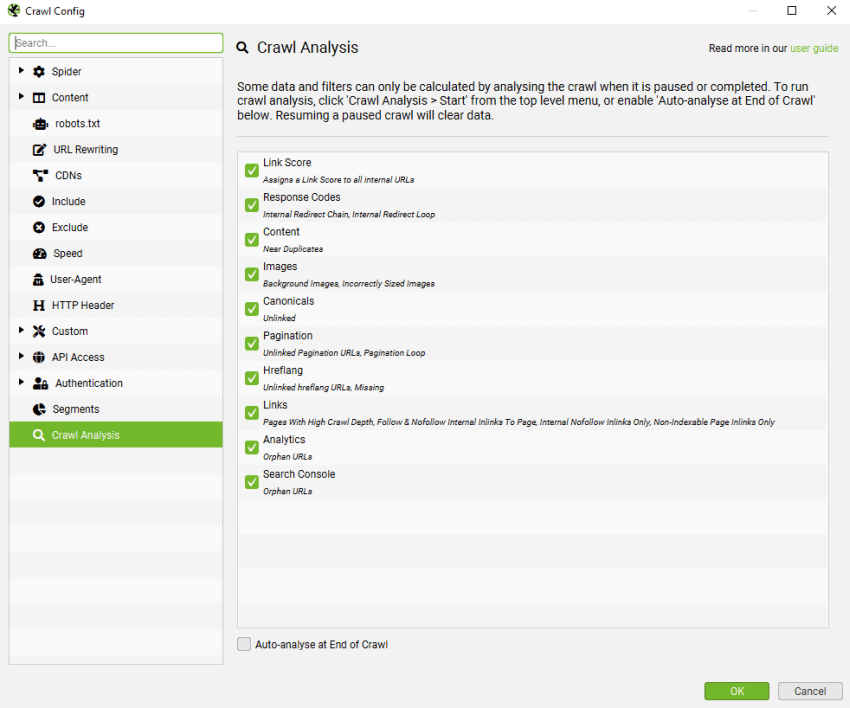
All of the above are filters under their respective tabs, apart from ‘Link Score’, which is a metric and shown as a column in the ‘Internal’ tab.
In the right hand ‘overview’ window pane, filters which require post ‘crawl analysis’ are marked with ‘Crawl Analysis Required’ for further clarity. The ‘Sitemaps’ filters in particular, mostly require post-crawl analysis.
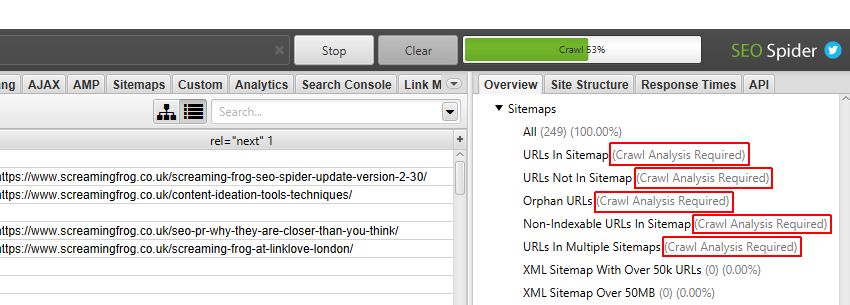
They are also marked as ‘You need to perform crawl analysis for this tab to populate this filter’ within the main window pane.
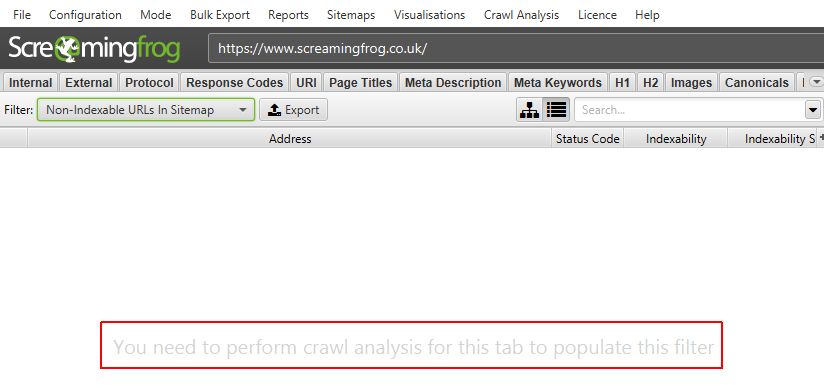
This analysis can be automatically performed at the end of a crawl by ticking the respective ‘Auto Analyse At End of Crawl’ tickbox under ‘Configure’, or it can be run manually by the user.
To run the crawl analysis, simply click ‘Crawl Analysis > Start’ in the top level menu.

When the crawl analysis is running you’ll see the ‘analysis’ progress bar with a percentage complete. The SEO Spider can continue to be used as normal during this period.

When the crawl analysis has finished, the empty filters which are marked with ‘Crawl Analysis Required’, will be populated with lots of lovely insightful data.
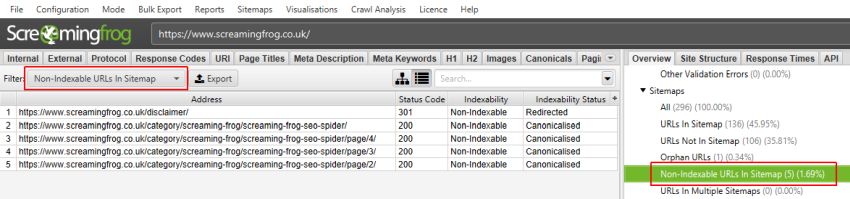
Please note – The Analytics and Search Console orphan URLs filters will only be populated if you have connected to their respective APIs and chosen to ‘Crawl New URLs Discovered in Google Analytics/Google Search Console’ under their ‘general’ tabs. Otherwise, orphan URLs will only be viewable under ‘Reports > Orphan Pages’.
For more information, watch our video guide on crawl analysis.
User Interface
File > Settings > User Interface (Windows, Linux)
Screaming Frog SEO Spider > Settings > User Interface (macOS)
There are a few configuration options under the user interface menu. These are as follows –
- Theme > Light / Dark – By default the SEO Spider uses a light grey theme. However, you can switch to a dark theme (aka, ‘Dark Mode’, ‘Batman Mode’ etc). This theme can help reduce eye strain, particularly for those that work in low light.
- Accent Colour – The SEO Spider uses green as it’s default colour for highlighting rows, cells and other UI options. However, you can adjust this to your own preference.
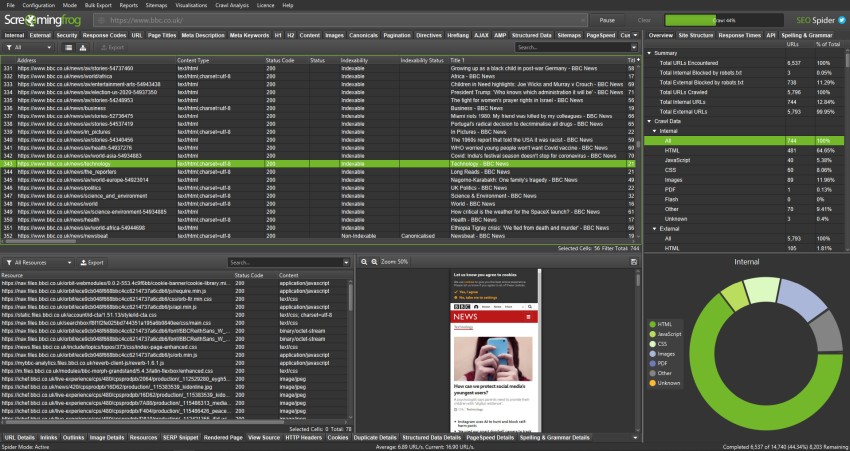
Language
File > Settings > Language (Windows, Linux)
Screaming Frog SEO Spider > Settings > Language (macOS)
The GUI is available in English, Spanish, German, French and Italian. It will detect the language used on your machine on startup, and default to using it.
Language can also be set within the tool via ‘File > Settings > Language’.
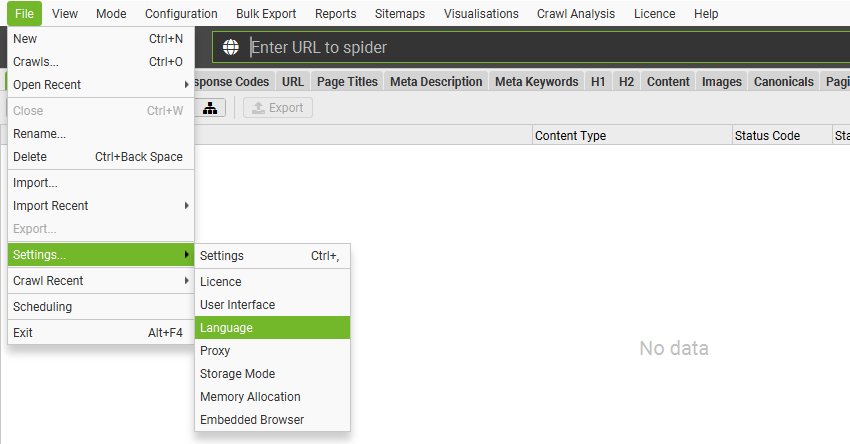
We may support more languages in the future, and if there’s a language you’d like us to support, please let us know via support.
Proxy
File > Settings > Proxy (Windows, Linux)
Screaming Frog SEO Spider > Settings > Proxy (macOS)
The proxy feature allows you the option to configure the SEO Spider to use a proxy server and supply credentials.
You will need to configure the address and port of the proxy in the configuration window. To disable the proxy server untick the ‘Use Proxy Server’ option.
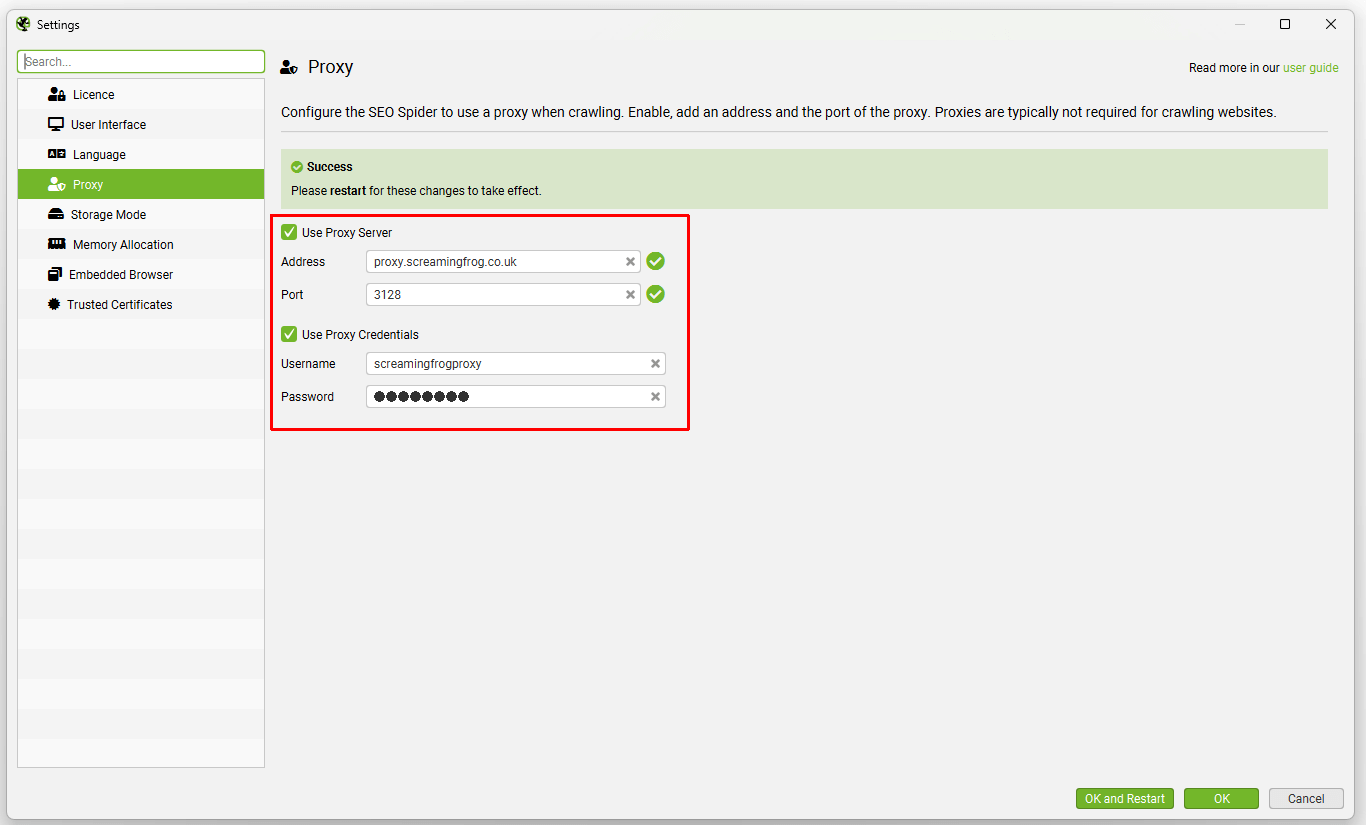
Please note:
- Only 1 proxy server can be configured.
- You must restart for your changes to take effect.
- No exceptions can be added – either all HTTP/HTTPS traffic goes via the proxy, or none of it does.
Storage mode
File > Settings > Storage Mode (Windows, Linux)
Screaming Frog SEO Spider > Settings > Storage Mode (macOS)
The Screaming Frog SEO Spider uses a configurable hybrid engine, allowing users to choose to store crawl data in a database, or in RAM.
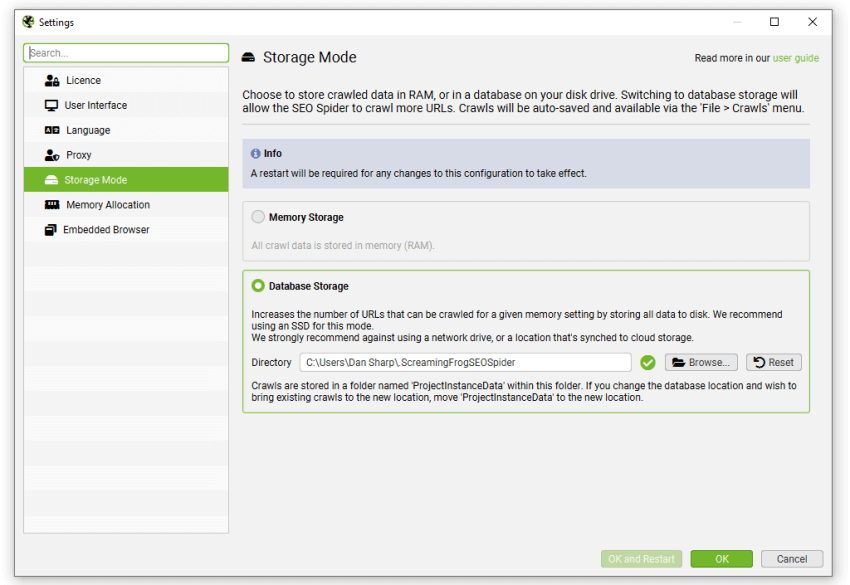
By default the SEO Spider will start in database storage mode and use your hard disk to store and process data. This allows the SEO Spider to crawl more URLs than memory storage mode, as well auto save crawls and allow for quicker opening of saved crawls.
Fundamentally both storage modes can still provide virtually the same crawling experience, allowing for real-time reporting, filtering and adjusting of the crawl. However, there are some key differences, and the ideal storage, will depend on the crawl scenario, and machine specifications.
Database Storage
We recommend this as the default storage for users with an SSD, and for crawling at scale.
Database storage mode allows for more URLs to be crawled for a given memory setting, with close to RAM storage crawling speed for set-ups with a solid state drive (SSD).
The full benefits of database storage mode include:
- Crawling at larger scale.
- Opening large crawls is quicker.
- Crawls are auto saved, and can be opened again via ‘File > Crawls’. If you lose power, accidentally clear, or close a crawl, it won’t be lost.
- Crawl comparison, change detection and segments features are only available in this mode.
The default crawl limit is 5 million URLs, but it isn’t a hard limit – the SEO Spider is capable of crawling significantly more with the right set-up. As an example, a machine with a 500gb SSD and 16gb of RAM, should allow you to crawl up to 10 million URLs approximately.
We do not recommend using regular hard disk drives (HDD) in database storage mode, as the writing and reading speed of a hard drive is too slow and will be a bottleneck in crawling.
Using a network drive is not supported – this will be much too slow and the connection unreliable. Using a local folder that syncs remotely, such as Dropbox or OneDrive is not supported due to these processes locking files. Vault drives are also not supported.
Memory Storage
Memory storage mode allows for super fast and flexible crawling for virtually all set-ups. However, as machines have less RAM than hard disk space, it means the SEO Spider is generally better suited for crawling websites under 500k URLs in memory storage mode.
Users are able to crawl more than this with the right set-up, and depending on how memory intensive the website is that’s being crawled. As a very rough guide, a 64-bit machine with 8gb of RAM will generally allow you to crawl a couple of hundred thousand URLs.
As well as being a better option for smaller websites, memory storage mode is also recommended for machines without an SSD, or where there isn’t much disk space.
Check out our video guide on storage modes.
Troubleshooting
- If you get a red X rather than a green tick next to Database Directory, hover over it to see the error message.
- If the error message includes “OverlappingFileLockException” this means you are using an ExFAT/MS-DOS (FAT) file systems which is not supported on macOS due to JDK-8205404. You’ll need to choose a drive with a different format or reformat your drive to a different format to resolve this. You can use the Disk Utility application to view the current format and reformat the drive.
Memory allocation
File > Settings > Memory Allocation (Windows, Linux)
Screaming Frog SEO Spider > Settings > Memory Allocation (macOS)
The SEO Spider uses Java which requires memory to be allocated at start-up. By default the SEO Spider will allow 1gb for 32-bit, and 2gb for 64-bit machines.
Increasing memory allocation will enable the SEO Spider to crawl more URLs, particularly when in RAM storage mode, but also when storing to database.
We recommend setting the memory allocation to at least 2gb below your total physical machine memory so the OS and other applications can operate.
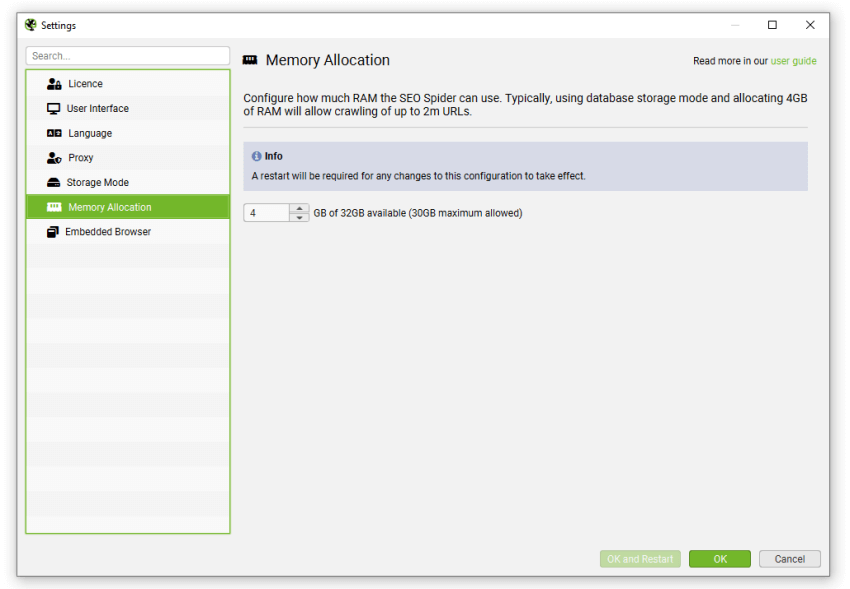
If you’d like to find out more about crawling large websites, memory allocation and the storage options available, please see our guide on crawling large websites.
Trusted Certificates
File > Settings > Trusted Certificates (Windows, Linux)
Screaming Frog SEO Spider > Settings > Trusted Certificates (macOS)
A Man In The Middle (MITM) proxy will resign TLS certificates. If a resigned certificate is not from a trusted Certificate Authority (CA), the TLS connection will be rejected.
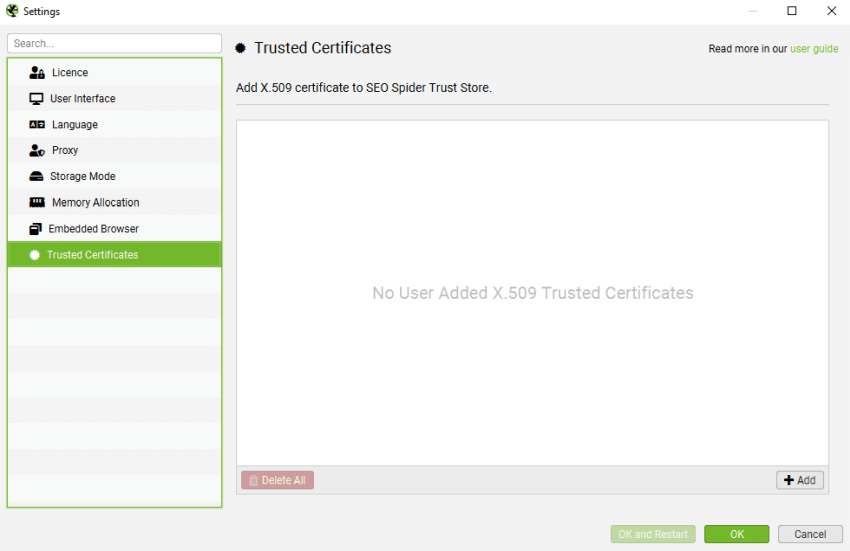
Companies employing this style of proxy will usually distribute an X.509 certificate to employees. This X.509 certificate can be used by the SEO Spider by adding it to a ‘Trusted Certificates Folder’.
The SEO Spider will only accept X.509 certificates with the following extensions: .crt, .pem, .cer and .der.
How To Add A Trusted Certificate
When a proxy is changing the issuer of a certificate, it can be quickly seen within Screaming Frog. Click ‘File > Settings > Trusted Certificates’ on Windows or ‘Screaming Frog SEO Spider > Settings > Trusted Certificates’ on macOS and then click the ‘Discover’ button.
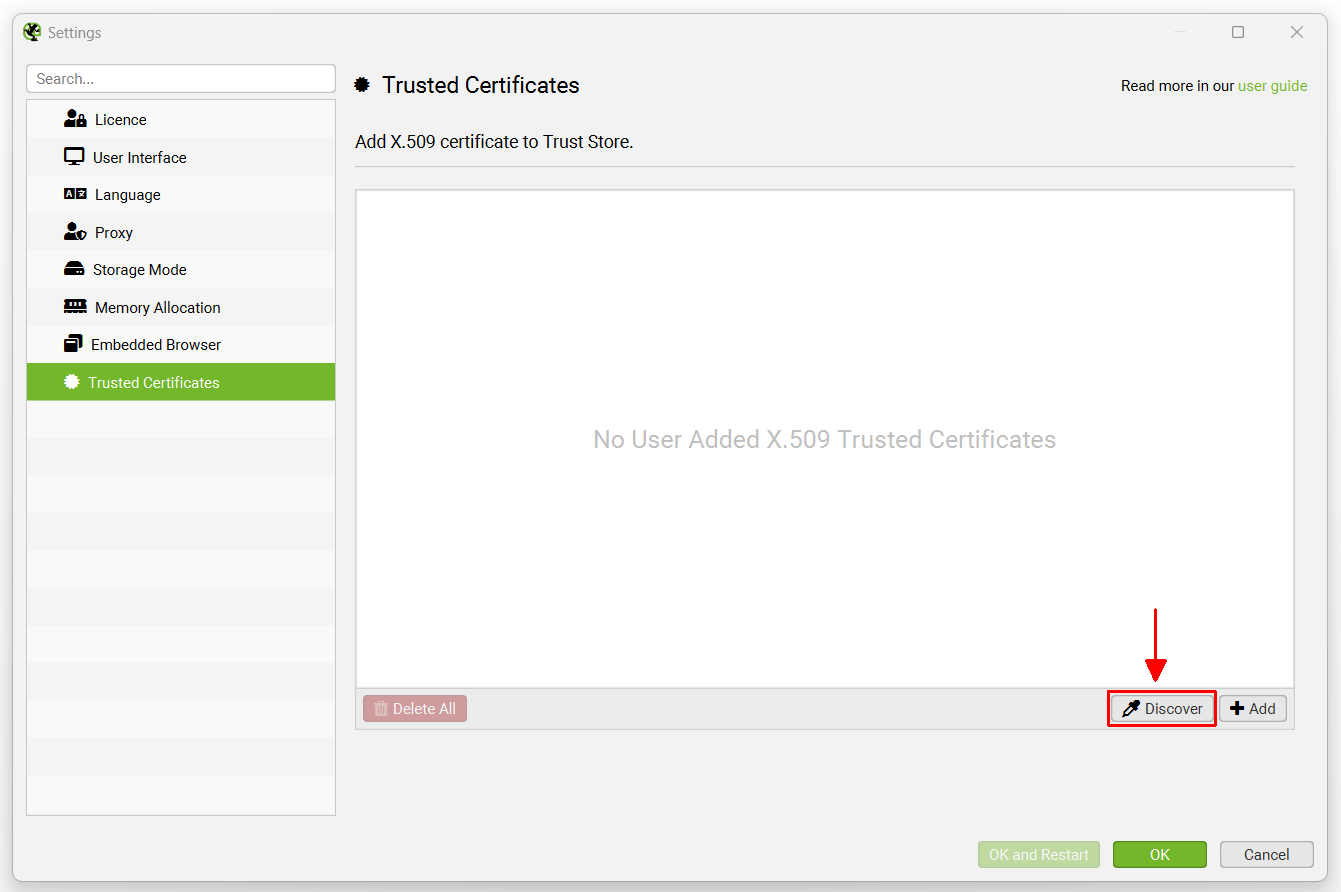
The genuine issuer for the Screaming Frog website certificate is ‘GTS CA 1P5’, however, you should see this is as something different – such as your proxy, for example ZScaler or McAfee. This shows the issuer of the certificate is being changed in your networking environment.
If you are seeing ‘ZScaler, McAfee’ etc as the issuer certificate, then click the ‘Add’ button next to it.
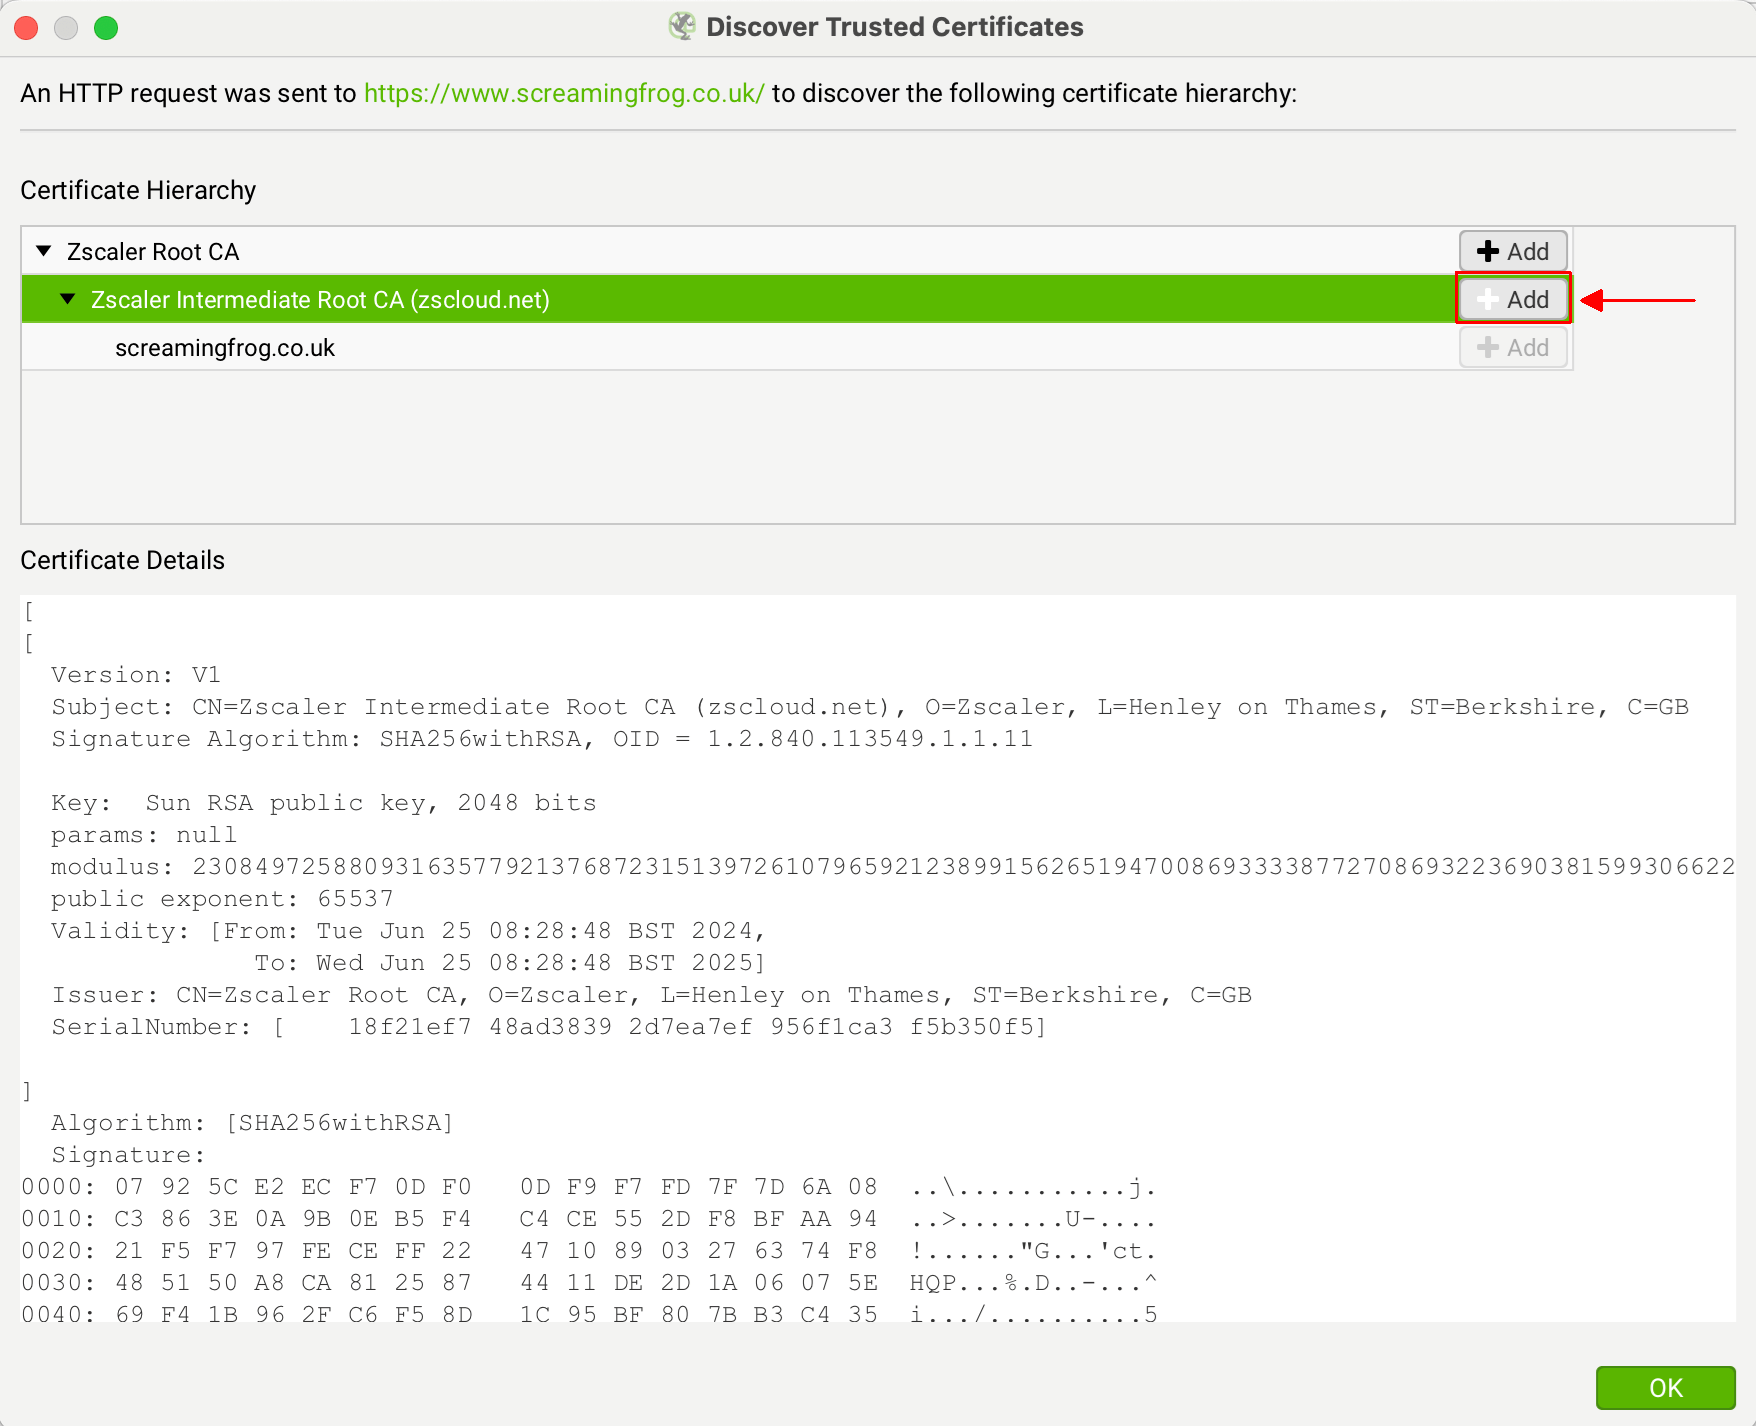
This will add the certificate file to the SEO Spider trusted certificates trust store.
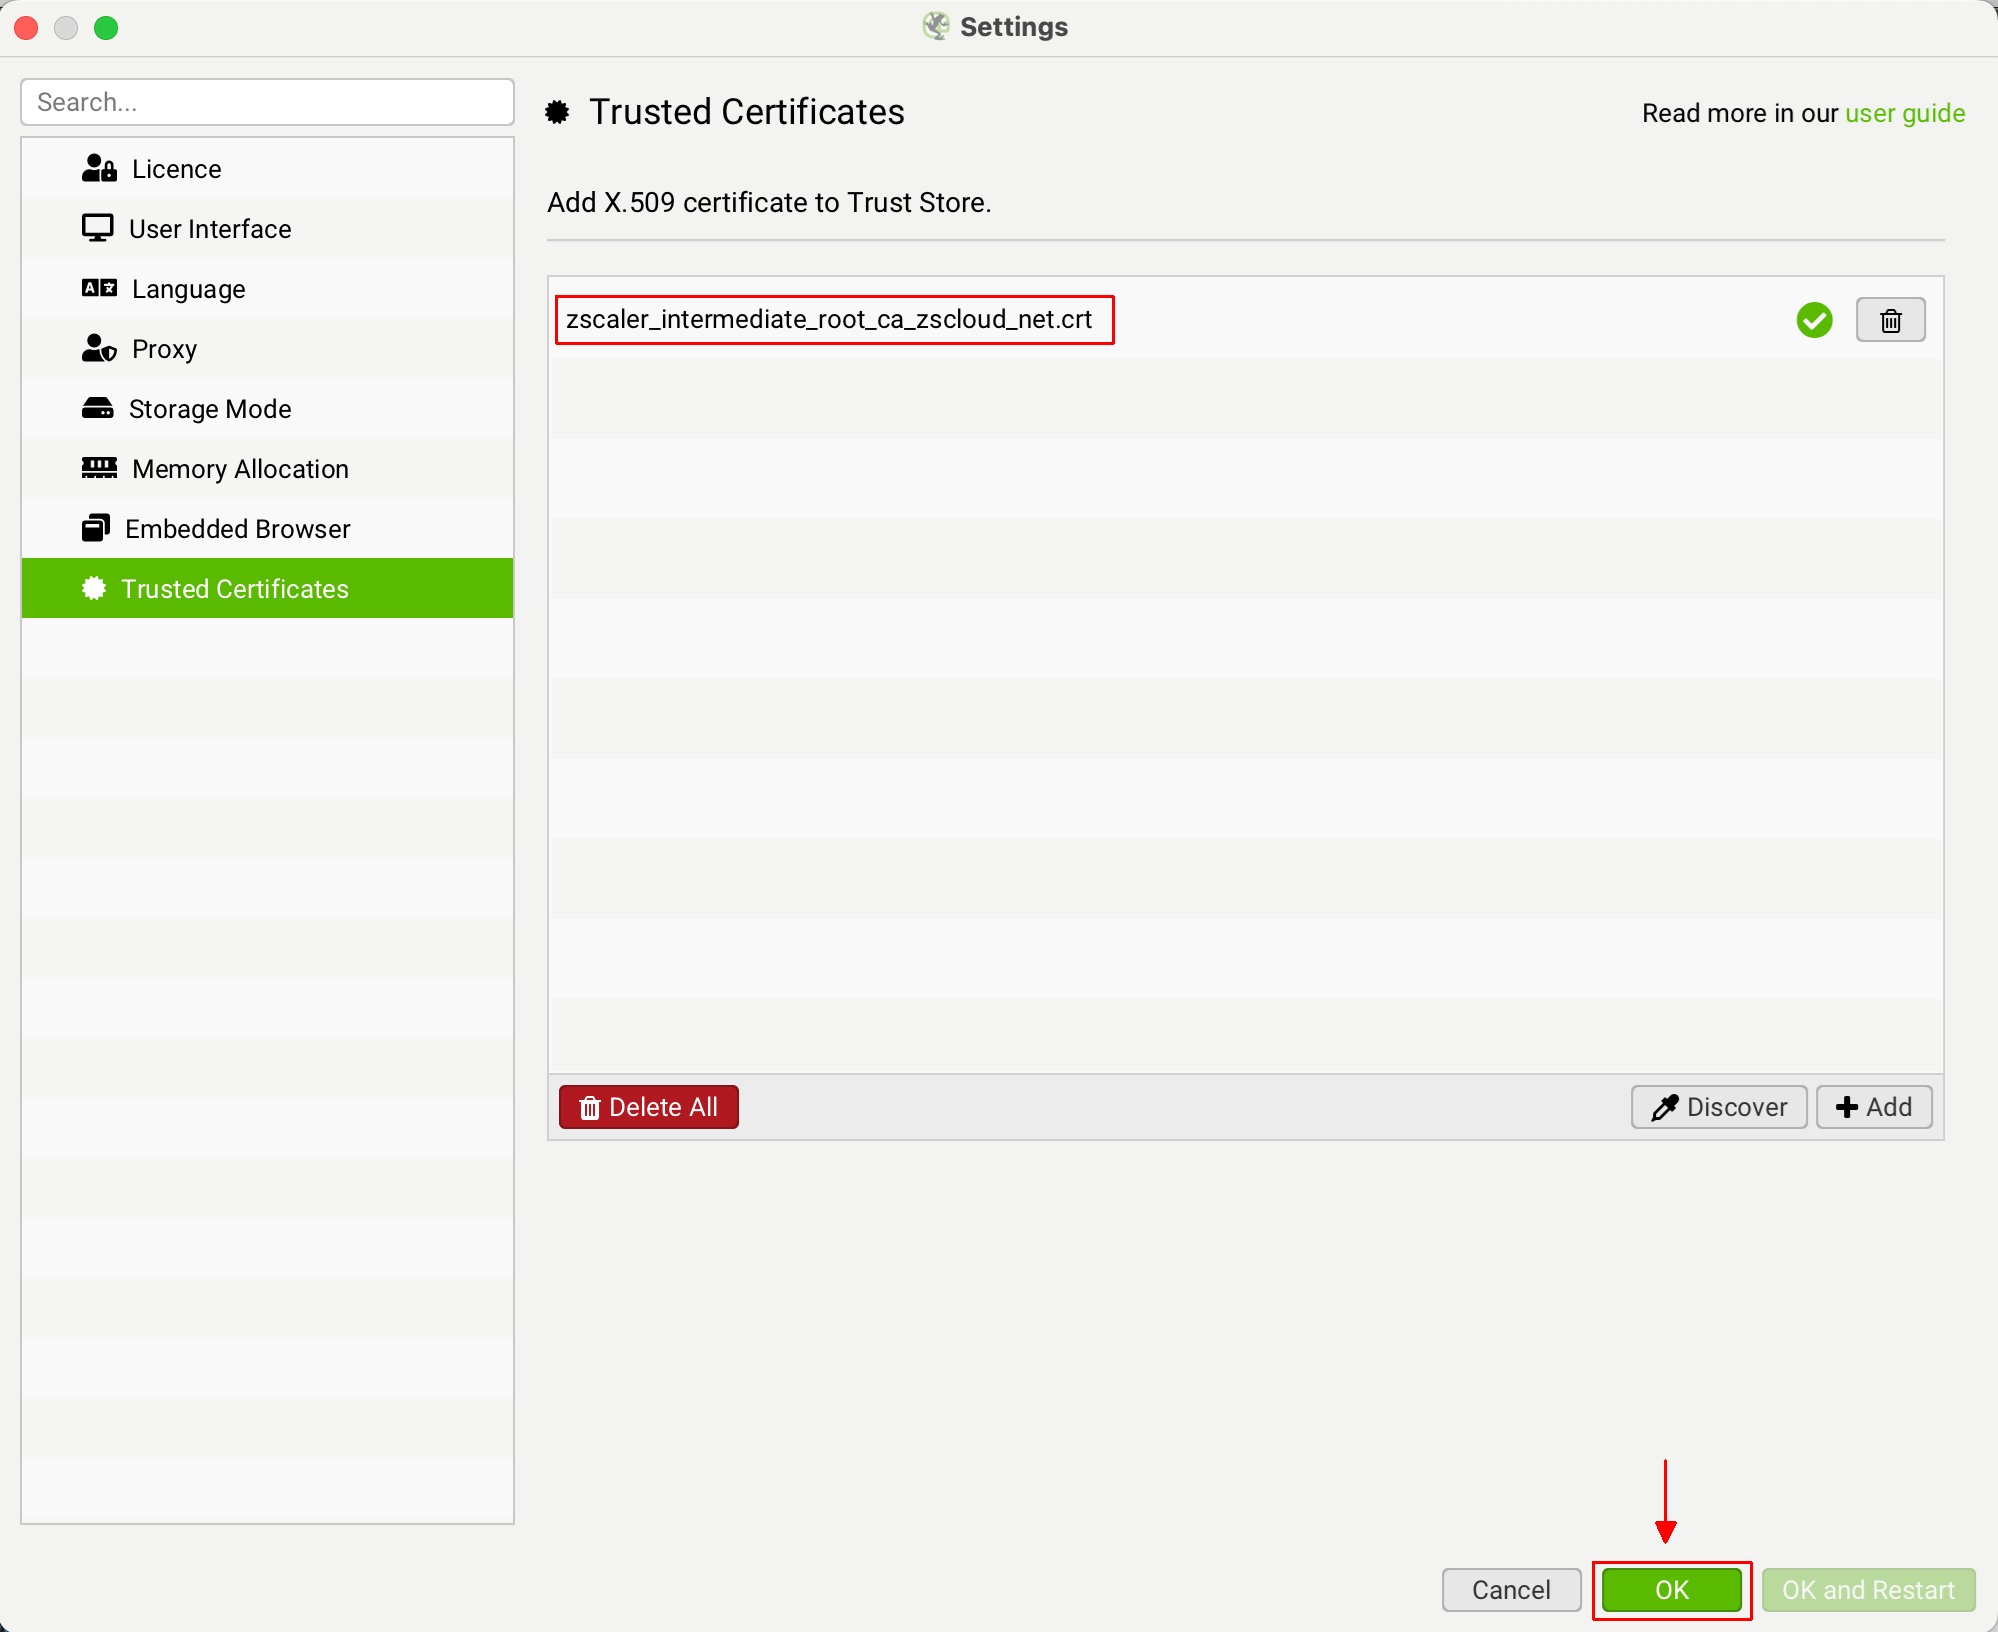
You can then click ‘OK’. You should then be able to validate your licence.
Notifications
File > Settings > Notifications (Windows, Linux)
Screaming Frog SEO Spider > Settings > Notifications (macOS)
The notifications settings allow you to connect to an email account and send an email from this account on crawl completion to selected email addresses.
You can select an Outlook or Gmail account, or set up custom SMTP settings to send email notifications from.
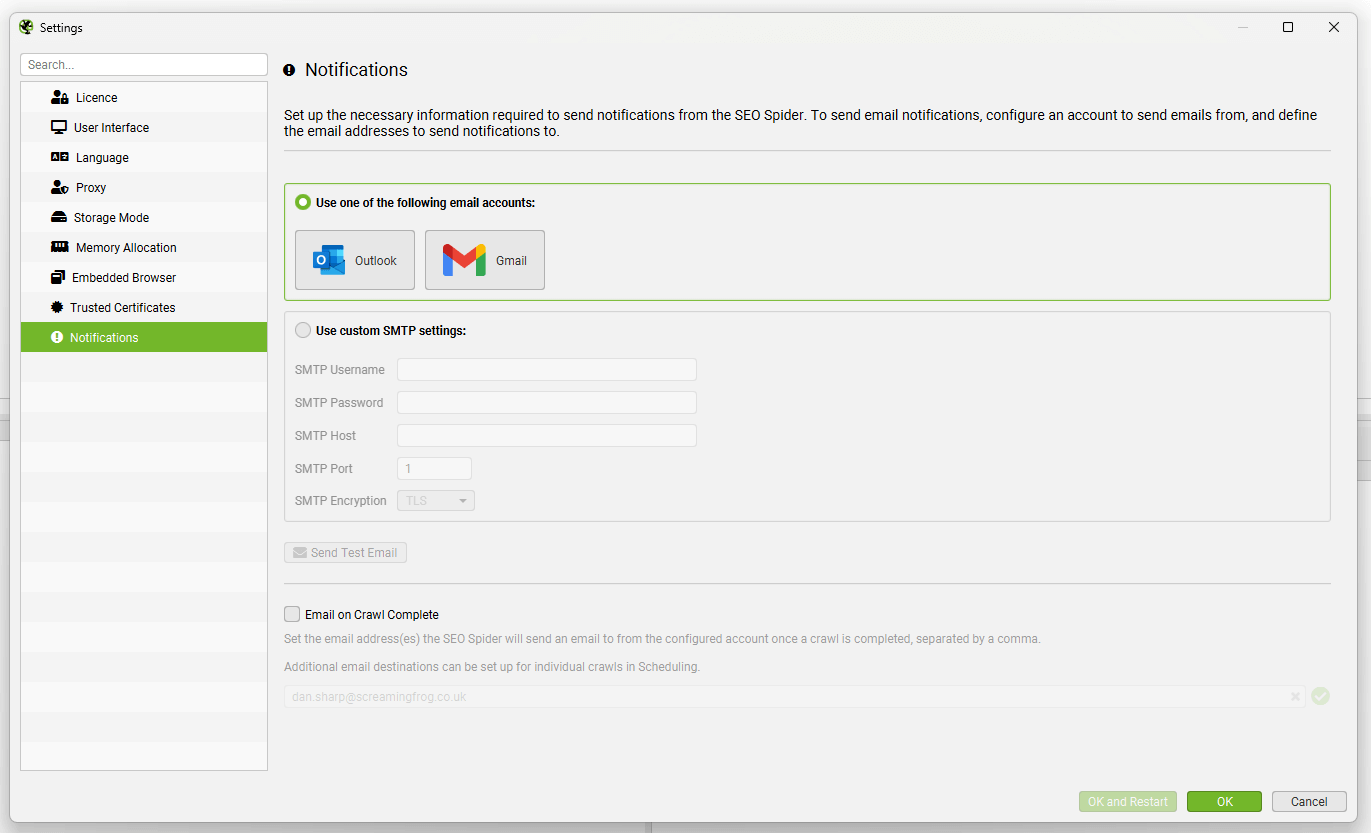
If you select Gmail, please remember to confirm the ‘Send email on your behalf’ box during authorisation, or emails will not send.

The email delivered confirms crawl completion and provides top-level data from the crawl.
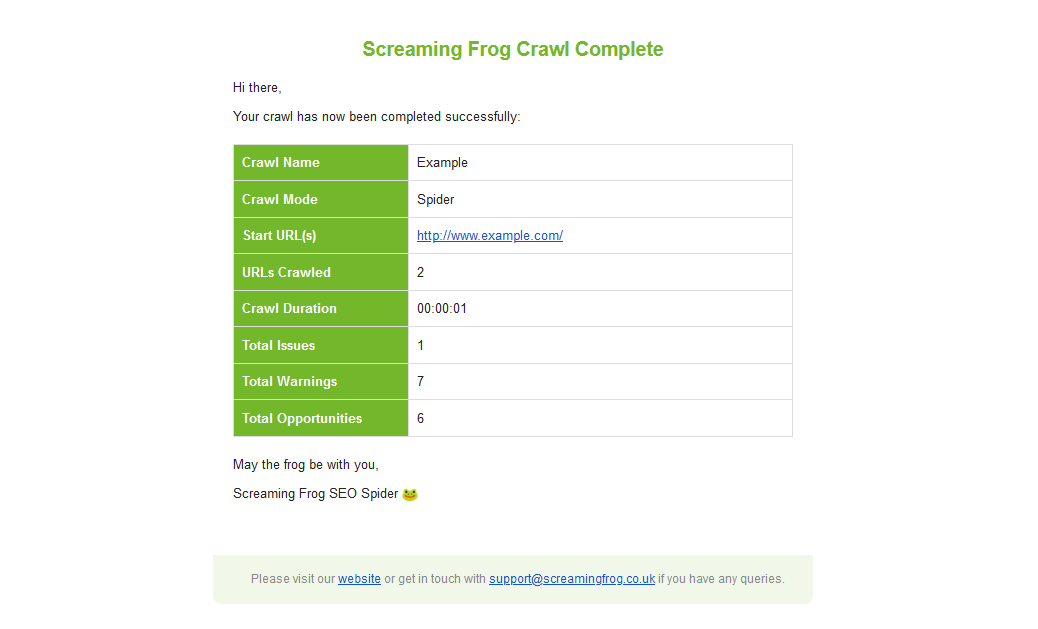
There are two ways to send emails on crawl completion.
Email for All Crawls
Enable the ‘Email on Crawl Complete’ option to send an email when a crawl finishes for every crawl to specified email addresses.
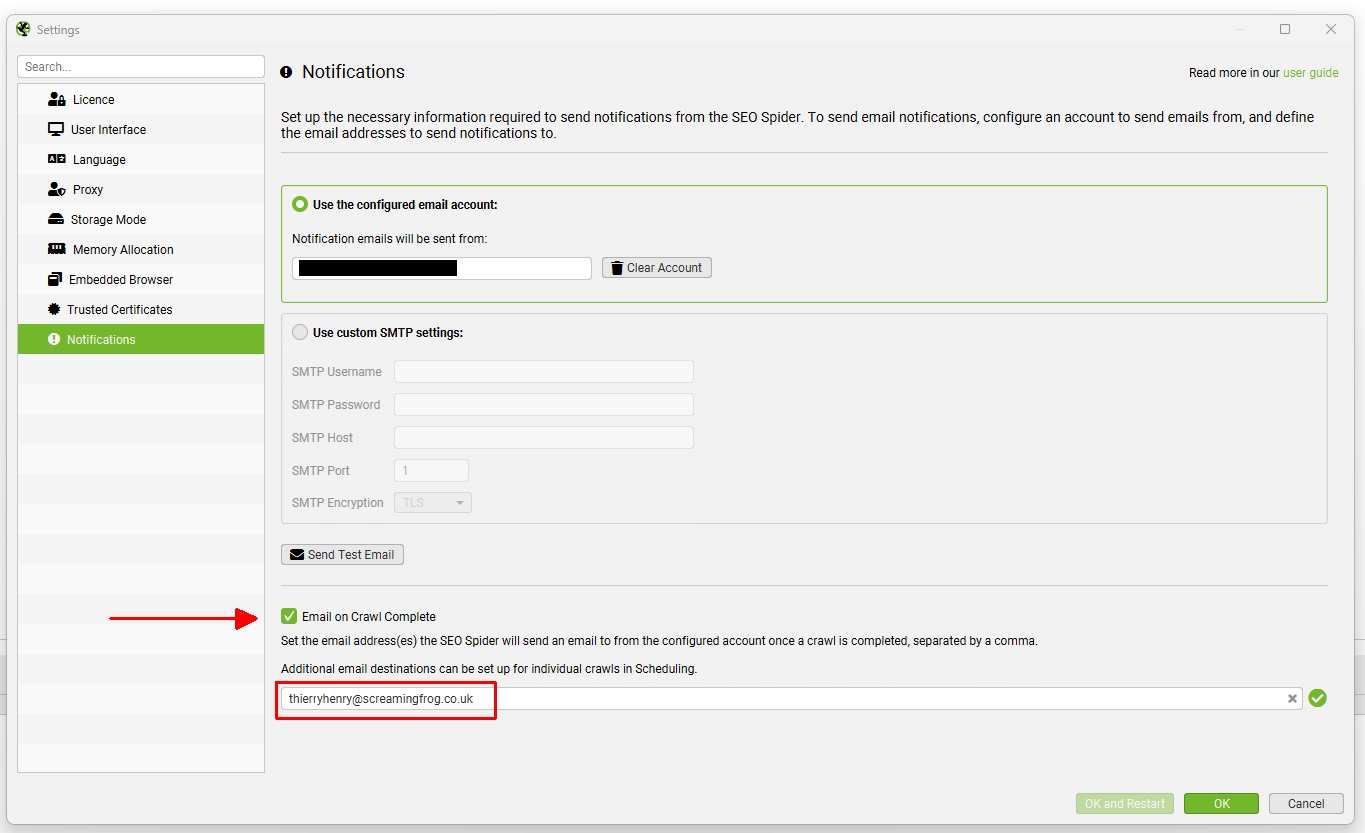
This is useful when a user or team want to know when any crawl has completed.
Email for Scheduled Crawls
Alternatively, send notification emails for specific scheduled crawls upon completion using the ‘Notifications’ tab in the scheduled crawl task via ‘File > Scheduling > Scheduled Crawl Task’.

This is useful when a user or team want to know when a specific crawl has completed only.
Please note: If you’re receiving emails regarding a ‘Screaming Frog Crawl Complete’, it is not us sending them. Please review your own settings, or speak with colleagues and agencies you work with that may have these set up to adjust in anyway.
Mode
Mode > Spider / List / SERP / Compare / APIs
Spider Mode
This is the default mode of the SEO Spider. In this mode the SEO Spider will crawl a web site, gathering links and classifying URLs into the various tabs and filters. Simply enter the URL of your choice and click ‘start’.
List Mode
In this mode you can check a predefined list of URLs. This list can come from a variety of sources – a simple copy and paste, or a .txt, .xls, .xlsx, .csv or .xml file. The files will be scanned for http:// or https:// prefixed URLs, all other text will be ignored. For example, you can directly upload an Adwords download and all URLs will be found automatically.

If you’re performing a site migration and wish to test URLs, we highly recommend using the ‘always follow redirects‘ configuration so the SEO Spider finds the final destination URL. The best way to view these is via the ‘redirect chains’ report, and we go into more detail within our ‘How To Audit Redirects‘ guide.
List mode changes the crawl depth setting to zero, which means only the uploaded URLs will be checked. If you want to check links from these URLs, adjust the crawl depth to 1 or more in the ‘Limits’ tab in ‘Configuration > Spider’. List mode also sets the spider to ignore robots.txt by default, we assume if a list is being uploaded the intention is to crawl all the URLs in the list.
If you wish to export data in list mode in the same order it was uploaded, then use the ‘Export’ button which appears next to the ‘upload’ and ‘start’ buttons at the top of the user interface.

The data in the export will be in the same order and include all of the exact URLs in the original upload, including duplicates or any fix-ups performed.
If you’d like to learn how to perform more advancing crawling in list mode, then read our how to use list mode guide.
SERP Mode
In this mode you can upload page titles and meta descriptions directly into the SEO Spider to calculate pixel widths (and character lengths!). There is no crawling involved in this mode, so they do not need to be live on a website.
This means you can export page titles and descriptions from the SEO Spider, make bulk edits in Excel (if that’s your preference, rather than in the tool itself) and then upload them back into the tool to understand how they may appear in Google’s SERPs.
Under ‘reports’, we have a new ‘SERP Summary’ report which is in the format required to re-upload page titles and descriptions. We simply require three headers for ‘URL’, ‘Title’ and ‘Description’.
For example –
You can upload in a .txt, .csv or Excel file.
Compare Mode
This mode allows you to compare two crawls and see how data has changed in tabs and filters over time. Please see how tutorial on ‘How To Compare Crawls’ for a walk-through guide.
The compare feature is only available in database storage mode with a licence. If you haven’t already moved, it’s as simple as ‘File > Settings > Storage Mode’ and choosing ‘Database Storage’.
There are two options to compare crawls –
1) Switch to ‘compare’ mode via ‘Mode > Compare’ and click ‘Select Crawl’ via the top menu to pick two crawls you wish to compare.

2) When in ‘Spider’ or ‘List’ modes go to ‘File > Crawls’, highlight two crawls, and ‘Select To Compare’, which will switch you to ‘compare’ mode.
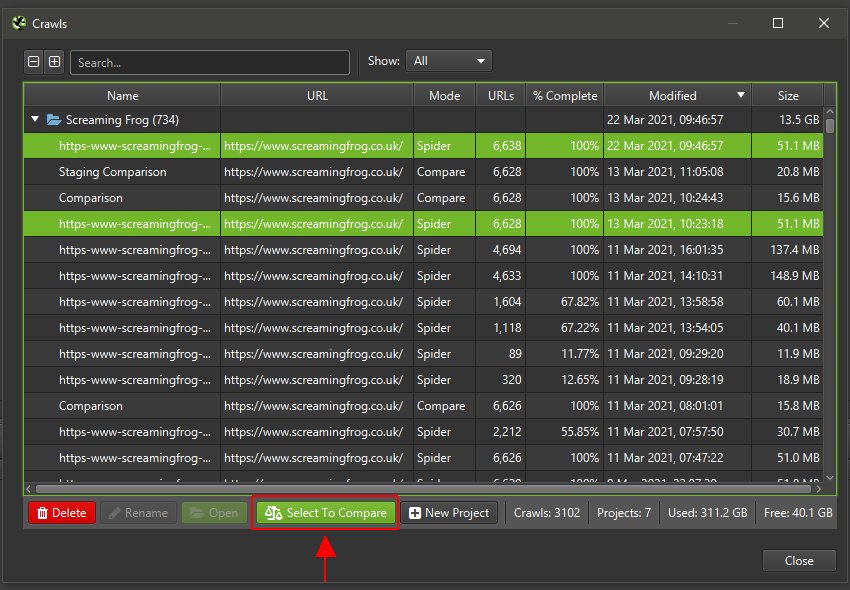
You can then adjust the compare configuration via the ‘cog’ icon, or clicking ‘Config > Compare’. This allows you to select additional elements to analyse for change detection.
Then click ‘Compare’ for the crawl comparison analysis to run and the right hand overview tab to populate and show current and previous crawl data with changes.
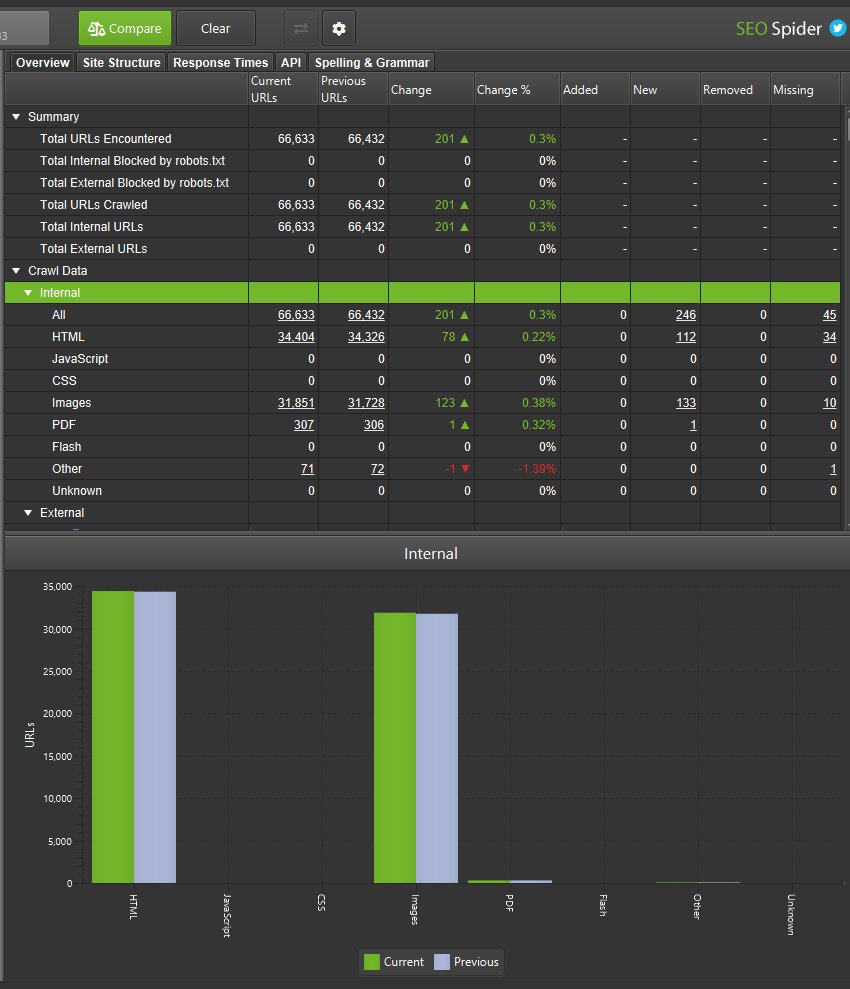
You’re able to click on the numbers in the columns to view which URLs have changed, and use the filter on the master window view to toggle between current and previous crawls, or added, new, removed or missing URLs.
There are four columns and filters that help segment URLs that move into tabs and filters.
Added – URLs in previous crawl that moved to filter of current crawl.
New – New URLs not in the previous crawl, that are in current crawl and fiter.
Removed – URLs in filter for previous crawl, but not in filter for current crawl.
Missing – URLs not found in the current crawl, that previous were in filter.
Essentially ‘added’ and ‘removed’ are URLs that exist in both current and previous crawls, whereas ‘new’ and ‘missing’ are URLs that only exist in one of the crawls.
When you have completed a crawl comparison, a small comparison file is automatically stored in ‘File > Crawls’, which allows you to open and view it without running the analysis again.
This file utilises the two crawls compared. Therefore they are both required to be stored to view the comparison. Deleting one or both of the crawls in the comparison will mean the comparison will not be accessible anymore.
Please refer to our tutorial on ‘How To Compare Crawls‘ for more.
APIs Mode
APIs mode allows you to upload URLs and pull data from any APIs, without any crawling involved for speed.
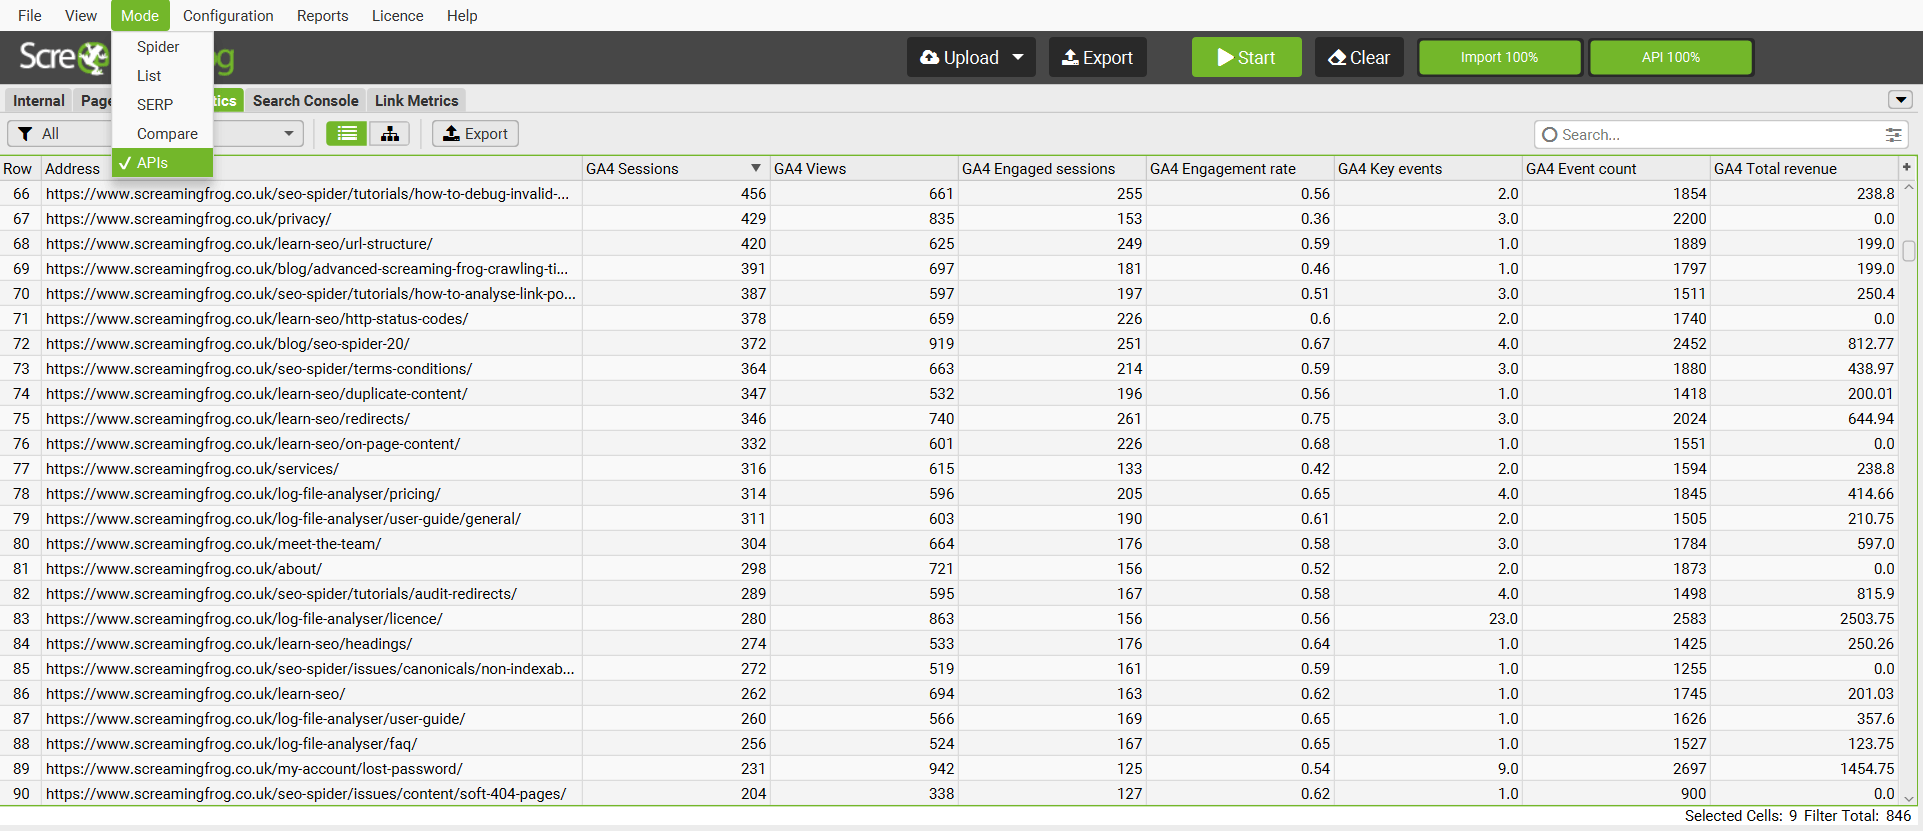
It allows you to connect to Google Analytics, Search Console, PageSpeed Insights, Majestic, Ahrefs and Moz.
SEO Spider Configuration
Table of Contents


